Page 1770 of 2158
(33) Remove overdrive support (Fig. 25) with
bridge-type Puller 7536.
(34) Remove race from hub of overdrive support
(Fig. 26).(35) Measure stroke length of second coast brake
piston rod as follows:
(a) Make reference mark on piston rod (Fig. 27)
as shown.
(b) Apply 57-114 psi air pressure through piston
feed hole and check stroke length with Gauge Tool
7552 (Fig. 27).
(c) Stroke length should be 1.5 - 3.0 mm (0.059 -
0.118 in.).
(d) If stroke length is incorrect, install new pis-
ton rod and recheck stroke. If stroke is still incor-
rect, replace second coast brake band.
(e) Replacement piston rods are available in two
different lengths which are: 71.4 mm (2.811 in.)
and 72.9 mm (2.870 in.).
Fig. 25 Removing Overdrive Support
Fig. 26 Remove Overdrive Support Race
Fig. 27 Measuring Second Coast Brake Piston Rod
Stroke
21 - 208 AW-4 TRANSMISSION OVERHAULJ
Page 1781 of 2158
(3) Remove overdrive clutch from planetary gear
(Fig. 3).(4) Remove thrust bearing and race assembly from
clutch drum (Fig. 4).
(5) Measure stroke length of clutch piston as fol-
lows:
(a) Mount oil pump on torque converter. Then
mount clutch on oil pump (Fig. 5).
Fig. 2 Checking One-Way Clutch
Fig. 3 Removing Overdrive Clutch From Gear
Fig. 4 Removing Clutch Drum Bearing And Race
Fig. 5 Assembling Converter, Pump And Clutch For
Test
JAW-4 TRANSMISSION OVERHAUL 21 - 219
Page 1782 of 2158
(b) Mount dial indicator on clutch and position
indicator stylus on clutch piston (Fig. 6).
(c) Apply compressed air through clutch feed hole
in oil pump and note piston stroke length. Stroke
length should be 1.85 - 2.15 mm (0.0728 - 0.0846
in.).
(6) Replace clutch pack if stroke length is incor-
rect.
(7) Remove clutch pack snap ring and remove the
clutch pack.(8) Compress piston return spring with Tool 7538
(Fig. 8). Remove snap ring and remove compressor
tool.
(9) Remove compressor tool and piston return
springs.
(10) Mount oil pump on converter. Then mount
clutch on oil pump (Fig. 9).
(11) Hold clutch piston by hand and apply com-
pressed air through oil pump feed hole to ease piston
out (Fig. 9). Apply only enough air pressure to re-
move piston.
Fig. 6 Checking Overdrive Clutch Piston Stroke
Fig. 7 Removing Clutch Pack Snap Ring
Fig. 8 Removing Clutch Piston Snap Ring
Fig. 9 Removing Overdrive Clutch Piston
21 - 220 AW-4 TRANSMISSION OVERHAULJ
Page 1784 of 2158
(16) Remove one-way clutch and outer race as as-
sembly. Then separate race from clutch (Fig. 14).
(17) Remove planetary thrust washer (Fig. 15).
(18) Check overdrive clutch disc thickness. Mini-
mum allowable thickness is 1.84 mm (0.0724 in.).(19) Measure free length of piston return springs
with springs in retainer (Fig. 16). Length should be
16.8 mm (0.661 in.).
(20) Check clutch piston check ball (Fig. 17). Shake
piston to see if ball moves freely. Then check ball
sealing by applying low pressure compressed air to
ball inlet as shown. Air should not leak past check
ball.
Fig. 14 Removing One-Way Clutch
Fig. 15 Removing Planetary Thrust Washer
Fig. 16 Checking Piston Return Spring Length
Fig. 17 Testing Clutch Piston Check Ball
21 - 222 AW-4 TRANSMISSION OVERHAULJ
Page 1789 of 2158

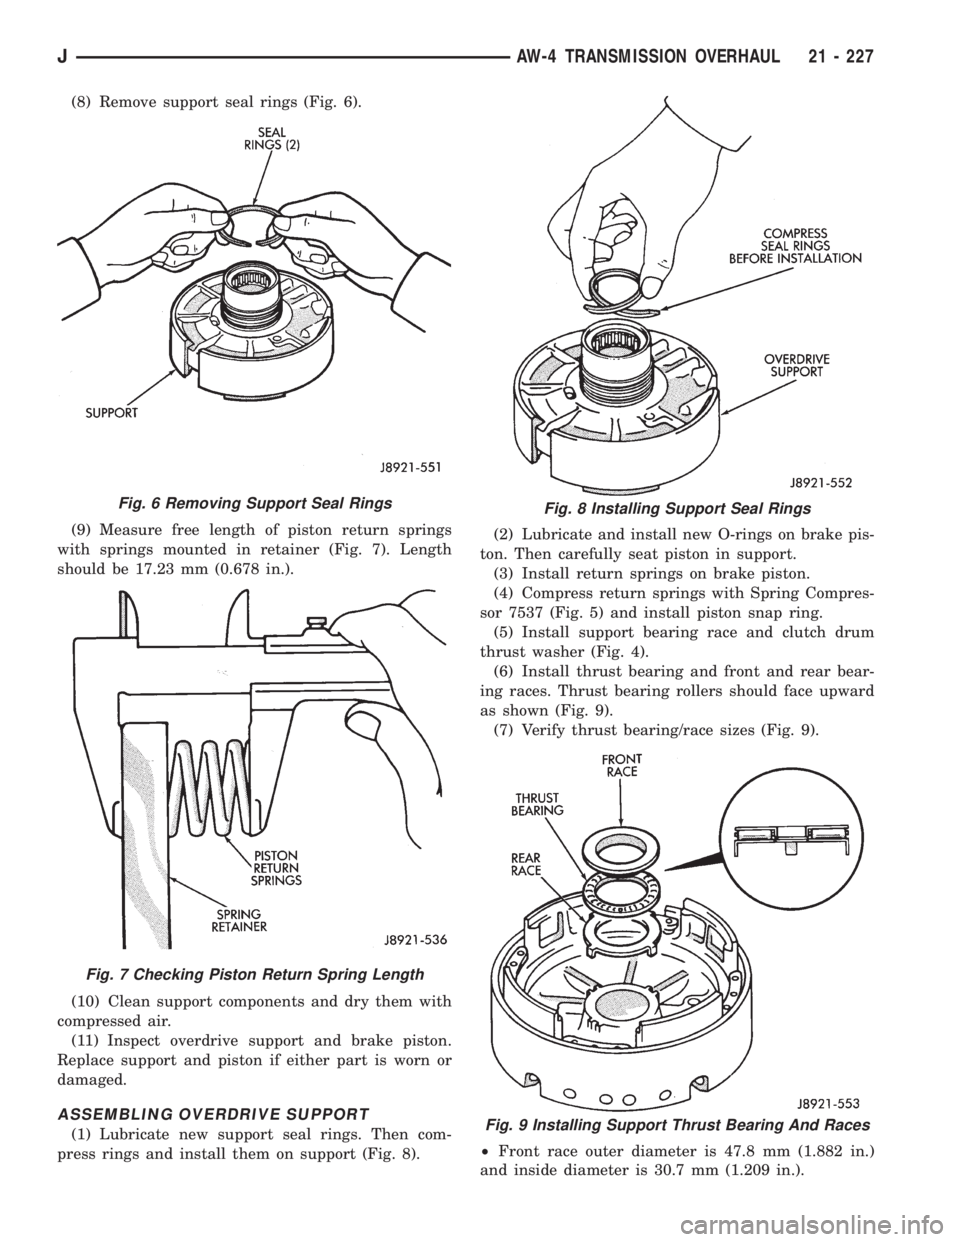
(8) Remove support seal rings (Fig. 6).
(9) Measure free length of piston return springs
with springs mounted in retainer (Fig. 7). Length
should be 17.23 mm (0.678 in.).
(10) Clean support components and dry them with
compressed air.
(11) Inspect overdrive support and brake piston.
Replace support and piston if either part is worn or
damaged.
ASSEMBLING OVERDRIVE SUPPORT
(1) Lubricate new support seal rings. Then com-
press rings and install them on support (Fig. 8).(2) Lubricate and install new O-rings on brake pis-
ton. Then carefully seat piston in support.
(3) Install return springs on brake piston.
(4) Compress return springs with Spring Compres-
sor 7537 (Fig. 5) and install piston snap ring.
(5) Install support bearing race and clutch drum
thrust washer (Fig. 4).
(6) Install thrust bearing and front and rear bear-
ing races. Thrust bearing rollers should face upward
as shown (Fig. 9).
(7) Verify thrust bearing/race sizes (Fig. 9).
²Front race outer diameter is 47.8 mm (1.882 in.)
and inside diameter is 30.7 mm (1.209 in.).
Fig. 6 Removing Support Seal Rings
Fig. 7 Checking Piston Return Spring Length
Fig. 8 Installing Support Seal Rings
Fig. 9 Installing Support Thrust Bearing And Races
JAW-4 TRANSMISSION OVERHAUL 21 - 227
Page 1790 of 2158

²Rear race outer diameter is 47.8 mm (1.882 in.)
and inside diameter is 34.3 mm (1.350 in.).
²Bearing outer diameter is 47.7 mm (1.878 in.) and
inside diameter is 32.7 mm (1.287 in.).
(8) Verify brake piston operation. Use same proce-
dure described at beginning of disassembly. Piston
should operate smoothly and not bind or stick.
DIRECT CLUTCH OVERHAUL
CLUTCH DISASSEMBLY
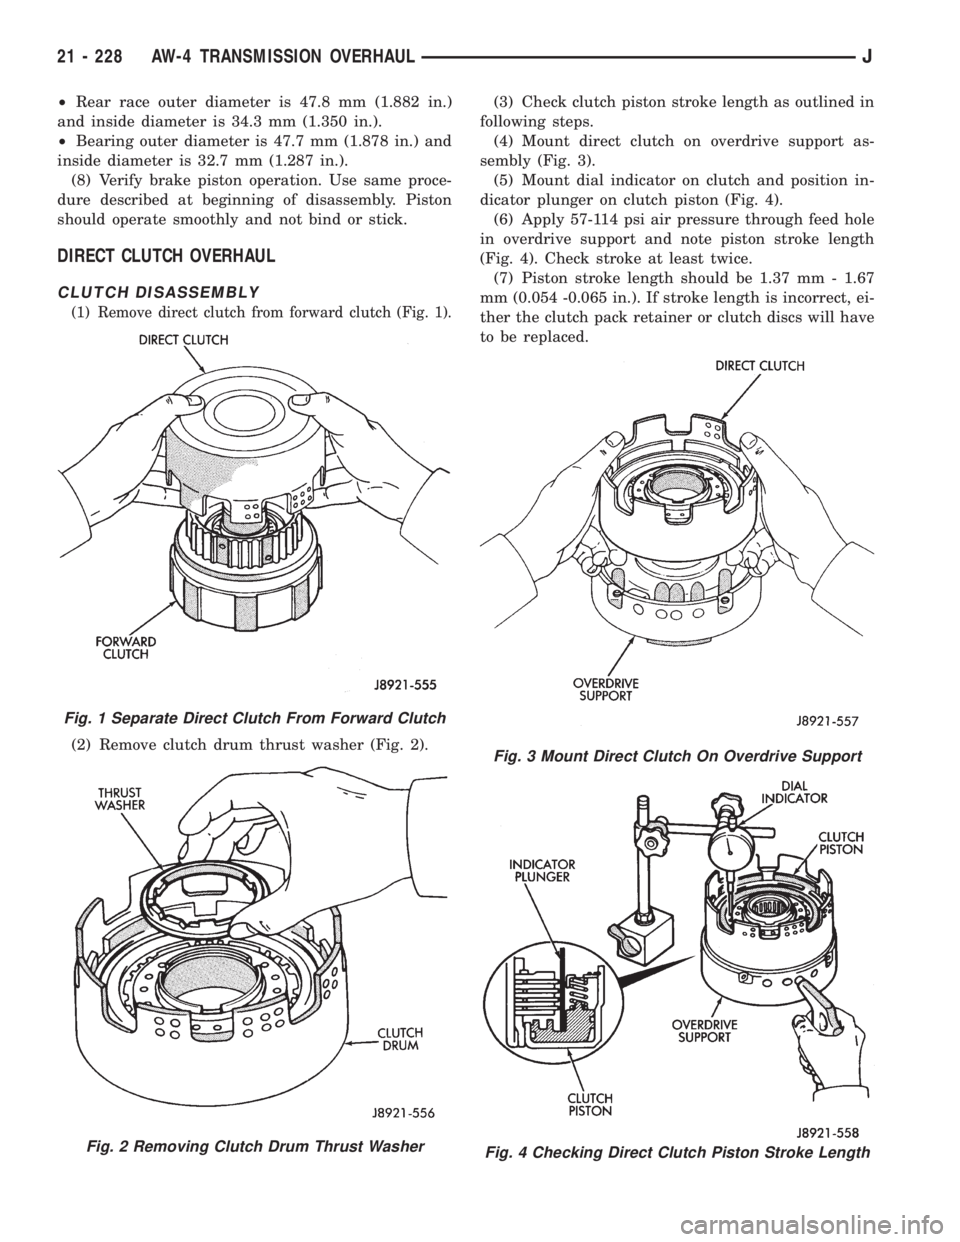
(1) Remove direct clutch from forward clutch (Fig. 1).
(2) Remove clutch drum thrust washer (Fig. 2).(3) Check clutch piston stroke length as outlined in
following steps.
(4) Mount direct clutch on overdrive support as-
sembly (Fig. 3).
(5) Mount dial indicator on clutch and position in-
dicator plunger on clutch piston (Fig. 4).
(6) Apply 57-114 psi air pressure through feed hole
in overdrive support and note piston stroke length
(Fig. 4). Check stroke at least twice.
(7) Piston stroke length should be 1.37 mm - 1.67
mm (0.054 -0.065 in.). If stroke length is incorrect, ei-
ther the clutch pack retainer or clutch discs will have
to be replaced.
Fig. 1 Separate Direct Clutch From Forward Clutch
Fig. 2 Removing Clutch Drum Thrust Washer
Fig. 3 Mount Direct Clutch On Overdrive Support
Fig. 4 Checking Direct Clutch Piston Stroke Length
21 - 228 AW-4 TRANSMISSION OVERHAULJ
Page 1791 of 2158

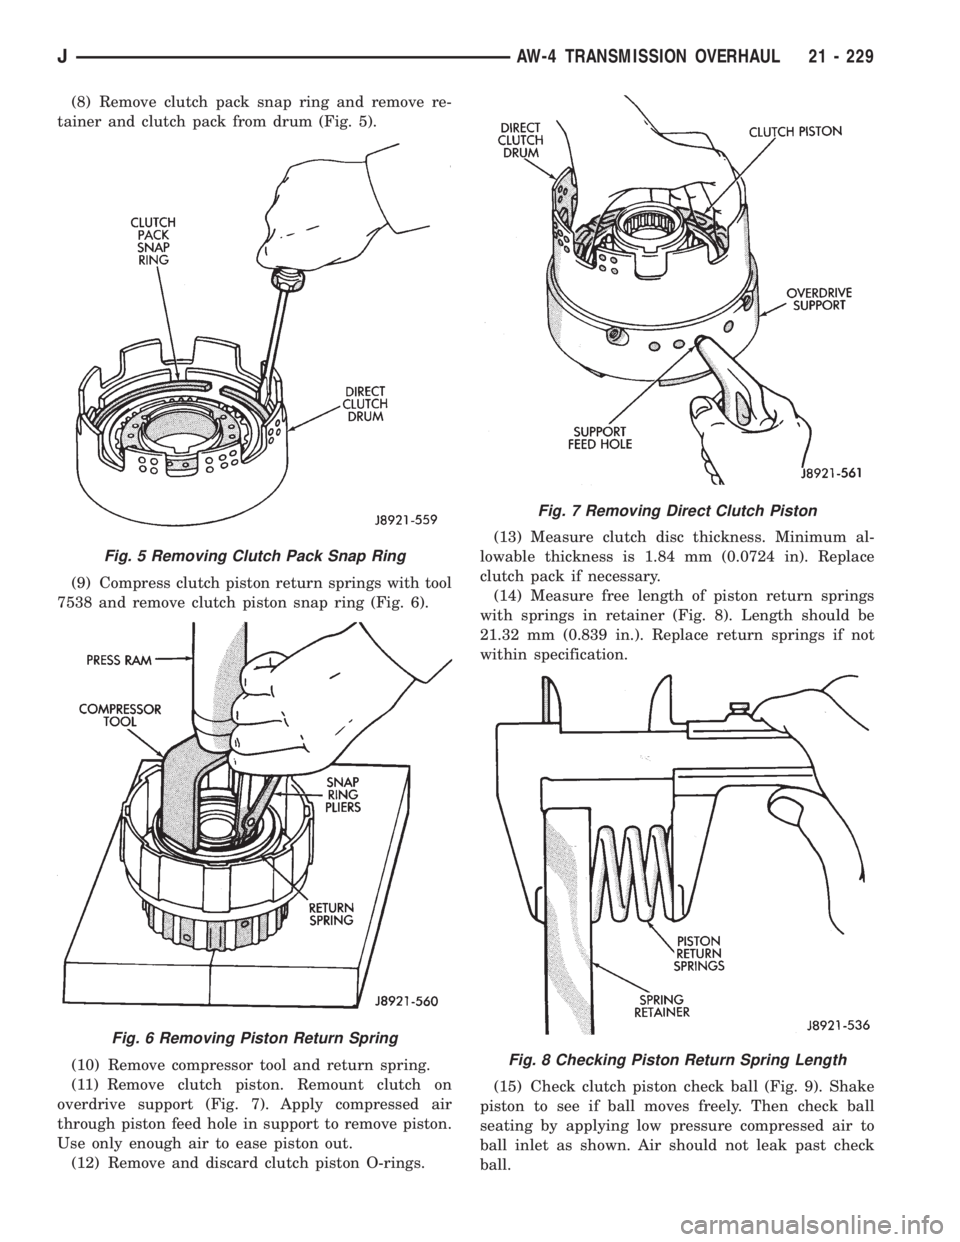
(8) Remove clutch pack snap ring and remove re-
tainer and clutch pack from drum (Fig. 5).
(9) Compress clutch piston return springs with tool
7538 and remove clutch piston snap ring (Fig. 6).
(10) Remove compressor tool and return spring.
(11) Remove clutch piston. Remount clutch on
overdrive support (Fig. 7). Apply compressed air
through piston feed hole in support to remove piston.
Use only enough air to ease piston out.
(12) Remove and discard clutch piston O-rings.(13) Measure clutch disc thickness. Minimum al-
lowable thickness is 1.84 mm (0.0724 in). Replace
clutch pack if necessary.
(14) Measure free length of piston return springs
with springs in retainer (Fig. 8). Length should be
21.32 mm (0.839 in.). Replace return springs if not
within specification.
(15) Check clutch piston check ball (Fig. 9). Shake
piston to see if ball moves freely. Then check ball
seating by applying low pressure compressed air to
ball inlet as shown. Air should not leak past check
ball.
Fig. 5 Removing Clutch Pack Snap Ring
Fig. 6 Removing Piston Return Spring
Fig. 7 Removing Direct Clutch Piston
Fig. 8 Checking Piston Return Spring Length
JAW-4 TRANSMISSION OVERHAUL 21 - 229
Page 1794 of 2158
FORWARD CLUTCH OVERHAUL
FORWARD CLUTCH DISASSEMBLY (FIG. 1)
(1) Check clutch piston stroke as outlined in fol-
lowing steps (2) through (7).
(2) Position overdrive support on wood blocks and
mount forward clutch drum on support (Fig. 2).
(3) Remove bearing and race from forward clutch
drum (Fig. 2).
(4) Mount dial indicator on clutch drum. Position
dial indicator plunger against clutch piston (Fig. 3).(5) Apply compressed air through right side feed
hole in support and note piston stroke length on dial
indicator.
(6) Stroke length should be 3.55 - 3.73 mm (0.1348
- 0.1469 in.).
(7) Replace clutch discs if stroke length is incor-
rect.
(8) Remove clutch pack snap ring and remove re-
tainer and clutch pack (Fig. 4).
(9) Remove clutch pack cushion plate (Fig. 5).
(10) Compress clutch springs with Tool 7538 and
remove piston snap ring.
Fig. 1 Forward Clutch Components
21 - 232 AW-4 TRANSMISSION OVERHAULJ