1995 ACURA TL ABS
[x] Cancel search: ABSPage 528 of 1771

Component Location s
ABS CONTRO L UNI TSERVIC E CHEC K CONNECTO R (2P )
STEERIN G ANGL E SENSO R RIGHT-REA
R WHEE L SENSO R
TCS CONTRO L UNI T
UNDER-DAS H RELA Y BO X
POWERTRAI N
CONTRO L MODUL E (PCM )
EC T SENSO R
TC S CONTRO L VALV E
SENSO R
RIGHT-FRON T
WHEE L SENSO R
LEFT-REA RWHEEL SENSO R
TC S SWITC H
UNDER-DAS H FUSE/RELA Y BO X
UNDER-DAS H FUSE/RELA Y BO X
GAUG E ASSEMBL Y
TC S INDICATO R LIGH T
UNDER-HOO D FUSE/RELA Y BO X BACK-U
P LIGHTS /
METE R LIGHT S
(1 0 A ) FUS E EC
U (PCM)/CRUIS E
CONTRO L
(1 5 A ) FUS E
BATTER Y (120A ) FUS E
UNDER-DASH RELA Y BO X
I G S W (5 0 A ) FUS E
FAIL-SAF E RELA Y
TCS CONTRO L
VALV E ACTUATO R
UNDER-HOO D FUSE/RELA Y BO X
LEFT-FRON
T WHEE L SENSO R
TCS/RUNNIN GLIGHT (1 5 A ) FUS ESTOP/HOR N(20 A ) FUS E
ProCarManuals.com
Page 529 of 1771
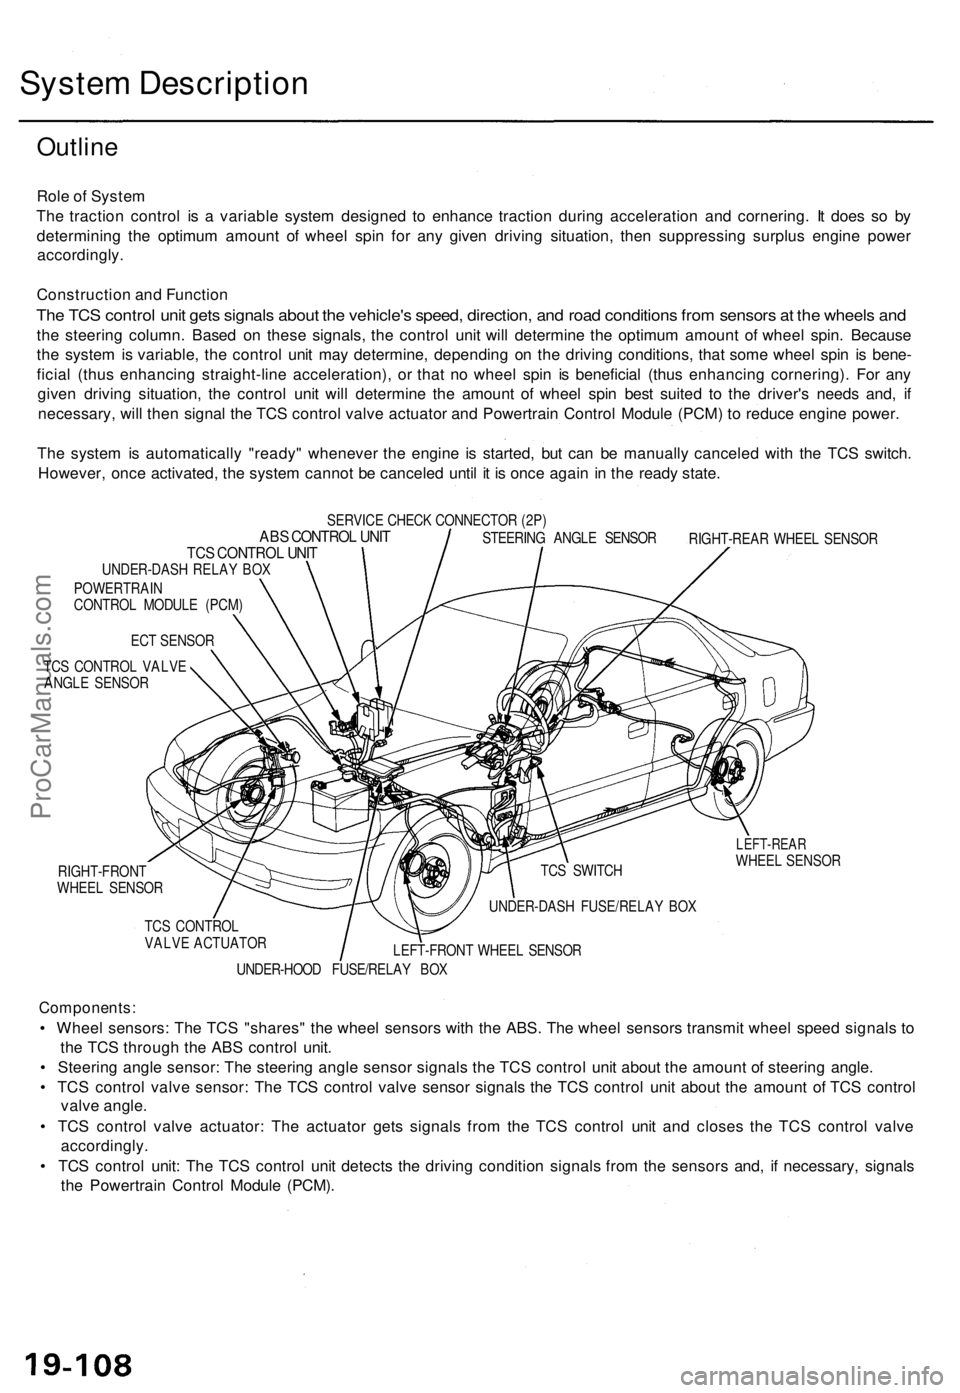
System Descriptio n
Outline
Role o f Syste m
Th e tractio n contro l i s a variabl e syste m designe d t o enhanc e tractio n durin g acceleratio n an d cornering . I t doe s s o b y
determinin g th e optimu m amoun t o f whee l spi n fo r an y give n drivin g situation , the n suppressin g surplu s engin e powe r
accordingly .
Constructio n an d Functio n
The TC S contro l uni t get s signal s abou t th e vehicle' s speed , direction , an d roa d condition s fro m sensor s a t th e wheel s an d
the steerin g column . Base d o n thes e signals , th e contro l uni t wil l determin e th e optimu m amoun t o f whee l spin . Becaus e
th e syste m is variable , th e contro l uni t ma y determine , dependin g o n th e drivin g conditions , tha t som e whee l spi n i s bene -
ficia l (thu s enhancin g straight-lin e acceleration) , o r tha t n o whee l spi n i s beneficia l (thu s enhancin g cornering) . Fo r an y
give n drivin g situation , th e contro l uni t wil l determin e th e amoun t o f whee l spi n bes t suite d t o th e driver' s need s and , i f
necessary , wil l the n signa l th e TC S contro l valv e actuato r an d Powertrai n Contro l Modul e (PCM ) t o reduc e engin e power .
Th e syste m is automaticall y "ready " wheneve r th e engine is started , bu t ca n b e manuall y cancele d wit h th e TC S switch .
However , onc e activated , th e syste m canno t b e cancele d unti l i t i s onc e agai n i n th e read y state .
SERVIC E CHEC K CONNECTO R (2P )ABS CONTRO L UNI TTCS CONTRO L UNI TUNDER-DAS H RELA Y BO X
POWERTRAI N
CONTRO L MODUL E (PCM )
EC T SENSO R
TC S CONTRO L VALV E
ANGL E SENSO R STEERIN
G ANGL E SENSO R
RIGHT-REA R WHEE L SENSO R
RIGHT-FRON T
WHEE L SENSO R
Components :
• Whee l sensors : Th e TC S "shares " th e whee l sensor s wit h th e ABS . Th e whee l sensor s transmi t whee l spee d signal s t o
th e TC S throug h th e AB S contro l unit .
• Steerin g angl e sensor : Th e steerin g angl e senso r signal s th e TC S contro l uni t abou t th e amoun t o f steerin g angle .
• TC S contro l valv e sensor : Th e TC S contro l valv e senso r signal s th e TC S contro l uni t abou t th e amoun t o f TC S contro l
valv e angle .
• TC S contro l valv e actuator : Th e actuato r get s signal s fro m th e TC S contro l uni t an d close s th e TC S contro l valv e
accordingly .
• TC S contro l unit : Th e TC S contro l uni t detect s th e drivin g conditio n signal s fro m th e sensor s and , i f necessary , signal s
th e Powertrai n Contro l Modul e (PCM) .
LEFT-REA RWHEEL SENSO R
UNDER-HOO D FUSE/RELA Y BO X
LEFT-FRON
T WHEE L SENSO R
TC
S CONTRO L
VALV E ACTUATO R UNDER-DAS
H FUSE/RELA Y BO X
TC
S SWITC H
ProCarManuals.com
Page 535 of 1771
Troubleshooting Precaution s
1. I n an y o f thes e cases , th e TC S indicato r ligh t ma y com e o n o r sta y o n eve n th e TC S syste m is normal .
• Th e coolan t temperatur e is 32° F (0°C ) o r below .
• Th e parkin g brak e is applie d fo r mor e tha n 3 0 second s whil e th e vehicl e is bein g driven .
• Th e tir e pressur e is no t a t th e specifie d pressure .
• Th e whee l senso r signa l i s interrupte d durin g drivin g a t th e spee d o f 6 mp h (1 0 km/h ) o r abov e du e to , fo r example ,
th e vehicl e spinning .
• Th e MA P sensor , coolan t temperatur e sensor , IC M o r th e atmospheri c pressur e senso r syste m o f th e PGM-F I syste m
is faulty .
2. TC S doe s no t functio n whe n th e TC S indicato r ligh t i s ON .
3 . Whe n bot h th e TC S indicato r ligh t an d th e MI L ar e ON , troubleshoo t th e PGM-F I syste m first .
4 . Whe n bot h th e TC S indicato r ligh t an d th e AB S indicato r ligh t ar e ON , troubleshoo t th e AB S first .
5 . Th e DT C 4- 9 (AB S down ) i s memorize d whe n th e AB S contro l uni t canno t outpu t th e whee l spee d signa l du e to , fo r
example , a missin g o r blow n AB S B 2 (1 5 A ) fuse . I f yo u fai l t o eras e th e DT C o f th e TC S afte r troubleshootin g th e ABS ,
th e DT C remain s in th e TC S contro l uni t memory . Therefore , b e sur e to test-driv e th e vehicl e an d chec k th e TC S indica -
to r ligh t befor e startin g th e troubleshootin g th e TCS .
ProCarManuals.com
Page 547 of 1771
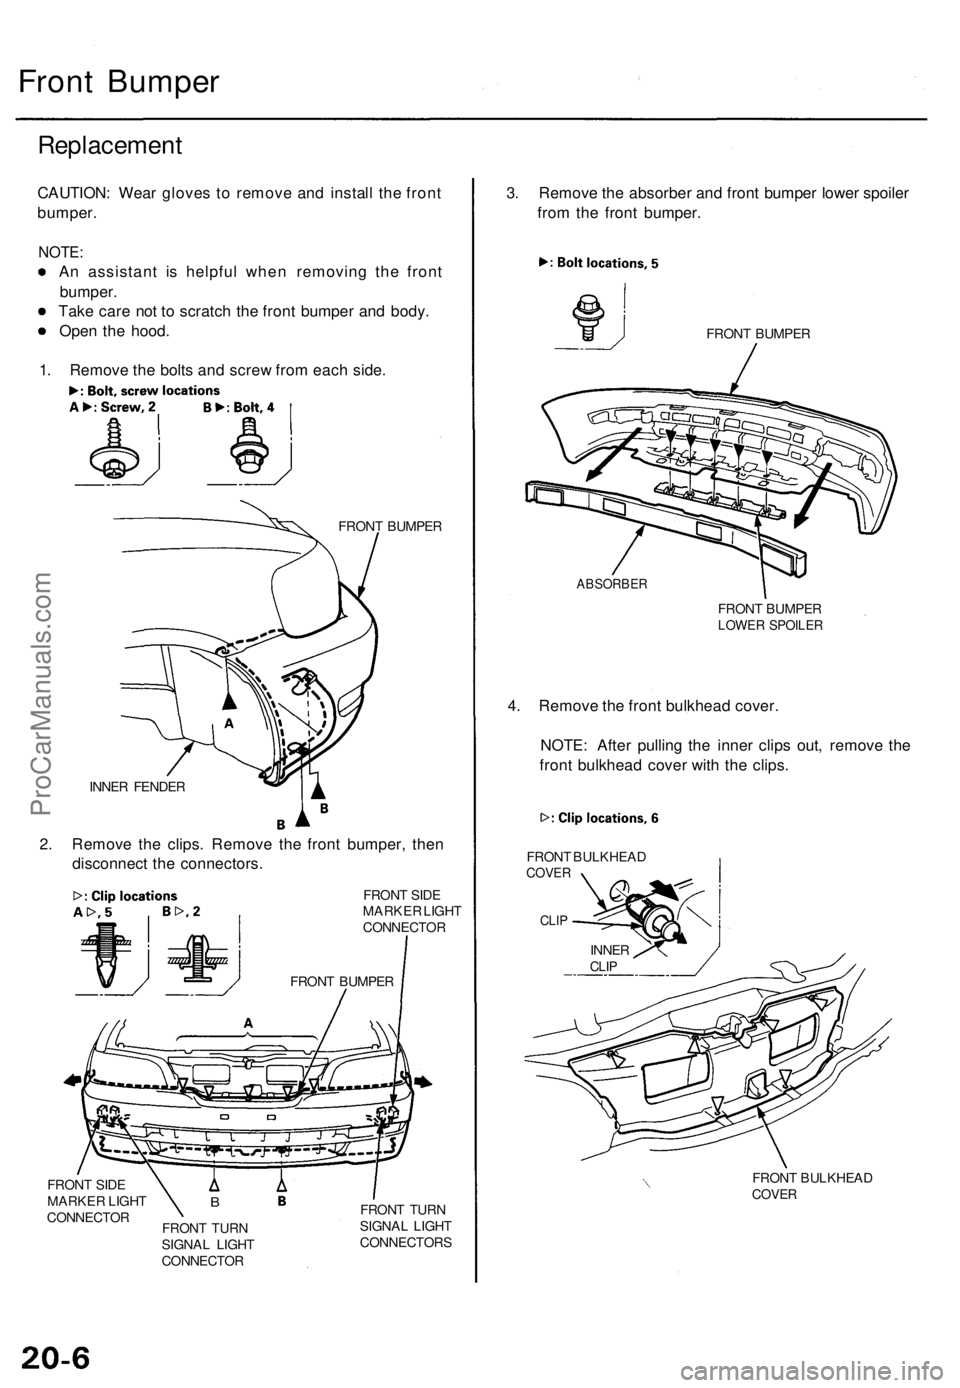
Front Bumper
Replacement
CAUTION: Wear gloves to remove and install the front
bumper.
NOTE:
An assistant is helpful when removing the front
bumper.
Take care not to scratch the front bumper and body.
Open the hood.
1. Remove the bolts and screw from each side.
FRONT BUMPER
INNER FENDER
2. Remove the clips. Remove the front bumper, then
disconnect the connectors.
FRONT SIDE
MARKER LIGHT
CONNECTOR
FRONT SIDE
MARKER LIGHT
CONNECTOR
B
FRONT TURN
SIGNAL LIGHT
CONNECTOR
FRONT TURN
SIGNAL LIGHT
CONNECTORS
3. Remove the absorber and front bumper lower spoiler
from the front bumper.
FRONT BUMPER
ABSORBER
FRONT BUMPER
LOWER SPOILER
4. Remove the front bulkhead cover.
NOTE: After pulling the inner clips out, remove the
front bulkhead cover with the clips.
FRONT BULKHEAD
COVER
CLIP
FRONT BULKHEAD
COVER
FRONT BUMPER
INNER
CLIPProCarManuals.com
Page 565 of 1771
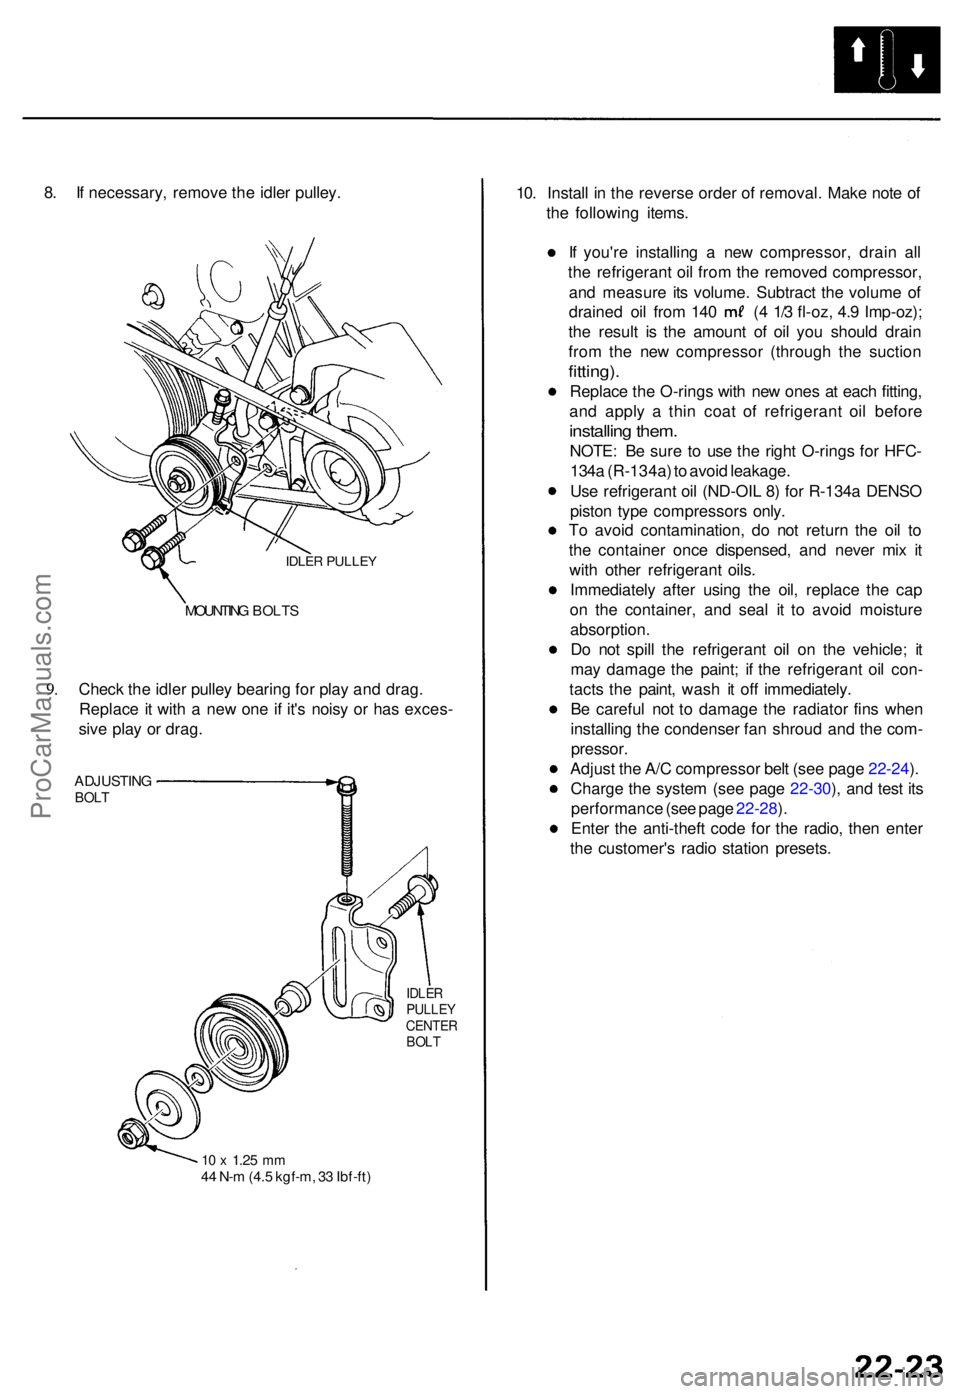
8. I f necessary , remov e th e idle r pulley .
IDLER PULLE Y
9.
MOUNTIN G BOLT S
Check th e idle r pulle y bearin g fo r pla y an d drag .
Replac e it wit h a ne w on e i f it' s nois y o r ha s exces -
siv e pla y o r drag .
ADJUSTIN GBOLT
IDLE RPULLE YCENTE RBOLT
10 x 1.2 5 mm44 N- m (4. 5 kgf-m , 3 3 Ibf-ft )
10. Instal l i n th e revers e orde r o f removal . Mak e not e o f
th e followin g items .
I f you'r e installin g a ne w compressor , drai n al l
th e refrigeran t oi l fro m th e remove d compressor ,
an d measur e it s volume . Subtrac t th e volum e o f
draine d oi l fro m 14 0 ( 4 1/ 3 fl-oz , 4. 9 Imp-oz) ;
th e resul t i s th e amoun t o f oi l yo u shoul d drai n
fro m th e ne w compresso r (throug h th e suctio n
fitting).
Replac e th e O-rings with ne w one s a t eac h fitting ,
an d appl y a thi n coa t of refrigeran t oi l befor e
installin g them .
NOTE : B e sur e t o us e th e righ t O-ring s fo r HFC -
134 a (R-134a ) t o avoi d leakage .
Us e refrigeran t oi l (ND-OI L 8 ) fo r R-134 a DENS O
pisto n typ e compressor s only .
T o avoi d contamination , d o no t retur n th e oi l t o
th e containe r onc e dispensed , an d neve r mi x i t
wit h othe r refrigeran t oils .
Immediatel y afte r usin g th e oil , replac e th e ca p
o n th e container , an d sea l i t t o avoi d moistur e
absorption .
D o no t spil l th e refrigeran t oi l o n th e vehicle ; i t
ma y damag e th e paint ; i f th e refrigeran t oi l con -
tact s th e paint , was h i t of f immediately .
B e carefu l no t t o damag e th e radiato r fin s whe n
installin g th e condense r fa n shrou d an d th e com -
pressor .
Adjust th e A/ C compresso r bel t (se e pag e 22-24 ).
Charg e th e syste m (se e pag e 22-30 ), an d tes t it s
performanc e (se e pag e 22-28 ).
Ente r th e anti-thef t cod e fo r th e radio , the n ente r
th e customer' s radi o statio n presets .
ProCarManuals.com
Page 569 of 1771
A/C Service Tips and Precautions
The air
conditioner system uses
HFC-134a
(R-134a)
refrigerant
and
polyalkyleneglycol (PAG) refrigerant
oil*,
which
are not
compatible with CFC-12 (R-12) refrigerant and mineral oil. Do not use R-12 refrigerant or mineral oil in this system, and do
not attempt to use R-12 servicing equipment; damage to the air conditioner system or your servicing equipment will result.
*DENSO ND-OIL 8:
P/N 38897 - PR7 - A01AH: 120 (4 fl-oz, 4.2 Imp-oz)
P/N 38899 - PR7 - A01: 40 (1 1/3 fl-oz, 1.4 Imp-oz)
Use only service equipment that is U.L.-listed and is certified to meet the requirements of SAE J2210 to remove R-134a
from the air conditioner system.
CAUTION: Exposure to air conditioner refrigerant and lubricant vapor or mist can irritate eyes, nose and throat. Avoid
breathing the air conditioner refrigerant and lubricant vapor or mist.
If accidental system discharge occurs, ventilate work area before resuming service.
R-134a service equipment or vehicle air conditioner systems should not be pressure tested or leak tested with compressed
air.
Some mixtures of air and R-134a have been shown to be combustible at elevated pressures and can result
in tire or explosion causing injury or property damage. Never use compressed air to pressure test R-134a service equip-
ment or vehicle air conditioner systems.
Additional health and safety information may be obtained from the refrigerant and lubricant manufacturers.
1. Always disconnect the negative cable from the battery whenever replacing air conditioning parts.
2. Keep moisture and dust out of the system. When disconnecting any lines, plug or cap the fittings immediately; don't
remove the caps or plugs until just before you reconnect each line.
3. Before connecting any hose or line, apply a few drops of refrigerant oil to the O-ring.
4. When tightening or loosening a fitting, use a second wrench to support the matching fitting.
5. When discharging the system, use a R-134a refrigerant Recovery/Recycling/Charging System; don't release refriger-
ant into the atmosphere.
6. Add refrigerant oil after replacing the following parts:
NOTE:
To avoid contamination, do not return the oil to the container once dispensed, and never mix it with other refriger-
ant oils.
Immediately after using the oil, replace the cap on the container, and seal it to avoid moisture absorption.
Do not spill the refrigerant oil on the vehicle; it may damage the paint; if the refrigerant oil contacts the paint, wash
it off immediately.
Condenser ........................................ 25 (5/6 fl-oz, 0.9 Imp-oz)
Evaporator........................................ 50 (1 2/3 fl-oz, 1.8 Imp-oz)
Line or hose ...................................... 20 (2/3 fl-oz, 0.7 Imp-oz)
Receiver/Dryer
.................................
15
(1/2
fl-oz,
0.5
Imp-oz)
Leakage repair ................................. 25 (5/6 fl-oz, 0.9 Imp-oz)
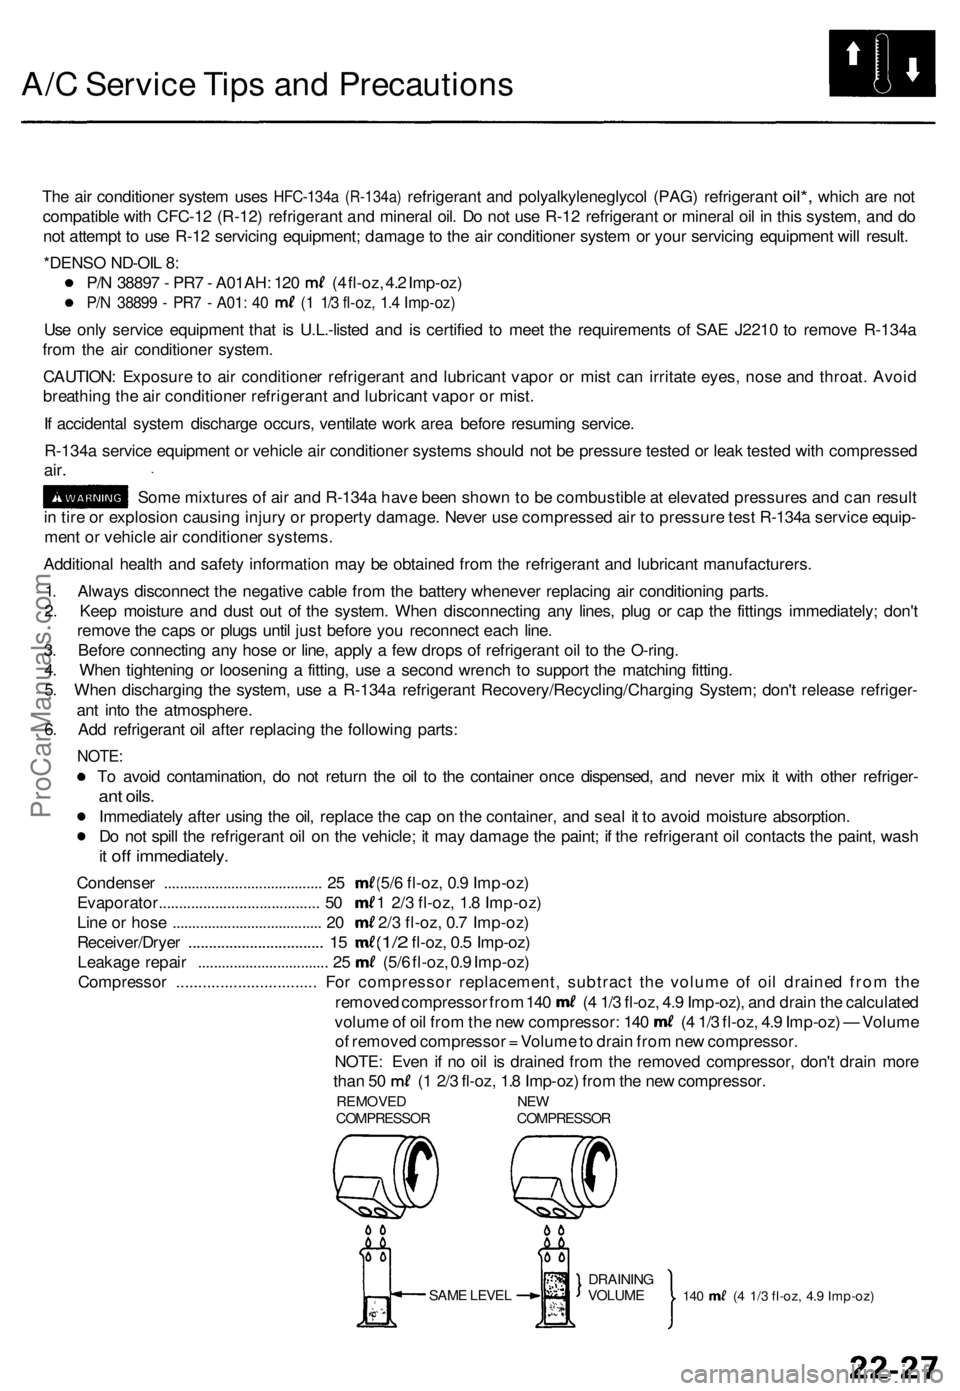
Compressor ................................ For compressor replacement, subtract the volume of oil drained from the
removed compressor from 140 (4 1/3 fl-oz, 4.9 Imp-oz), and drain the calculated
volume of oil from the new compressor: 140 (4 1/3 fl-oz, 4.9 Imp-oz) — Volume
of removed compressor = Volume to drain from new compressor.
NOTE: Even if no oil is drained from the removed compressor, don't drain more
than 50 (1 2/3 fl-oz, 1.8 Imp-oz) from the new compressor.
REMOVED NEW
COMPRESSOR COMPRESSOR
SAME LEVEL
140 (4 1/3 fl-oz, 4.9 Imp-oz)
DRAINING
VOLUMEProCarManuals.com
Page 671 of 1771
General Info
Specifications
Maintenance
Engine
Cooling
Fuel and Emissions
2.5L
3.2L
* Transaxle
SteeringSuspension
* Brakes (Including ABS)
* Body
* Heating, Ventilation
and Air Conditioning
* Body Electrical
* Engine Electrical
* SRS2.5L
3.2L
1995±98 TL Main Menu
As sections w/ * include SRS components, special precautions are required when servicing.
ProCarManuals.com
Page 720 of 1771
Engine Removal/Installation
Removal (cont'd)
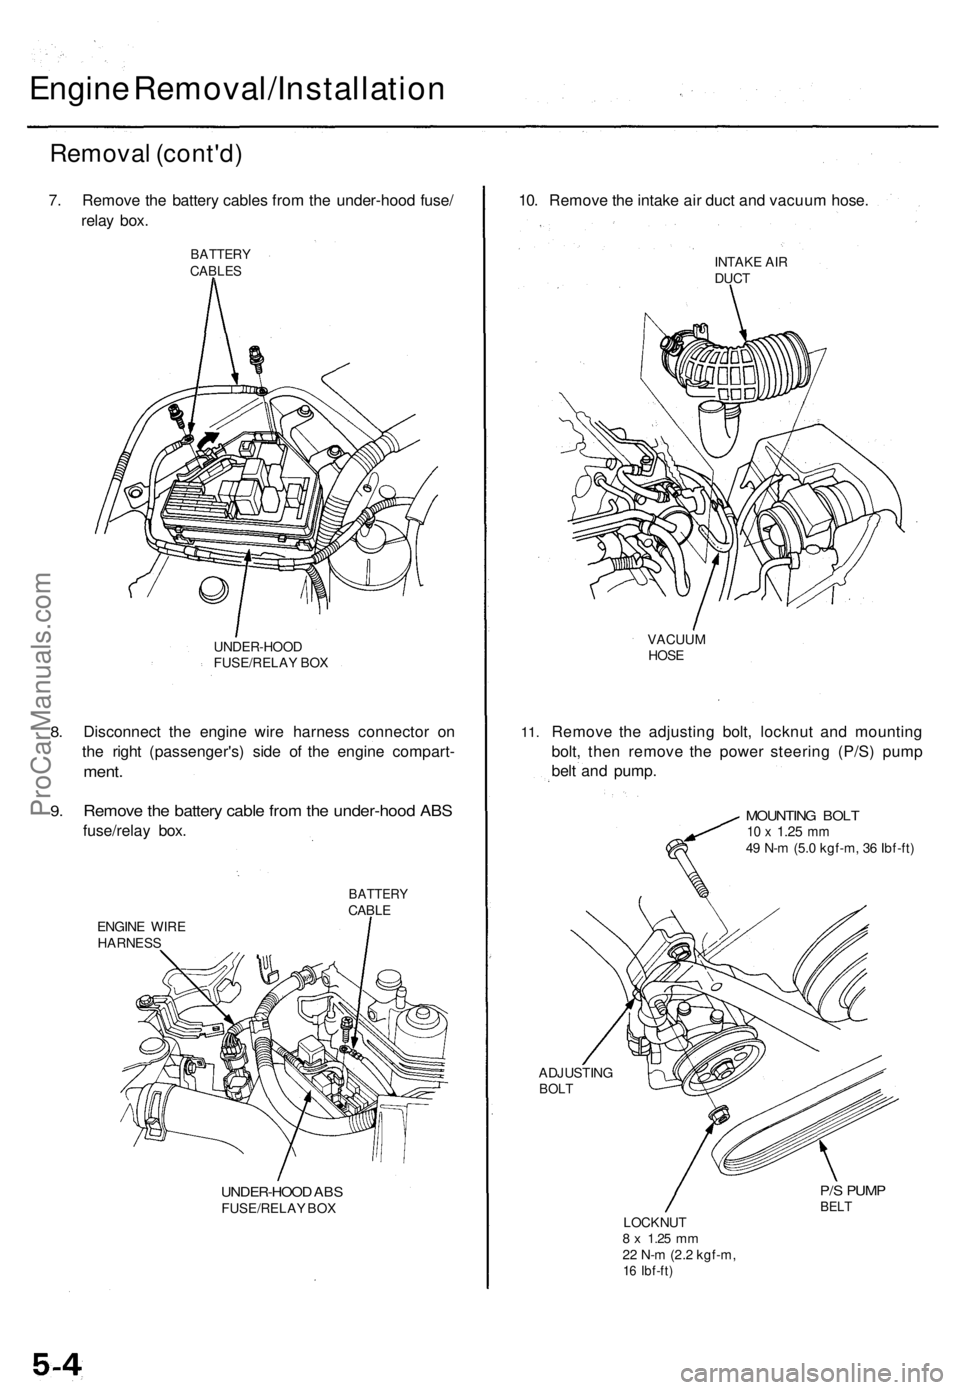
7. Remove the battery cables from the under-hood fuse/
relay box.
BATTERY
CABLES
8.
9.
UNDER-HOOD
FUSE/RELAY BOX
Disconnect the engine wire harness connector on
the right (passenger's) side of the engine compart-
ment.
Remove the battery cable from the under-hood ABS
fuse/relay box.
BATTERY
CABLE
ENGINE WIRE
HARNESS
UNDER-HOOD ABS
FUSE/RELAY BOX
10. Remove the intake air duct and vacuum hose.
INTAKE AIR
DUCT
11.
VACUUM
HOSE
Remove the adjusting bolt, locknut and mounting
bolt, then remove the power steering (P/S) pump
belt and pump.
MOUNTING BOLT
10 x
1.25
mm
49 N-m (5.0 kgf-m, 36 Ibf-ft)
ADJUSTING
BOLT
P/S PUMP
BELT
LOCKNUT
8 x
1.25
mm
22 N-m (2.2 kgf-m,
16 Ibf-ft)ProCarManuals.com