1995 ACURA TL oil level
[x] Cancel search: oil levelPage 126 of 1771
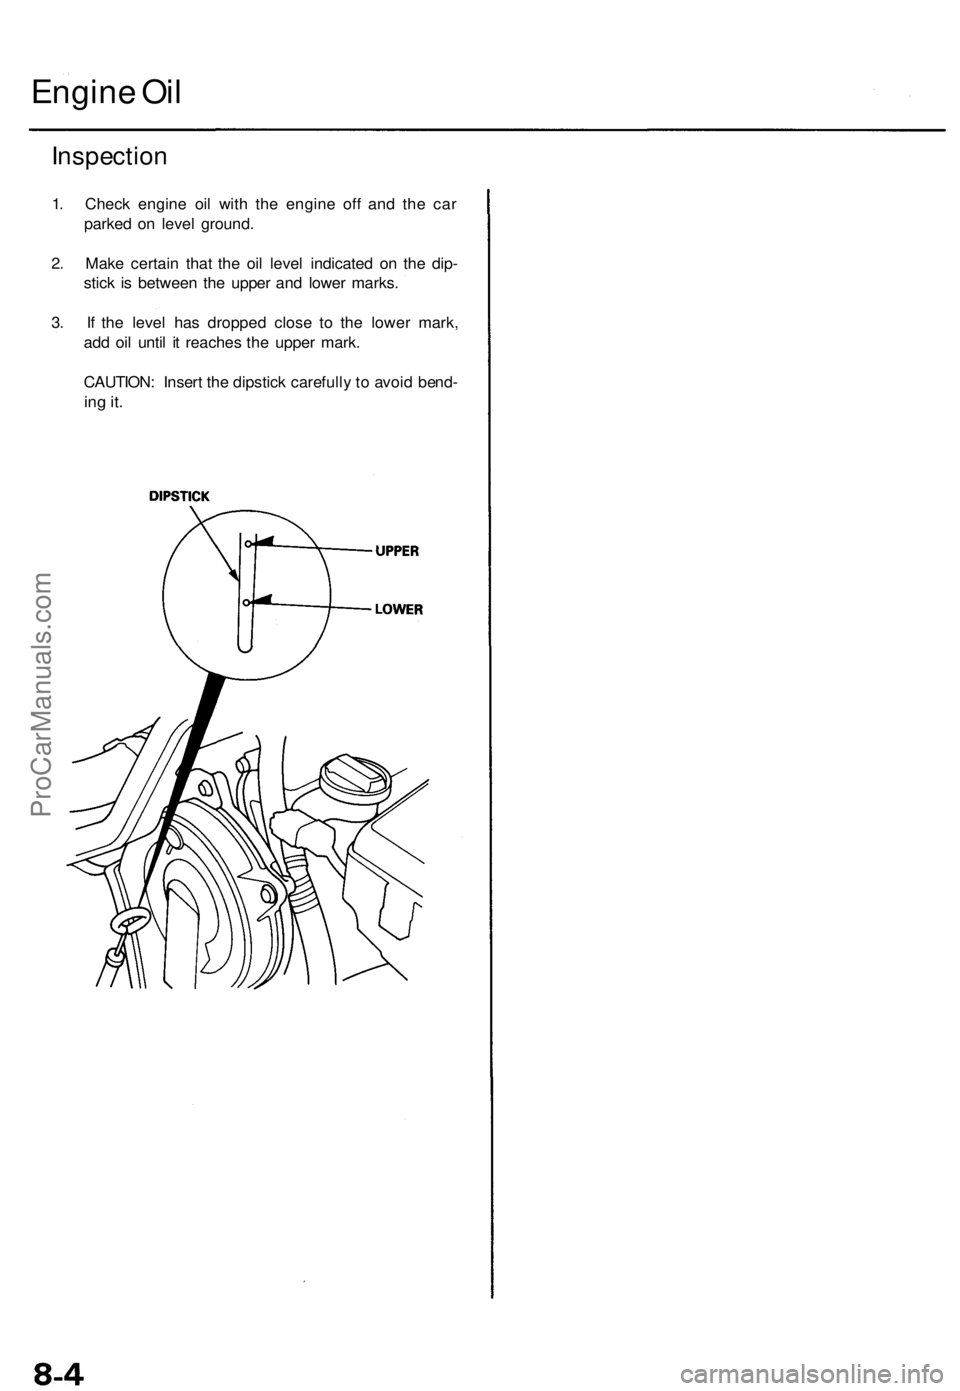
Inspection
1. Check engine oil with the engine off and the car
parked on level ground.
2. Make certain that the oil level indicated on the dip-
stick is between the upper and lower marks.
3. If the level has dropped close to the lower mark,
add oil until it reaches the upper mark.
CAUTION: Insert the dipstick carefully to avoid bend-
ing it.
Engine OilProCarManuals.com
Page 130 of 1771
Oil Pressur e Engin
e Oi l Temperatur e Switc h
Testin gTestin g
If th e oi l pressur e warnin g ligh t stay s o n wit h th e engin e
running , chec k th e engin e oi l level . I f th e oi l leve l i s cor -
rect :
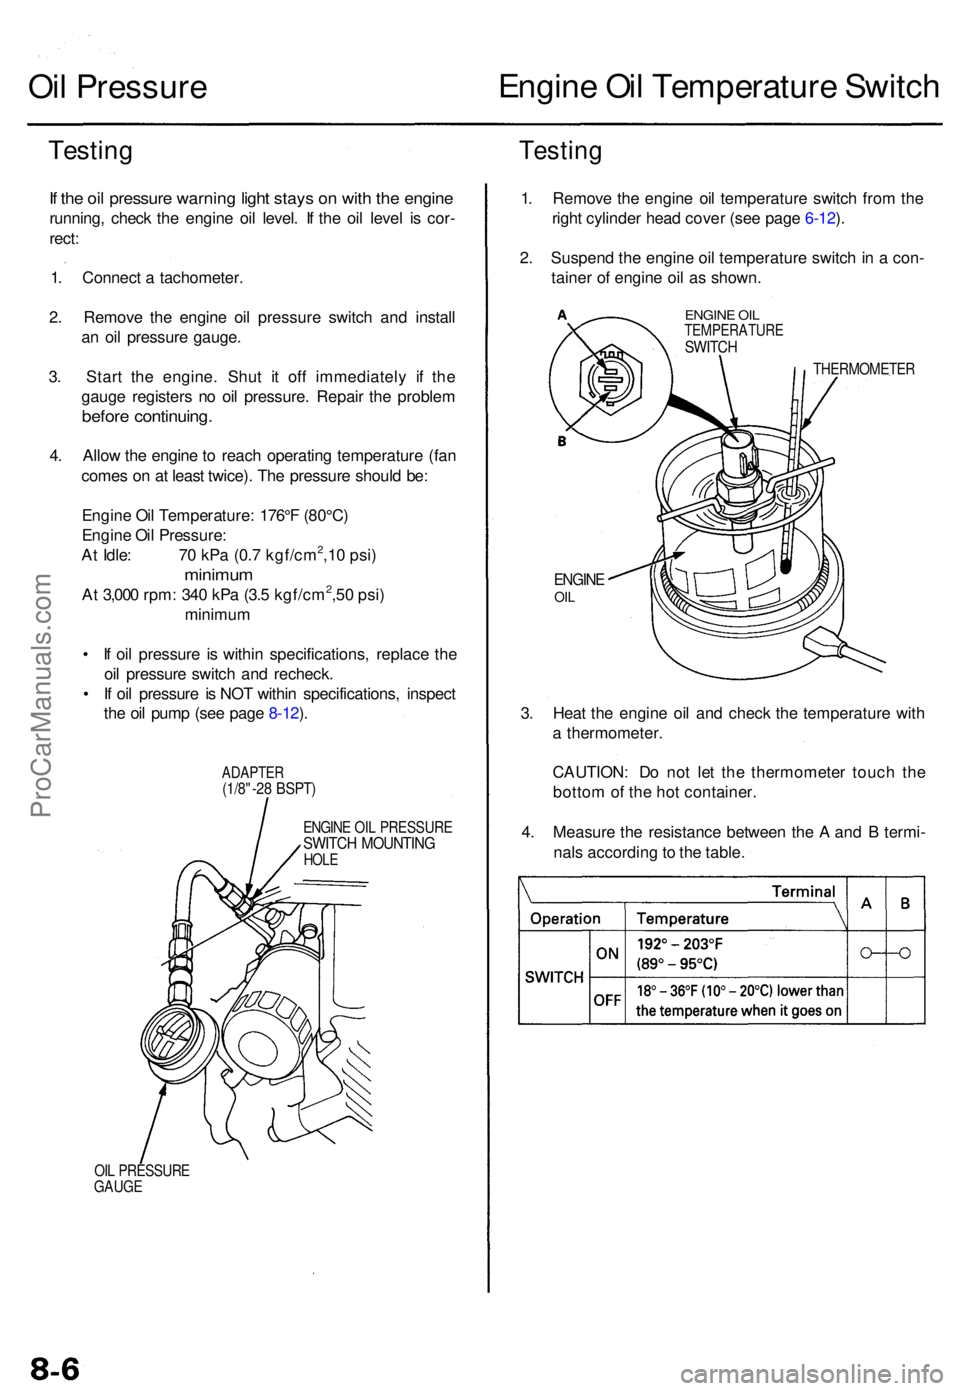
1 . Connec t a tachometer .
2 . Remov e th e engin e oi l pressur e switc h an d instal l
a n oi l pressur e gauge .
3 . Star t th e engine . Shu t i t of f immediatel y i f th e
gaug e register s n o oi l pressure . Repai r th e proble m
before continuing .
4. Allo w th e engin e to reac h operatin g temperatur e (fa n
come s o n a t leas t twice) . Th e pressur e shoul d be :
Engin e Oi l Temperature : 176° F (80°C )
Engin e Oi l Pressure :
A t Idle : 7 0 kP a (0. 7 kgf/cm
2,1 0 psi )
minimu m
At 3,00 0 rpm : 34 0 kP a (3. 5 kgf/cm2,5 0 psi )
minimu m
• I f oi l pressur e i s withi n specifications , replac e th e
oi l pressur e switc h an d recheck .
• I f oi l pressur e i s NO T withi n specifications , inspec t
th e oi l pum p (se e pag e 8-12 ).
ADAPTE R(1/8"-28 BSPT )
ENGIN E OI L PRESSUR ESWITCH MOUNTIN GHOLE
OIL PRESSUR E
GAUG E
1. Remov e th e engin e oi l temperatur e switc h fro m th e
righ t cylinde r hea d cove r (se e pag e 6-12 ).
2 . Suspen d th e engin e oi l temperatur e switc h in a con -
taine r o f engin e oi l a s shown .
ENGINE OI LTEMPERATUR ESWITCH
THERMOMETE R
ENGINEOIL
3. Hea t th e engin e oi l an d chec k th e temperatur e wit h
a thermometer .
CAUTION : D o no t le t th e thermomete r touc h th e
botto m of th e ho t container .
4 . Measur e th e resistanc e betwee n th e A an d B termi -
nal s accordin g to th e table .
ProCarManuals.com
Page 434 of 1771
Maintenance
Differential Oi l
NOTE : Chec k th e differentia l oi l wit h engin e OFF , an d
th e vehicl e o n leve l ground .
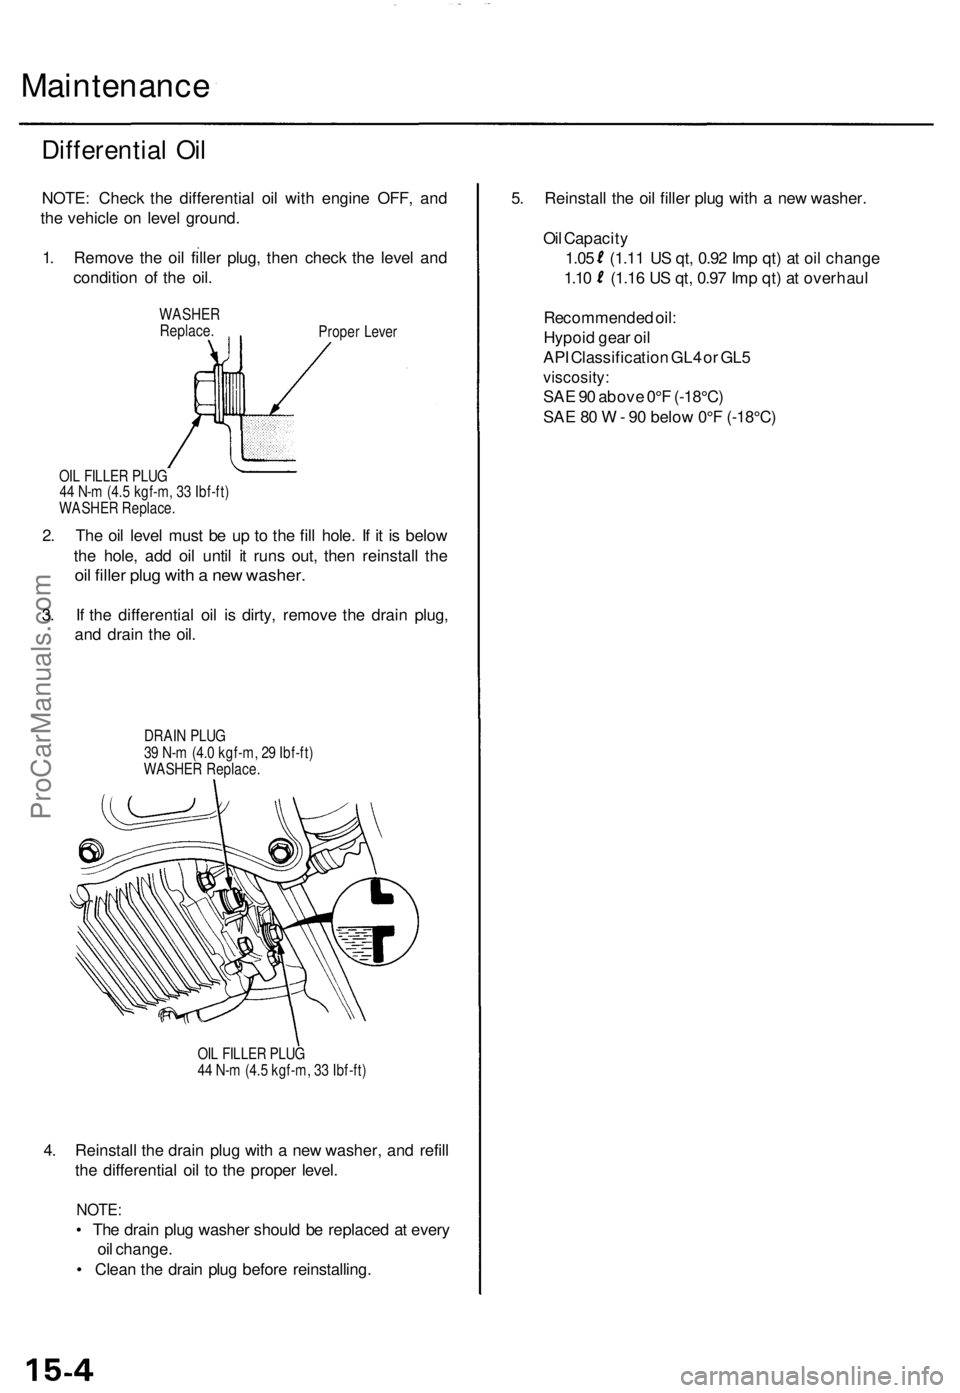
1 . Remov e th e oi l fille r plug , the n chec k th e leve l an d
conditio n o f th e oil .
WASHERReplace .Proper Leve r
OI L FILLE R PLU G
4 4 N- m (4. 5 kgf-m , 3 3 Ibf-ft )
WASHE R Replace .
2. Th e oi l leve l mus t b e u p t o th e fil l hole . I f i t i s belo w
th e hole , ad d oi l unti l i t run s out , the n reinstal l th e
oil fille r plu g wit h a ne w washer .
3. I f th e differentia l oi l i s dirty , remov e th e drai n plug ,
an d drai n th e oil .
DRAI N PLU G
3 9 N- m (4. 0 kgf-m , 2 9 Ibf-ft )
WASHE R Replace .
OI L FILLE R PLU G
4 4 N- m (4. 5 kgf-m , 3 3 Ibf-ft )
4. Reinstal l th e drai n plu g wit h a ne w washer , an d refil l
th e differentia l oi l t o th e prope r level .
NOTE :
• Th e drai n plu g washe r shoul d b e replace d a t ever y
oi l change .
• Clea n th e drai n plu g befor e reinstalling . 5
. Reinstal l th e oi l fille r plu g wit h a ne w washer .
Oi l Capacit y
1.0 5 (1.1 1 U S qt , 0.9 2 Im p qt ) a t oi l chang e
1.10 (1.1 6 U S qt , 0.9 7 Im p qt ) a t overhau l
Recommende d oil :
Hypoi d gea r oi l
AP I Classificatio n GL 4 o r GL 5
viscosity :
SAE 9 0 abov e 0° F (-18°C )
SA E 8 0 W - 9 0 belo w 0° F (-18°C )
ProCarManuals.com
Page 569 of 1771
A/C Service Tips and Precautions
The air
conditioner system uses
HFC-134a
(R-134a)
refrigerant
and
polyalkyleneglycol (PAG) refrigerant
oil*,
which
are not
compatible with CFC-12 (R-12) refrigerant and mineral oil. Do not use R-12 refrigerant or mineral oil in this system, and do
not attempt to use R-12 servicing equipment; damage to the air conditioner system or your servicing equipment will result.
*DENSO ND-OIL 8:
P/N 38897 - PR7 - A01AH: 120 (4 fl-oz, 4.2 Imp-oz)
P/N 38899 - PR7 - A01: 40 (1 1/3 fl-oz, 1.4 Imp-oz)
Use only service equipment that is U.L.-listed and is certified to meet the requirements of SAE J2210 to remove R-134a
from the air conditioner system.
CAUTION: Exposure to air conditioner refrigerant and lubricant vapor or mist can irritate eyes, nose and throat. Avoid
breathing the air conditioner refrigerant and lubricant vapor or mist.
If accidental system discharge occurs, ventilate work area before resuming service.
R-134a service equipment or vehicle air conditioner systems should not be pressure tested or leak tested with compressed
air.
Some mixtures of air and R-134a have been shown to be combustible at elevated pressures and can result
in tire or explosion causing injury or property damage. Never use compressed air to pressure test R-134a service equip-
ment or vehicle air conditioner systems.
Additional health and safety information may be obtained from the refrigerant and lubricant manufacturers.
1. Always disconnect the negative cable from the battery whenever replacing air conditioning parts.
2. Keep moisture and dust out of the system. When disconnecting any lines, plug or cap the fittings immediately; don't
remove the caps or plugs until just before you reconnect each line.
3. Before connecting any hose or line, apply a few drops of refrigerant oil to the O-ring.
4. When tightening or loosening a fitting, use a second wrench to support the matching fitting.
5. When discharging the system, use a R-134a refrigerant Recovery/Recycling/Charging System; don't release refriger-
ant into the atmosphere.
6. Add refrigerant oil after replacing the following parts:
NOTE:
To avoid contamination, do not return the oil to the container once dispensed, and never mix it with other refriger-
ant oils.
Immediately after using the oil, replace the cap on the container, and seal it to avoid moisture absorption.
Do not spill the refrigerant oil on the vehicle; it may damage the paint; if the refrigerant oil contacts the paint, wash
it off immediately.
Condenser ........................................ 25 (5/6 fl-oz, 0.9 Imp-oz)
Evaporator........................................ 50 (1 2/3 fl-oz, 1.8 Imp-oz)
Line or hose ...................................... 20 (2/3 fl-oz, 0.7 Imp-oz)
Receiver/Dryer
.................................
15
(1/2
fl-oz,
0.5
Imp-oz)
Leakage repair ................................. 25 (5/6 fl-oz, 0.9 Imp-oz)
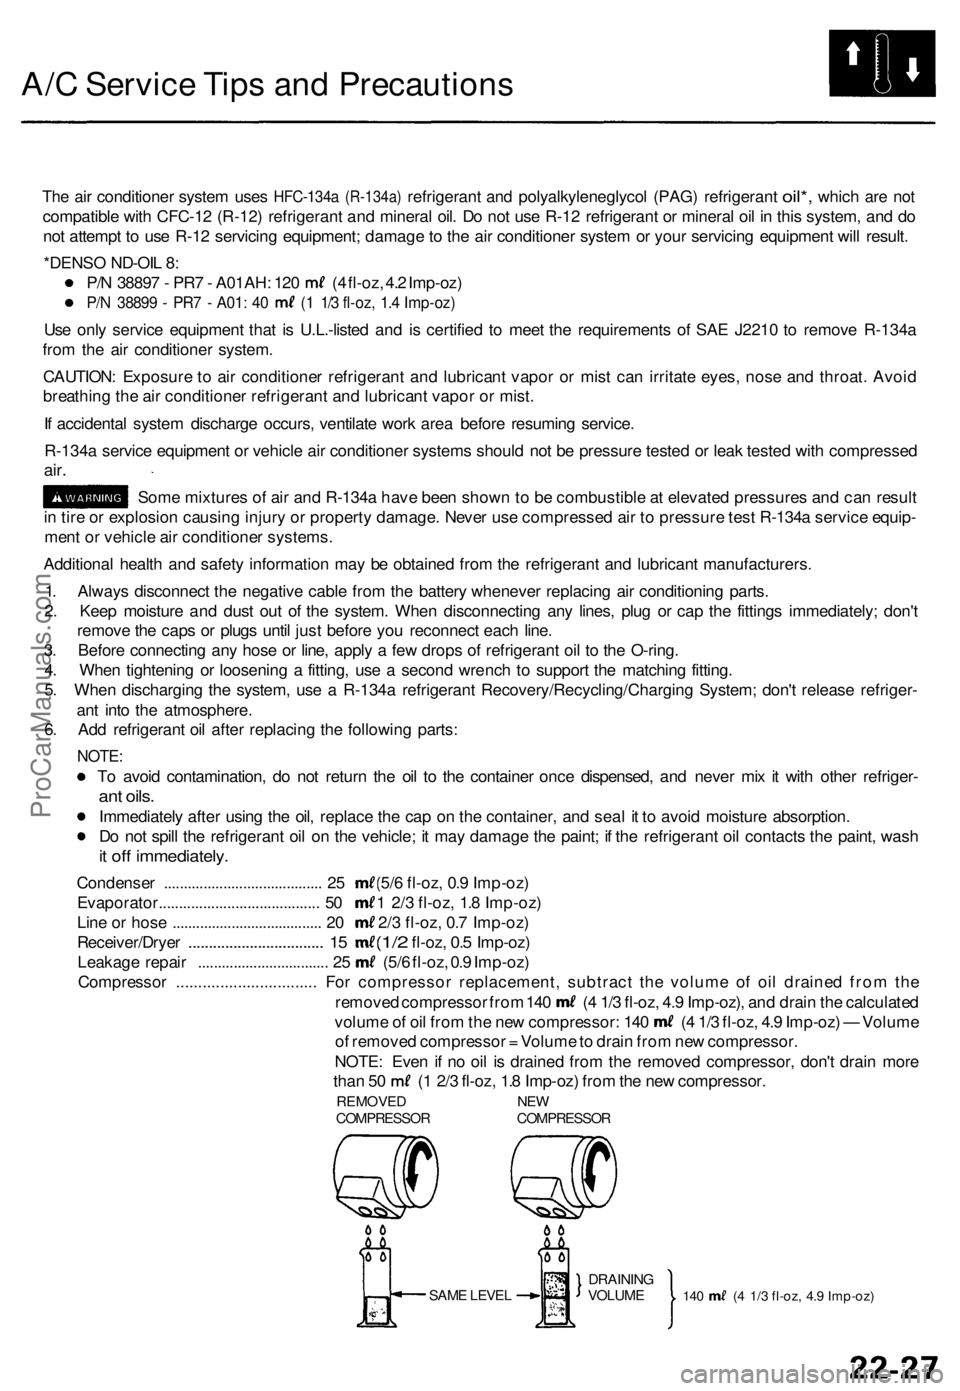
Compressor ................................ For compressor replacement, subtract the volume of oil drained from the
removed compressor from 140 (4 1/3 fl-oz, 4.9 Imp-oz), and drain the calculated
volume of oil from the new compressor: 140 (4 1/3 fl-oz, 4.9 Imp-oz) — Volume
of removed compressor = Volume to drain from new compressor.
NOTE: Even if no oil is drained from the removed compressor, don't drain more
than 50 (1 2/3 fl-oz, 1.8 Imp-oz) from the new compressor.
REMOVED NEW
COMPRESSOR COMPRESSOR
SAME LEVEL
140 (4 1/3 fl-oz, 4.9 Imp-oz)
DRAINING
VOLUMEProCarManuals.com
Page 805 of 1771
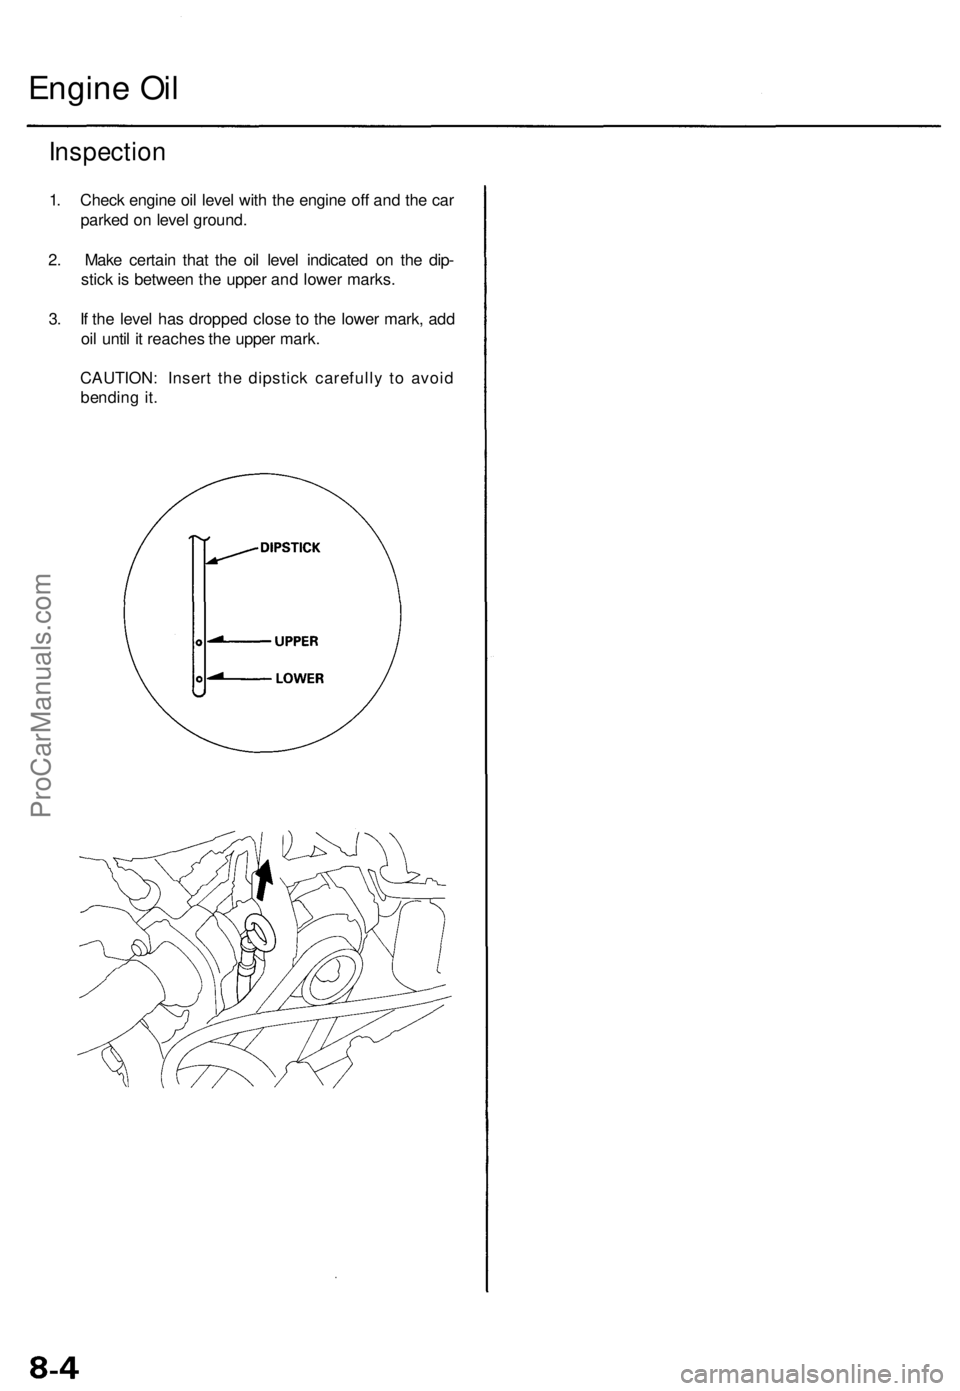
Engine Oil
Inspection
1. Check engine oil level with the engine off and the car
parked on level ground.
2. Make certain that the oil level indicated on the dip-
stick is between the upper and lower marks.
3. If the level has dropped close to the lower mark, add
oil until it reaches the upper mark.
CAUTION: Insert the dipstick carefully to avoid
bending it.ProCarManuals.com
Page 807 of 1771
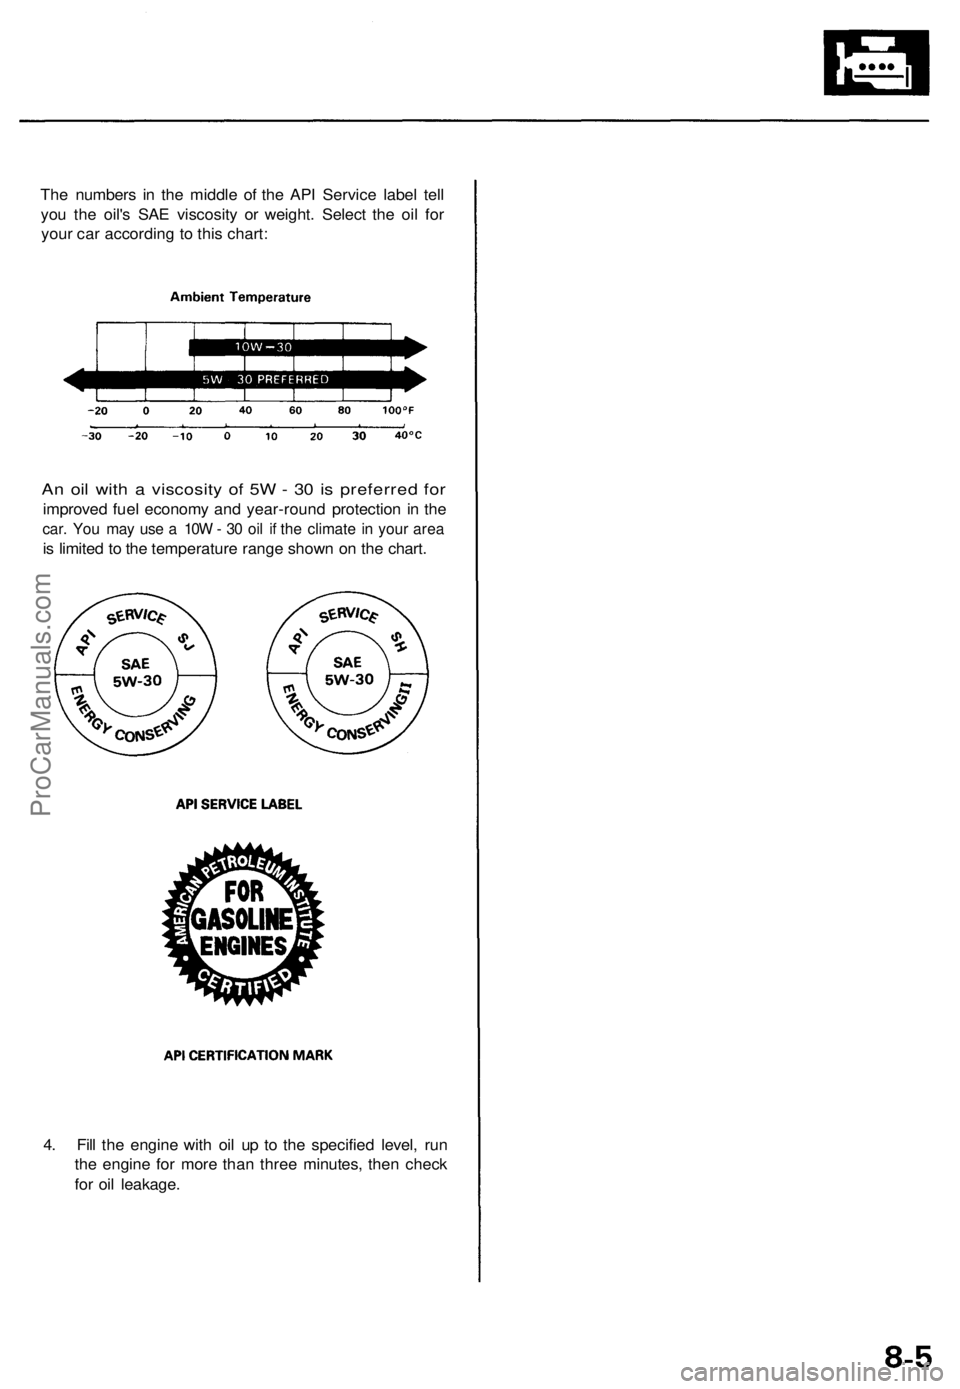
The numbers in the middle of the API Service label tell
you the oil's SAE viscosity or weight. Select the oil for
your car according to this chart:
An oil with a viscosity of 5W - 30 is preferred for
improved fuel economy and year-round protection in the
car. You may use a 10W - 30 oil if the climate in your area
is limited to the temperature range shown on the chart.
4. Fill the engine with oil up to the specified level, run
the engine for more than three minutes, then check
for oil leakage.ProCarManuals.com
Page 809 of 1771
Oil Filte r
Replacemen t (cont'd )
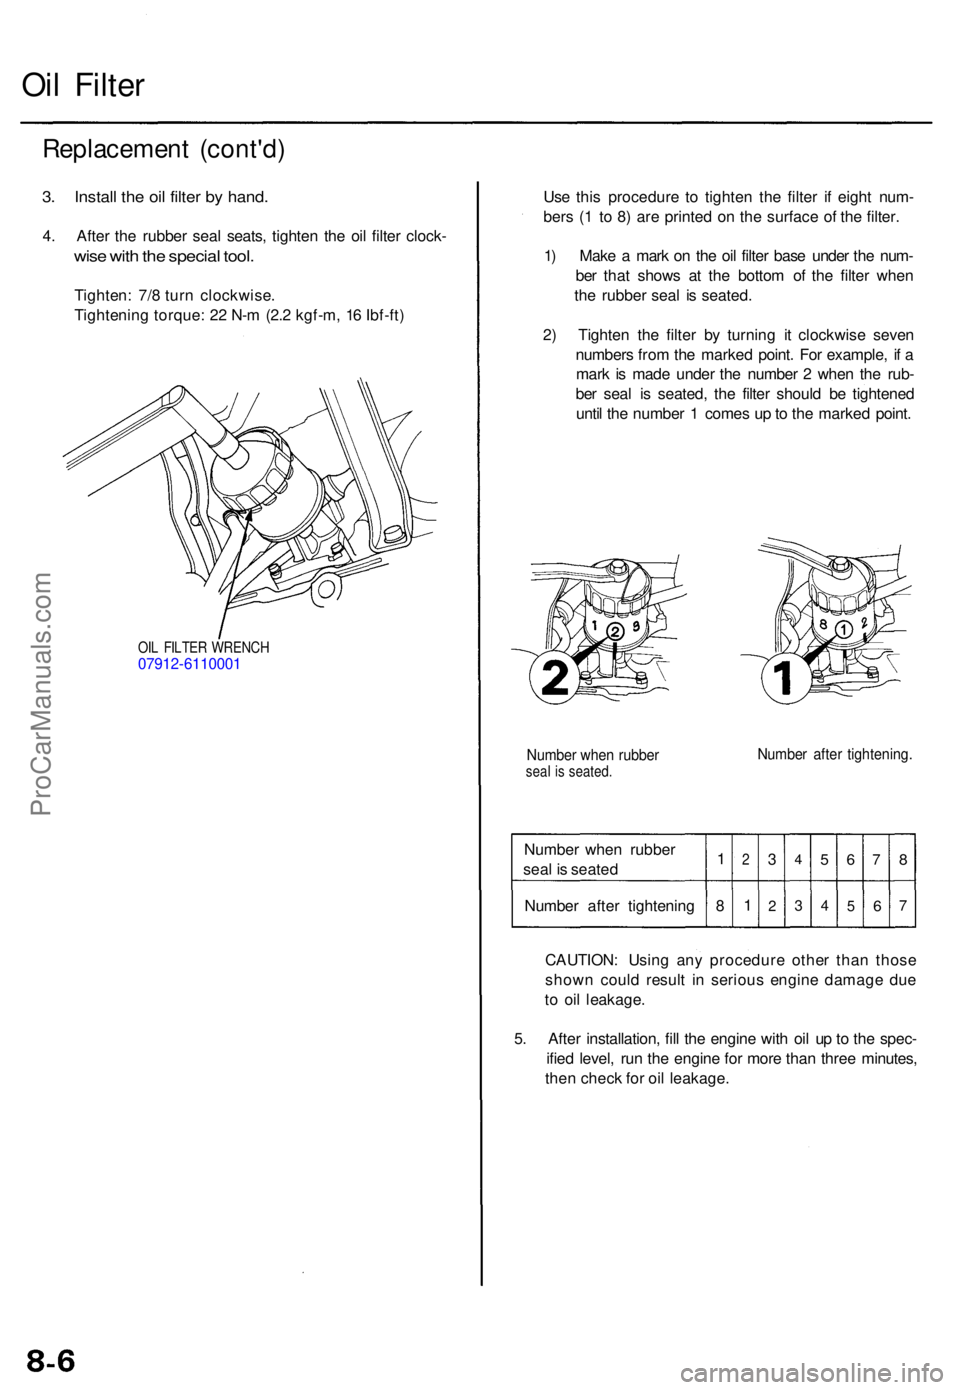
3. Instal l th e oi l filte r b y hand .
4. Afte r th e rubbe r sea l seats , tighte n th e oi l filte r clock -
wise wit h th e specia l tool .
Tighten : 7/ 8 tur n clockwise .
Tightenin g torque : 2 2 N- m (2. 2 kgf-m , 1 6 Ibf-ft )
OIL FILTE R WRENC H07912-611000 1
Use thi s procedur e t o tighte n th e filte r i f eigh t num -
ber s ( 1 t o 8 ) ar e printe d o n th e surfac e o f th e filter .
1 ) Mak e a mar k o n th e oi l filte r bas e unde r th e num -
be r tha t show s a t th e botto m o f th e filte r whe n
th e rubber seal i s seated .
2 ) Tighte n th e filte r b y turnin g i t clockwis e seve n
number s fro m th e marke d point . Fo r example , i f a
mar k i s mad e unde r th e numbe r 2 whe n th e rub -
be r sea l i s seated , th e filte r shoul d b e tightene d
unti l th e numbe r 1 come s u p to th e marke d point .
Numbe r whe n rubbe rseal i s seated .Number afte r tightening .
Number whe n rubbe r
sea l i s seate d
Numbe r afte r tightenin g1
8
2
1
3
2
4
3
5
4
6
5
7
6
8
7
CAUTION : Usin g an y procedur e othe r tha n thos e
show n coul d resul t i n seriou s engin e damag e du e
t o oi l leakage .
5 . Afte r installation , fil l th e engin e wit h oi l u p to th e spec -
ifie d level , ru n th e engin e fo r mor e tha n thre e minutes ,
the n chec k fo r oi l leakage .
ProCarManuals.com
Page 810 of 1771
Oil Pressur e
Testing
If th e oi l pressur e warnin g ligh t stay s o n wit h th e engin e
running , chec k th e engine oil level . I f th e oi l leve l i s cor -
rect :
1 . Connec t a tachometer .
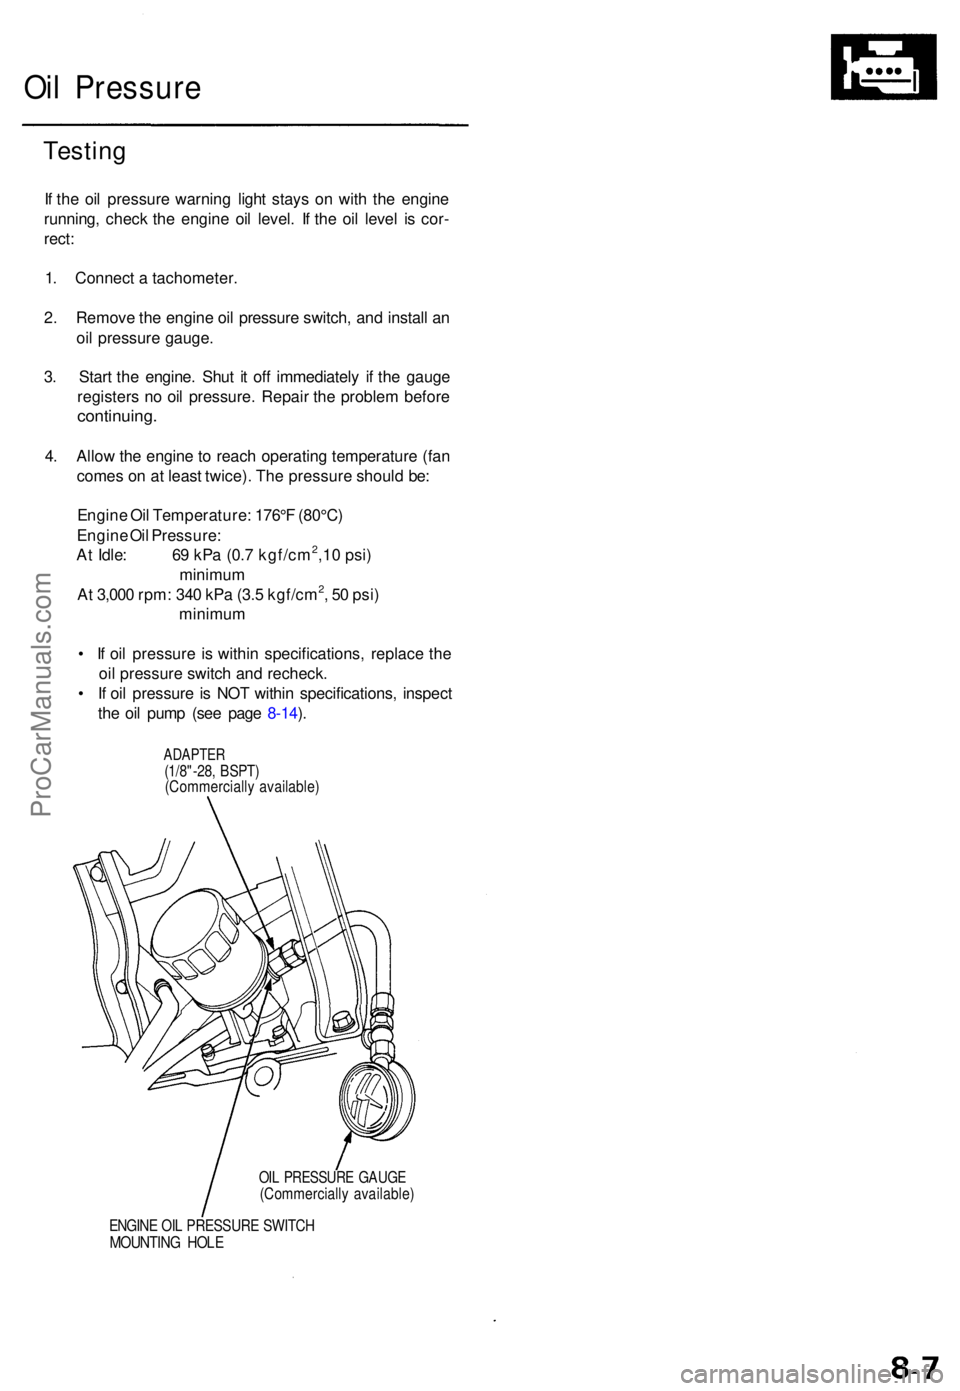
2 . Remov e th e engin e oi l pressur e switch , an d instal l a n
oi l pressur e gauge .
3 . Star t th e engine . Shu t i t of f immediatel y i f th e gaug e
register s n o oi l pressure . Repai r th e proble m befor e
continuing .
4. Allo w th e engin e to reac h operatin g temperatur e (fa n
come s o n a t leas t twice) . Th e pressur e shoul d be :
Engin e Oi l Temperature : 176° F (80°C )
Engin e Oi l Pressure :
A t Idle : 6 9 kP a (0. 7 kgf/cm
2,1 0 psi )
minimu m
A t 3,00 0 rpm : 34 0 kP a (3. 5 kgf/cm
2, 5 0 psi )
minimu m
• I f oi l pressur e i s withi n specifications , replac e th e
oi l pressur e switc h an d recheck .
• I f oi l pressur e is NO T withi n specifications , inspec t
th e oi l pum p (se e pag e 8-14 ).
ADAPTE R(1/8"-28, BSPT )(Commerciall y available )
OIL PRESSUR E GAUG E(Commerciall y available )
ENGINE OI L PRESSUR E SWITC HMOUNTIN G HOL E
ProCarManuals.com