Page 239 of 1771
Intake Air System
System Description
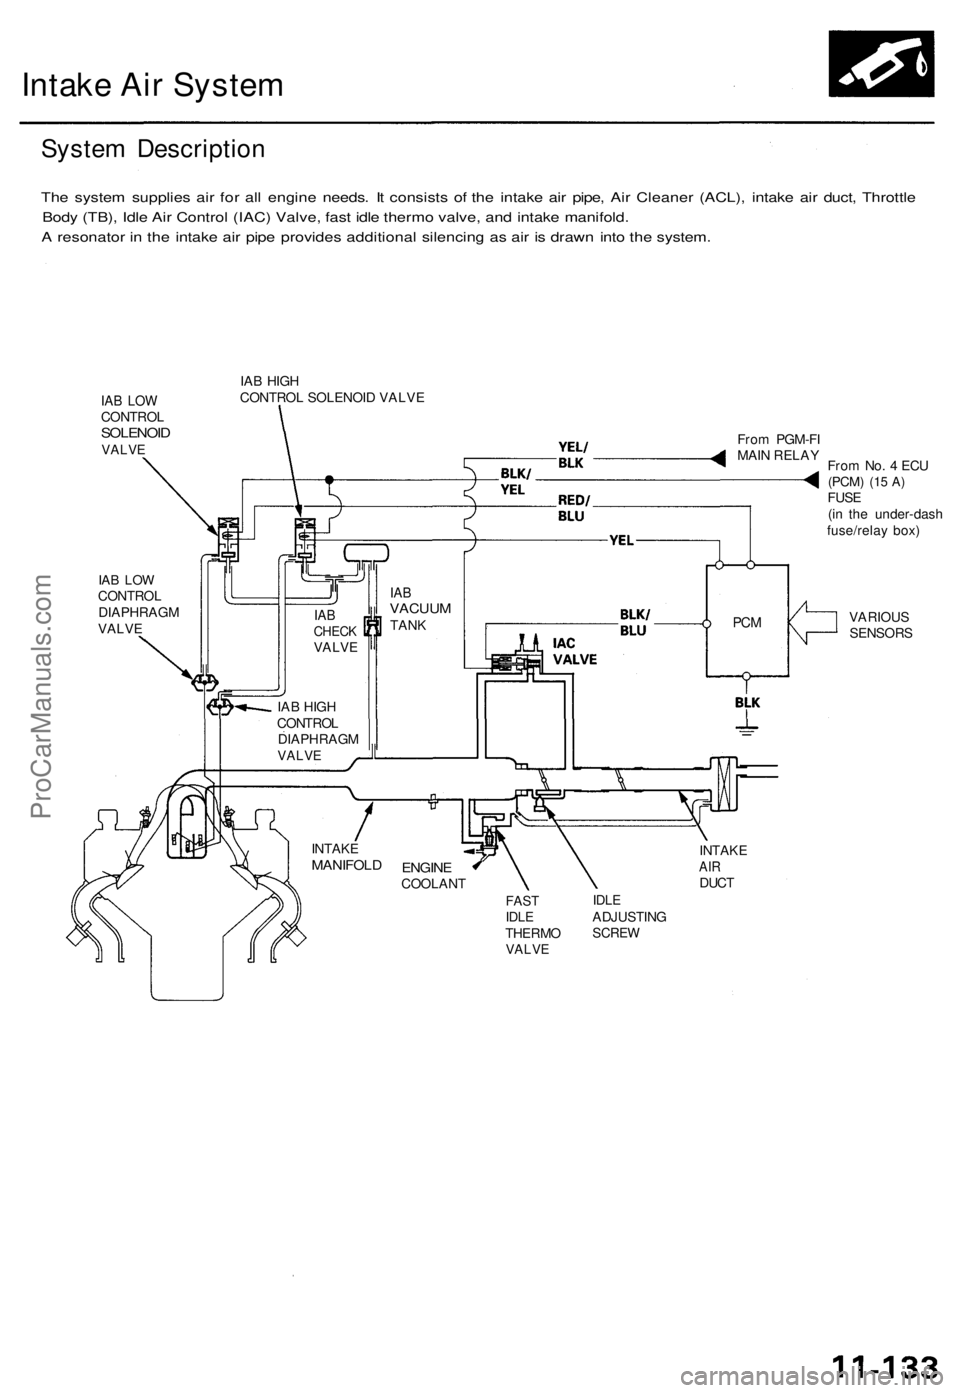
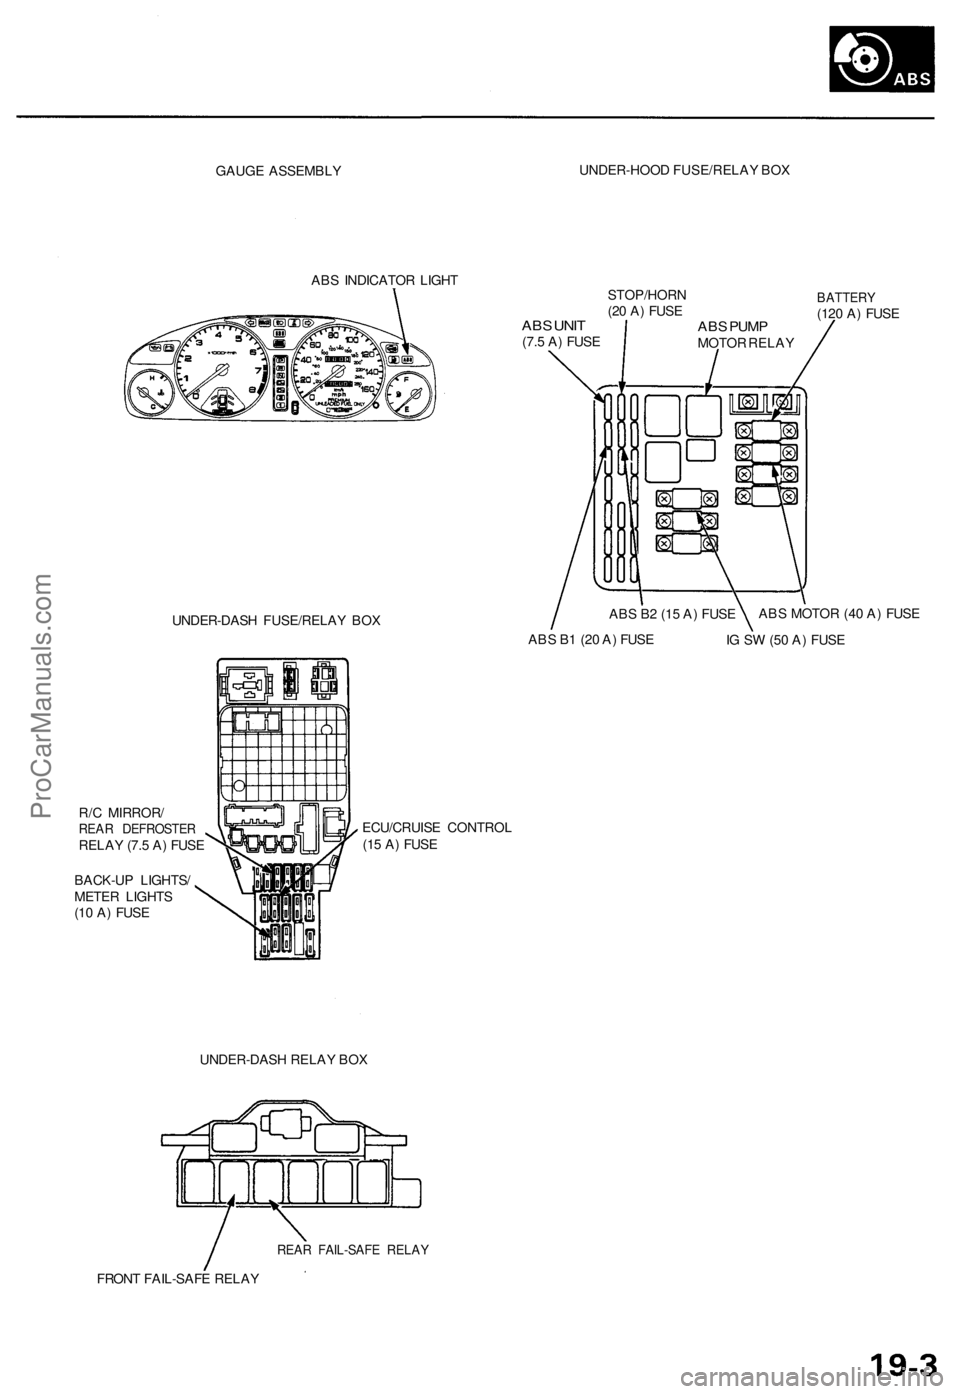
The system supplies air for all engine needs. It consists of the intake air pipe, Air Cleaner (ACL), intake air duct, Throttle
Body (TB), Idle Air Control (IAC) Valve, fast idle thermo valve, and intake manifold.
A resonator in the intake air pipe provides additional silencing as air is drawn into the system.
IAB LOW
CONTROL
SOLENOID
VALVE
IAB HIGH
CONTROL SOLENOID VALVE
IAB LOW
CONTROL
DIAPHRAGM
VALVE
From PGM-FI
MAIN RELAY
From No. 4 ECU
(PCM)
(15 A)
FUSE
(in the under-dash
fuse/relay box)
VARIOUS
SENSORS
INTAKE
AIR
DUCT
FAST
IDLE
THERMO
VALVE
IDLE
ADJUSTING
SCREW
ENGINE
COOLANT
INTAKE
MANIFOLD
PCM
IAB
VACUUM
TANK
IAB
CHECK
VALVE
IAB HIGH
CONTROL
DIAPHRAGM
VALVEProCarManuals.com
Page 251 of 1771
Emission Control System
Exhaust Gas Recirculation (EGR) System
Description
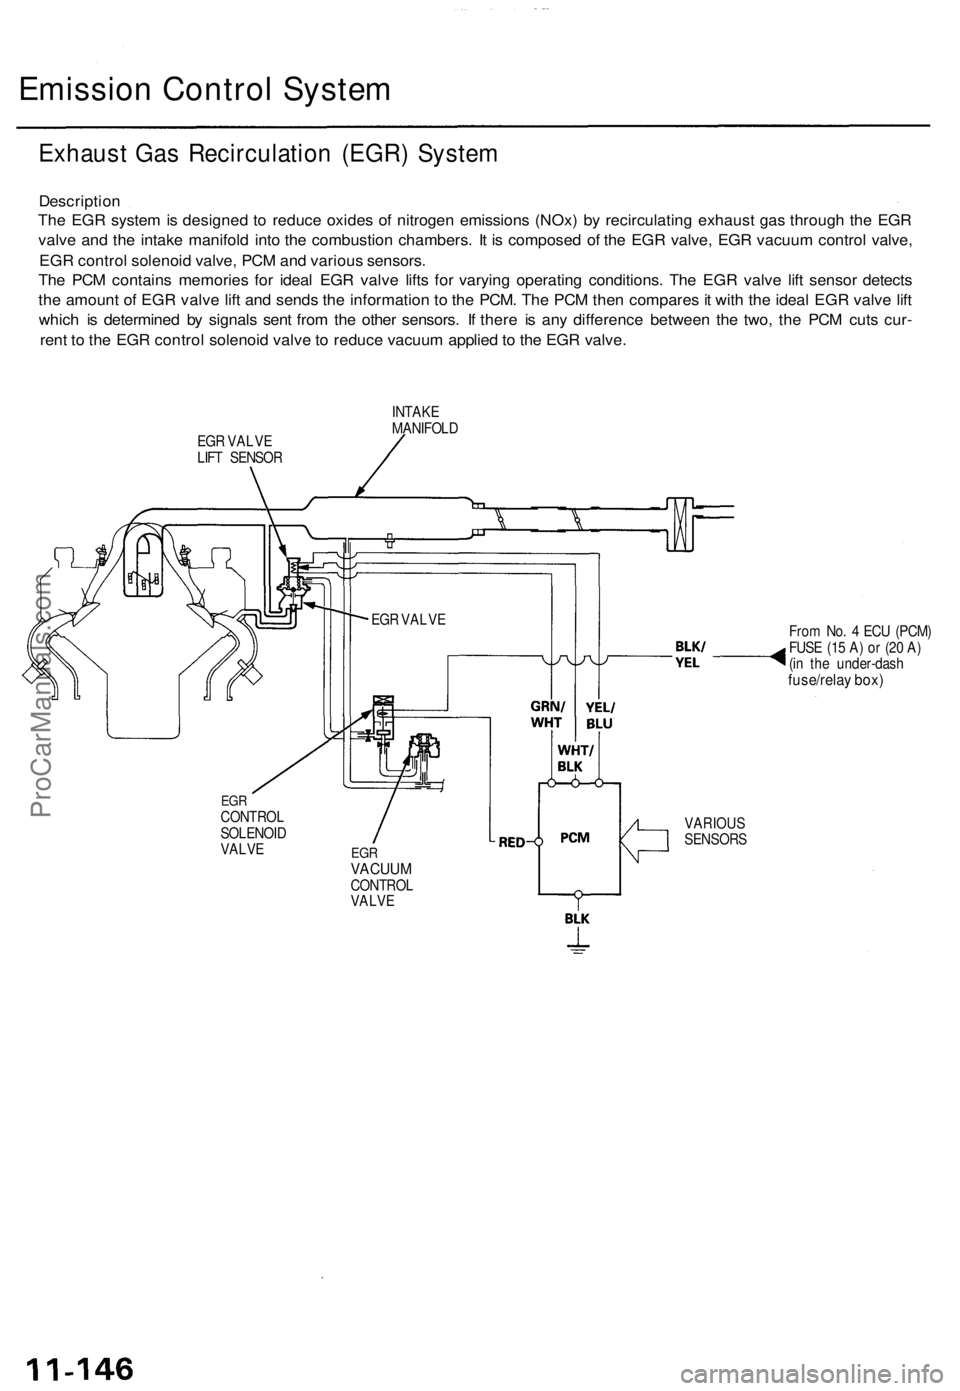
The EGR system is designed to reduce oxides of nitrogen emissions (NOx) by recirculating exhaust gas through the EGR
valve and the intake manifold into the combustion chambers. It is composed of the EGR valve, EGR vacuum control valve,
EGR control solenoid valve, PCM and various sensors.
The PCM contains memories for ideal EGR valve lifts for varying operating conditions. The EGR valve lift sensor detects
the amount of EGR valve lift and sends the information to the PCM. The PCM then compares it with the ideal EGR valve lift
which is determined by signals sent from the other sensors. If there is any difference between the two, the PCM cuts cur-
rent to the EGR control solenoid valve to reduce vacuum applied to the EGR valve.
EGR VALVE
LIFT SENSOR
INTAKE
MANIFOLD
From No. 4 ECU (PCM)
FUSE (15 A) or (20 A)
(in the under-dash
fuse/relay box)
EGR
CONTROL
SOLENOID
VALVE
EGR
VACUUM
CONTROL
VALVE
VARIOUS
SENSORS
EGR VALVEProCarManuals.com
Page 253 of 1771
Evaporative Emission (EVAP) Controls
Description
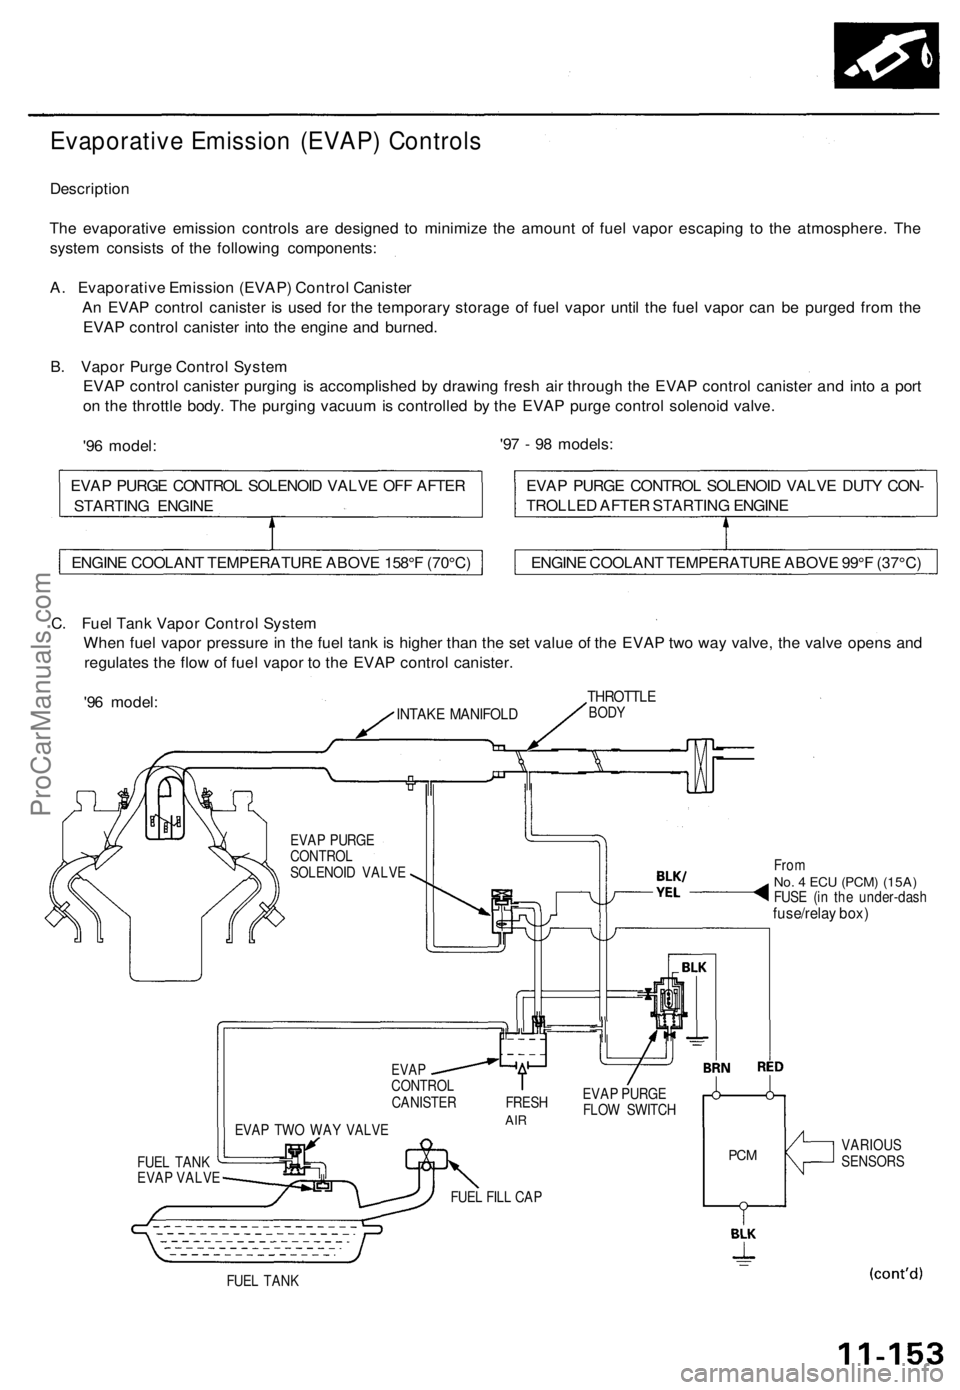
The evaporative emission controls are designed to minimize the amount of fuel vapor escaping to the atmosphere. The
system consists of the following components:
A. Evaporative Emission (EVAP) Control Canister
An EVAP control canister is used for the temporary storage of fuel vapor until the fuel vapor can be purged from the
EVAP control canister into the engine and burned.
B. Vapor Purge Control System
EVAP control canister purging is accomplished by drawing fresh air through the EVAP control canister and into a port
on the throttle body. The purging vacuum is controlled by the EVAP purge control solenoid valve.
'96 model:
'97 - 98 models:
C. Fuel Tank Vapor Control System
When fuel vapor pressure in the fuel tank is higher than the set value of the EVAP two way valve, the valve opens and
regulates the flow of fuel vapor to the EVAP control canister.
'96 model:
INTAKE MANIFOLD
THROTTLE
BODY
EVAP PURGE
CONTROL
SOLENOID VALVE
FUEL TANK
EVAP VALVE
EVAP TWO WAY VALVE
From
No. 4 ECU
(PCM) (15A)
FUSE (in the under-dash
fuse/relay box)
EVAP
CONTROL
CANISTER FRESH
AIR
EVAP PURGE
FLOW SWITCH
FUEL FILL CAP
PCM
VARIOUS
SENSORS
FUEL TANK
ENGINE COOLANT TEMPERATURE ABOVE 158°F (70°C)
ENGINE COOLANT TEMPERATURE ABOVE 99°F (37°C)
EVAP PURGE CONTROL SOLENOID VALVE DUTY CON-
TROLLED AFTER STARTING ENGINE
EVAP PURGE CONTROL SOLENOID VALVE OFF AFTER
STARTING ENGINEProCarManuals.com
Page 304 of 1771
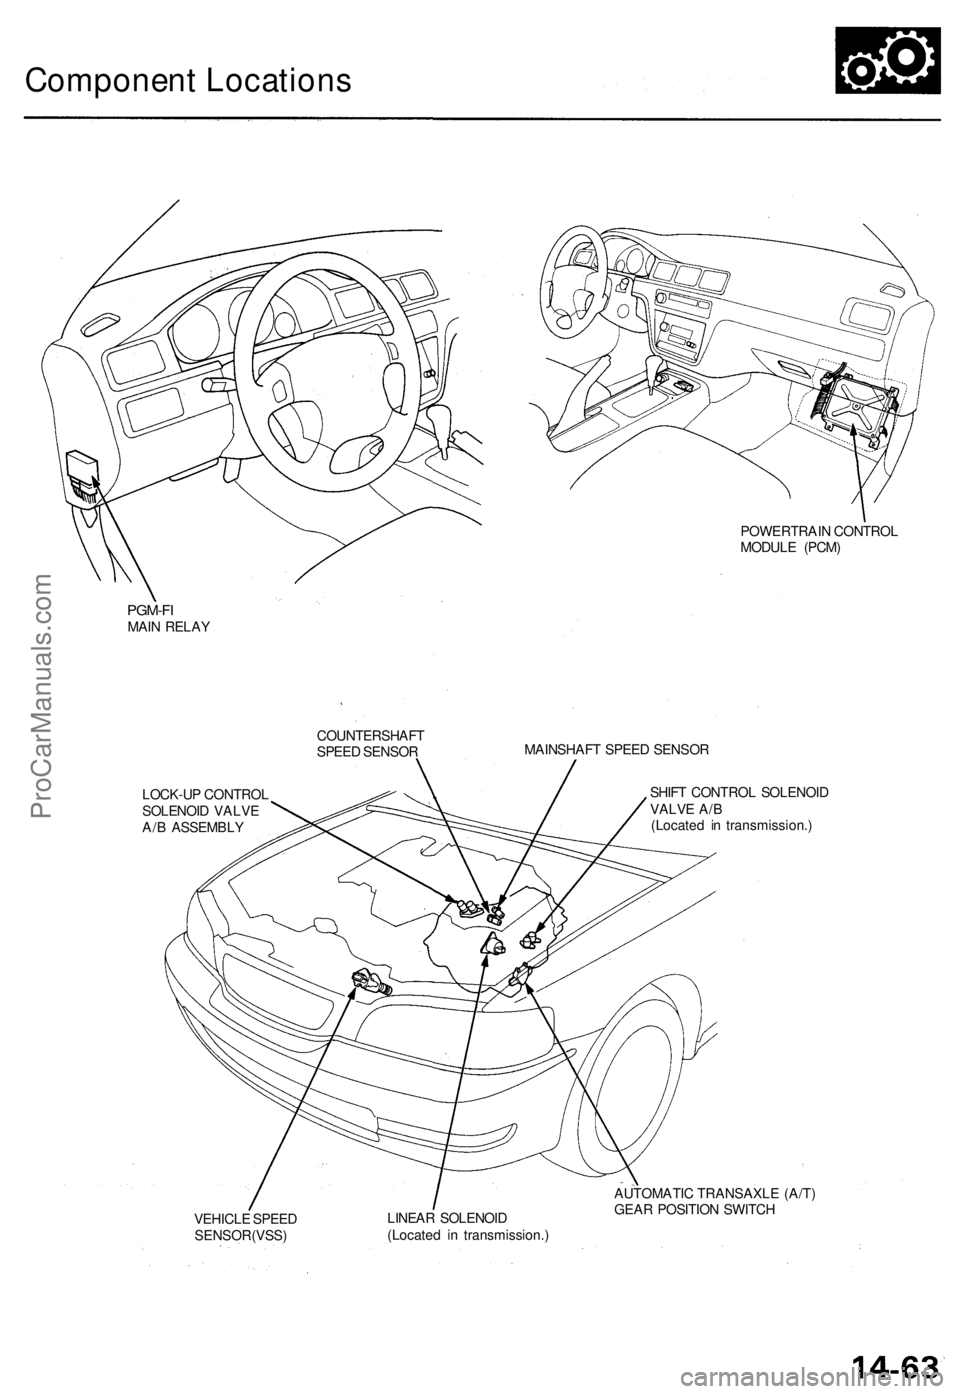
Component Locations
POWERTRAIN CONTROL
MODULE (PCM)
PGM-FI
MAIN RELAY
COUNTERSHAFT
SPEED SENSOR
MAINSHAFT SPEED SENSOR
LOCK-UP CONTROL
SOLENOID VALVE
A/B ASSEMBLY
SHIFT CONTROL SOLENOID
VALVE A/B
(Located in transmission.)
VEHICLE SPEED
SENSOR(VSS)
LINEAR SOLENOID
(Located in transmission.)
AUTOMATIC TRANSAXLE (A/T)
GEAR POSITION SWITCHProCarManuals.com
Page 308 of 1771
PCM Reset Procedure
1. Make sure you have the anti-theft code for the radio, then write down the frequencies for the radio's preset buttons.
2. Turn the ignition switch OFF.
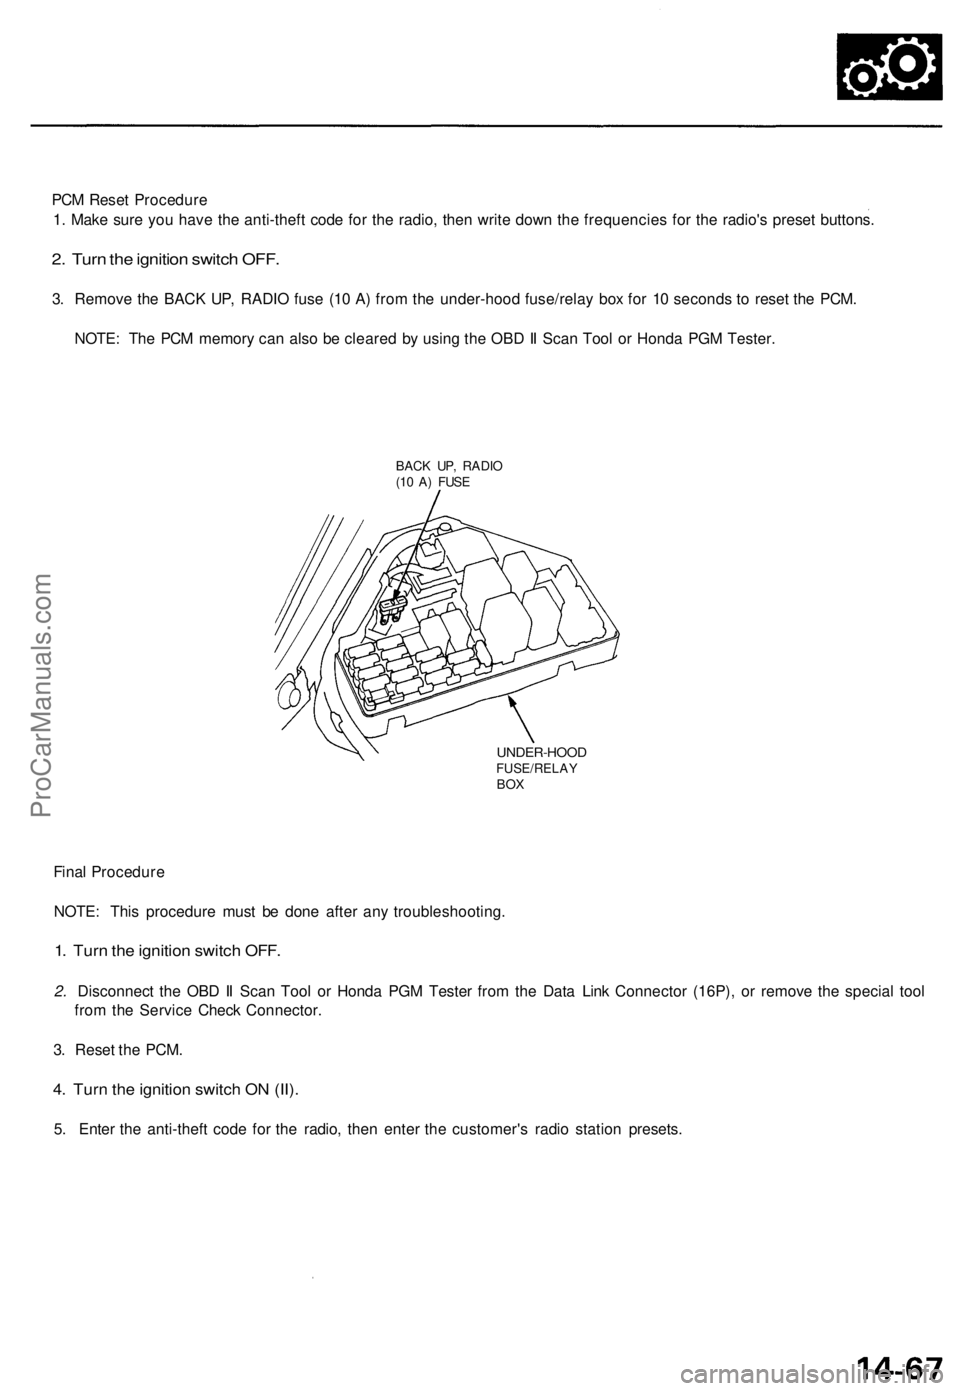
3. Remove the BACK UP, RADIO fuse (10 A) from the under-hood fuse/relay box for 10 seconds to reset the PCM.
NOTE: The PCM memory can also be cleared by using the OBD II Scan Tool or Honda PGM Tester.
BACK UP, RADIO
(10 A) FUSE
UNDER-HOOD
FUSE/RELAY
BOX
Final Procedure
NOTE: This procedure must be done after any troubleshooting.
1. Turn the ignition switch OFF.
2. Disconnect the OBD II Scan Tool or Honda PGM Tester from the Data Link Connector (16P), or remove the special tool
from the Service Check Connector.
3. Reset the PCM.
4. Turn the ignition switch ON (II).
5. Enter the anti-theft code for the radio, then enter the customer's radio station presets.ProCarManuals.com
Page 504 of 1771
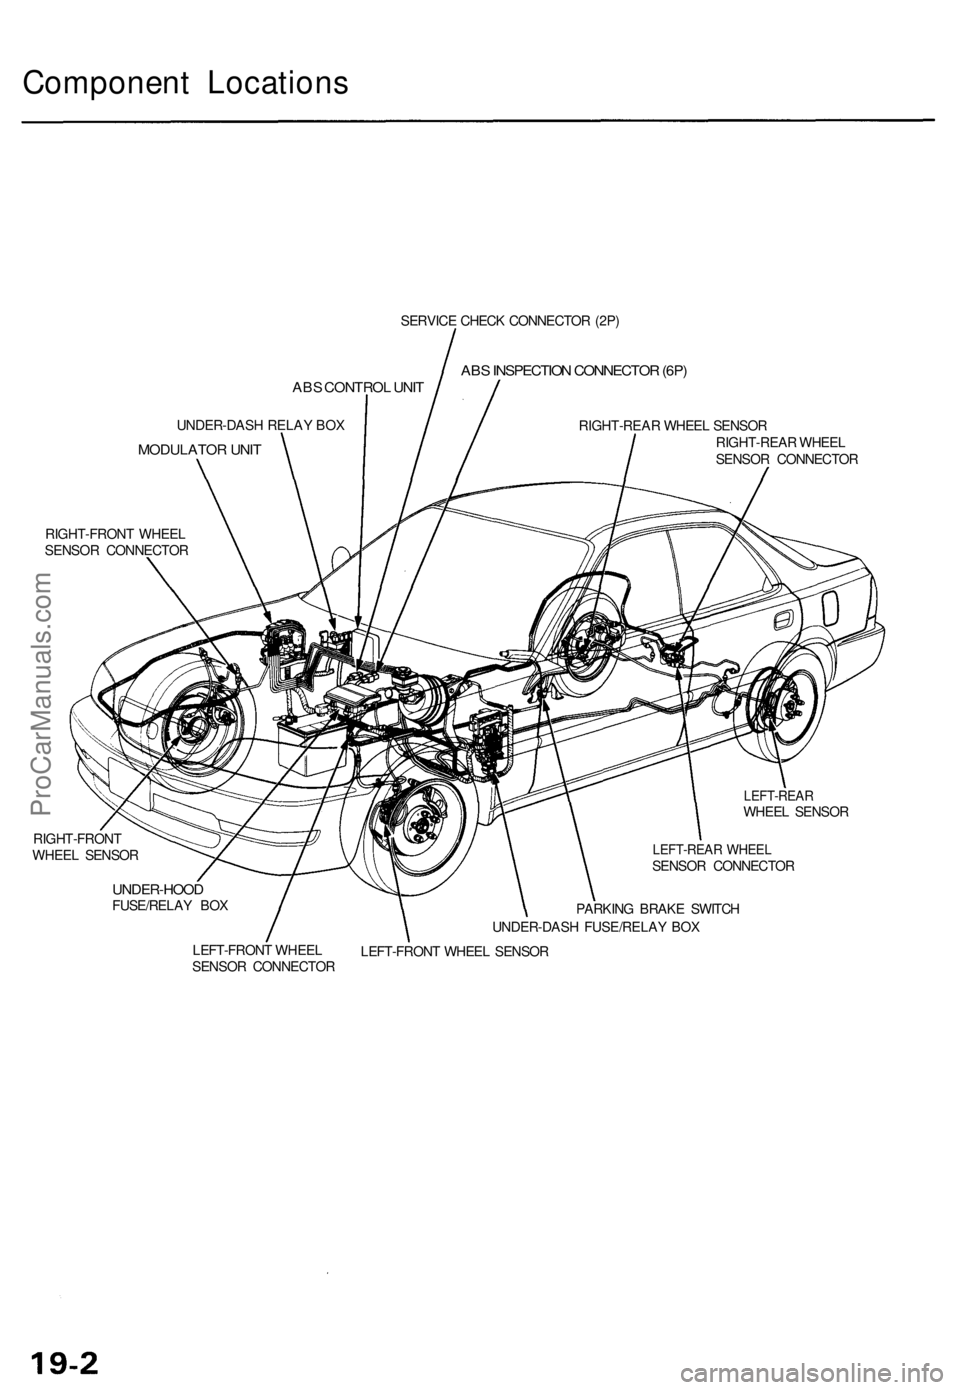
Component Location s
SERVICE CHEC K CONNECTO R (2P )
ABS INSPECTIO N CONNECTO R (6P )
UNDER-DAS H RELA Y BO X
MODULATO R UNI T
RIGHT-REA R WHEE L SENSO R
RIGHT-REA R WHEE L
SENSO R CONNECTO R
RIGHT-FRON T WHEE L
SENSO R CONNECTO R
LEFT-REARWHEEL SENSO R
RIGHT-FRON T
WHEE L SENSO R
LEFT-REA R WHEE LSENSO R CONNECTO R
UNDER-HOODFUSE/RELAY BO X
PARKING BRAK E SWITC H
UNDER-DAS H FUSE/RELA Y BO X
LEFT-FRON T WHEE L
SENSO R CONNECTO RLEFT-FRON
T WHEE L SENSO R
ABS CONTRO L UNI T
ProCarManuals.com
Page 505 of 1771
GAUGE ASSEMBL Y UNDER-HOO
D FUSE/RELA Y BO X
AB S INDICATO R LIGH T
ABS UNI T(7.5 A ) FUS ESTOP/HOR
N
(2 0 A ) FUS E
UNDER-DAS H FUSE/RELA Y BO X
BATTER Y(120 A ) FUS E
R/ C MIRROR /
REAR DEFROSTE RRELAY (7. 5 A ) FUS E
BACK-U P LIGHTS /
METE R LIGHT S
(1 0 A ) FUS E ECU/CRUIS
E CONTRO L
(1 5 A ) FUS E
UNDER-DAS H RELA Y BO X
REA R FAIL-SAF E RELA Y
FRONT FAIL-SAF E RELA Y
ABS PUM PMOTO R RELA Y
AB S B 1 (2 0 A ) FUS E
IG S W (5 0 A ) FUS E
AB
S B 2 (1 5 A ) FUS E AB
S MOTO R (4 0 A ) FUS E
ProCarManuals.com
Page 508 of 1771

Troubleshooting Precautions
ABS Indicator Light:
The ABS indicator light comes on for three seconds and then goes off when the control unit detects no problem during the
initial diagnosis right after the engine starts. However, the ABS indicator light can stay on for up to 40 seconds when the
control unit starts to check for pump overrun, etc. during the initial diagnosis. The ABS indicator light comes on, and the
ABS control unit memorizes the diagnostic trouble code (DTC) under certain conditions.
• The parking brake is applied for more than 30 seconds while the vehicle is being driven. (DTC 2-1)
• The transmission downshifted excessively. (DTC 4-1, 4-2)
• The vehicle loses traction, and the front wheels spin for more than one minute when starting from a stuck condition on
a muddy, snowy, or sandy road. (DTC 4-8)
• Tire adhesion is lost due to excessive cornering speed. (DTC 5, 5-4, 5-8)
• The vehicle is driven on an extremely rough road. (DTC 8-1)
• The vehicle is interfered by strong radio waves (noise), for example, illegal radio, etc. (DTC 8-2)
NOTE: If there is any trouble in the system, the ABS indicator light comes on during driving.
Diagnostic Trouble Code (DTC):
• When the control unit detects a problem and the ABS indicator light comes on, the control unit memorizes the DTC.
• The control unit has three memory registers. When a problem occurs, the control unit stores the DTC in the first memory
register. If another problem occurs, or the same problem occurs again, the control unit moves the first DTC to the next
memory register, and stores the second DTC in the first register. If there's a third problem occurrence, the two existing
DTCs are moved up one register, and the third DTC is stored in the first register. If problems continue to occur, the oldest
problem is moved out of the last register and lost, and the most recent problem is stored in the first register. When the
same problem occurs three times, the same DTC is stored in all memory registers. (Refer to the Symptom-to-System
Chart for diagnostic period.)
• The most recent DTC is indicated first, and the oldest DTC is indicated last.
• The DTCs are erased from the control unit when the ABS control unit +B2 power supply or connector is disconnected.
• The control unit's memory can be erased by disconnecting the ABS B2 fuse for more than three seconds.
Self-diagnosis:
• There are three self-diagnosises described below.
Initial diagnosis: Performed right after the engine starts until the ABS indicator light goes off.
Regular diagnosis: Continuously performed (under some conditions) after the ABS indicator light goes off until the
engine stops.
Individual part/system diagnosis: Diagnosis about a specific part/system under its operating conditions.
• The CPU (central processing unit) controls the following when it detects a problem during self-diagnosis:
Turns the ABS indicator light ON.
Turns the front and rear fail-safe relays off.
Stops the ABS control.
Stops the ABS pump. (The pump may work under some conditions.)
After the DTC is stored in the control unit, the CPU stops self-diagnosis.ProCarManuals.com