1994 JEEP CHEROKEE front
[x] Cancel search: frontPage 161 of 1784
CAUTION: Do not allow the master cylinder to run
out of fluid when bleeding the brakes. An empty
cylinder will allow additional air to be drawn into
the system. Check the cylinder fluid level frequently
and add fluid as needed.
(10) Bleed each wheel brake unit as follows:
(a) Open caliper or wheel cylinder bleed fitting
1/2 to 3/4 turn.
(b) Have helper press and hold brake pedal to
floor.Do not pump brake pedal while bleeding.
Air in system will be compressed into small
bubbles that are distributed throughout hy-
draulic system. This will make a second and
third bleeding operation necessary.
(c) Tighten bleed fitting and have helper release
brake pedal. Continue bleeding operation until
fluid entering bleed container is clear and free of
bubbles.
(d) Repeat bleeding operation at remaining
wheel brake units.
(e) Discard fluid bled into glass container. It
should not be reused.
(11) Check and adjust master cylinder fluid level.
(12) Verify proper brake operation before moving
vehicle.
PRESSURE BLEEDING
The front brake metering valve is located in the
forward end of the combination valve. The valve
stem is accessible from the same end of the valve.
The stem must be either pressed inward, or held out-
ward slightly in order to bleed the front brakes.
(1) Fill bleeder tank if necessary.
(2) Purge air from bleeder tank and lines before
proceeding.(3) Wipe master cylinder cover clean.
(4) Remove master cylinder cover and install pres-
sure hose adapter in place of cover. A suitable
adapter will usually be available from tank manufac-
turer.
(5) Connect bleeder tank pressure hose to adapter.
(6) Bleed master cylinder first. Then bleed rear
brakes as described in manual bleeding procedure.
(7) Bleed front brakes as described in manual
bleeding procedure. Have helper hold metering valve
open by pressing valve stem inward slightly. Amount
of valve stem movement needed to hold valve open is
quite modest. Do not use excessive force.
(8) Remove pressure bleeding equipment and top
off master cylinder reservoir.
BRAKE BLEEDINGÐXJ/YJ WITH ABS BRAKES
A different bleeding method is required for the
ABS system. It is basically a three step process
consisting of: A conventional manual brake
bleed. A second bleed using the DRB II, fol-
lowed by a repeat of the conventional manual
bleed procedure. Recommended ABS bleeding
procedure is as follows:
(1) Clean master cylinder reservoir caps and reser-
voir exterior. Dirt, foreign material on the caps and
reservoir must not be allowed to enter reservoir.
(2) Fill reservoir with Mopar brake fluid, or equiv-
alent quality fluid meeting SAE 1703 and DOT 3
standards.
(3) Recommended bleeding sequence is:
²master cylinder
²HCU valve body (at fluid lines)
²right rear wheel
²left rear wheel
²right front wheel
²left front wheel.
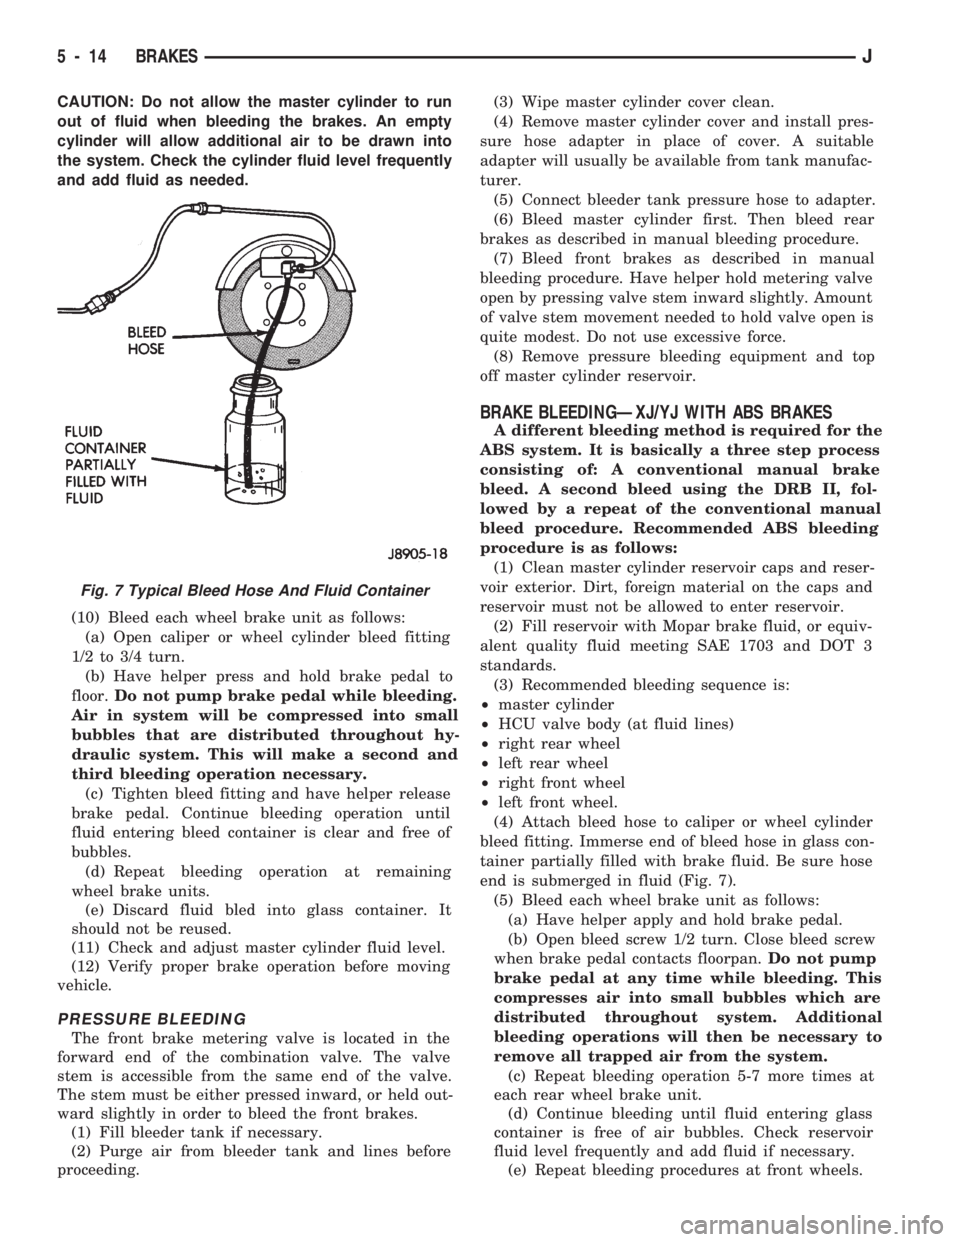
(4) Attach bleed hose to caliper or wheel cylinder
bleed fitting. Immerse end of bleed hose in glass con-
tainer partially filled with brake fluid. Be sure hose
end is submerged in fluid (Fig. 7).
(5) Bleed each wheel brake unit as follows:
(a) Have helper apply and hold brake pedal.
(b) Open bleed screw 1/2 turn. Close bleed screw
when brake pedal contacts floorpan.Do not pump
brake pedal at any time while bleeding. This
compresses air into small bubbles which are
distributed throughout system. Additional
bleeding operations will then be necessary to
remove all trapped air from the system.
(c) Repeat bleeding operation 5-7 more times at
each rear wheel brake unit.
(d) Continue bleeding until fluid entering glass
container is free of air bubbles. Check reservoir
fluid level frequently and add fluid if necessary.
(e) Repeat bleeding procedures at front wheels.
Fig. 7 Typical Bleed Hose And Fluid Container
5 - 14 BRAKESJ
Page 162 of 1784
CAUTION: Do not allow the master cylinder reser-
voir to run dry while bleeding the brakes. Running
dry will allow air to re-enter the system making a
second bleeding operation necessary.
(6) Perform ``Bleed Brake'' procedure with DRB II
scan tool. Procedure is described in DRB II software
information and diagnostic manual.
(a) Connect DRB II scan tool to diagnostic con-
nector.
(b) Run Bleed Brake procedure as described in
tester manual.
(7) Repeat conventional bleeding procedure out-
lined in steps (1) through (8).
(8) Top off master cylinder fluid level if necessary.
(9) Verify proper brake operation.
BRAKELINES AND HOSES
Metal brakelines and rubber brake hoses should be
inspected periodically and replaced if damaged.
Rubber brake hoses should be replaced if cut,
cracked, swollen, or leaking. Rubber hoses must be
replaced. They are not repairable parts.
When installing new, or original brakelines andhoses, lubricate the fitting threads with brake fluid
before connection.
The steel brakelines should be checked every time
the vehicle is in for normal maintainence. This is im-
portant on high mileage vehicles. It is even more im-
portant when a vehicle is operated in areas where
salt is used regularly on the road surface during win-
ter.
Heavily rusted/corroded brake rotors, drums, sup-
port plates, and brakelines should be cleaned and
carefully inspected. Heavy rust buildup can hide se-
vere damge to a component. Severely rusted parts
should be replaced if you are unsure about their con-
dition.
COMBINATION VALVE
The combination valve is not a serviceable part.
The valve must be replaced if a malfunction occurs.
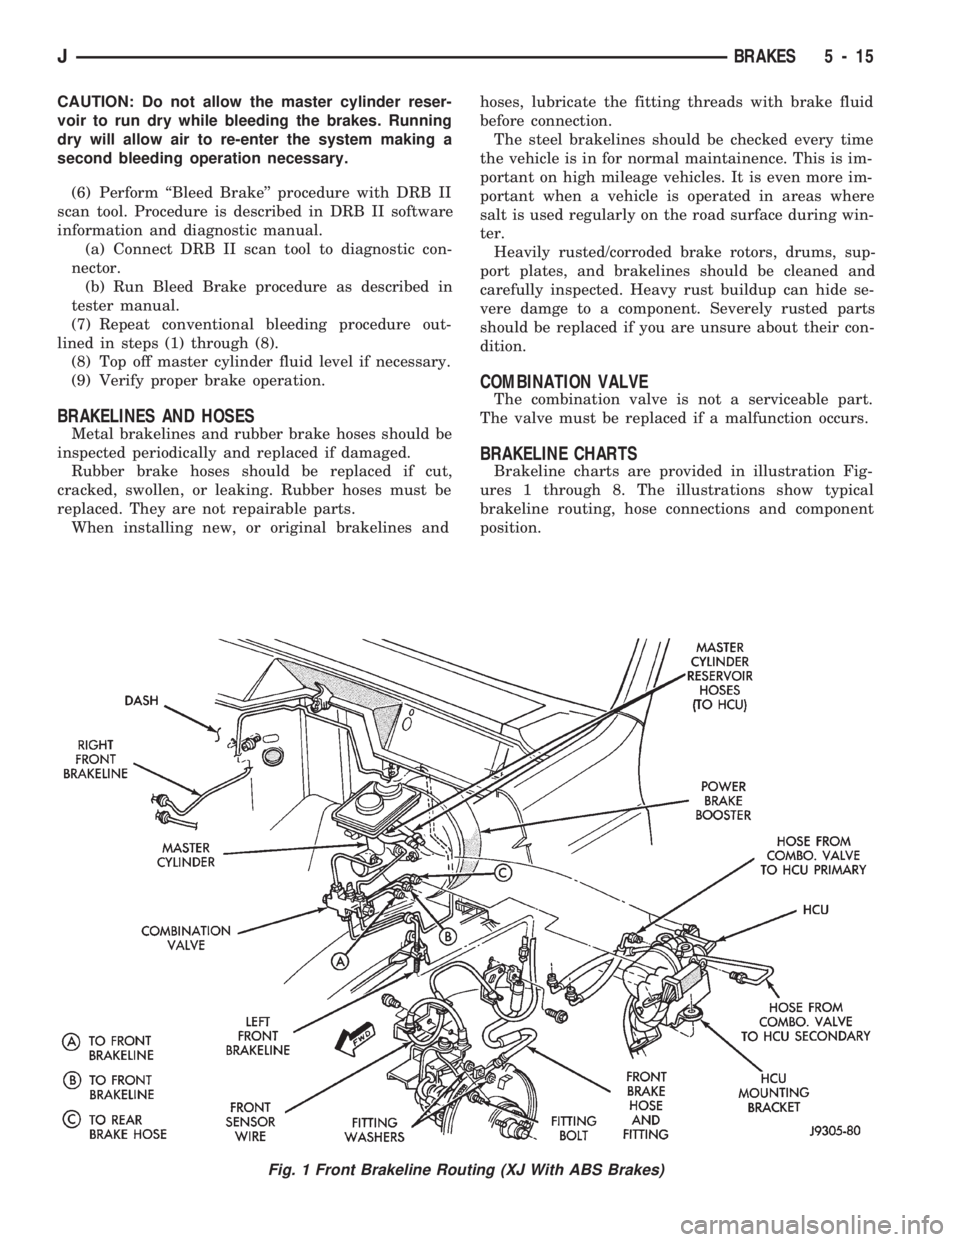
BRAKELINE CHARTS
Brakeline charts are provided in illustration Fig-
ures 1 through 8. The illustrations show typical
brakeline routing, hose connections and component
position.
Fig. 1 Front Brakeline Routing (XJ With ABS Brakes)
JBRAKES 5 - 15
Page 163 of 1784
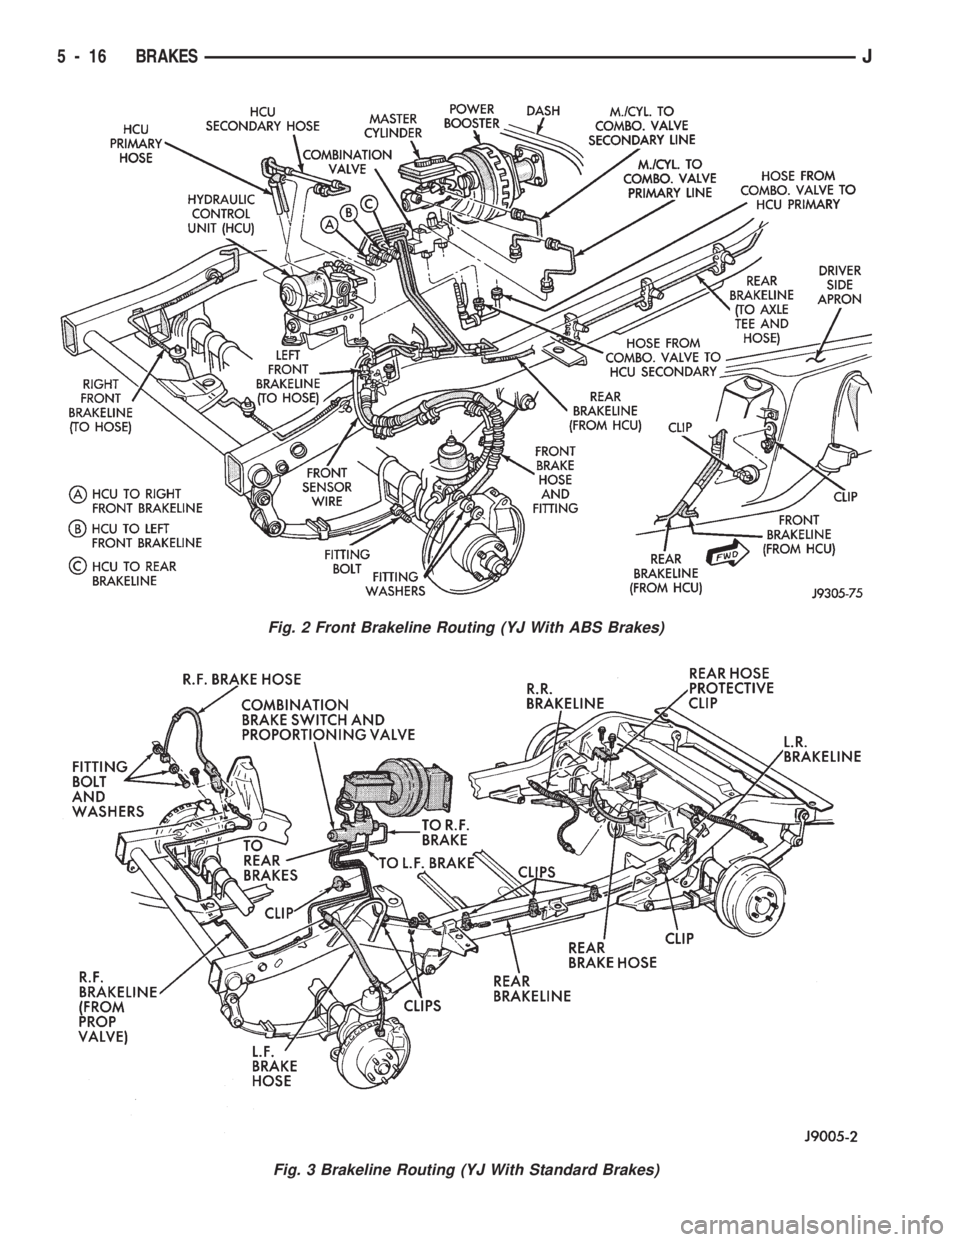
Fig. 2 Front Brakeline Routing (YJ With ABS Brakes)
Fig. 3 Brakeline Routing (YJ With Standard Brakes)
5 - 16 BRAKESJ
Page 165 of 1784
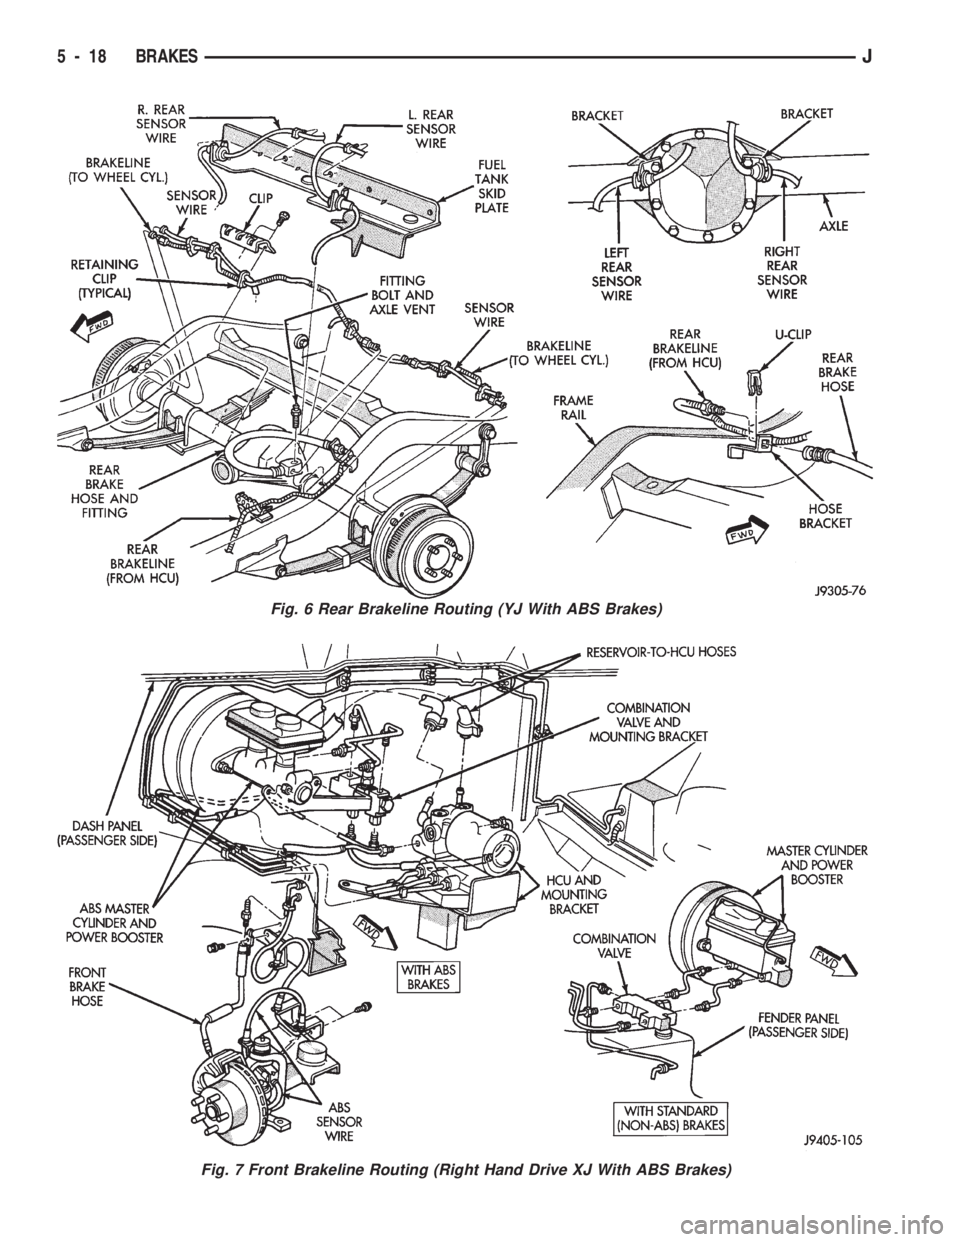
Fig. 6 Rear Brakeline Routing (YJ With ABS Brakes)
Fig. 7 Front Brakeline Routing (Right Hand Drive XJ With ABS Brakes)
5 - 18 BRAKESJ
Page 166 of 1784
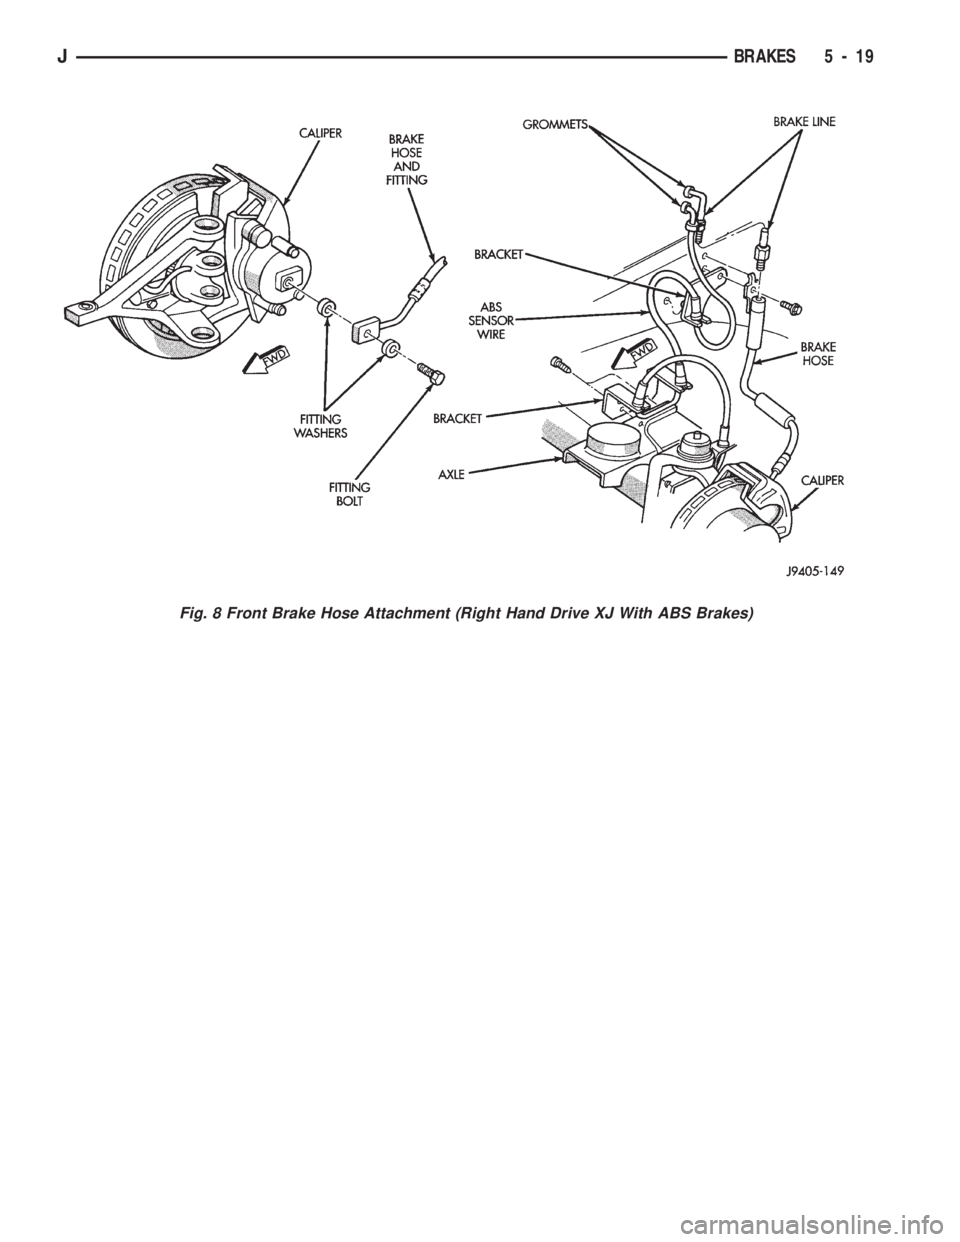
Fig. 8 Front Brake Hose Attachment (Right Hand Drive XJ With ABS Brakes)
JBRAKES 5 - 19
Page 169 of 1784
POWER BRAKE BOOSTER
INDEX
page page
Power Brake Booster Installation............. 23
Power Brake Booster Operation............. 22Power Brake Booster Removal.............. 22
Service Information....................... 22
SERVICE INFORMATION
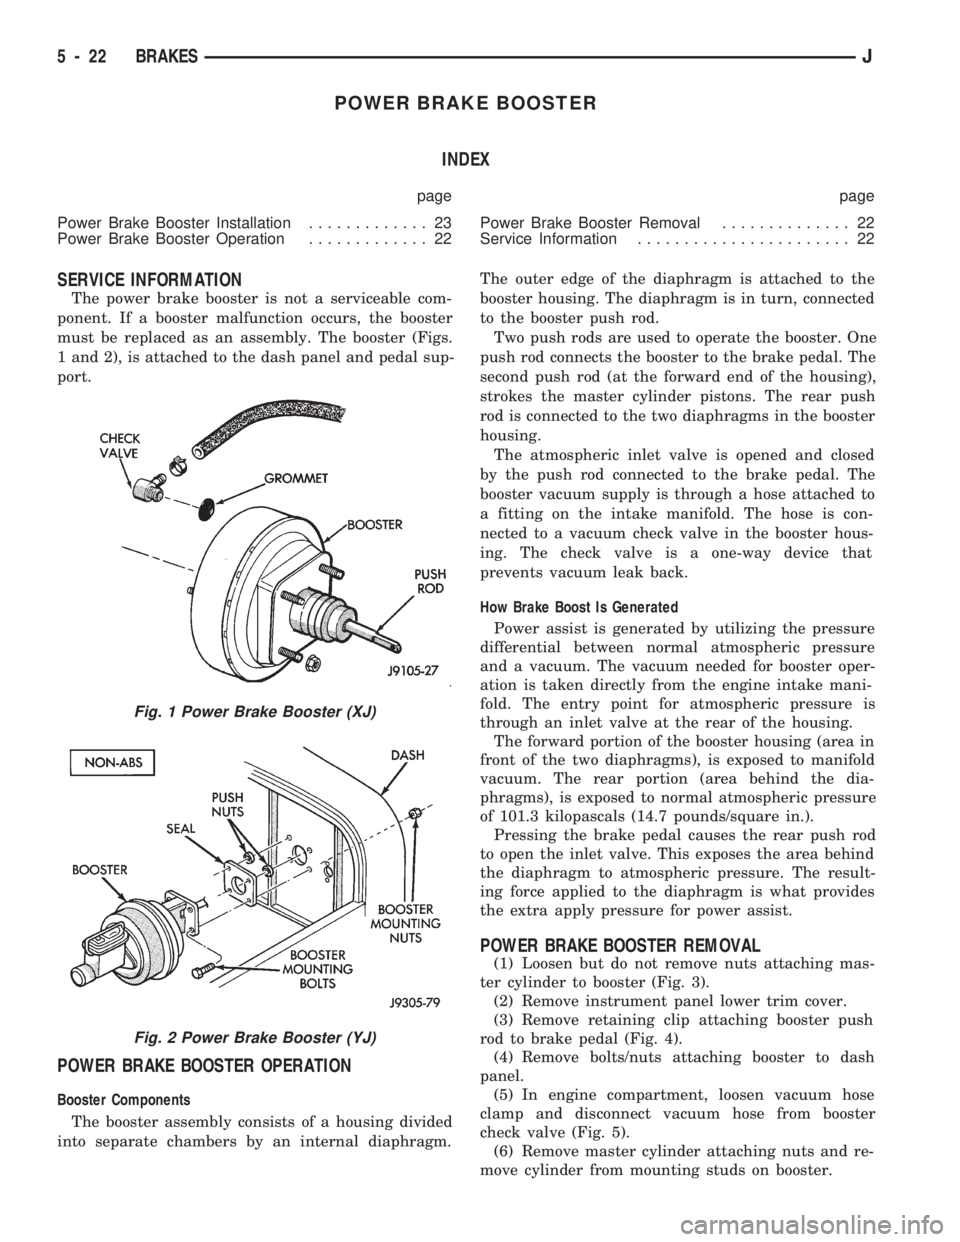
The power brake booster is not a serviceable com-
ponent. If a booster malfunction occurs, the booster
must be replaced as an assembly. The booster (Figs.
1 and 2), is attached to the dash panel and pedal sup-
port.
POWER BRAKE BOOSTER OPERATION
Booster Components
The booster assembly consists of a housing divided
into separate chambers by an internal diaphragm.The outer edge of the diaphragm is attached to the
booster housing. The diaphragm is in turn, connected
to the booster push rod.
Two push rods are used to operate the booster. One
push rod connects the booster to the brake pedal. The
second push rod (at the forward end of the housing),
strokes the master cylinder pistons. The rear push
rod is connected to the two diaphragms in the booster
housing.
The atmospheric inlet valve is opened and closed
by the push rod connected to the brake pedal. The
booster vacuum supply is through a hose attached to
a fitting on the intake manifold. The hose is con-
nected to a vacuum check valve in the booster hous-
ing. The check valve is a one-way device that
prevents vacuum leak back.
How Brake Boost Is Generated
Power assist is generated by utilizing the pressure
differential between normal atmospheric pressure
and a vacuum. The vacuum needed for booster oper-
ation is taken directly from the engine intake mani-
fold. The entry point for atmospheric pressure is
through an inlet valve at the rear of the housing.
The forward portion of the booster housing (area in
front of the two diaphragms), is exposed to manifold
vacuum. The rear portion (area behind the dia-
phragms), is exposed to normal atmospheric pressure
of 101.3 kilopascals (14.7 pounds/square in.).
Pressing the brake pedal causes the rear push rod
to open the inlet valve. This exposes the area behind
the diaphragm to atmospheric pressure. The result-
ing force applied to the diaphragm is what provides
the extra apply pressure for power assist.
POWER BRAKE BOOSTER REMOVAL
(1) Loosen but do not remove nuts attaching mas-
ter cylinder to booster (Fig. 3).
(2) Remove instrument panel lower trim cover.
(3) Remove retaining clip attaching booster push
rod to brake pedal (Fig. 4).
(4) Remove bolts/nuts attaching booster to dash
panel.
(5) In engine compartment, loosen vacuum hose
clamp and disconnect vacuum hose from booster
check valve (Fig. 5).
(6) Remove master cylinder attaching nuts and re-
move cylinder from mounting studs on booster.
Fig. 1 Power Brake Booster (XJ)
Fig. 2 Power Brake Booster (YJ)
5 - 22 BRAKESJ
Page 172 of 1784
enough to maintain contact between the piston and
inboard brakeshoe. Brakelining running clearance at
the rotor, will be held between zero and a maximum
of 0.12 mm (0.005 in.).
DISC BRAKESHOE REMOVAL
(1) Raise vehicle and remove front wheels.
(2) Drain small amount of fluid from master cylin-
der front brake reservoir with suction gun.
(3) Bottom caliper piston in bore with C-clamp. Po-
sition clamp screw on outboard brakeshoe and clamp
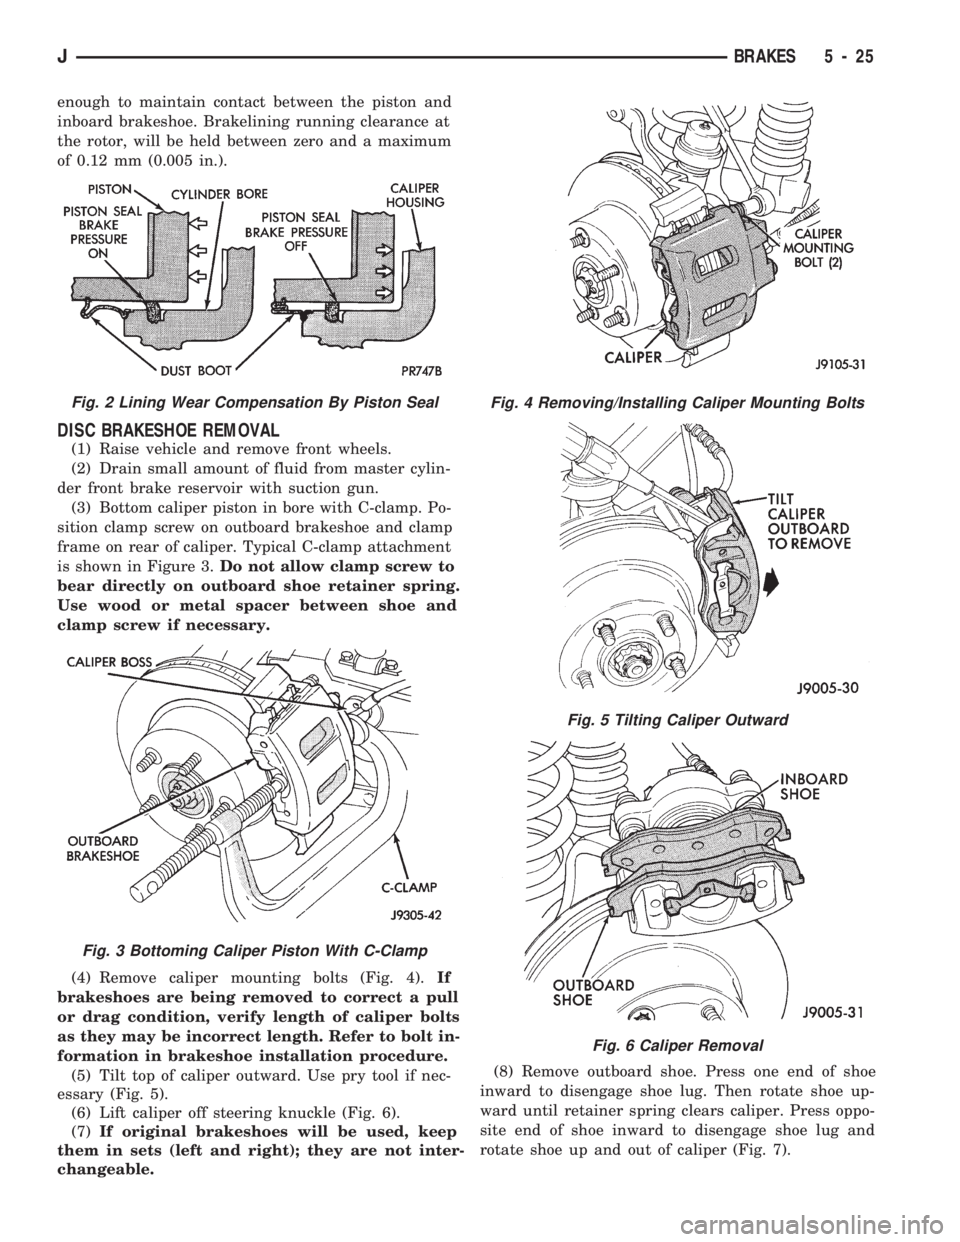
frame on rear of caliper. Typical C-clamp attachment
is shown in Figure 3.Do not allow clamp screw to
bear directly on outboard shoe retainer spring.
Use wood or metal spacer between shoe and
clamp screw if necessary.
(4) Remove caliper mounting bolts (Fig. 4).If
brakeshoes are being removed to correct a pull
or drag condition, verify length of caliper bolts
as they may be incorrect length. Refer to bolt in-
formation in brakeshoe installation procedure.
(5) Tilt top of caliper outward. Use pry tool if nec-
essary (Fig. 5).
(6) Lift caliper off steering knuckle (Fig. 6).
(7)If original brakeshoes will be used, keep
them in sets (left and right); they are not inter-
changeable.(8) Remove outboard shoe. Press one end of shoe
inward to disengage shoe lug. Then rotate shoe up-
ward until retainer spring clears caliper. Press oppo-
site end of shoe inward to disengage shoe lug and
rotate shoe up and out of caliper (Fig. 7).
Fig. 2 Lining Wear Compensation By Piston Seal
Fig. 3 Bottoming Caliper Piston With C-Clamp
Fig. 4 Removing/Installing Caliper Mounting Bolts
Fig. 5 Tilting Caliper Outward
Fig. 6 Caliper Removal
JBRAKES 5 - 25
Page 174 of 1784

(8) Install and tighten caliper mounting bolts to
10-20 Nzm (7-15 ft. lbs.) torque.
CAUTION: If new caliper bolts are being installed,
or if the original reason for repair was a drag/pull
condition, check caliper bolt length before proceed-
ing. If the bolts have a shank length greater than
67.6 mm (2.66 in.), they will contact the inboard
brakeshoe causing a partial apply condition. Refer
to Figure 14 for required caliper bolt length.
(9) Install wheels. Tighten lug nuts to 102 Nzm (75
ft. lbs.) torque.
(10) Pump brake pedal until caliper pistons and
brakeshoes are seated.
(11) Top off brake fluid level if necessary. Use Mo-
par brake fluid or equivalent meeting SAE J1703
and DOT 3 standards only.
CALIPER REMOVAL
(1) Raise vehicle and remove front wheels.
(2) Remove caliper mounting bolts (Fig. 4).(3) Rotate caliper rearward by hand or with pry
tool (Fig. 5). Then rotate caliper and brakeshoes off
mounting ledges.
(4) Remove caliper hose fitting bolt and disconnect
front brake hose at caliper. Discard fitting bolt wash-
ers. They are not reusable and should be replaced.
(5) Remove caliper from vehicle.
CALIPER DISASSEMBLY
(1) Remove brakeshoes from caliper.
(2) Pad interior of caliper with minimum, 2.54 cm
(1 in.) thickness of shop towels or rags (Fig. 15). Tow-
els are needed to protect caliper piston during re-
moval.
(3) Remove caliper piston withshort burstsof low
pressure compressed air. Direct air through fluid in-
let port and ease piston out of bore (Fig. 16).
Fig. 11 Installing Inboard Brakeshoe
Fig. 12 Installing Outboard Brakeshoe
Fig. 13 Caliper Installation
Fig. 14 Caliper Mounting Bolt Dimensions
JBRAKES 5 - 27