Page 68 of 1784
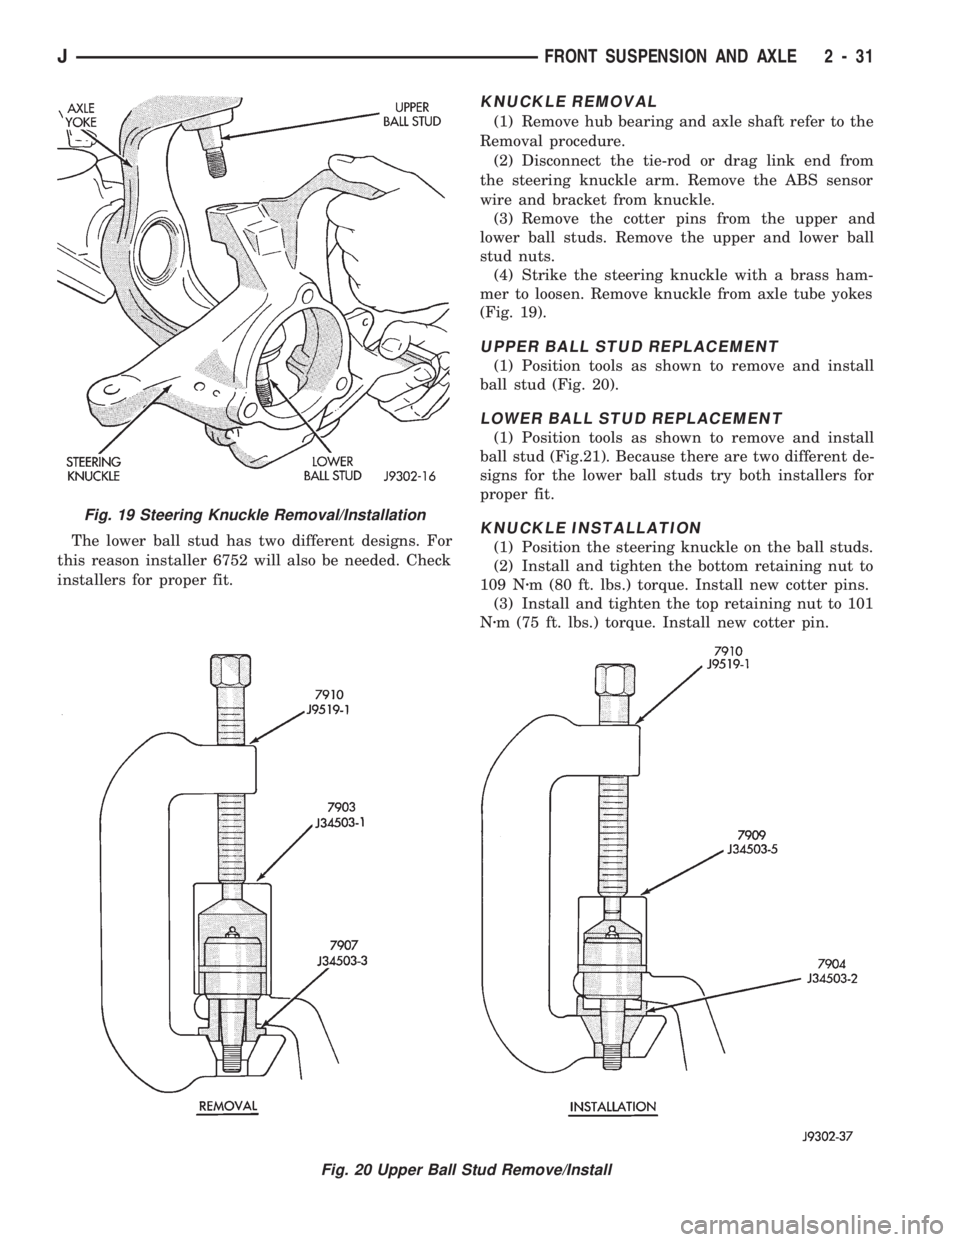
The lower ball stud has two different designs. For
this reason installer 6752 will also be needed. Check
installers for proper fit.
KNUCKLE REMOVAL
(1) Remove hub bearing and axle shaft refer to the
Removal procedure.
(2) Disconnect the tie-rod or drag link end from
the steering knuckle arm. Remove the ABS sensor
wire and bracket from knuckle.
(3) Remove the cotter pins from the upper and
lower ball studs. Remove the upper and lower ball
stud nuts.
(4) Strike the steering knuckle with a brass ham-
mer to loosen. Remove knuckle from axle tube yokes
(Fig. 19).
UPPER BALL STUD REPLACEMENT
(1) Position tools as shown to remove and install
ball stud (Fig. 20).
LOWER BALL STUD REPLACEMENT
(1) Position tools as shown to remove and install
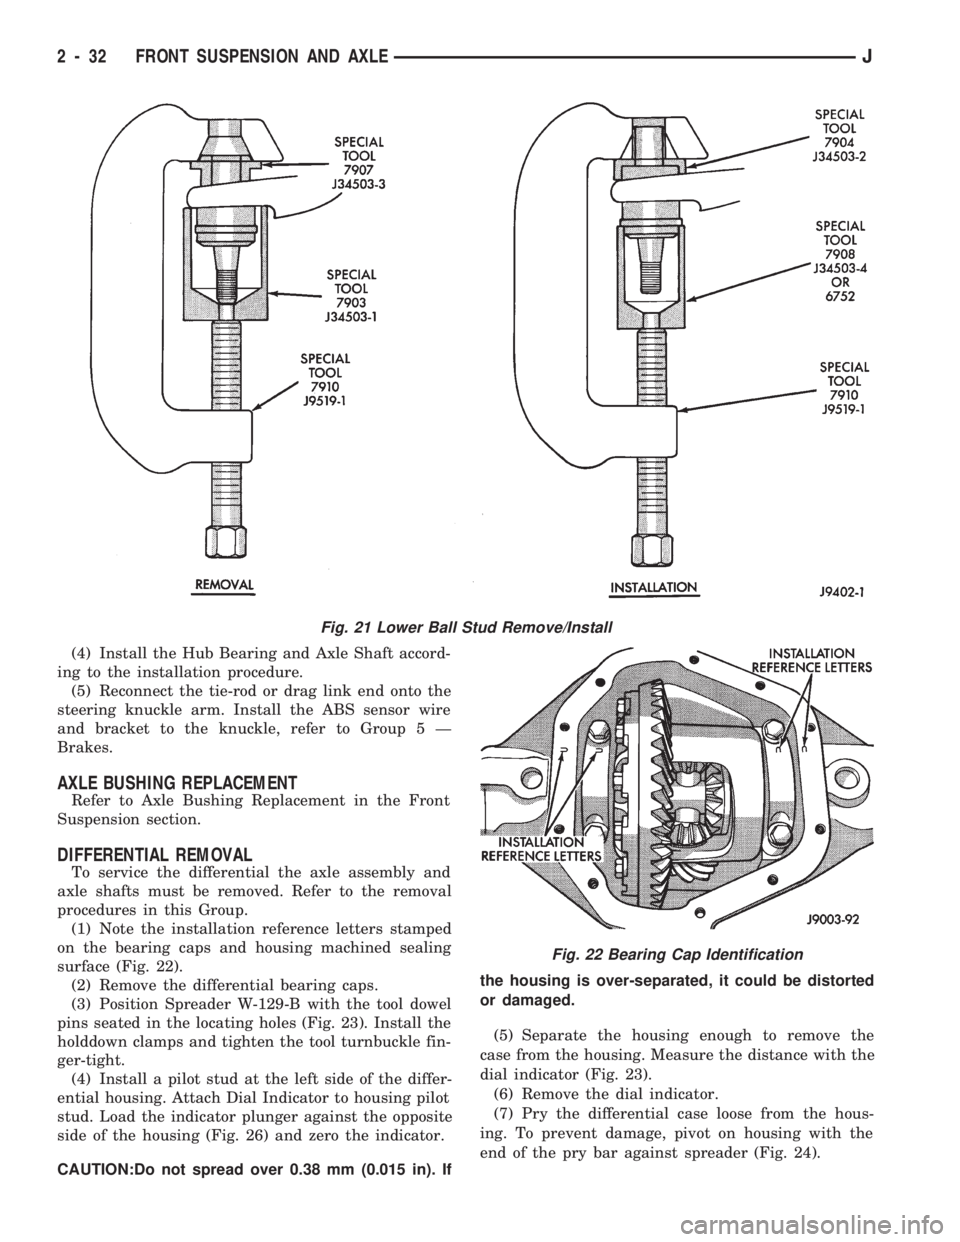
ball stud (Fig.21). Because there are two different de-
signs for the lower ball studs try both installers for
proper fit.
KNUCKLE INSTALLATION
(1) Position the steering knuckle on the ball studs.
(2) Install and tighten the bottom retaining nut to
109 Nzm (80 ft. lbs.) torque. Install new cotter pins.
(3) Install and tighten the top retaining nut to 101
Nzm (75 ft. lbs.) torque. Install new cotter pin.
Fig. 19 Steering Knuckle Removal/Installation
Fig. 20 Upper Ball Stud Remove/Install
JFRONT SUSPENSION AND AXLE 2 - 31
Page 69 of 1784
(4) Install the Hub Bearing and Axle Shaft accord-
ing to the installation procedure.
(5) Reconnect the tie-rod or drag link end onto the
steering knuckle arm. Install the ABS sensor wire
and bracket to the knuckle, refer to Group 5 Ð
Brakes.
AXLE BUSHING REPLACEMENT
Refer to Axle Bushing Replacement in the Front
Suspension section.
DIFFERENTIAL REMOVAL
To service the differential the axle assembly and
axle shafts must be removed. Refer to the removal
procedures in this Group.
(1) Note the installation reference letters stamped
on the bearing caps and housing machined sealing
surface (Fig. 22).
(2) Remove the differential bearing caps.
(3) Position Spreader W-129-B with the tool dowel
pins seated in the locating holes (Fig. 23). Install the
holddown clamps and tighten the tool turnbuckle fin-
ger-tight.
(4) Install a pilot stud at the left side of the differ-
ential housing. Attach Dial Indicator to housing pilot
stud. Load the indicator plunger against the opposite
side of the housing (Fig. 26) and zero the indicator.
CAUTION:Do not spread over 0.38 mm (0.015 in). Ifthe housing is over-separated, it could be distorted
or damaged.
(5) Separate the housing enough to remove the
case from the housing. Measure the distance with the
dial indicator (Fig. 23).
(6) Remove the dial indicator.
(7) Pry the differential case loose from the hous-
ing. To prevent damage, pivot on housing with the
end of the pry bar against spreader (Fig. 24).
Fig. 21 Lower Ball Stud Remove/Install
Fig. 22 Bearing Cap Identification
2 - 32 FRONT SUSPENSION AND AXLEJ
Page 70 of 1784
(8) Remove the case from housing. Mark or tag
bearing cups indicating which side they were re-
moved. Remove spreader from housing.
INNER AXLE SHAFT OIL SEAL REPLACEMENT
SELECT-TRAC
(1) Remove the inner axle shaft seals with a pry
bay.
(2) Install oil seals with Discs 6764 and Turn-
buckle D-112-A (Fig. 25). Tighten tool until disc bot-
toms in housing.
COMMAND-TRACÐ LEFT-SIDE
(1) Remove the inner axle shaft seal with a pry
bay.(2) Install the inner axle seal on Tool 6228-1 (Fig.
26).
(3) Thread thereverseside of Installer 6228-1
tightly onto the threaded rod tool (Fig. 26).
(4) Press the seal into position.
Fig. 23 Spread Differential Housing
Fig. 24 Differential Removal
Fig. 25 Axle Seal Installation
Fig. 26 Left Side Seal Installation
JFRONT SUSPENSION AND AXLE 2 - 33
Page 71 of 1784
DIFFERENTIAL DISASSEMBLY
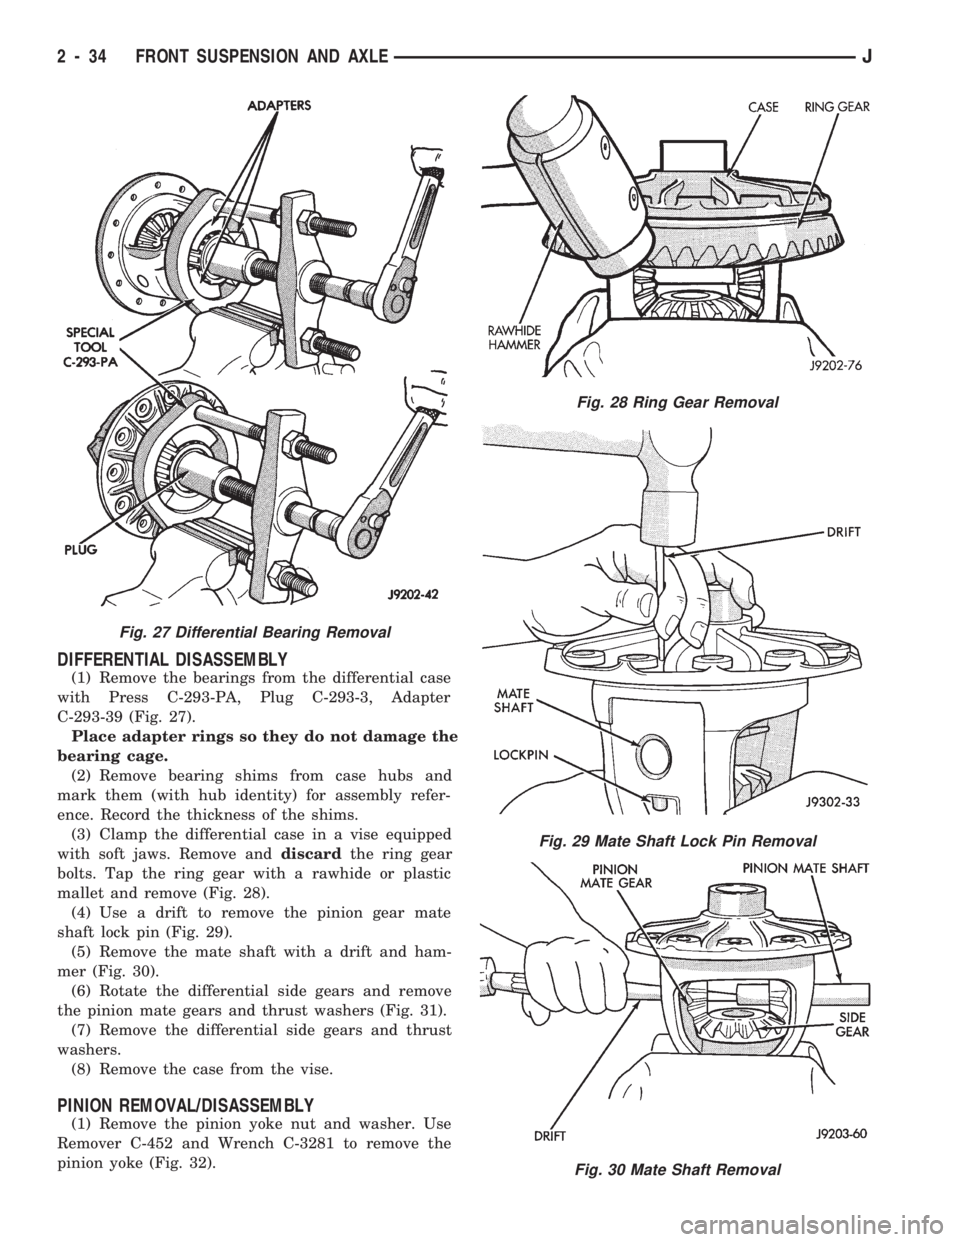
(1) Remove the bearings from the differential case
with Press C-293-PA, Plug C-293-3, Adapter
C-293-39 (Fig. 27).
Place adapter rings so they do not damage the
bearing cage.
(2) Remove bearing shims from case hubs and
mark them (with hub identity) for assembly refer-
ence. Record the thickness of the shims.
(3) Clamp the differential case in a vise equipped
with soft jaws. Remove anddiscardthe ring gear
bolts. Tap the ring gear with a rawhide or plastic
mallet and remove (Fig. 28).
(4) Use a drift to remove the pinion gear mate
shaft lock pin (Fig. 29).
(5) Remove the mate shaft with a drift and ham-
mer (Fig. 30).
(6) Rotate the differential side gears and remove
the pinion mate gears and thrust washers (Fig. 31).
(7) Remove the differential side gears and thrust
washers.
(8) Remove the case from the vise.
PINION REMOVAL/DISASSEMBLY
(1) Remove the pinion yoke nut and washer. Use
Remover C-452 and Wrench C-3281 to remove the
pinion yoke (Fig. 32).
Fig. 27 Differential Bearing Removal
Fig. 28 Ring Gear Removal
Fig. 29 Mate Shaft Lock Pin Removal
Fig. 30 Mate Shaft Removal
2 - 34 FRONT SUSPENSION AND AXLEJ
Page 72 of 1784
(2) Remove the pinion gear seal with a slide ham-
mer or pry out with bar.
(3) Drive out pinion gear from housing with raw-
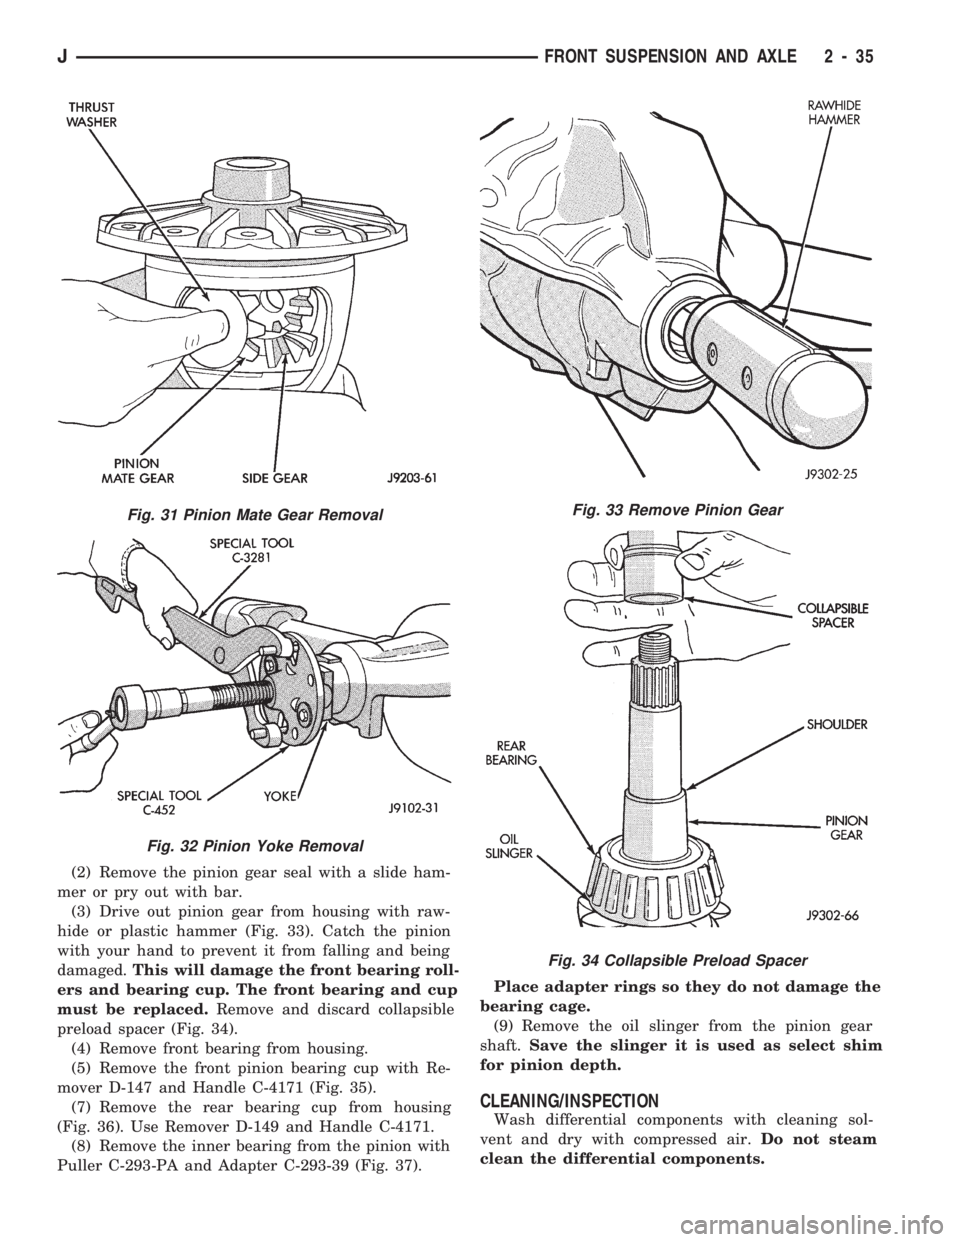
hide or plastic hammer (Fig. 33). Catch the pinion
with your hand to prevent it from falling and being
damaged.This will damage the front bearing roll-
ers and bearing cup. The front bearing and cup
must be replaced.Remove and discard collapsible
preload spacer (Fig. 34).
(4) Remove front bearing from housing.
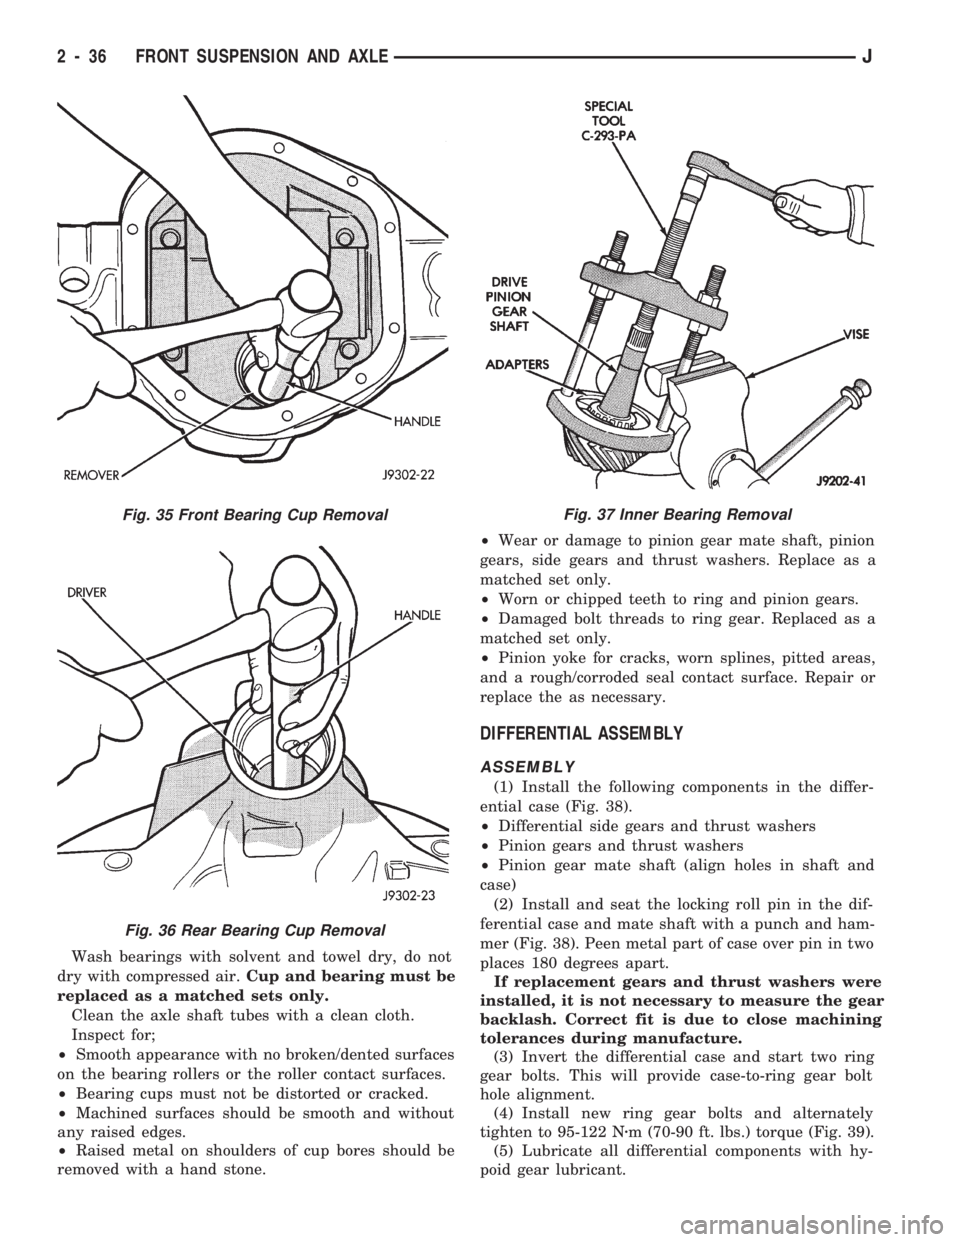
(5) Remove the front pinion bearing cup with Re-
mover D-147 and Handle C-4171 (Fig. 35).
(7) Remove the rear bearing cup from housing
(Fig. 36). Use Remover D-149 and Handle C-4171.
(8) Remove the inner bearing from the pinion with
Puller C-293-PA and Adapter C-293-39 (Fig. 37).Place adapter rings so they do not damage the
bearing cage.
(9) Remove the oil slinger from the pinion gear
shaft.Save the slinger it is used as select shim
for pinion depth.
CLEANING/INSPECTION
Wash differential components with cleaning sol-
vent and dry with compressed air.Do not steam
clean the differential components.
Fig. 31 Pinion Mate Gear Removal
Fig. 32 Pinion Yoke Removal
Fig. 33 Remove Pinion Gear
Fig. 34 Collapsible Preload Spacer
JFRONT SUSPENSION AND AXLE 2 - 35
Page 73 of 1784
Wash bearings with solvent and towel dry, do not
dry with compressed air.Cup and bearing must be
replaced as a matched sets only.
Clean the axle shaft tubes with a clean cloth.
Inspect for;
²Smooth appearance with no broken/dented surfaces
on the bearing rollers or the roller contact surfaces.
²Bearing cups must not be distorted or cracked.
²Machined surfaces should be smooth and without
any raised edges.
²Raised metal on shoulders of cup bores should be
removed with a hand stone.²Wear or damage to pinion gear mate shaft, pinion
gears, side gears and thrust washers. Replace as a
matched set only.
²Worn or chipped teeth to ring and pinion gears.
²Damaged bolt threads to ring gear. Replaced as a
matched set only.
²Pinion yoke for cracks, worn splines, pitted areas,
and a rough/corroded seal contact surface. Repair or
replace the as necessary.
DIFFERENTIAL ASSEMBLY
ASSEMBLY
(1) Install the following components in the differ-
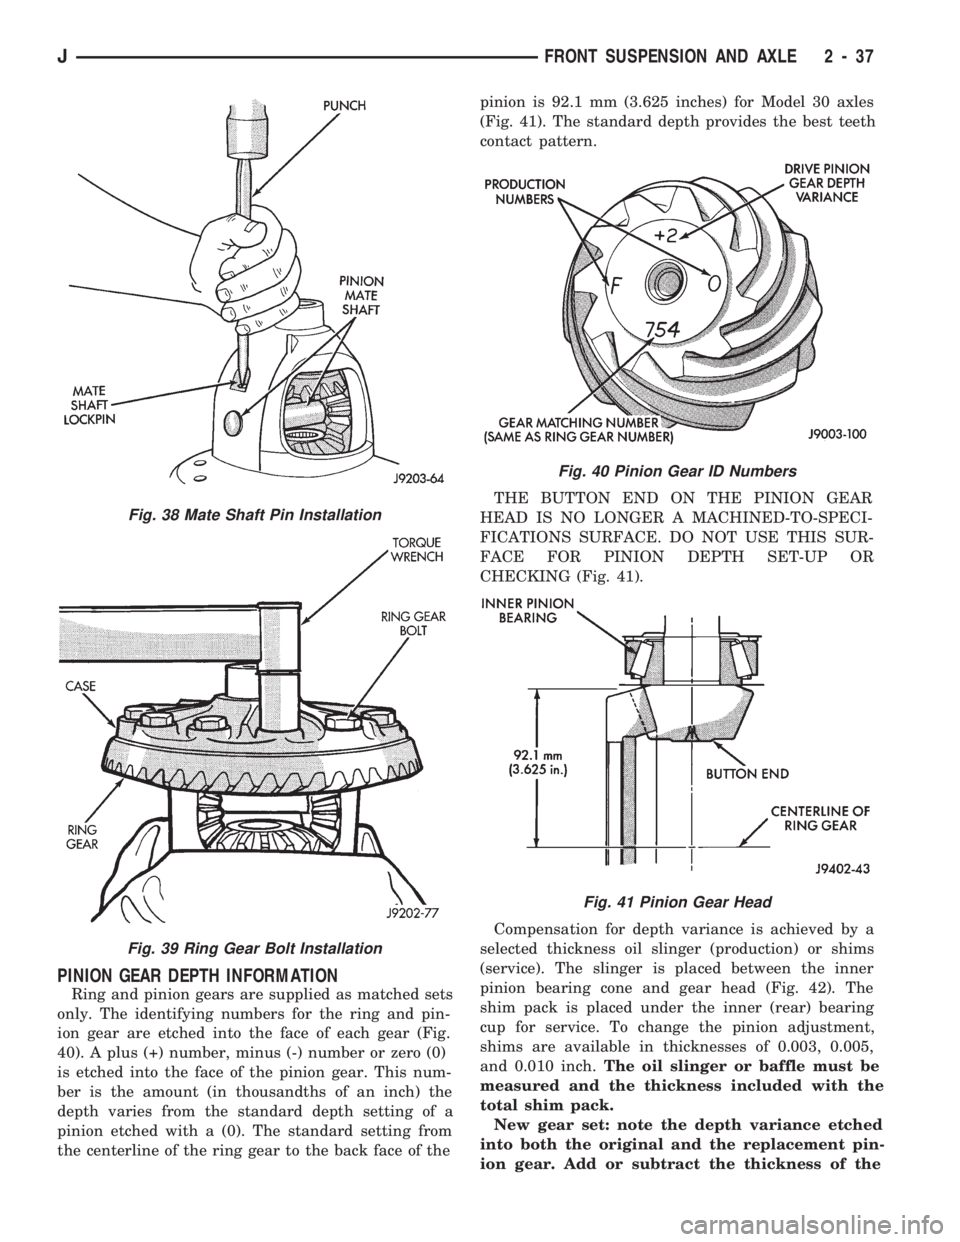
ential case (Fig. 38).
²Differential side gears and thrust washers
²Pinion gears and thrust washers
²Pinion gear mate shaft (align holes in shaft and
case)
(2) Install and seat the locking roll pin in the dif-
ferential case and mate shaft with a punch and ham-
mer (Fig. 38). Peen metal part of case over pin in two
places 180 degrees apart.
If replacement gears and thrust washers were
installed, it is not necessary to measure the gear
backlash. Correct fit is due to close machining
tolerances during manufacture.
(3) Invert the differential case and start two ring
gear bolts. This will provide case-to-ring gear bolt
hole alignment.
(4) Install new ring gear bolts and alternately
tighten to 95-122 Nzm (70-90 ft. lbs.) torque (Fig. 39).
(5) Lubricate all differential components with hy-
poid gear lubricant.
Fig. 35 Front Bearing Cup Removal
Fig. 36 Rear Bearing Cup Removal
Fig. 37 Inner Bearing Removal
2 - 36 FRONT SUSPENSION AND AXLEJ
Page 74 of 1784
PINION GEAR DEPTH INFORMATION
Ring and pinion gears are supplied as matched sets
only. The identifying numbers for the ring and pin-
ion gear are etched into the face of each gear (Fig.
40). A plus (+) number, minus (-) number or zero (0)
is etched into the face of the pinion gear. This num-
ber is the amount (in thousandths of an inch) the
depth varies from the standard depth setting of a
pinion etched with a (0). The standard setting from
the centerline of the ring gear to the back face of thepinion is 92.1 mm (3.625 inches) for Model 30 axles
(Fig. 41). The standard depth provides the best teeth
contact pattern.
THE BUTTON END ON THE PINION GEAR
HEAD IS NO LONGER A MACHINED-TO-SPECI-
FICATIONS SURFACE. DO NOT USE THIS SUR-
FACE FOR PINION DEPTH SET-UP OR
CHECKING (Fig. 41).
Compensation for depth variance is achieved by a
selected thickness oil slinger (production) or shims
(service). The slinger is placed between the inner
pinion bearing cone and gear head (Fig. 42). The
shim pack is placed under the inner (rear) bearing
cup for service. To change the pinion adjustment,
shims are available in thicknesses of 0.003, 0.005,
and 0.010 inch.The oil slinger or baffle must be
measured and the thickness included with the
total shim pack.
New gear set: note the depth variance etched
into both the original and the replacement pin-
ion gear. Add or subtract the thickness of the
Fig. 38 Mate Shaft Pin Installation
Fig. 39 Ring Gear Bolt Installation
Fig. 40 Pinion Gear ID Numbers
Fig. 41 Pinion Gear Head
JFRONT SUSPENSION AND AXLE 2 - 37
Page 75 of 1784
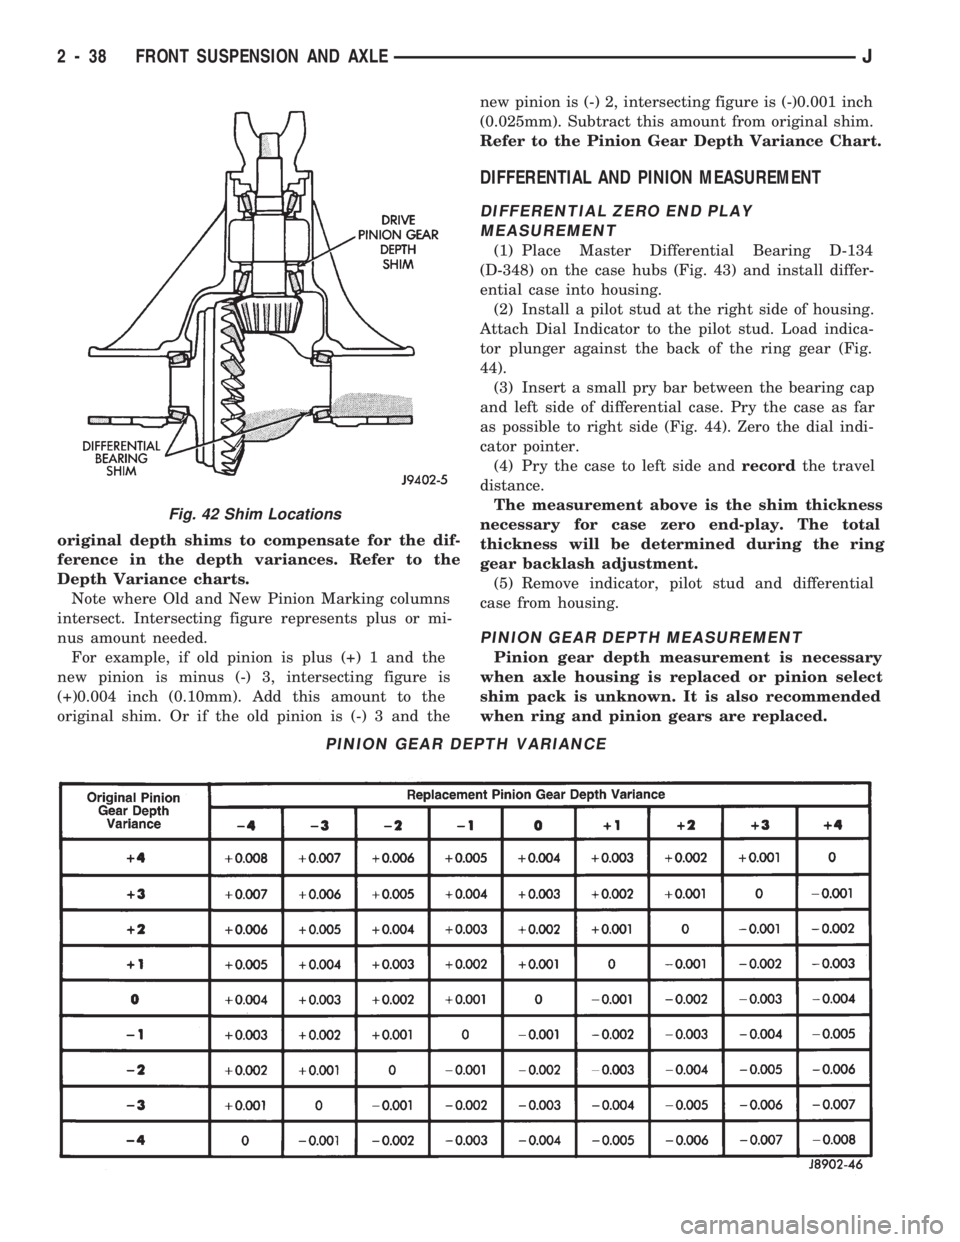
original depth shims to compensate for the dif-
ference in the depth variances. Refer to the
Depth Variance charts.
Note where Old and New Pinion Marking columns
intersect. Intersecting figure represents plus or mi-
nus amount needed.
For example, if old pinion is plus (+) 1 and the
new pinion is minus (-) 3, intersecting figure is
(+)0.004 inch (0.10mm). Add this amount to the
original shim. Or if the old pinion is (-) 3 and thenew pinion is (-) 2, intersecting figure is (-)0.001 inch
(0.025mm). Subtract this amount from original shim.
Refer to the Pinion Gear Depth Variance Chart.
DIFFERENTIAL AND PINION MEASUREMENT
DIFFERENTIAL ZERO END PLAY
MEASUREMENT
(1) Place Master Differential Bearing D-134
(D-348) on the case hubs (Fig. 43) and install differ-
ential case into housing.
(2) Install a pilot stud at the right side of housing.
Attach Dial Indicator to the pilot stud. Load indica-
tor plunger against the back of the ring gear (Fig.
44).
(3) Insert a small pry bar between the bearing cap
and left side of differential case. Pry the case as far
as possible to right side (Fig. 44). Zero the dial indi-
cator pointer.
(4) Pry the case to left side andrecordthe travel
distance.
The measurement above is the shim thickness
necessary for case zero end-play. The total
thickness will be determined during the ring
gear backlash adjustment.
(5) Remove indicator, pilot stud and differential
case from housing.
PINION GEAR DEPTH MEASUREMENT
Pinion gear depth measurement is necessary
when axle housing is replaced or pinion select
shim pack is unknown. It is also recommended
when ring and pinion gears are replaced.
PINION GEAR DEPTH VARIANCE
Fig. 42 Shim Locations
2 - 38 FRONT SUSPENSION AND AXLEJ