1993 DODGE TRUCK differential
[x] Cancel search: differentialPage 30 of 1502

LUBRICATION
AND
MAINTENANCE
0-11
J
DRIVE-ON
HOIST
I
FRAME
CONTACT
HOIST
TWIN
POST
CHASSIS
HOIST
FLOOR
JACK
RROOD30
Fig.
8 Correct Vehicle Lifting
Locations
An axle tube
A body side sill
A steering linkage component
A drive shaft
The engine or transmission oil pan
The fuel tank
• A front suspension arm Use the correct frame rail lifting locations only
(Fig. 8).
HOIST A vehicle can be lifted with:
• A single-post, frame-contact hoist
• A twin-post, chassis hoist
• A ramp-type, drive-on hoist
When a frame-contact type hoist is used, verify
that the lifting pads are positioned properly (Fig. 8).
WARNING:
WHEN
A
SERVICE
PROCEDURE
RE
QUIRES
THE
REMOVAL
OF
THE
REAR
AXLE,
FUEL
TANK,
OR
SPARE
TIRE,
EITHER:
• PLACE ADDITIONAL WEIGHT ON THE REAR
END OF THE VEHICLE
« ATTACH THE VEHICLE TO THE HOIST
« PLACE JACK STANDS UNDER THE VEHICLE
FOR SUPPORT TO PREVENT TIPPING WHEN
THE CENTER OF BALANCE CHANGES
4WD VEHICLES A standard hoist can be used to lift a 4WD vehicle.
The hoist should be inspected for adequate clearance. The lift arms, pads or ramps should be adjusted to
ensure that there is adequate clearance (Fig. 9).
ADJUSTMENT
PAD
ii 7
MAINTAIN
CLEARANCE
HOIST
ARM
RK44
Fig.
9 Lifting 4WD Vehicle
With
Single-Post
Hoist—
Typical
When a twin-post hoist is used, a 4 x 4 x 12-inch
wood spacer also could be required. Place the wood spacer under the front axle (opposite the differential
housing). This will maintain balance and level lift ing.
CAUTION:
The
block
that
is
used must
be
secured in
a
safe manner. This
will
ensure
that
it
will
not un
balance
the
vehicle.
VEHICLE
TOWING
RECOMMENDATIONS
When it is necessary to tow a Ram Truck, the rec
ommended method is either:
• the sling-type, rear-end raised towing method; or
• the wheel-lift towing method with a tow dolly lo
cated under the front wheels. A vehicle with flat-bed hauling equipment can also
be used to transport a disabled vehicle.
SLING-TYPE
FLAT
BED
RR0OD29
Fig.
10 Tow Vehicles
With
Approved
Equipment
Page 44 of 1502
•
LUBRICATION
AND
MAINTENANCE
0 - 25
CAUTION:
Do not
over-tighten
the
drain
and fill
hole
plugs.
Over-tightening
can strip the
hole
threads
and/or crack
the
aluminum housing.
(5) Install the drain hole plug (Figs. 4 and 5) in
the transfer case. Tighten the drain hole plug to 27 N*m (20 ft-lbs) torque. (6) Fill the transfer case to the bottom edge of the
fill hole (Figs. 4 and 5) with: • MOPAR®ATF PLUS or an equivalent Dexron II®
ATF for NP241 transfer cases
• Multi-purpose gear oil (API GL-5) or engine oil (API SG, SG/CD or SG/CE) for NP205 transfer cases. (7) Install the fill hole plug (Figs. 4 and 5) in the
transfer case. Tighten the plug to 27 N«m (20 ft-lbs) torque.
(8) Remove the support and lower the vehicle.
FLUID SPECIFICATION
• MOPAR®ATF PLUS or an equivalent Dexron II®
ATF for NP241 transfer cases • Multi-purpose gear oil (API GL-5) or engine oil (API SG, SG/CD or SG/CE) for NP205 transfer cases
NP20I
MULTI-PURPOSE GEAR OIL/ENGINE
OIL
SELECTION
MULTI-PURPOSE GEAR OIL-if the anticipated
minimum temperature will: • Be above 32°C (90°F)-use SAE 140, API GL-5;
• Decrease to as low as -23°C (-10°F)-use SAE 90,
API GL-5; and • Be below -23°C (-10°F)-use SAE 80, API GL-5. ENGINE OIL—if the anticipated minimum tem
perature will be: ® Above 0°C (32°F)-use SAE 50, API SG, SG/CD or
SG/CE;
• Below 0°C (32°F)-use SAE 30, API SG, SG/CD or SG/CE.
SHIFT MECHANISM-NP241 AND NP205 The transfer case shift mechanism should be
cleaned and lubricated as necessary.
Lubricate the pivot, the sliding contact areas and
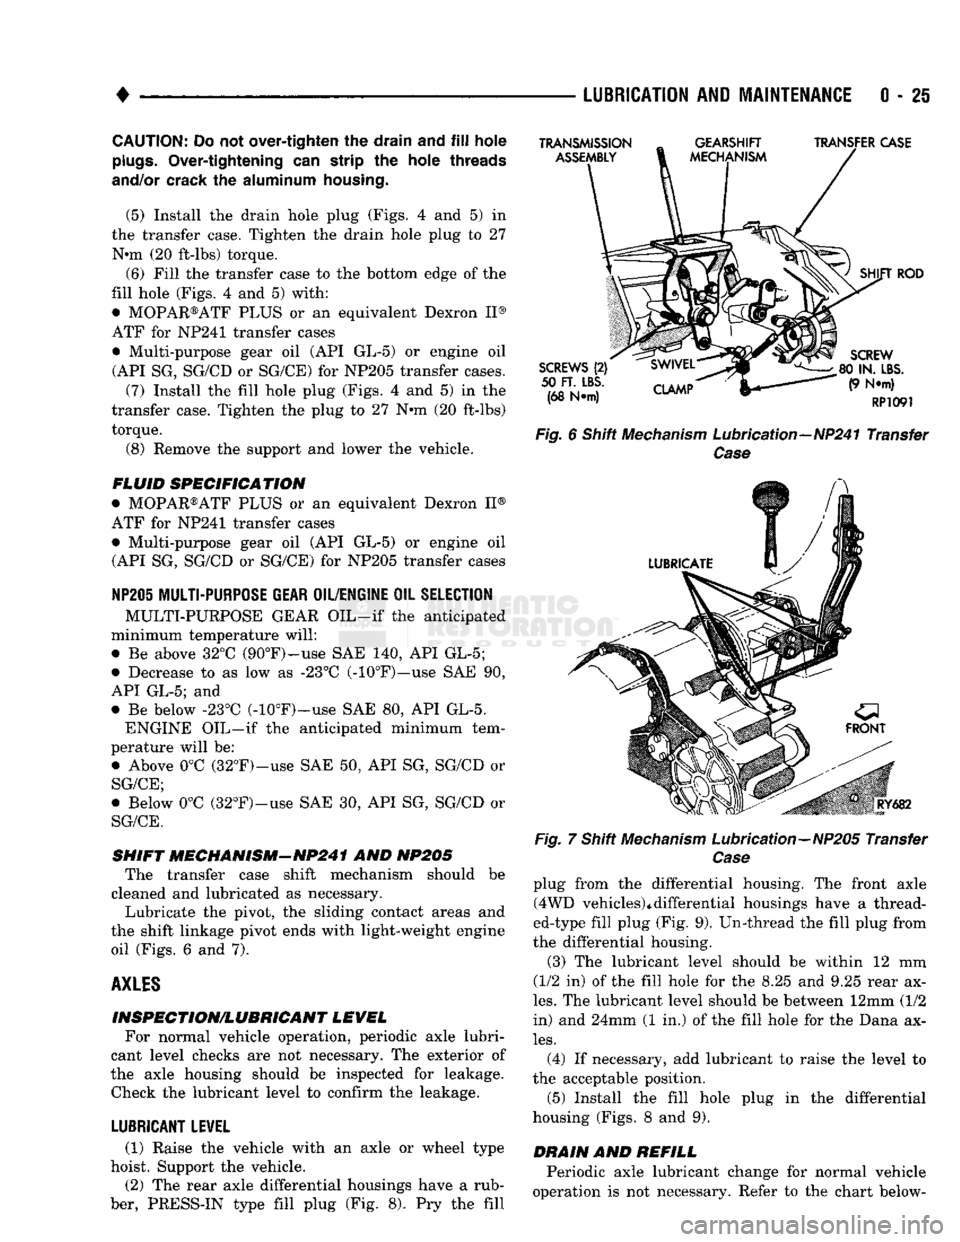
the shift linkage pivot ends with light-weight engine oil (Figs. 6 and 7).
AXLES
INSPECTION/LUBRICANT LEVEL For normal vehicle operation, periodic axle lubri
cant level checks are not necessary. The exterior of
the axle housing should be inspected for leakage. Check the lubricant level to confirm the leakage.
LUBRICANT LEVEL
(1) Raise the vehicle with an axle or wheel type
hoist. Support the vehicle.
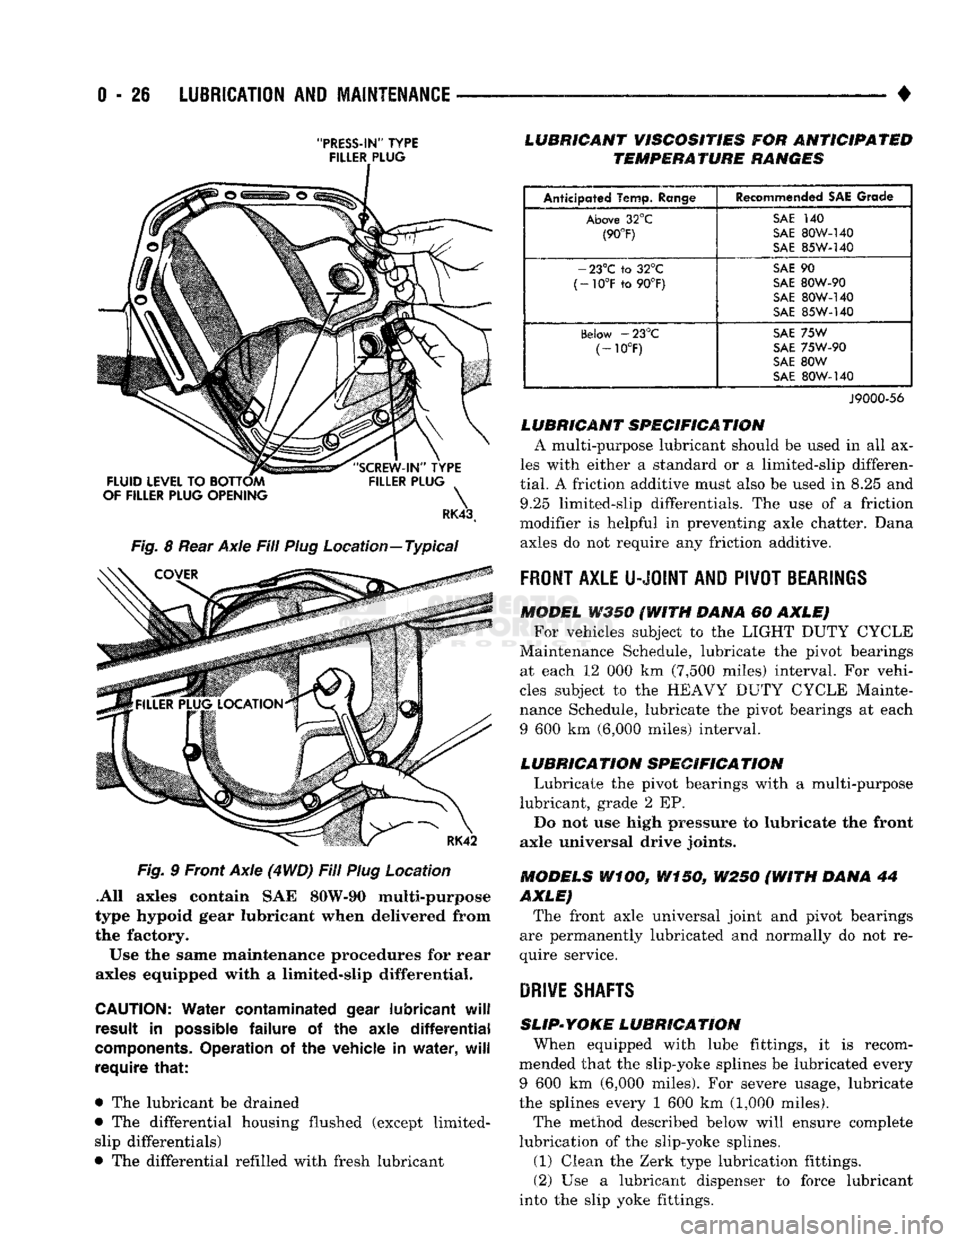
(2) The rear axle differential housings have a rub
ber, PRESS-IN type fill plug (Fig. 8). Pry the fill
TRANSMISSION
ASSEMBLY
GEARSHIFT
MECHANISM TRANSFER CASE
SCREWS
(2)
50
FT. LBS.
(68 N*m)
CLAMP
SHIFT
ROD
SCREW
80 IN.
LBS.
(9 N*m)
RP1091
Fig.
6 Shift
Mechanism
Lubrication—NP241 Transfer
Case
Fig.
RY682
7 Shift
Mechanism
Lubrication—NP205 Transfer
Case
plug from the differential housing. The front axle (4WD vehicles)*differential housings have a thread
ed-type fill plug (Fig. 9). Un-thread the fill plug from
the differential housing.
(3) The lubricant level should be within 12 mm
(1/2 in) of the fill hole for the 8.25 and 9.25 rear ax
les.
The lubricant level should be between 12mm (1/2
in) and 24mm (1 in.) of the fill hole for the Dana ax
les.
(4) If necessary, add lubricant to raise the level to
the acceptable position.
(5) Install the fill hole plug in the differential
housing (Figs. 8 and 9).
DRAIN
AND
REFILL
Periodic axle lubricant change for normal vehicle
operation is not necessary. Refer to the chart below-
Page 45 of 1502
0
- 26
LUBRICATION
AND
MAINTENANCE
•
"PRESS-IN"
TYPE FILLER PLUG
RK43t
Fig.
8
Rear Axle Fill Plug Location—Typical Fig.
9
Front Axle (4
WD)
Fill Plug Location
.All axles contain
SAE
80W-90 multi-purpose
type hypoid gear lubricant when delivered from
the factory.
Use
the
same maintenance procedures
for
rear
axles equipped with
a
limited-slip differential.
CAUTION:
Water
contaminated
gear
lubricant
will
result
in
possible
failure
of the
axle
differential
components.
Operation
of the
vehicle
in
water,
will
require
that:
•
The
lubricant
be
drained
•
The
differential housing flushed (except limited- slip differentials)
•
The
differential refilled with fresh lubricant
LUBRICANT
VISCOSITIES
FOR
ANTICIPATED
TEMPERATURE
RANGES
Anticipated Temp.
Range
Recommended
SAE
Grade
Above
32°C
SAi
140
(90°F)
SAE
SOW-140
(90°F)
S\E
85W-140
-
23°C to 32°C
SAE
90
(-10°F
to 90°F)
SAE
80W-90
(-10°F
to 90°F)
SAE
80W-140
oAE
85W-140
(ielow
-23°C
SAE
75W
(-10°F)
SAE
75W-90
(-10°F)
SAE
80W
SAE
80W-I40
J9000-56
LUBRICANT
SPECIFICA
TION
A multi-purpose lubricant should
be
used
in all ax
les with either
a
standard
or a
limited-slip differen
tial.
A
friction additive must also
be
used
in 8.25 and
9.25 limited-slip differentials.
The use of a
friction
modifier
is
helpful
in
preventing axle chatter. Dana axles
do not
require
any
friction additive.
FRONT
AXLE
U-JOINT
AND
PIVOT
BEARINGS
MODEL
W350 (WITH
DANA
60
AXLE) For vehicles subject
to the
LIGHT DUTY CYCLE
Maintenance Schedule, lubricate
the
pivot bearings at each
12 000 km
(7,500 miles) interval.
For
vehi
cles subject
to the
HEAVY DUTY CYCLE Mainte
nance Schedule, lubricate
the
pivot bearings
at
each
9
600 km
(6,000 miles) interval.
LUBRICATION
SPECIFICATION
Lubricate
the
pivot bearings with
a
multi-purpose
lubricant, grade
2 EP.
Do
not use
high pressure
to
lubricate
the
front
axle universal drive joints.
MODELS
WiOO,
W150,
W250 (WITH
DANA
44
AXLE)
The front axle universal joint
and
pivot bearings
are permanently lubricated
and
normally
do not re
quire service.
DRIVE
SHAFTS
SLIP-YOKE
LUBRICATION
When equipped with lube fittings,
it is
recom
mended that
the
slip-yoke splines
be
lubricated every
9
600 km
(6,000 miles).
For
severe usage, lubricate
the splines every
1 600 km
(1,000 miles).
The method described below will ensure complete
lubrication
of the
slip-yoke splines.
(1)
Clean
the
Zerk type lubrication fittings.
(2)
Use a
lubricant dispenser
to
force lubricant
into
the
slip yoke fittings.
Page 50 of 1502
•
LUBRICATION
AND
MAINTENANCE
0 - 31
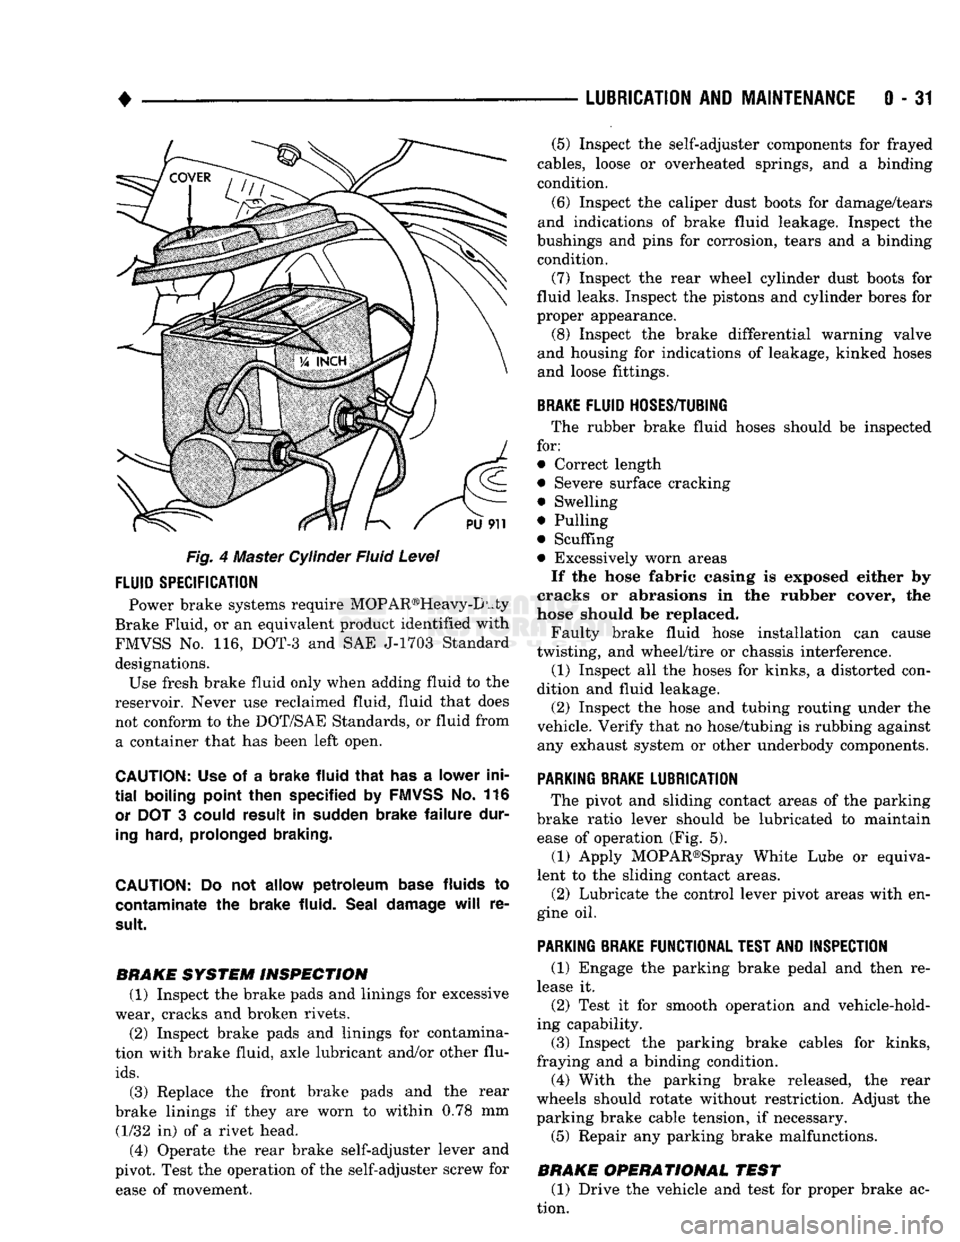
Fig. 4 Master Cylinder Fluid Level
FLUID
SPECIFICATION
Power brake systems require MOP AR®Heavy-D uty
Brake Fluid, or an equivalent product identified with
FMVSS No. 116, DOT-3 and SAE J-1703 Standard designations. Use fresh brake fluid only when adding fluid to the
reservoir. Never use reclaimed fluid, fluid that does not conform to the DOT/SAE Standards, or fluid from a container that has been left open.
CAUTION:
Use of a
brake fluid that
has a
lower ini
tial
boiling point then specified
by
FMVSS
No. 116
or
DOT 3
could result
in
sudden brake failure dur
ing
hard, prolonged braking.
CAUTION:
Do not
allow petroleum base
fluids
to
contaminate
the
brake fluid. Seal damage
will
re
sult.
BRAKE SYSTEM INSPECTION (1) Inspect the brake pads and linings for excessive
wear, cracks and broken rivets.
(2) Inspect brake pads and linings for contamina
tion with brake fluid, axle lubricant and/or other flu
ids.
(3) Replace the front brake pads and the rear
brake linings if they are worn to within 0.78 mm (1/32 in) of a rivet head.
(4) Operate the rear brake self-adjuster lever and
pivot. Test the operation of the self-adjuster screw for ease of movement. (5) Inspect the self-adjuster components for frayed
cables, loose or overheated springs, and a binding
condition.
(6) Inspect the caliper dust boots for damage/tears
and indications of brake fluid leakage. Inspect the
bushings and pins for corrosion, tears and a binding condition.
(7) Inspect the rear wheel cylinder dust boots for
fluid leaks. Inspect the pistons and cylinder bores for
proper appearance. (8) Inspect the brake differential warning valve
and housing for indications of leakage, kinked hoses and loose fittings.
BRAKE
FLUID
HOSES/TUBING
The rubber brake fluid hoses should be inspected
for:
• Correct length
• Severe surface cracking
• Swelling
• Pulling
• Scuffing
• Excessively worn areas If the hose fabric casing is exposed either by
cracks or abrasions in the rubber cover, the
hose should be replaced.
Faulty brake fluid hose installation can cause
twisting, and wheel/tire or chassis interference.
(1) Inspect all the hoses for kinks, a distorted con
dition and fluid leakage. (2) Inspect the hose and tubing routing under the
vehicle. Verify that no hose/tubing is rubbing against any exhaust system or other underbody components.
PARKING
BRAKE
LUBRICATION
The pivot and sliding contact areas of the parking
brake ratio lever should be lubricated to maintain ease of operation (Fig. 5).
(1) Apply MOPAR®Spray White Lube or equiva
lent to the sliding contact areas.
(2) Lubricate the control lever pivot areas with en
gine oil.
PARKING
BRAKE
FUNCTIONAL
TEST
AND
INSPECTION
(1) Engage the parking brake pedal and then re
lease it. (2) Test it for smooth operation and vehicle-hold
ing capability.
(3) Inspect the parking brake cables for kinks,
fraying and a binding condition. (4) With the parking brake released, the rear
wheels should rotate without restriction. Adjust the
parking brake cable tension, if necessary.
(5) Repair any parking brake malfunctions.
BRAKE OPERATIONAL TEST (1) Drive the vehicle and test for proper brake ac
tion.
Page 54 of 1502
•
FRONT SUSPENSION
AND
AXLE
2 - 1
CONTENTS
page
FRONT SUSPENSION—2WD VEHICLES
......
7
FRONT SUSPENSION—4WD VEHICLES
14
FRONT WHEEL
ALIGNMENT
...............
3
GENERAL INFORMATION
1
page
MODEL
44
FRONT AXLE
17
MODEL
80
FRONT AXLE
49
TORQUE SPECIFICATIONS
75
GENERAL
INFORMATION
FRONT SUSPENSION—2WD VEHICLES
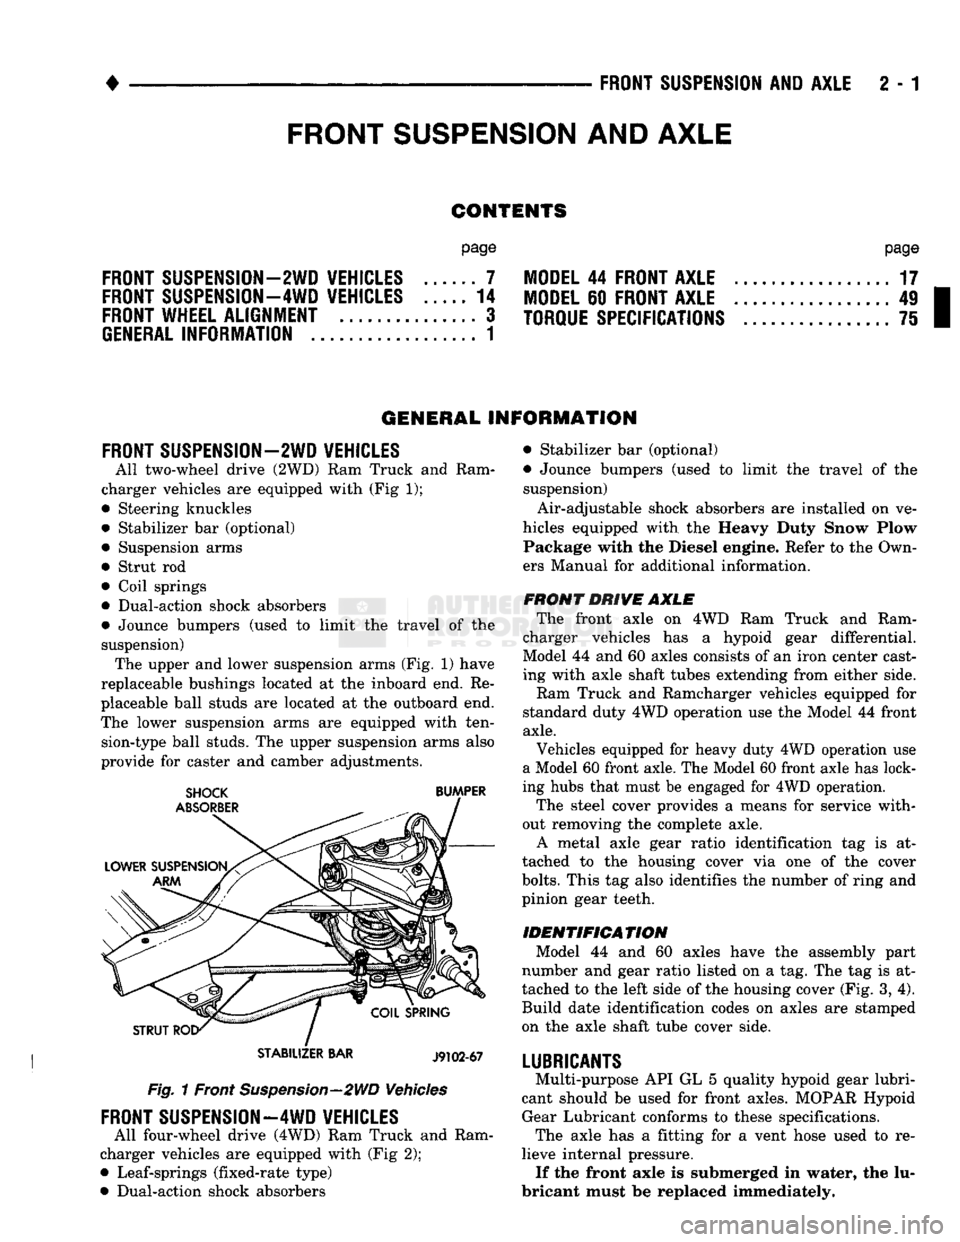
All two-wheel drive (2WD)
Ram
Truck
and
Ram
charger vehicles
are
equipped with (Fig
1);
• Steering knuckles
• Stabilizer
bar
(optional) • Suspension arms
• Strut
rod
• Coil springs
• Dual-action shock absorbers
• Jounce bumpers (used
to
limit
the
travel
of the
suspension) The upper and lower suspension arms (Fig.
1)
have
replaceable bushings located
at the
inboard end.
Re
placeable ball studs
are
located
at
the
outboard end.
The lower suspension arms
are
equipped with ten sion-type ball studs. The upper suspension arms also
provide
for
caster
and
camber adjustments.
STABILIZER
BAR
J9102-67
Fig. 1 Front Suspension—2WD Vehicles
FRONT SUSPENSION—4WD VEHICLES
All four-wheel drive (4WD) Ram Truck
and
Ram
charger vehicles
are
equipped with (Fig
2);
• Leaf-springs (fixed-rate type)
• Dual-action shock absorbers • Stabilizer
bar
(optional)
• Jounce bumpers (used
to
limit
the
travel
of the
suspension)
Air-adjustable shock absorbers
are
installed
on
ve
hicles equipped with
the
Heavy Duty Snow Plow Package with
the
Diesel engine. Refer
to
the Own
ers Manual
for
additional information.
FRONT DRIVE AXLE The front axle
on 4WD Ram
Truck
and
Ram
charger vehicles
has a
hypoid gear differential.
Model
44
and
60
axles consists
of
an iron center cast
ing with axle shaft tubes extending from either side.
Ram Truck
and
Ramcharger vehicles equipped
for
standard duty 4WD operation use
the
Model
44
front
axle.
Vehicles equipped
for
heavy duty 4WD operation
use
a Model 60 front axle. The Model 60 front axle has lock
ing hubs that must
be
engaged
for
4WD operation.
The steel cover provides
a
means
for
service with
out removing
the
complete axle. A metal axle gear ratio identification
tag is at
tached
to the
housing cover
via one of the
cover
bolts.
This
tag
also identifies
the
number
of
ring and
pinion gear teeth.
IDENTIFICATION Model
44 and 60
axles have
the
assembly part
number
and
gear ratio listed
on a
tag. The
tag
is at
tached
to
the
left side
of
the housing cover (Fig.
3,
4).
Build date identification codes
on
axles
are
stamped
on
the
axle shaft tube cover side.
LUBRICANTS
Multi-purpose API
GL
5
quality hypoid gear lubri
cant should
be
used
for
front axles. MOPAR Hypoid Gear Lubricant conforms
to
these specifications. The axle
has a
fitting
for a
vent hose used
to re
lieve internal pressure. If the front axle
is
submerged
in
water,
the
lu
bricant must
be
replaced immediately.
FRONT
SUSPENSION
AND
AXLE
Page 70 of 1502
•
FRONT
SUSPENSION
AND
AXLE
2 - 17
MODEL
44
FRONT
AXLE
INDEX
page
Axle Shaft
and
U-Joint
Service
23
Complete Axle Removal/Installation
31
Differential
Assembly
35
Differential
Disassembly
. 32
Drain
and Refill
19
General
Information
17
Hub,
Spindle
and
Axle Shaft
20
Intermediate
Axle Shaft
30
Lubricant
17
GENERAL
INFORMATION
Model
44
front axles
(Fig. 1)
consists
of an
iron
center casting with axle shaft tubes extending from
either side. The integral type housing, hypoid gear design
has
the centerline
of the
pinion
set
below
the
centerline of
the
ring gear. The axle shaft disconnect housing
is
welded
to the
left axle shaft tube.
A
splined, two-piece axle shaft
is
located
on the
left side
and it is
engaged
or
disen
gaged
by a
shift collar.
The
collar
is
moved
by a
shift
fork controlled
by a
vacuum shift motor.
The
shift motor
is
operated
by
engine vacuum controlled
by a
switch located
at the
transfer case. The axles
are
equipped with full-floating axle
shafts,
meaning that loads
are
supported
by the
spin
dles attached
to the
steering knuckles. The removable, stamped steel cover provides
a
means
for
inspection
and
service without removing
the complete axle from
the
vehicle.
page
Pinion Gear Depth Measurement
and
Adjustment
with
Tool
Set
C-3715-B
40
Pinion Gear Depth Measurement
and
Adjustment
with
Tool
Set
D-115-44
... 38
Pinion Shaft Seal
19
Specifications
48
Steering Knuckle
Arm
31
Steering Knuckle, Upper
and
Lower Ball Studs
. . 24
Vacuum
Shift Motor
26
A small, stamped metal axle gear ratio identifica
tion
tag is
attached
to the
housing cover
via one of
the cover bolts. This
tag
also identifies
the
number
of
ring gear
and
pinion gear teeth.
The differential case
is a
one-piece design.
The dif
ferential pinion mate shaft
is
retained with
a
roll
pin. Differential bearing preload
and
ring gear back lash
are
adjusted
by the use of
shims located between
the differential bearing cones
and
case.
LUBRICANT
Multi-purpose
API GL 5
quality hypoid gear lubri
cant should
be
used
for
Model
44
axles. MOPAR
Hy
poid Gear Lubricant conforms with these specifications
and is
recommended.
CAUTION:
If a
front axle
is
submerged
in
water,
the
axle lubricant must
be
replaced immediately.
Page 72 of 1502
FRONT
SUSPENSION
AND
AXLE
2 - 19
DRAIN
AND
REFILL
(1) Drive the vehicle until the gear lubricant
reaches normal operating temperature. (2) Raise and support the vehicle.
(3) Remove the lubricant fill hole plug from the
differential housing cover.
(4) Remove the differential housing cover. Allow
the original lubricant to completely drain from the
housing and axle shaft tubes.
(5) With standard differential, clean the differen
tial and the housing cavity with a flushing oil (or light engine oil). This will remove the residual lubricant and foreign matter. Do not use water, steam,
kerosene or gasoline for flushing. (6) Scrape the residual gasket from the housing
and cover mating surfaces. Clean the mating sur
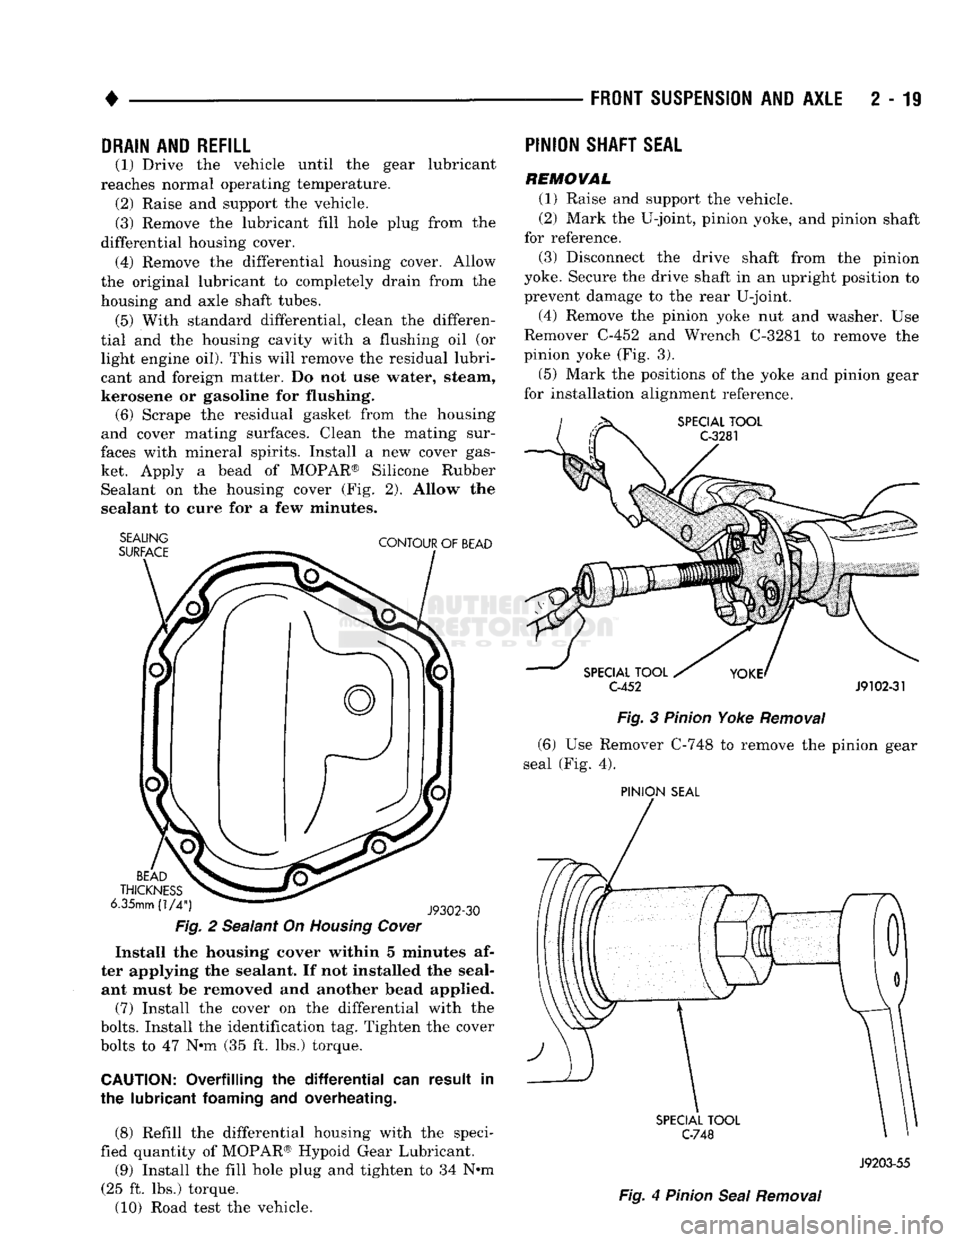
faces with mineral spirits. Install a new cover gas ket. Apply a bead of MOPAR® Silicone Rubber Sealant on the housing cover (Fig. 2). Allow the
sealant to cure for a few minutes.
SEALING
SURFACE
CONTOUR
OF
BEAD
BEAD
THICKNESS
6.35mm
(1/4")
J9302-30
Fig.
2 Sealant On
Housing
Cover
Install the housing cover within 5 minutes af
ter applying the sealant. If not installed the seal ant must be removed and another bead applied.
(7) Install the cover on the differential with the
bolts.
Install the identification tag. Tighten the cover
bolts to 47 Nnn (35 ft. lbs.) torque.
CAUTION:
Overfilling the
differential
can result in
the lubricant
foaming
and overheating.
(8) Refill the differential housing with the speci
fied quantity of MOPAR® Hypoid Gear Lubricant.
(9) Install the fill hole plug and tighten to 34 N#m
(25 ft. lbs.) torque.
(10) Road test the vehicle.
PINION
SHAFT
SEAL
REMOVAL
(1) Raise and support the vehicle.
(2) Mark the U-joint, pinion yoke, and pinion shaft
for reference.
(3) Disconnect the drive shaft from the pinion
yoke. Secure the drive shaft in an upright position to prevent damage to the rear U-joint.
(4) Remove the pinion yoke nut and washer. Use
Remover C-452 and Wrench C-3281 to remove the
pinion yoke (Fig. 3).
(5) Mark the positions of the yoke and pinion gear
for installation alignment reference.
SPECIAL
TOOL
C-3281
SPECIAL
TOOL
C-452
J9102-31
Fig.
3
Pinion
Yoke
Removal
(6) Use Remover C-748 to remove the pinion gear
seal (Fig. 4).
PINION
SEAL
SPECIAL
TOOL
C-748
Fig.
4
Pinion
Seal
Removal
J9203-55
Page 73 of 1502
2
- 20
FRONT SUSPENSION
AND
AXLE
•
INSTALLATION
(1) Apply a light coating of gear lubricant on the
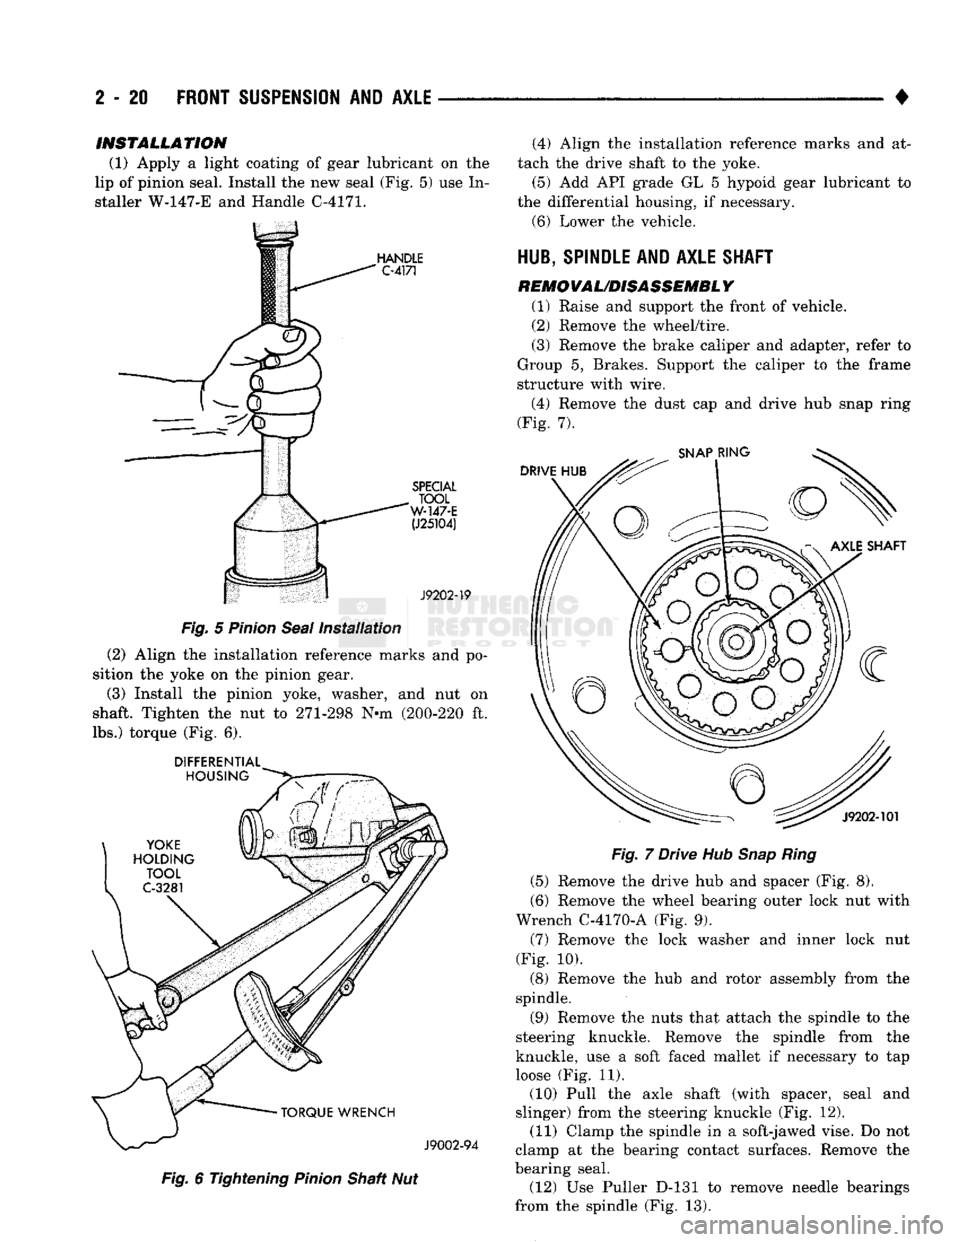
lip of pinion seal. Install the new seal (Fig. 5) use In
staller W-147-E and Handle C-4171.
Fig.
5
Pinion
Seal
Installation
(2) Align the installation reference marks and po
sition the yoke on the pinion gear.
(3) Install the pinion yoke, washer, and nut on
shaft. Tighten the nut to 271-298 N»m (200-220 ft.
lbs.) torque (Fig. 6).
DIFFERENTIAL
Fig.
6 Tightening
Pinion
Shaft Nut (4) Align the installation reference marks and at
tach the drive shaft to the yoke.
(5) Add API grade GL 5 hypoid gear lubricant to
the differential housing, if necessary.
(6) Lower the vehicle.
HUB, SPINDLE
AND
AXLE SHAFT
REMOVAL/DISASSEMBLY
(1) Raise and support the front of vehicle.
(2) Remove the wheel/tire.
(3) Remove the brake caliper and adapter, refer to
Group 5, Brakes. Support the caliper to the frame
structure with wire.
(4) Remove the dust cap and drive hub snap ring
(Fig. 7).
Fig.
7 Drive Hub
Snap Ring
(5) Remove the drive hub and spacer (Fig. 8).
(6) Remove the wheel bearing outer lock nut with
Wrench C-4170-A (Fig. 9). (7) Remove the lock washer and inner lock nut
(Fig. 10).
(8) Remove the hub and rotor assembly from the
spindle.
(9) Remove the nuts that attach the spindle to the
steering knuckle. Remove the spindle from the
knuckle, use a soft faced mallet if necessary to tap
loose (Fig. 11).
(10) Pull the axle shaft (with spacer, seal and
slinger) from the steering knuckle (Fig. 12). (11) Clamp the spindle in a soft-jawed vise. Do not
clamp at the bearing contact surfaces. Remove the
bearing seal. (12) Use Puller D-131 to remove needle bearings
from the spindle (Fig. 13).