1993 DODGE TRUCK air conditioning
[x] Cancel search: air conditioningPage 4 of 1502
GROUP TAB LOCATOR
Introduction
0
Lubrication
and
Maintenance
2
Front Suspension
and
Axle
3
Rear Suspension
and
Axles
5
Brakes
6
Clutch
7
Cooling System
8
Electrical
9
Engines
11
Exhaust System
and
Intake
Manifold
13
Frame
and Bumpers
14
Fuel
System
16
Propeller Shafts
19
Steering
21
Transmission
and
Transfer Case
22
Wheels and Tires
23
Body Components
24
Heating
and Air
Conditioning
25
Emission Control Systems Component and System Index
Service Manual Comment Forms (Rear
of
Manual)
Page 275 of 1502
DIAGNOSIS
PRELIMINARY
CHECKS
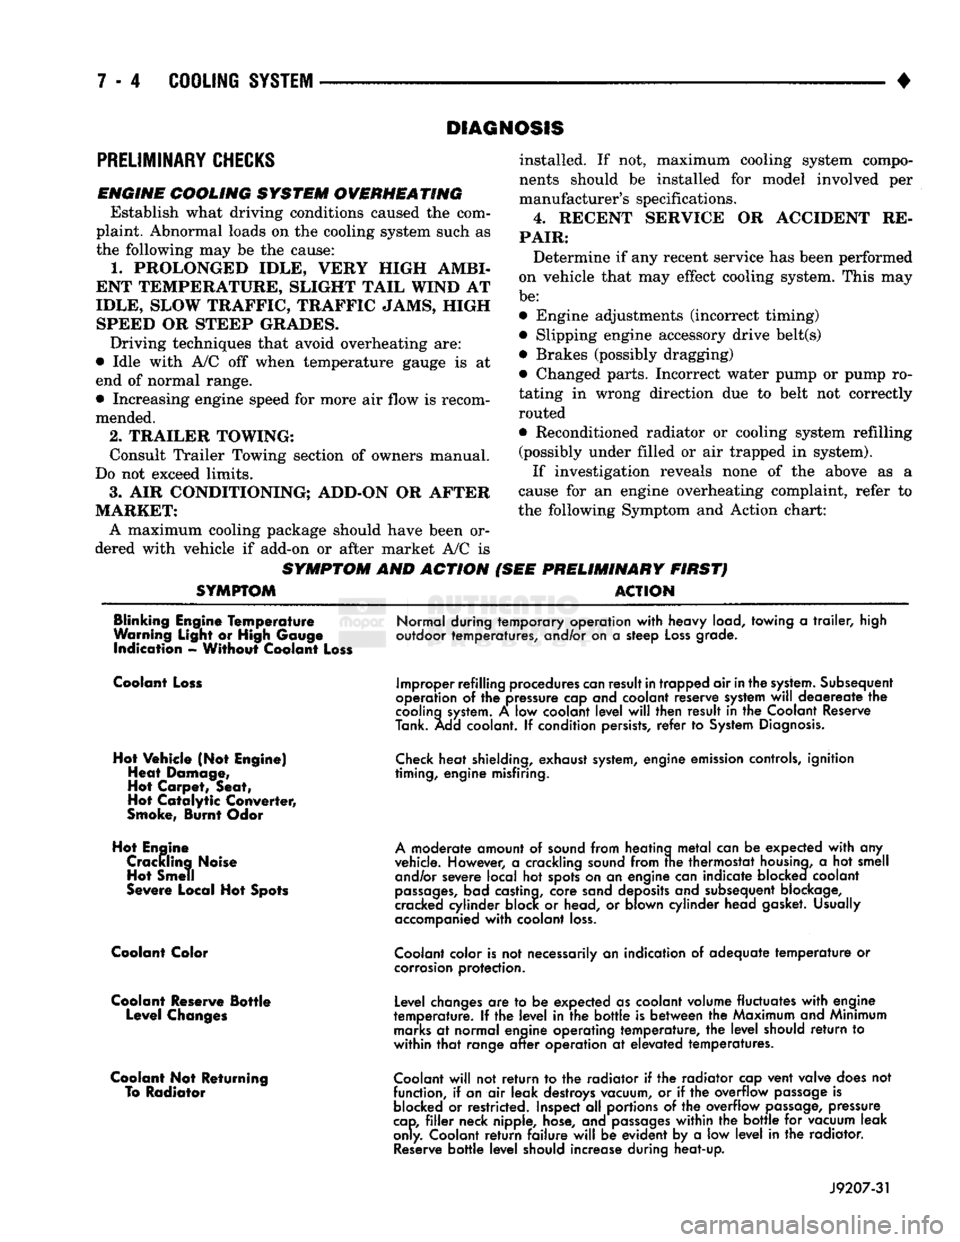
ENGINE COOLING SYSTEM OVERHEATING Establish what driving conditions caused the com
plaint. Abnormal loads on the cooling system such as
the following may be the cause:
1.
PROLONGED IDLE, VERY HIGH AMBI
ENT TEMPERATURE, SLIGHT TAIL WIND AT
IDLE, SLOW TRAFFIC, TRAFFIC JAMS, HIGH SPEED OR STEEP GRADES.
Driving techniques that avoid overheating are:
• Idle with A/C off when temperature gauge is at
end of normal range. * Increasing engine speed for more air flow is recom
mended.
2.
TRAILER TOWING: Consult Trailer Towing section of owners manual.
Do not exceed limits.
3.
AIR CONDITIONING; ADD-ON OR AFTER
MARKET: A maximum cooling package should have been or
dered with vehicle if add-on or after market A/C is
SYMPTOM AND ACTION
SYMPTOM
installed. If not, maximum cooling system compo
nents should be installed for model involved per
manufacturer's specifications.
4.
RECENT SERVICE OR ACCIDENT RE
PAIR:
Determine if any recent service has been performed
on vehicle that may effect cooling system. This may
be:
• Engine adjustments (incorrect timing)
• Slipping engine accessory drive belt(s) • Brakes (possibly dragging)
• Changed parts. Incorrect water pump or pump ro
tating in wrong direction due to belt not correctly
routed
• Reconditioned radiator or cooling system refilling (possibly under filled or air trapped in system).
If investigation reveals none of the above as a
cause for an engine overheating complaint, refer to
the following Symptom and Action chart:
PRELIMINARY FIRST) ACTION
Blinking Engine Temperature
Warning Light or High Gauge indication - Without Coolant Loss
Normal during temporary operation
with
heavy load, towing
a
trailer,
high
outdoor temperatures, and/or on
a
steep
Loss
grade.
Coolant Loss
Hot Vehicle (Not Engine) Heat Damage,
Hot Carpet, Seat,
Hot
Catalytic
Converter,
Smoke, Burnt Odor
Hot Engine Crackling Noise Hot Smell
Severe Local Hot Spots
Coolant Color
Coolant Reserve Bottle Level Changes
Coolant Not Returning To Radiator
Improper refilling procedures
can
result
in
trapped air
in
the
system.
Subsequent
operation
of the
pressure cap and coolant reserve system
will
deaereate
the
cooling
system.
A low
coolant
level
will
then result
in the
Coolant Reserve
Tank. Add coolant.
If
condition persists,
refer
to
System
Diagnosis.
Check
heat shielding, exhaust
system,
engine emission controls, ignition
timing, engine misfiring.
A
moderate amount
of
sound from heating
metal
can
be
expected
with
any
vehicle. However,
a
crackling sound from
trie
thermostat
housing,
a hot
smell and/or severe local
hot
spots on
an
engine can indicate blocked coolant
passages,
bad castina, core sand deposits and subsequent blockage,
cracked cylinder block
or
head,
or
blown cylinder head gasket. Usually
accompanied
with
coolant
loss.
Coolant
color is
not
necessarily
an
indication
of
adequate
temperature
or
corrosion
protection.
Level changes
are to be
expected as coolant volume fluctuates
with
engine
temperature.
If the
level
in the
bottle
is
between
the
Maximum and Minimum
marks
at
normal engine operating temperature,
the
level
should
return
to
within
that
range
after
operation
at
elevated temperatures.
Coolant
will
not
return
to the
radiator
if the
radiator cap vent valve does
not
function,
if
an
air
leak destroys vacuum,
or if the
overflow
passage
is
blocked
or
restricted. Inspect
all
portions
of the
overflow
passage,
pressure
cap,
filler
neck nipple, hose, and
passages
within
the
bottle
for
vacuum leak
only. Coolant
return
failure
will
be
evident
by a low
level
in the
radiator.
Reserve
bottle
level
should increase during heat-up.
J9207-31
Page 276 of 1502
•
COOLING
SYSTEM
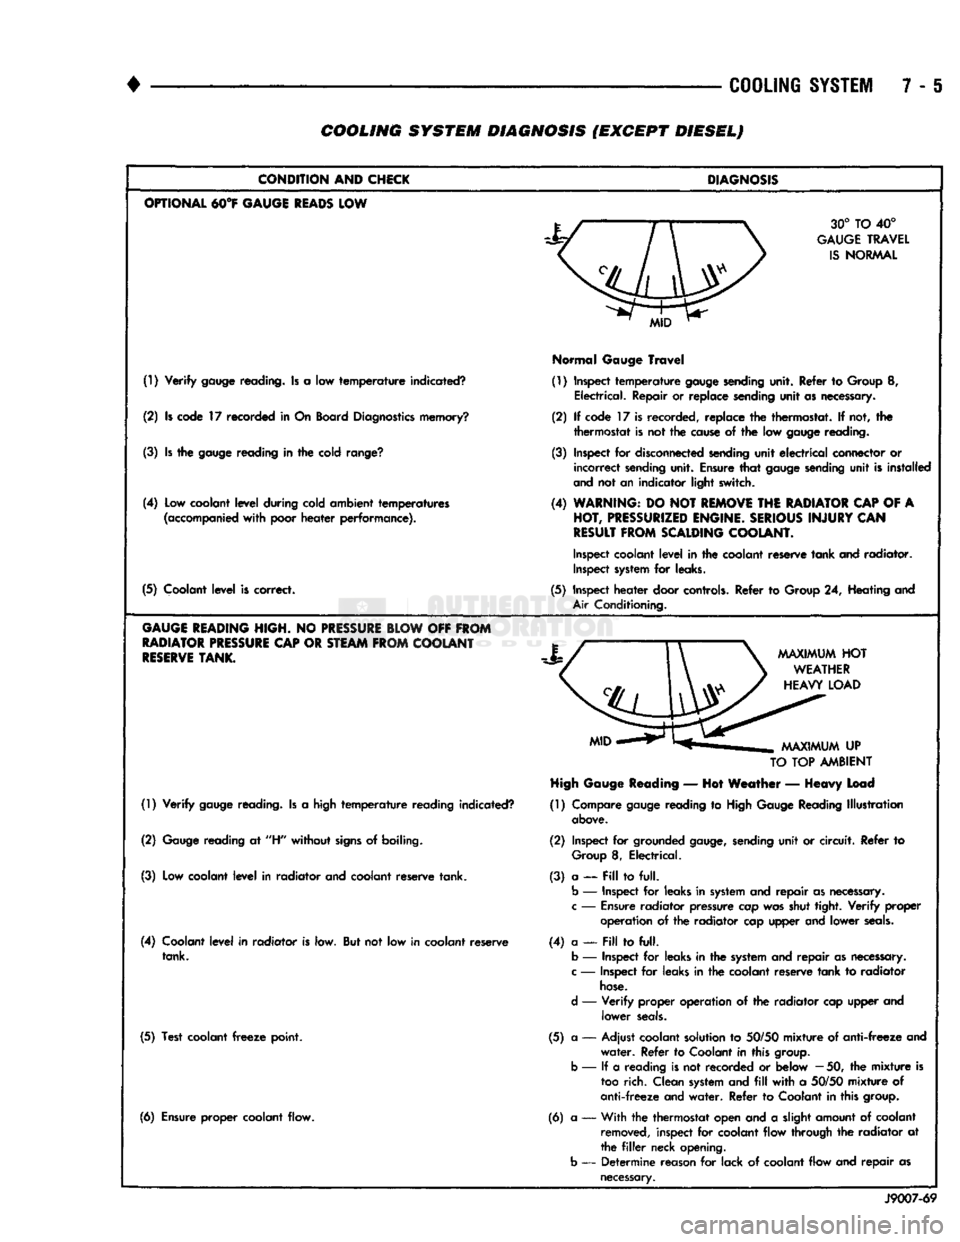
7 - 6 COOLING SYSTEM DIAGNOSIS (EXCEPT DIESEL)
CONDITION
AND
CHICK
OPTIONAL
M°¥
GAUGE
READS
LOW
(!) Verify
gauge
reading. Is a low temperature indicated?
(2) Is code 17 recorded in On Board
Diagnostics
memory?
(3) Is the
gauge
reading in the cold
range?
(4) Low coolant level during cold ambient temperatures
(accompanied
with poor heater performance).
(5) Coolant level is correct.
GAUGE
HEADING
HIGH.
NO
PRESSURE
BLOW
OFF
FROM
RADIATOR
PRESSURE
CAP
OR
STEAM
FROM
COOLANT
RESERVE
TANK.
(1) Verify
gauge
reading. Is a high temperature reading indicated?
(2)
Gauge
reading at
"H"
without
signs
of boiling.
(3) Low coolant level in radiator and coolant reserve tank.
(4) Coolant level in radiator is low. But not low in coolant reserve tank.
(5) Test coolant
freeze
point.
(6) Ensure proper coolant flow.
DIAGNOSIS
30° TO 40°
GAUGE
TRAVEL
IS
NORMAL
Normal
Gauge
Travel
(1) Inspect temperature
gauge
sending
unit. Refer to Group 8, Electrical. Repair or replace sending unit as necessary.
(2) If code 17 is recorded, replace the thermostat. If not, the thermostat is not the
cause
of the low
gauge
reading.
(3) Inspect for
disconnected
sending
unit electrical connector or incorrect
sending
unit. Ensure that
gauge
sending
unit is installed
and
not an indicator light switch.
(4)
WARNING:
DO NOT
REMOVE
THE
RADIATOR
CAP
OF A
HOT,
PRESSURIZED
ENGINE.
SERIOUS
INJURY
CAN
RESULT
FROM
SCALDING
COOLANT.
Inspect
coolant level in the coolant reserve tank and radiator.
Inspect
system
for leaks.
(5) Inspect heater door
controls.
Refer to Group 24, Heating and
Air
Conditioning.
TO
TOP
AMBIENT
High
Gauge
Reading
— Hot Weather — Heavy Load
(1) Compare
gauge
reading to
High
Gauge
Reading Illustration
above.
(2) Inspect for grounded
gauge,
sending
unit or circuit. Refer to
Group
8, Electrical.
(3) a — Pill to full.
b
— Inspect for leaks in
system
and repair as
necessary,
c
—
Ensure
radiator pressure cap was shut tight. Verify
proper
operation of the radiator cap upper and lower
seals.
(4) a —
Fill
to full,
b
— Inspect for leaks in the
system
and repair as
necessary,
c
— Inspect for leaks in the coolant reserve tank to radiator
hose.
d
— Verify proper operation of the radiator cap upper and lower
seals.
(5) a — Adjust coolant solution to
50/50
mixture of anti-freeze and water. Refer to Coolant in this
group,
b
— If a reading is not recorded or below
—
50, the mixture is
too
rich. Clean
system
and
fill
with a
50/50
mixture of
anti-freeze and water. Refer to Coolant in this
group.
(6) a •— With the thermostat open and a slight amount of coolant
removed,
inspect for coolant flow through the radiator at
the
filler
neck opening,
b
— Determine reason for lack of coolant flow and repair as
necessary.
J9007-69
Page 279 of 1502
7 - 8
COOLING
SYSTEM
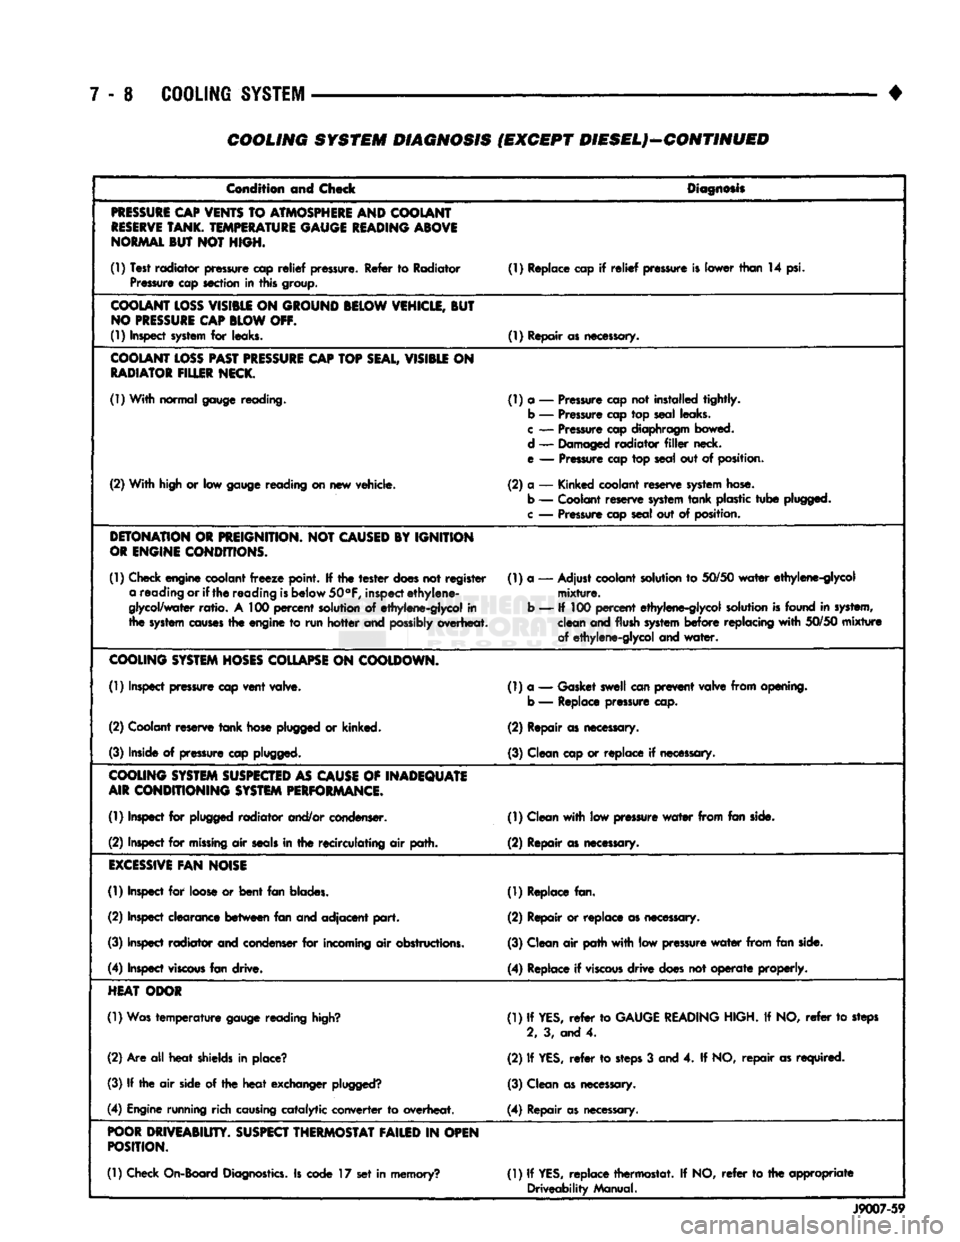
COOLING SYSTEM DIAGNOSIS (EXCEPT DIESEL)—CONTINUED
Condition and Check
Diagnosis
PRESSURE
CAP
VENTS
TO
ATMOSPHERE
AND COOLANT
RESERVE
TANK.
TEMPERATURE
GAUGE
READING
ABOVE
NORMAL
BUT NOT HIGH.
(1) Test radiator pressure cap
relief
pressure. Refer to Radiator Pressure cap section in this group. (1) Replace cap if
relief
pressure is lower than 14 psi.
COOLANT
LOSS
VISIBLE
ON
GROUND
BELOW
VEHICLE,
BUT
NO
PRESSURE
CAP
BLOW
OFF.
(1) Inspect
system
for leaks. (1) Repair as necessary.
COOLANT
LOSS
PAST
PRESSURE
CAP
TOP
SEAL,
VISIBLE
ON
RADIATOR
FILLER
NECK.
(1) With normal gauge reading. (1) a — Pressure cap not installed tightly.
b — Pressure cap top seal leaks.
c
— Pressure cap diaphragm bowed.
d — Damaged radiator
filler
neck.
e — Pressure cap top seal out of position.
(2) With high or low gauge reading on new vehicle. (2) a — Kinked coolant reserve
system
hose.
b — Coolant reserve
system
tank
plastic
tube
plugged,
c
— Pressure cap seal out of position.
DETONATION
OR
PREIGNITION.
NOT
CAUSED
BY IGNITION
OR
ENGINE
CONDITIONS.
(1) Check engine coolant
freeze
point. If the
tester
does
not register a reading or if
the
reading
is
below
50°F,
inspect
ethylene-
glycol/water
ratio.
A 100
percent
solution of ethylene-glycol in
the
system
causes
the engine to run
hotter
and
possibly
overheat. (1) a — Adjust coolant solution to
50/50
water
ethylene-glycol
mixture.
b — If 100
percent
ethylene-glycol solution
is
found in system, clean and flush
system
before
replacing
with
50/50
mixture
of ethylene-glycol and
water.
COOLING
SYSTEM
HOSES
COLLAPSE
ON
COOLDOWN.
(1) Inspect pressure cap
vent
valve. (1) a — Gasket swell can
prevent
valve from opening,
b — Replace pressure cap.
(2) Coolant reserve
tank
hose plugged or kinked. (2) Repair as necessary.
(3) Inside of pressure cap plugged. (3) Clean cap or replace if necessary.
COOLING
SYSTEM
SUSPECTED
AS
CAUSE
OF
INADEQUATE
AIR
CONDITIONING
SYSTEM
PERFORMANCE.
(1) Inspect for plugged radiator and/or condenser. (1) Clean
with
low pressure
water
from fan side.
(2) Inspect for
missing
air
seals
in the recirculating air path. (2) Repair as necessary.
EXCESSIVE
FAN
NOISE
(1) Inspect for loose or
bent
fan blades. (1) Replace fan.
(2) Inspect clearance
between
fan and adjacent
part.
(2) Repair or replace as necessary.
(3) Inspect radiator and condenser for incoming air obstructions. (3) Clean air path
with
low pressure
water
from fan side.
(4) Inspect
viscous
fan drive. (4) Replace if
viscous
drive
does not
operate
properly.
HEAT
ODOR
(1) Was
temperature
gauge reading
high?
(1) If
YES,
refer
to
GAUGE
READING
HIGH. If NO,
refer
to steps
2, 3, and 4.
(2) Are all
heat
shields in place? (2) If
YES,
refer
to
steps
3 and 4. If NO,
repair
as required.
(3) If the air side of the
heat
exchanger
plugged?
(3) Clean as necessary.
(4) Engine running rich
causing
catalytic converter to overheat. (4) Repair as necessary.
POOR
DRIVEABIUTY.
SUSPECT
THERMOSTAT
FAILED
IN
OPEN
POSITION.
(1) Check On-Board
Diagnostics.
Is code 17 set in memory? (1) If
YES,
replace thermostat. If NO,
refer
to the appropriate
Driveability Manual.
J9007-59
Page 281 of 1502
7-10 COOLING SYSTEM
•
DIESEL
COOLING SYSTEM
DIAGNOSIS
CONDITION AND CHECKS
DIAGNOSIS
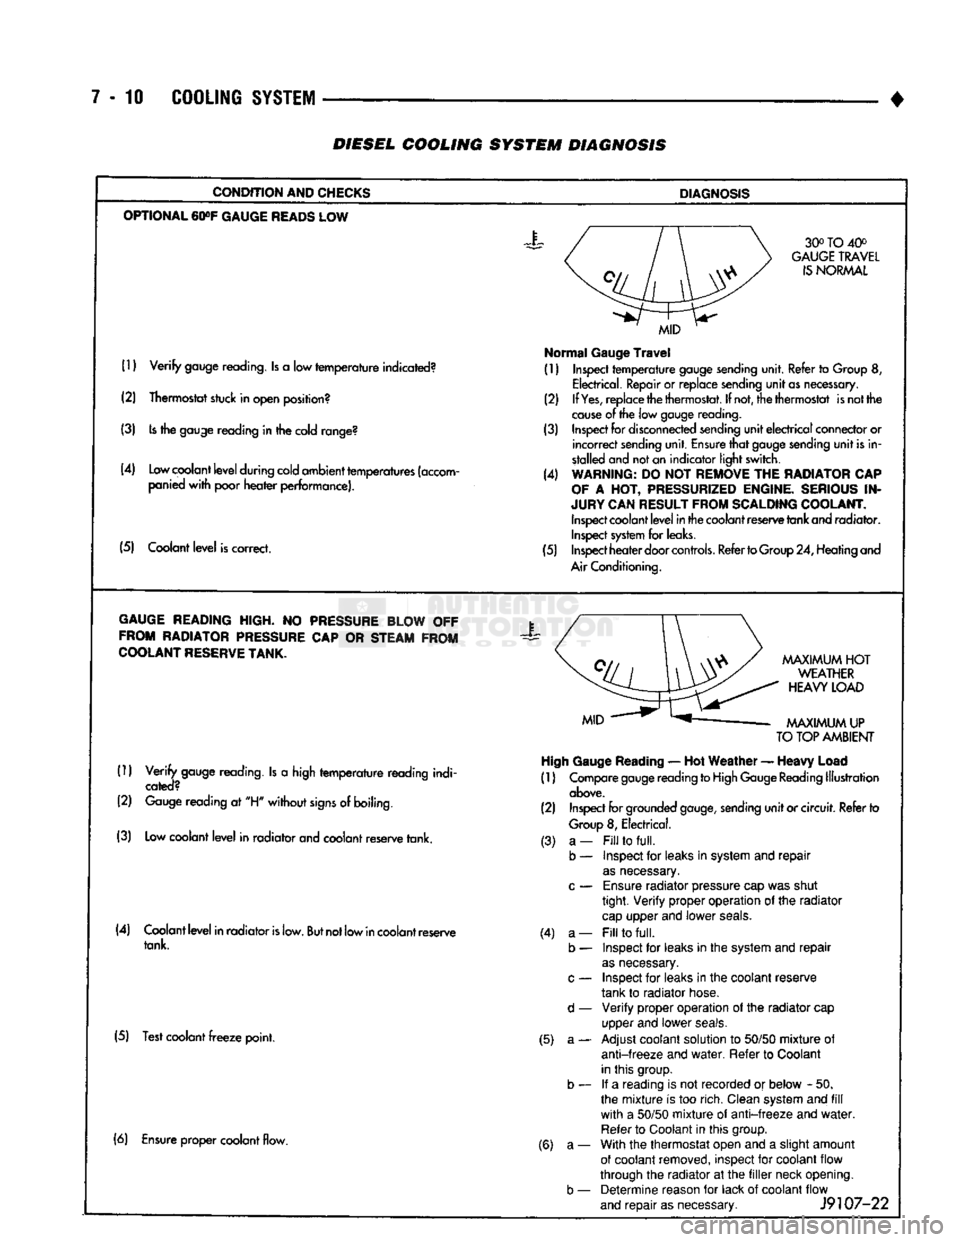
OPTIONAL
60»F
GAUGE
READS
LOW 30° TO 40°
GAUGE
TRAVEL
IS
NORMAL
(1)
Verify
gauge reading. Is a low
temperature
indicated?
(2) Thermostat stuck in open position?
(3) Is the gauge reading in the cold range?
(4) Low coolant
level
during cold ambient temperatures (accom panied
with
poor
heater
performance).
(5) Coolant
level
is correct.
MID
Normal
Gauge
Travel
(1) Inspect
temperature
gauge sending unit. Refer to Group 8,
Electrical. Repair or replace sending
unit
as necessary.
(2) If
Yes,
replace the thermostat. If not, the thermostat is not the
cause
of the low gauge
reading.
(3) Inspect for disconnected sending
unit
electrical
connector or
incorrect
sending unit. Ensure
that
gauge sending
unit
is in
stalled and not an indicator light switch.
(4) WARNING: DO NOT REMOVE THE RADIATOR CAP
OF
A HOT, PRESSURIZED ENGINE. SERIOUS IN
JURY CAN RESULT FROM SCALDING COOLANT. Inspect coolant
level
in the coolant reserve tank and radiator. Inspect system for leaks.
(5) Inspect
heater
door
controls.
Refer to Group 24, Heating and
Air Conditioning.
GAUGE
READING HIGH. NO PRESSURE BLOW OFF FROM RADIATOR PRESSURE CAP OR STEAM FROM
COOLANT
RESERVE
TANK.
X
(1)
Verify
gauge reading. Is a high
temperature
reading indi
cated?
(2) Gauge reading at "H"
without
signs
of boiling.
(3) Low coolant
level
in radiator and coolant reserve tank.
MAXIMUM
HOT
WEATHER
HEAVY
LOAD
MAXIMUM
UP
TO
TOP AMBIENT High Gauge
Reading
— Hot
Weather
—
Heavy
Load
(1) Compare gauge reading to High Gauge Reading Illustration
above.
(2) Inspect for grounded
gauge,
sending
unit
or circuit. Refer to
Group
8, Electrical.
(4) Coolant
level
in radiator
is
low.
But
not low in coolant reserve tank.
(5) Test coolant
freeze
point. (3) a-
b — (4) a-
b —
d —
(5) a- (6) Ensure proper coolant flow.
(6) a-
b —
Fill
to
full.
Inspect for leaks in system and
repair
as
necessary.
Ensure
radiator pressure cap was shut
tight.
Verify
proper operation of the radiator
cap
upper and lower
seals.
Fill
to
full.
Inspect for leaks in the system and
repair
as
necessary.
Inspect for leaks in the coolant reserve
tank to radiator hose.
Verify
proper operation of the radiator cap
upper and lower
seals.
Adjust coolant solution to
50/50
mixture
of
anti-freeze
and
water.
Refer to Coolant
in this group. If a reading is not recorded or below - 50.
the
mixture
is too rich. Clean system and
fill
with
a
50/50
mixture
of
anti-freeze
and
water.
Refer to Coolant in this group.
With the thermostat open and a slight amount
of coolant removed, inspect for coolant flow
through the radiator at the
filler
neck opening. Determine reason for lack of coolant flow
and
repair
as necessary.
J9107-22
Page 284 of 1502
•
COOLING SYSTEM 7-13
DIESEL COOLING SYSTEM DIAGNOSIS-CONTINUED
CONDITION
AND
CHECKS
DIAGNOSIS
COOLANT
LOSS
PAST
PRESSURE
CAP
TOP
SEAL,
VISIBLE
ON
RADIATOR
FILLER
NECK.
(1)
With
normal gauge reading. (1) a — Pressure cap not installed
tightly.
b — Pressure cap top seal leaks.
c
— Pressure cap diaphragm bowed.
d
— Damaged
radiator
filler
neck.
e — Pressure cap top seal out of position.
(2)
With
high or low gauge reading on new vehicle. (2) a — Kinked coolant reserve system hose.
(2)
With
high or low gauge reading on new vehicle.
b — Coolant reserve system
tank
plastic
tube
plugged.
c
— Pressure cap seal out of position.
DETONATION
OR
PREIGNITION.
NOT
CAUSED
BY
IGNI
TION OR
ENGINE
CONDITIONS.
(1)
Check engine coolant
freeze
point.
If the
tester
does
not
regis
(1) a — Adjust coolant solution to
50/50
water
ter a reading or if the reading is below 50°F, inspect
ethyl
ethylene-glycol
mixture.
ene-glycol/
water
ratio.
A 100
percent
solution of
ethylene-
b — If 100
percent
ethylene-glycol
solution is found
glycol
in
the
system
causes
the engine
to
run
hotter
and
possi
in system,
clean
and flush system
before
bly overheat.
replacing
with
50/50
mixture
of
ethylene-glycol
and
water.
COOLING
SYSTEM
HOSES
COLLAPSE
ON
COOLDOWN.
(1) Inspect pressure cap
vent
valve. (1) a — Gasket swell can
prevent
valve
from
opening.
b — Replace pressure cap.
(2) Coolant reserve
tank
hose plugged or kinked. (2) Repair as necessary.
(3) Inside of pressure cap plugged. (3) Clean cap or
replace
if necessary.
COOLING
SYSTEM
SUSPECTED
AS
CAUSE
OF
INADE
QUATE
AIR CONDITIONING
SYSTEM
PERFORMANCE.
(1) Inspect for plugged
radiator
and/or condenser. (D Clean
with
low pressure
water
from
fan side.
(2) Inspect for
missing
air
seals
in the
recirculating
air path. (2) Repair
as
necessary.
EXCESSIVE
FAN
NOISE
(1)
Inspect for loose or
bent
fan blades. (1) Replace fan.
(2) Inspect clearance
between
fan and
adjacent
part.
(2) Repair or
replace
as necessary.
(3) Inspect
radiator
and condenser for incoming air obstructions. (3) Clean air path
with
low pressure
water
from
fan side.
(4) Inspect
viscous
fan drive. (4) Replace if
viscous
drive
does not
operate
properly.
HEAT
ODOR
(1)
Was
temperature
gauge reading high? (1) If
YES,
refer
to
GAUGE
READING
HIGH.
If
NO,
refer
to
steps
2, 3, and 4.
(2) Are all
heat
shields in place? (2) If
YES,
refer
to steps 3 and 4. If NO,
repair
as
required.
(3)
Is
the air side of the
heat
exchanger plugged? (3) Clean as necessary.
(4) Engine running rich causing
catalytic
converter
to overheat. (4) Repair
as
necessary.
POOR
DRIVEABILITY.
SUSPECT
THERMOSTAT FAILED
IN OPEN POSITION.
(1)
Thermostat stuck in open position? 01 Replace thermostat. ._ _0 .
Jy
107-24
Page 286 of 1502
•
COOLING SYSTEM
7 - 15
SERVICE
PROCEDURES
INDEX
page
Coolant
26
Coolant Reserve/Overflow System
30
Cooling System Cleaning/Reverse Flushing
28
Cooling System Fan—Diesel Engine
. 37
Cooling System
Fan—Gas
Engines
36
Cooling System
Hoses
34
Draining Cooling System
27
Pressure
Testing
Radiator
Caps
............. 32
Radiator Pressure
Cap 31
Radiators
32
Refilling
the
Cooling System
28
WATER PUMPS—EXCEPT DIESEL
A centrifugal water pump circulates coolant
through the water jackets, passages, intake manifold,
radiator core, cooling system hoses and heater core.
The pump is driven from the engine crankshaft by a drive belt. The water pump impeller is pressed onto the rear
of a shaft that rotates in a bearing pressed into the
water pump body. The body has a small hole for ven
tilation. The water pump seals are lubricated by an
tifreeze in the coolant mixture. Additional lubrication is not necessary. A quick test to determine if pump is working is to
check if heater warms properly. A defective water
pump will not be able to circulate heated coolant
through the long heater hose to the heater core. The water pump on all models can be removed
without discharging the air conditioning system (if equipped).
REMOVAL The water pump on all gas powered engines is
bolted directly to the engine timing chain case/cover.
A gasket is used as a seal between the water pump
and timing chain case/cover.
If water pump is replaced because of bearing/shaft
damage or leaking shaft seal, the mechanical cooling
fan assembly should also be inspected. Inspect for fa tigue cracks, loose blades or loose rivets that could
have resulted from excessive vibration. Replace fan if any of these conditions are found. Also check condi
tion of the thermal viscous fan drive. Refer to Vis
cous Fan Drive in this group. (1) Disconnect negative battery cable from battery.
(2) Drain cooling system. Refer to Draining Cool
ing System in this group. Do not waste reusable coolant. If solution is clean,
drain coolant into a clean container for reuse.
(3)
Disconnect throttle cable from clip at top of fan
shroud.
page
Testing
Cooling System
for
Leaks
. 29
Thermostat
22
Transmission
Oil
Cooler—Diesel
35
Transmission
Oil
Cooler—Except Diesel
35
Transmission Oil-To-Air Cooler
36
Viscous
Fan
Drive
38
Water
Pump
Bypass
Hose—All
Gas
Powered
Engines
.............................. 19
Water
Pumps—5.9L Diesel
18
Water
Pumps—Except Diesel
15
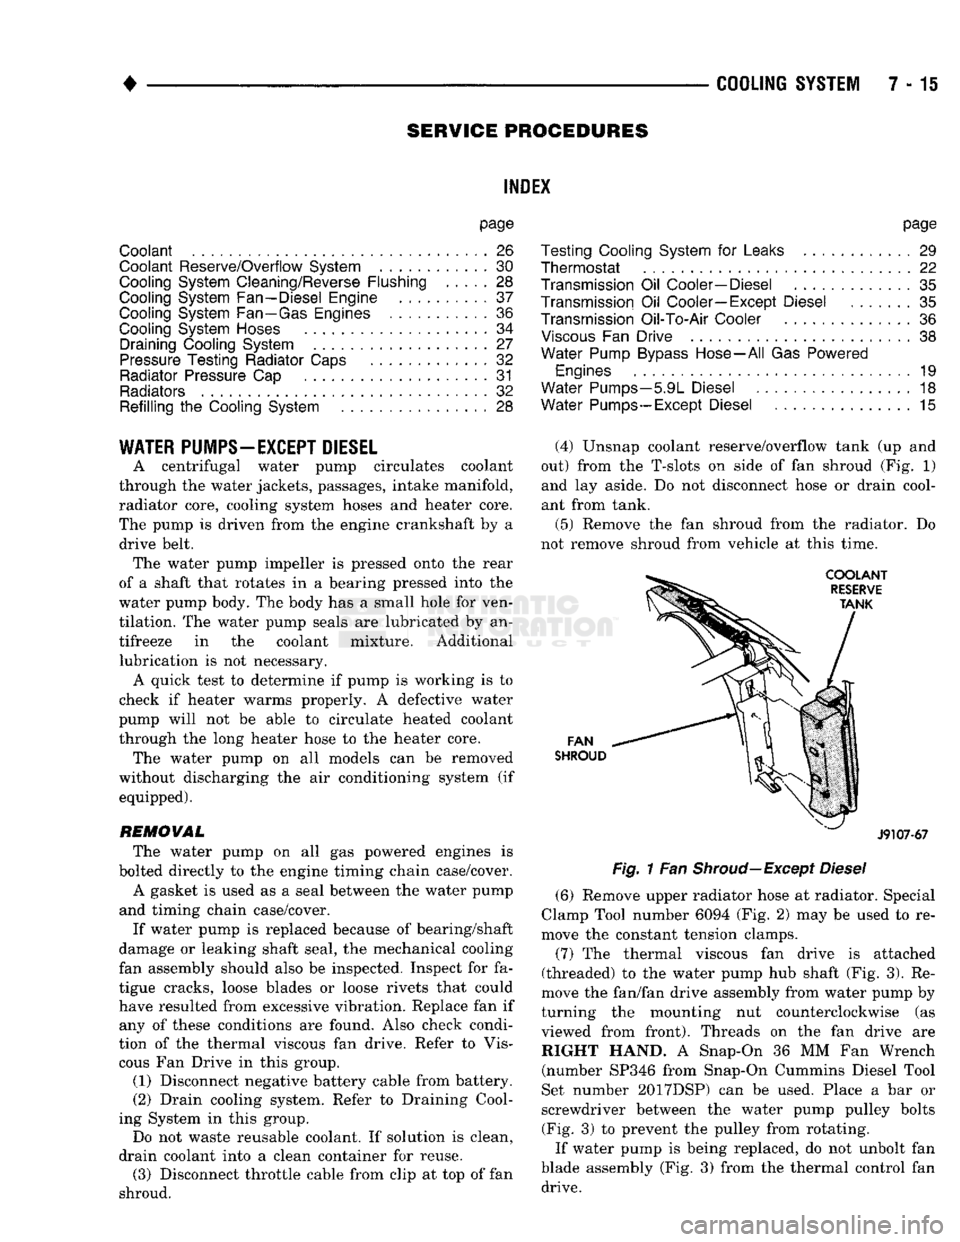
(4) Unsnap coolant reserve/overflow tank (up and
out) from the T-slots on side of fan shroud (Fig. 1) and lay aside. Do not disconnect hose or drain cool
ant from tank.
(5) Remove the fan shroud from the radiator. Do
not remove shroud from vehicle at this time.
FAN
SHROUD
J9107-67
Fig.
1 Fan
Shroud—Except
Diesel
(6) Remove upper radiator hose at radiator. Special
Clamp Tool number 6094 (Fig. 2) may be used to re
move the constant tension clamps.
(7) The thermal viscous fan drive is attached
(threaded) to the water pump hub shaft (Fig. 3). Re
move the fan/fan drive assembly from water pump by
turning the mounting nut counterclockwise (as viewed from front). Threads on the fan drive are RIGHT HAND. A Snap-On 36 MM Fan Wrench (number SP346 from Snap-On Cummins Diesel Tool
Set number 2017DSP) can be used. Place a bar or
screwdriver between the water pump pulley bolts (Fig. 3) to prevent the pulley from rotating.
If water pump is being replaced, do not unbolt fan
blade assembly (Fig. 3) from the thermal control fan drive.
Page 290 of 1502
•
COOLING
SYSTEM
7-11
MOUNT.
BOLT
3/8
SQUARE
HOLE
ACCESSORY
DRIVE
BELT AUTOMATIC
BELT
TENSIONER
J9307-59
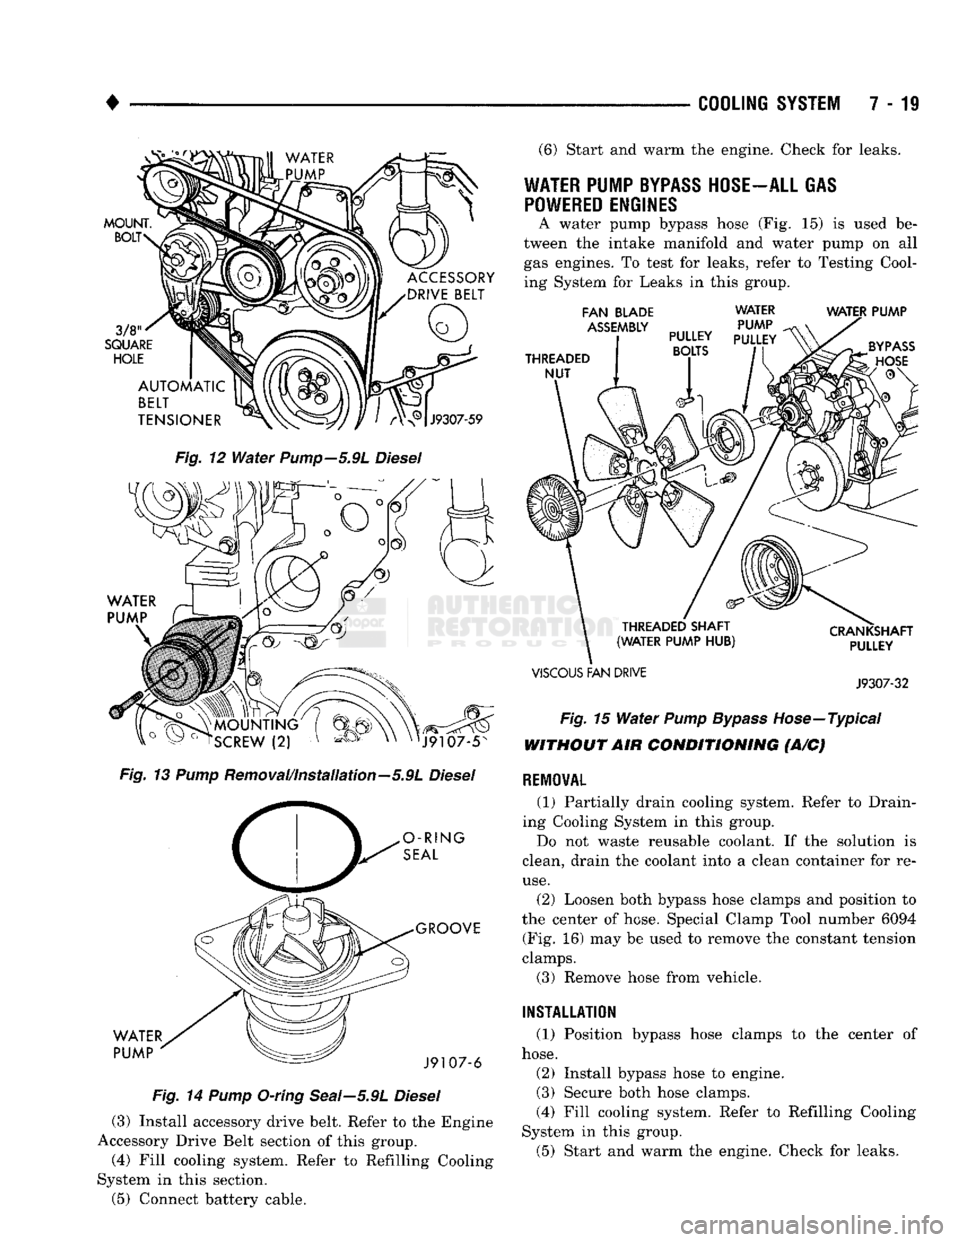
Fig.
12
Water
Pump—5.91
Diesel
o ~ " o
rSCREW
(2) v '^ov XN
nJ9107-5N
Fig.
13
Pump
Removal/Installation—5.9L
Diesel
O-RING
SEAL
WATER
PUMP
GROOVE
J9107-6
Fig.
14
Pump
O-ring Seal—5.9L
Diesel
(3) Install accessory drive belt. Refer to the Engine
Accessory Drive Belt section of this group.
(4) Fill cooling system. Refer to Refilling Cooling
System in this section.
(5) Connect battery cable. (6) Start and warm the engine. Check for leaks.
WATER PUMP
BYPASS
HOSE-ALL GAS POWERED ENGINES
A water pump bypass hose (Fig. 15) is used be
tween the intake manifold and water pump on all gas engines. To test for leaks, refer to Testing Cool
ing System for Leaks in this group.
FAN
BLADE
ASSEMBLY
THREADED
NUT
WATER
PUMP
PULLEY
PULLEY BOLTS WATER PUMP
THREADED SHAFT
(WATER PUMP
HUB)
VISCOUS
FAN DRIVE CRANKSHAFT
PULLEY
J9307-32
Fig.
15
Water
Pump Bypass
Hose—Typical
WITHOUT AIR CONDITIONING (A/C)
RE10WAL
(1) Partially drain cooling system. Refer to Drain
ing Cooling System in this group.
Do not waste reusable coolant. If the solution is
clean, drain the coolant into a clean container for re
use.
(2) Loosen both bypass hose clamps and position to
the center of hose. Special Clamp Tool number 6094 (Fig. 16) may be used to remove the constant tension
clamps.
(3) Remove hose from vehicle.
INSTALLATION
(1) Position bypass hose clamps to the center of
hose.
(2) Install bypass hose to engine.
(3) Secure both hose clamps.
(4) Fill cooling system. Refer to Refilling Cooling
System in this group.
(5) Start and warm the engine. Check for leaks.