Page 404 of 1216
9-120ENGINE <2.0L DOHC Engine>- Front Case, Oil Pump and Silent Shaft
7LUOoo6
Fine
7LUOOO76LUO12OIL PRESSURE SWITCH
-1
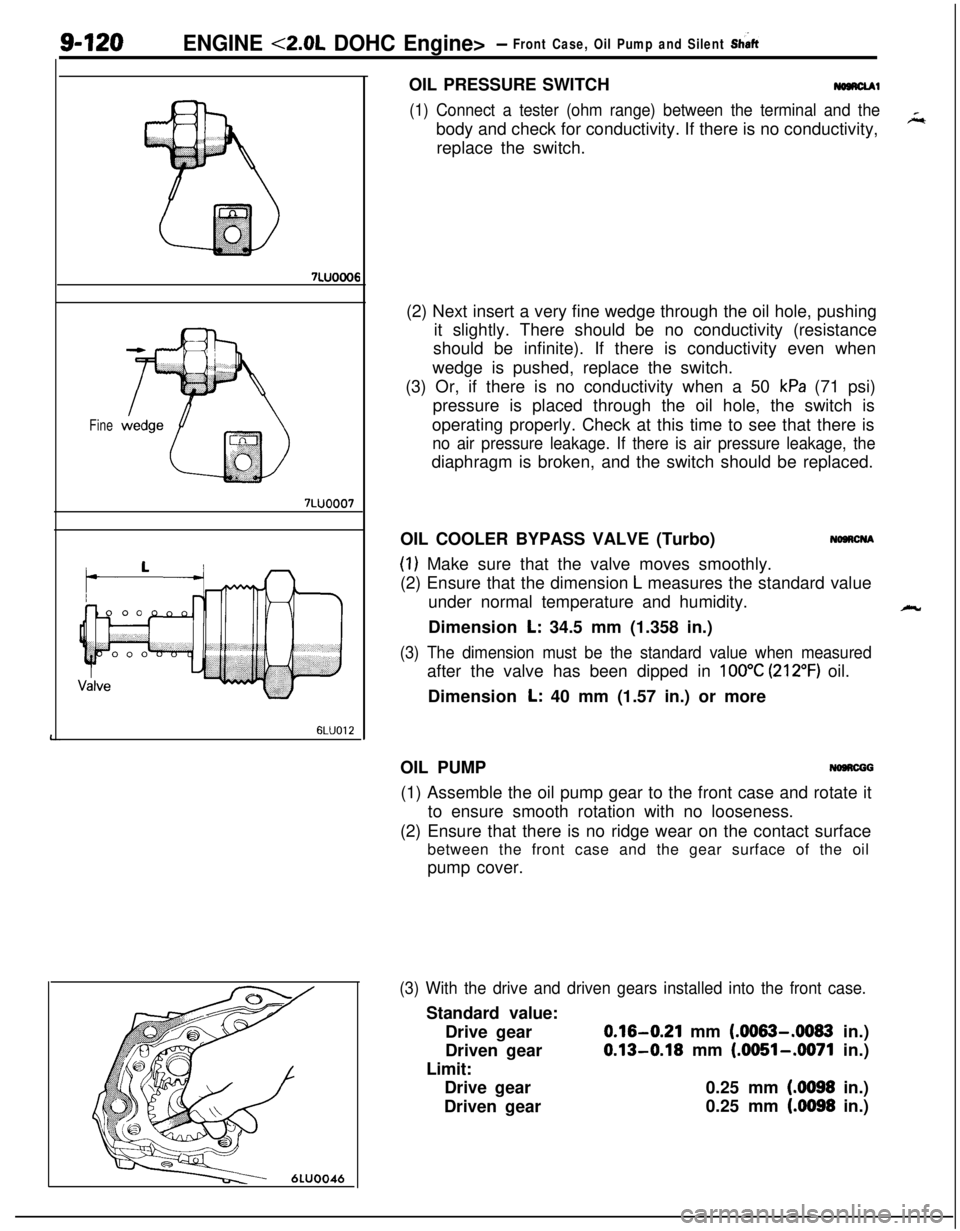
(1) Connect a tester (ohm range) between the terminal and thebody and check for conductivity. If there is no conductivity,
replace the switch.
(2) Next insert a very fine wedge through the oil hole, pushing
it slightly. There should be no conductivity (resistance
should be infinite). If there is conductivity even when
wedge is pushed, replace the switch.
(3) Or, if there is no conductivity when a 50
kPa (71 psi)
pressure is placed through the oil hole, the switch is
operating properly. Check at this time to see that there is
no air pressure leakage. If there is air pressure leakage, thediaphragm is broken, and the switch should be replaced.
OIL COOLER BYPASS VALVE (Turbo)
NaacNA
(1) Make sure that the valve moves smoothly.
(2) Ensure that the dimension
L measures the standard value
under normal temperature and humidity.
Dimension
L: 34.5 mm (1.358 in.)
(3) The dimension must be the standard value when measuredafter the valve has been dipped in
100°C (212°F) oil.
Dimension
L: 40 mm (1.57 in.) or more
OIL PUMP
NOBRCGG(1) Assemble the oil pump gear to the front case and rotate it
to ensure smooth rotation with no looseness.
(2) Ensure that there is no ridge wear on the contact surface
between the front case and the gear surface of the oil
pump cover.
(3) With the drive and driven gears installed into the front case.Standard value:
Drive gear
0.16-0.21 mm (.0063-.0083 in.)
Driven gear
0.13-0.18 mm (.0051-.0071 in.)
Limit:
Drive gear0.25 mm
(.0098 in.)
Driven gear0.25 mm
(4098 in.)
k
Page 405 of 1216
ENGINE <2.0L DOHC Engine>- Front Case, Oil Pump and Silent Shaft9-121
II6LUOO13~DEN662
Engine oil
bOil jet
Check valve assembly
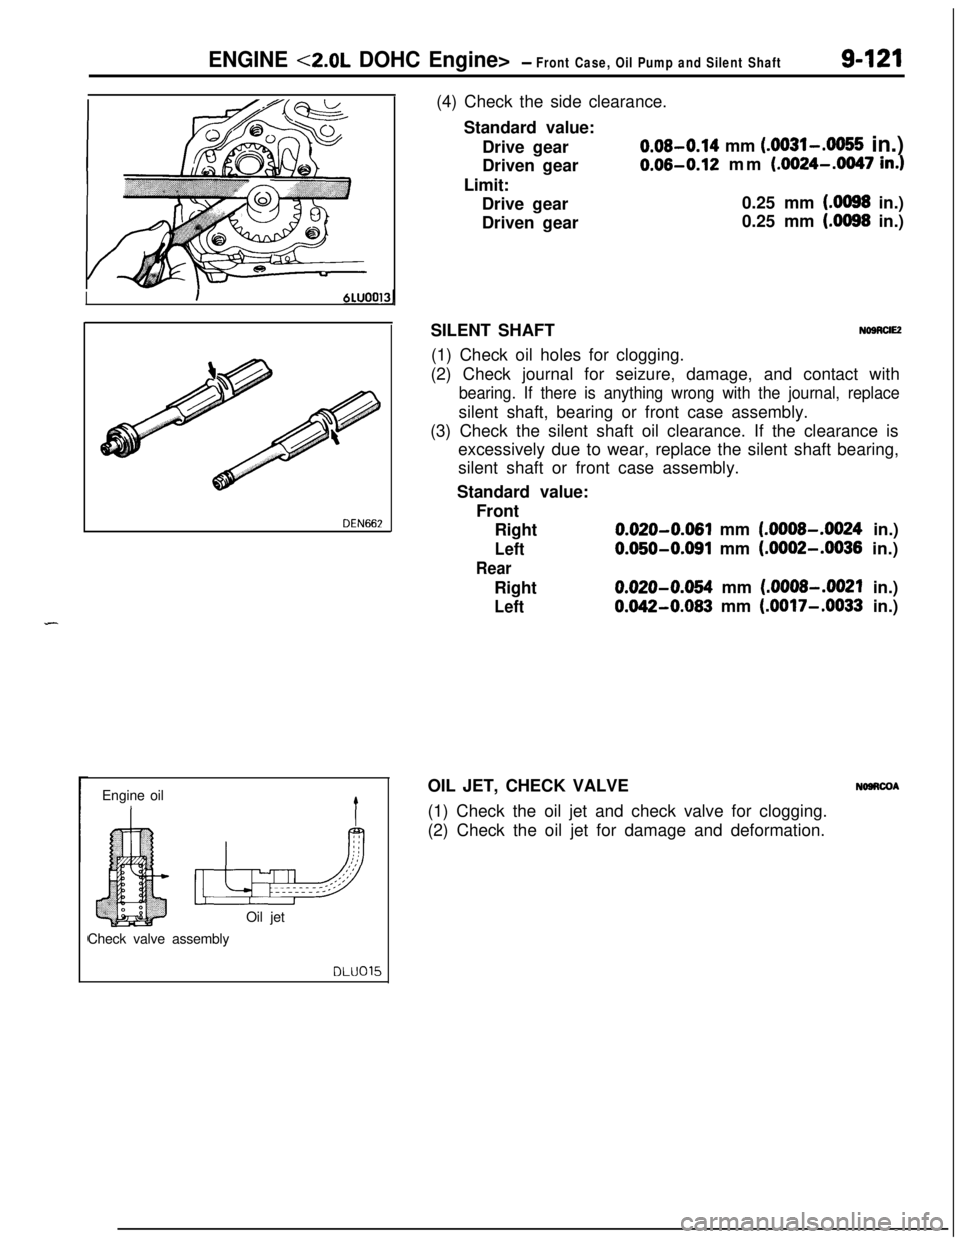
DLU015(4) Check the side clearance.
Standard value:
Drive gear
0.08-0.14 mm (.0031-.0055 in.)
Driven gear
0.06-0.12 mm (.0024-.0047 in.)Limit:
Drive gear0.25 mm
(.0098 in.)
Driven gear0.25 mm
(.0098 in.)
SILENT SHAFT
NOBRUE(1) Check oil holes for clogging.
(2) Check journal for seizure, damage, and contact with
bearing. If there is anything wrong with the journal, replacesilent shaft, bearing or front case assembly.
(3) Check the silent shaft oil clearance. If the clearance is
excessively due to wear, replace the silent shaft bearing,
silent shaft or front case assembly.
Standard value:
Front
Right
0.020-0.061 mm (.0008-.0024 in.)
Left0.050-0.091 mm (.0002-.0036 in.)
RearRight
0.020-0.054 mm (.0008-.0021 in.)
Left0.042-0.083 mm (.0017-.0033 in.)
OIL JET, CHECK VALVE
NOSRCOA(1) Check the oil jet and check valve for clogging.
(2) Check the oil jet for damage and deformation.
Page 406 of 1216
9-122ENGINE <2.0L DOHC Engine>- Front Case, Oil Pump and Silent ShaftMain gallery
Check valve6LUO14Left
rearbearing
6EN323
SERVICE POINTS OF REASSEMBLYNOSRHAG36. INSTALLATION OF OIL JET
;;;itWhen installing the oil jet, make sure that the nozzle is in
_correct direction, that is, toward the piston.
33. INSTALLATION OF LEFT SILENT SHAFT REAR BEAR-
ING
(1) Install the special (GUIDE PLATE) tool to the cylinder
block.k
(2) Apply engine oil to the rear bearing outer circumference1and bearing hole in cylinder block.
(3) Using the special tool, install the rear bearing.
NOTEThe left rear bearing has no oil holes.
Page 412 of 1216
9-128ENGINE <2.0L DOHC Enaine> - Piston and Connectina Rod
DEN050
6EN185
95EN057
Piston ringring gap6EN037
JSERVICE POINTS OF DISASSEMBLY
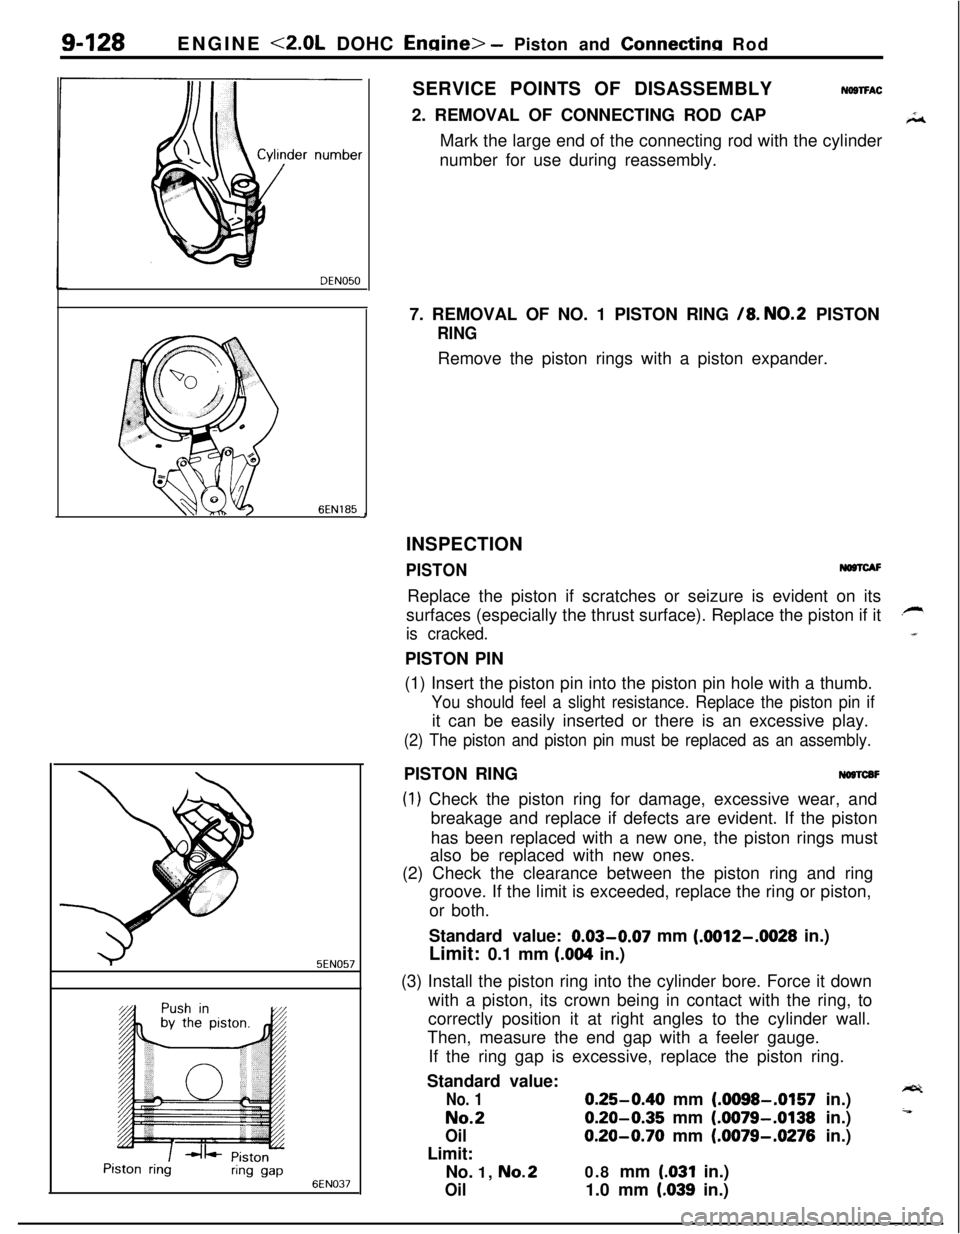
NOSTFAC2. REMOVAL OF CONNECTING ROD CAP
Mark the large end of the connecting rod with the cylinder
number for use during reassembly.
7. REMOVAL OF NO. 1 PISTON RING
/8. NO.2 PISTON
RINGRemove the piston rings with a piston expander.
INSPECTION
PISTONNO@lCAFReplace the piston if scratches or seizure is evident on its
surfaces (especially the thrust surface). Replace the piston if it
is cracked.PISTON PIN
(1) Insert the piston pin into the piston pin hole with a thumb.
You should feel a slight resistance. Replace the piston pin ifit can be easily inserted or there is an excessive play.
(2) The piston and piston pin must be replaced as an assembly.PISTON RING
NOSTCBF
(1) Check the piston ring for damage, excessive wear, and
breakage and replace if defects are evident. If the piston
has been replaced with a new one, the piston rings must
also be replaced with new ones.
(2) Check the clearance between the piston ring and ring
groove. If the limit is exceeded, replace the ring or piston,
or both.
Standard value: 0.03-0.07 mm
(.0012-.0028 in.)
Limit: 0.1 mm
(.004 in.)
(3) Install the piston ring into the cylinder bore. Force it down
with a piston, its crown being in contact with the ring, to
correctly position it at right angles to the cylinder wall.
Then, measure the end gap with a feeler gauge.
If the ring gap is excessive, replace the piston ring.
Standard value:
No. 10.25-0.40 mm (.0098-.0157 in.)
No.20.20-0.35 mm (.0079-.0138 in.)
Oil0.20-0.70 mm (.0079-.0276 in.)
Limit:
No. 1,
No.20.8 mm (.031 in.)
Oil1.0 mm (.039 in.)
Page 413 of 1216
ENGINE <2.0L DOHC Engine> - Piston and Connecting Rodgi’1.29
L
6EN377Side rail gap
I
1 EN062ICONNECTING ROD BEARING
NWTCDD(1) Visually check the bearing surface for uneven contact,
streaks, scratches, and seizure. Replace if defects are
evident. If streaks and seizure are excessive, check also the
crankshaft. If damage is present on the crankshaft, replacecrankshaft or regrind to undersize for reuse.
(2) Measure the connecting rod bearing I.D. and crankshaft pin
O.D. if the oil clearance exceeds the limit, replace bearing,
and crankshaft if necessary. Or, regrind the crankshaft to anundersize and replace bearing with an undersize one.
Standard value:
0.02-0.05 mm (.0008-JO20 in.)
Limit: 0.1 mm
(.004 in.)
NOTEFor oil clearance measuring method using the plastic
gauge, refer to the section CRANKSHAFT.
SERVICE POINTS OF REASSEMBLYNO9TGACa9. INSTALLATION OF OIL RING
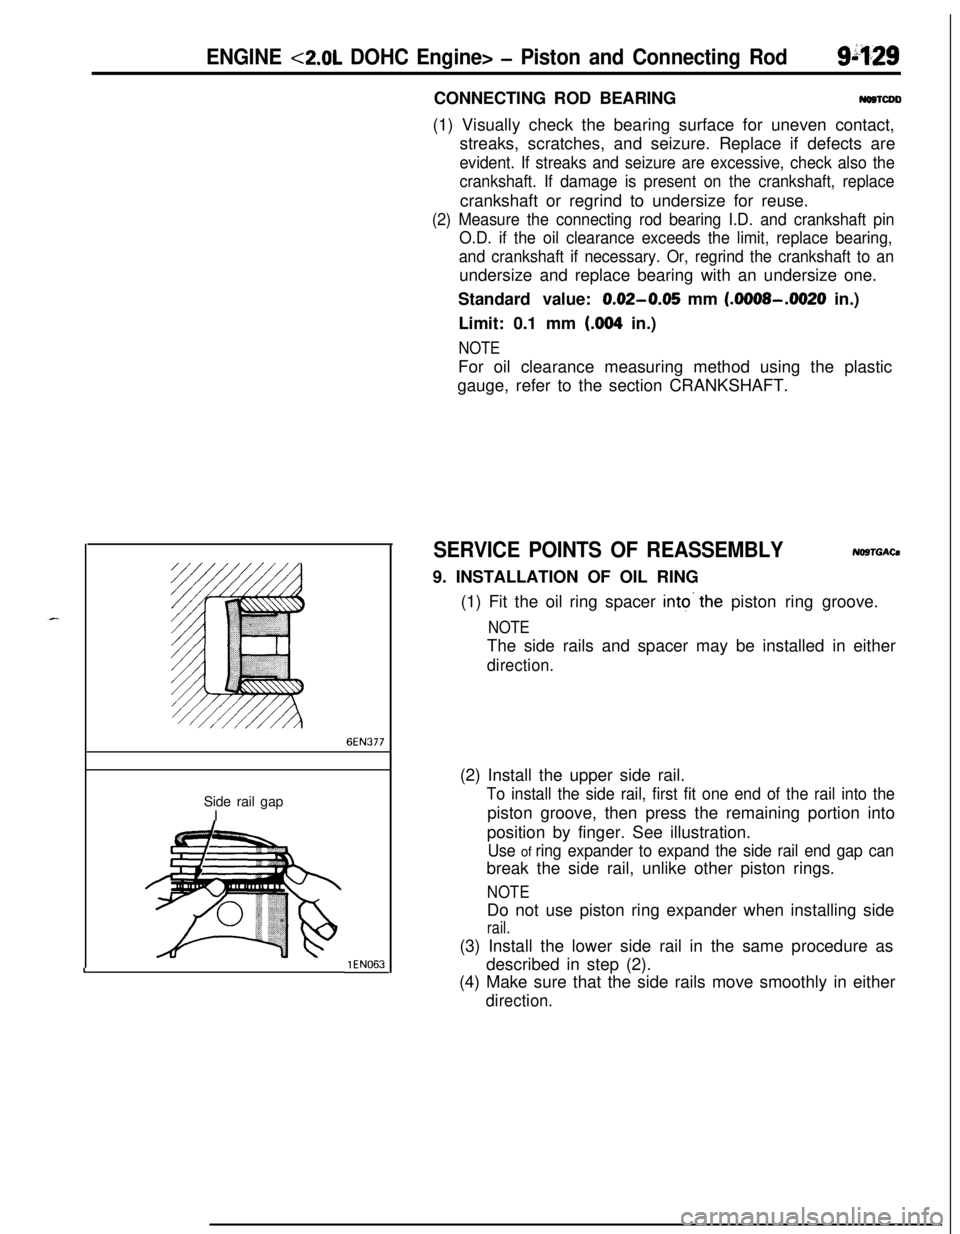
(1) Fit the oil ring spacer
into’the piston ring groove.
NOTEThe side rails and spacer may be installed in either
direction.(2) Install the upper side rail.
To install the side rail, first fit one end of the rail into thepiston groove, then press the remaining portion into
position by finger. See illustration.
Use of ring expander to expand the side rail end gap canbreak the side rail, unlike other piston rings.
NOTEDo not use piston ring expander when installing side
rail.(3) Install the lower side rail in the same procedure as
described in step (2).
(4) Make sure that the side rails move smoothly in either
direction.
Page 414 of 1216
9-130ENGINE <2.0L DOHC Engine> - Piston and Connecting Rod
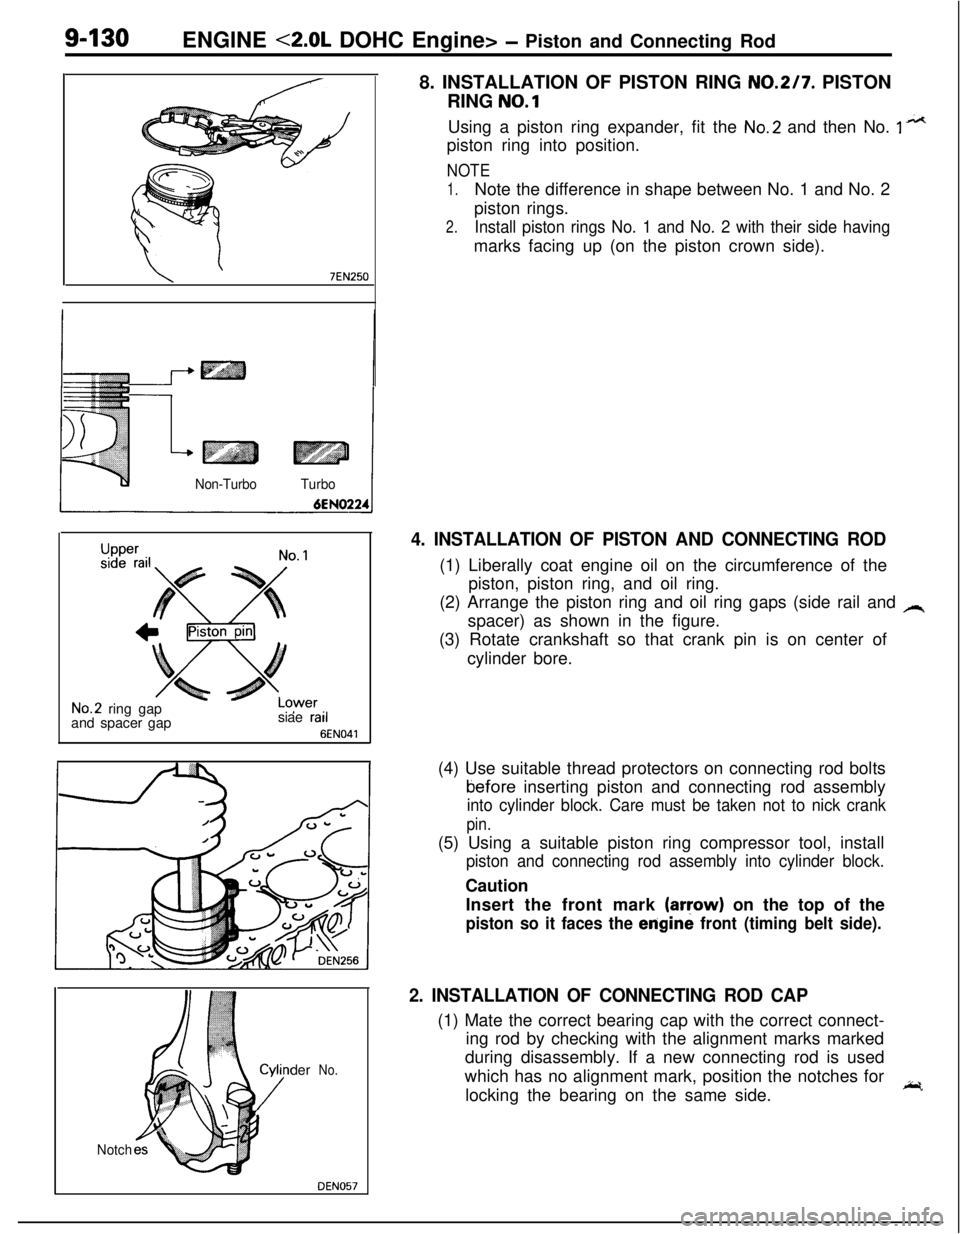
8. INSTALLATION OF PISTON RING
NO.217. PISTON
RING
NO.1
\ ’7EN250
Non-TurboTurbo
Upper
LCsiae rail
6
3wer’ ‘I
EN041
No.2 ring gap
and spacer gap
der
No.
Notch
DEN057Using a piston ring expander, fit the
No.2 and then No. 1 n*tpiston ring into position.
NOTE
1.Note the difference in shape between No. 1 and No. 2
piston rings.
2.Install piston rings No. 1 and No. 2 with their side havingmarks facing up (on the piston crown side).
4. INSTALLATION OF PISTON AND CONNECTING ROD(1) Liberally coat engine oil on the circumference of the
piston, piston ring, and oil ring.
(2) Arrange the piston ring and oil ring gaps (side rail and
Aspacer) as shown in the figure.
(3) Rotate crankshaft so that crank pin is on center of
cylinder bore.
(4) Use suitable thread protectors on connecting rod boltstiefore inserting piston and connecting rod assembly
into cylinder block. Care must be taken not to nick crank
pin.(5) Using a suitable piston ring compressor tool, install
piston and connecting rod assembly into cylinder block.Caution
Insert the front mark
(aryow) on the top of the
piston so it faces the erigine front (timing belt side).
2. INSTALLATION OF CONNECTING ROD CAP(1) Mate the correct bearing cap with the correct connect-
ing rod by checking with the alignment marks marked
during disassembly. If a new connecting rod is used
which has no alignment mark, position the notches for
locking the bearing on the same side.
I;r.
Page 417 of 1216
ENGINE <2.0L DOHC Engine>- Crankshaft, Flywheel and Drive Plate,91133
INSPECTIONNOSUHAD
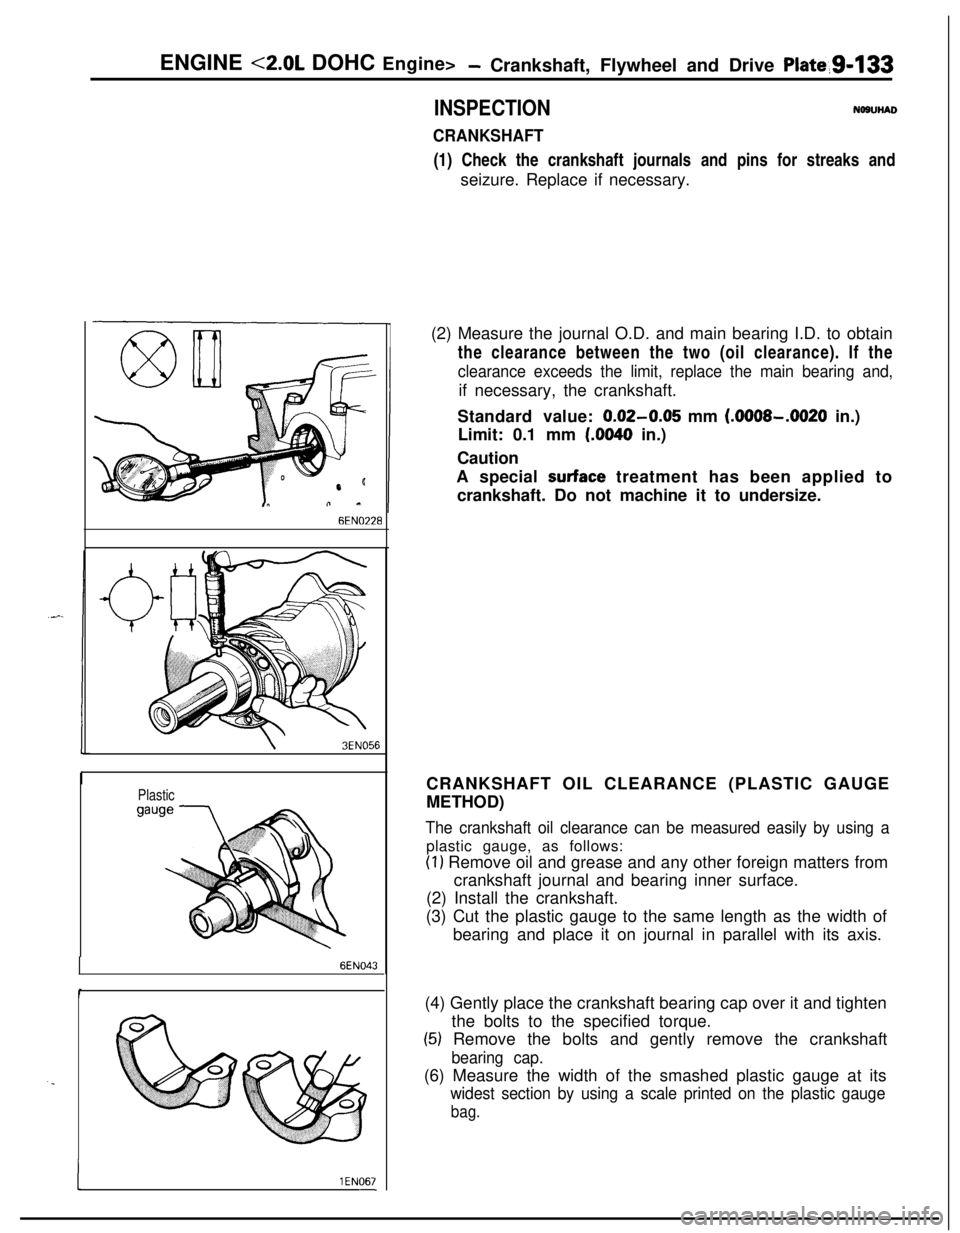
CRANKSHAFT(1) Check the crankshaft journals and pins for streaks and
seizure. Replace if necessary.
6EN0’228
\3EN056
Plastic
6EN043
. .
I1 EN067-(2) Measure the journal O.D. and main bearing I.D. to obtain
the clearance between the two (oil clearance). If the
clearance exceeds the limit, replace the main bearing and,if necessary, the crankshaft.
Standard value:
0.02-0.05 mm (.OOOS-.0020 in.)
Limit: 0.1 mm
(.0040 in.)
Caution
A special
surface treatment has been applied to
crankshaft. Do not machine it to undersize.
CRANKSHAFT OIL CLEARANCE (PLASTIC GAUGE
METHOD)
The crankshaft oil clearance can be measured easily by using aplastic gauge, as follows:
(1) Remove oil and grease and any other foreign matters from
crankshaft journal and bearing inner surface.
(2) Install the crankshaft.
(3) Cut the plastic gauge to the same length as the width of
bearing and place it on journal in parallel with its axis.
(4) Gently place the crankshaft bearing cap over it and tighten
the bolts to the specified torque.
(5) Remove the bolts and gently remove the crankshaft
bearing cap.(6) Measure the width of the smashed plastic gauge at its
widest section by using a scale printed on the plastic gauge
bag.
Page 418 of 1216
g-134 ENGINE <2.0L DOHC Engine>- Crankshaft, Flywheel and Drive Plate
3EN301CRANKSHAFT REAR OIL SEAL
(1) Check oil seal lip for wear and damage.
(2) Check rubber for deterioration or hardening.
(3) Check oil seal case for cracks and damage.
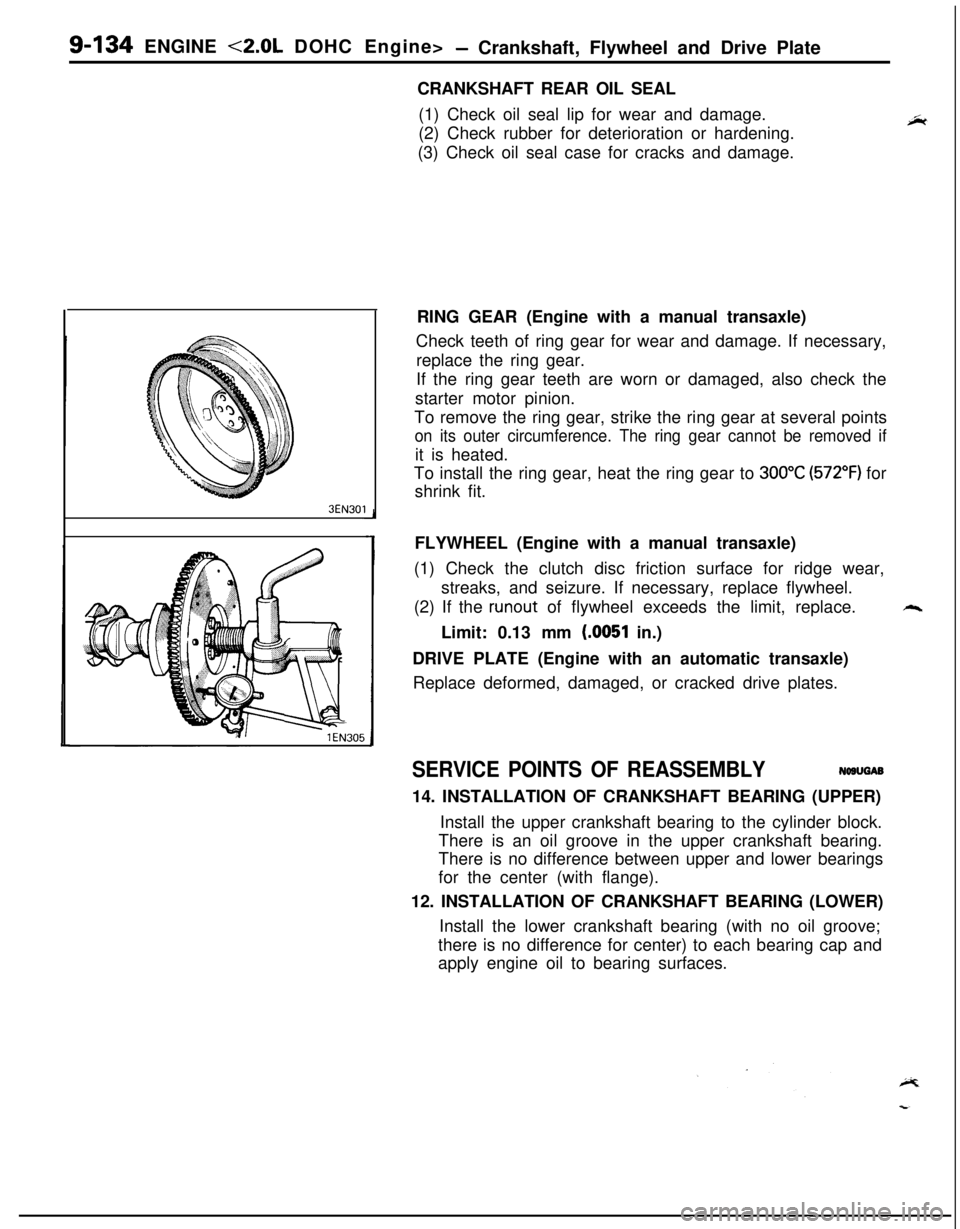
RING GEAR (Engine with a manual transaxle)
Check teeth of ring gear for wear and damage. If necessary,
replace the ring gear.
If the ring gear teeth are worn or damaged, also check the
starter motor pinion.
To remove the ring gear, strike the ring gear at several points
on its outer circumference. The ring gear cannot be removed ifit is heated.
To install the ring gear, heat the ring gear to
300°C (572°F) for
shrink fit.
FLYWHEEL (Engine with a manual transaxle)
(1) Check the clutch disc friction surface for ridge wear,
streaks, and seizure. If necessary, replace flywheel.
(2) If the
runout of flywheel exceeds the limit, replace.++.Limit: 0.13 mm
(.0051 in.)
DRIVE PLATE (Engine with an automatic transaxle)
Replace deformed, damaged, or cracked drive plates.
SERVICE POINTS OF REASSEMBLYNWUGAB
14. INSTALLATION OF CRANKSHAFT BEARING (UPPER)
Install the upper crankshaft bearing to the cylinder block.
There is an oil groove in the upper crankshaft bearing.
There is no difference between upper and lower bearings
for the center (with flange).
12. INSTALLATION OF CRANKSHAFT BEARING (LOWER)
Install the lower crankshaft bearing (with no oil groove;
there is no difference for center) to each bearing cap and
apply engine oil to bearing surfaces.