Page 1187 of 1216

HEATERS AND AIR CONDITIONING - Compiessor24-43
2OW660
2OW8628. REMOVAL OF FELT
Using a flat-tip
0 screwdriver, remove the felt from the
front housing.
11. REMOVAL OF SHAFT SEAL
Using a flat-tip
0 screwdriver, remove the shaft seal from
the front housing.
INSPECTIONN24TGAH
lCheck the surface of the clutch hub for scoring or bluing.
l Check the surface of the rotor for scoring or bluing.
l Check the sealing surfaces for cracks, scratches and
deformation.
lCheck the front housing for cracks or scoring on the sealing
surfaces.l Check the compressor shaft for scoring.
SERVICE POINTS OF REASSEMBLYN24StiAC11. INSTALLATION OF SHAFT SEAL
(1) Lubricate the shaft seal with specified compressor oil.
Specified compressor oil:
DENS0 OIL 6 or SUNISO 5GS(2) Set the shaft seal to the front housing so that the
projection side of the center ring is at the shaft seal
side.(3) Using a 21 mm
(.83 in,) socket, install the shaft seal.
7. INSTALLATION OF FRONT HOUSING
(1) Apply the specified compressor oil on the shaft.
Specified compressor oil:
DENS0 OIL 6 or SUNISO 5GS(2) Taking care to prevent injuring the lip area of the shaft
tool, mount the front housing.
(3) Mount the bolt on the shaft, and then measure the
shaft starting torque.
Standard value: 5.0 Nm (43
in.lbs.) or less
(4) Remove the bolt from the shaft.
Page 1195 of 1216

HEATERS AND AIR CONDITIONING- Engine Coolant Temperature Switch24-51
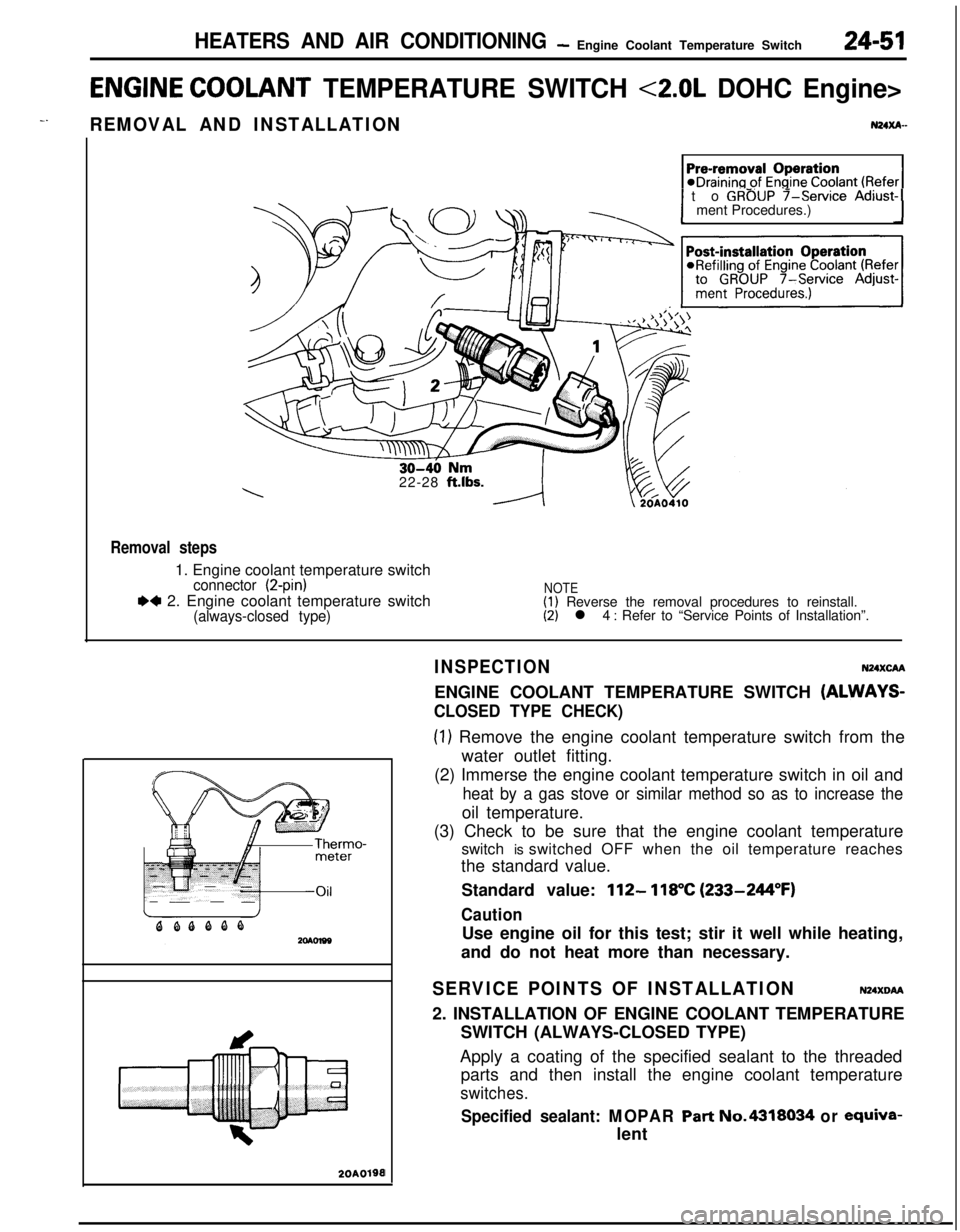
ENGINE COOLANT TEMPERATURE SWITCH <2.0L DOHC Engine>
-.REMOVAL AND INSTALLATIONN24xA-
1 to GROUP f-service Adjust-1ment Procedures.)
22-28
ft.lbs.
Removal steps1. Engine coolant temperature switch
connector (2-pin)
.4 2. Engine coolant temperature switch(always-closed type)
NOTE(1) Reverse the removal procedures to reinstall.(2) l 4 : Refer to “Service Points of Installation”.
20A0190I
INSPECTIONN24XcAAENGINE COOLANT TEMPERATURE SWITCH
(ALWAYS-
CLOSED TYPE CHECK)
(1) Remove the engine coolant temperature switch from the
water outlet fitting.
(2) Immerse the engine coolant temperature switch in oil and
heat by a gas stove or similar method so as to increase theoil temperature.
(3) Check to be sure that the engine coolant temperature
switch is switched OFF when the oil temperature reaches
the standard value.
Standard value:
112- 118°C (233-244°F)
CautionUse engine oil for this test; stir it well while heating,
and do not heat more than necessary.
SERVICE POINTS OF INSTALLATIONN24XDM2. INSTALLATION OF ENGINE COOLANT TEMPERATURE
SWITCH (ALWAYS-CLOSED TYPE)
Apply a coating of the specified sealant to the threaded
parts and then install the engine coolant temperature
switches.
Specified sealant: MOPAR Part No.4318034 or ewiva-lent
Page 1199 of 1216
-.
EMISSION CONTROL SYSTEMS - Troubleshooting
TROUBLESHOOTING
., ,_
SymptomProbable causeRemedy
Engine will not start or hard toVacuum hose disconnected or damaged
Repair or replacestart
The EGR valve is not closedMalfunction of the purge control solenoid
valve
Rough idle or engine stalls
The EGR valve is not closed.
Repair or replace
Vacuum hose disconnected or damagedMalfunction of the positive crankcase
ventilation valve
ReplaceMalfunction of the purge control system
Check the system; if there is a problem,
check its component parts
Engine hesitates or poor accel-Malfunction of the exhaust gas
recircula-Check the system; if there is a problem,
erationtion systemcheck its component parts
Excessive oil consumptionPositive crankcase ventilation line cloggedCheck positive crankcase ventilation sys-tem
Poor fuel mileageMalfunction of the exhaust gas recircula-Check the system; if there is a problem,tion systemcheck its component parts