Page 349 of 4087
OKNG
OKNG
OKNG
INSPECTION PROCEDURE
1Check operation of stop light.
Check if the stop lights go on and off normally when the brake pedal is operated and released.C
Check and repair stop light circuit (See BE section).
2Check stop light signal.
C
OK
1. Connect voltmeter to the terminals TT and E1 of the
DLC2.
2. Turn ignition switch ON (Do not start the engine).
3. Fully depress the accelerator pedal until the volt- meter indicates 8 V and hold it.
4. Depress and release the brake pedal and check the
voltage.
Proceed to next circuit inspection shown on matrix chart
(See page AT±66).
3Check harness and connector between ECM and stop light switch (See page\
IN±33).
Repair or replace harness or connector.
Check and replace ECM.
±
A304E (1UZ±FE) AUTOMATIC TRANSMISSION TROUBLESHOOTINGAT±109
WhereEverybodyKnowsYourName
Page 352 of 4087
WIRING DIAGRAM
O/D Main Switch and O/D OFF Indicator Light Circuit
CIRCUIT DESCRIPTION
The O/D main switch contacts go off when the switch is pushed in and comes on when it is pushed out.
In O/D main switch OFF position, the O/D OFF indicator lights up, and the \
ECM prohibits shifting to over-
drive. The ECM also causes the O/D OFF indicator light to blink when a malfunc\
tion is detected. In this
case, connecting the terminals in the DLC2 or DLC1 can display the malfu\
nction code.
DIAGNOSTIC CHARTDIAGNOSTIC CHART
See next page.
AT±112
±
A304E (1UZ±FE) AUTOMATIC TRANSMISSION TROUBLESHOOTING
WhereEverybodyKnowsYourName
Page 353 of 4087
O/D OFF indicator light does not light up.
AT±66
BE IN±33
IN±33
O/D OFF indicator light blinks
Perform diagnostic trouble code check (See page AT±38).
±
A304E (1UZ±FE) AUTOMATIC TRANSMISSION TROUBLESHOOTINGAT±113
WhereEverybodyKnowsYourName
Page 354 of 4087

OKNG
OKNG
OKNG
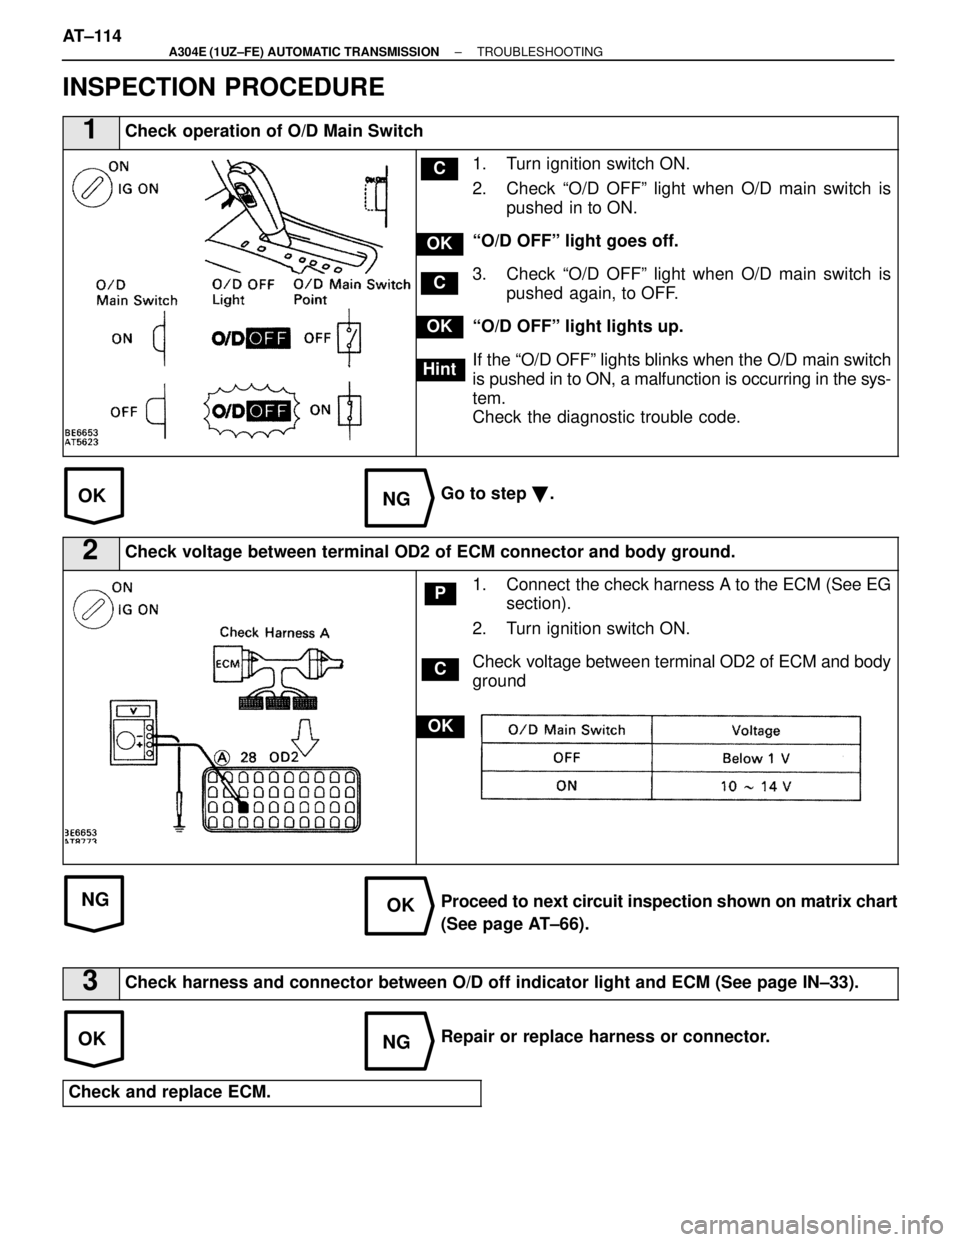
INSPECTION PROCEDURE
1Check operation of O/D Main Switch
C
OK
Hint
C
OK
1. Turn ignition switch ON.
2. Check ªO/D OFFº light when O/D main switch ispushed in to ON.
ªO/D OFFº light goes off.
3. Check ªO/D OFFº light when O/D main switch is pushed again, to OFF.
ªO/D OFFº light lights up.
If the ªO/D OFFº lights blinks when the O/D main switch
is pushed in to ON, a malfunction is occurring in the sys-
tem.
Check the diagnostic trouble code.
Go to step �.
2Check voltage between terminal OD2 of ECM connector and body ground.
C
OK
P1. Connect the check harness A to the ECM (See EG
section).
2. Turn ignition switch ON.
Check voltage between terminal OD2 of ECM and body
ground
Proceed to next circuit inspection shown on matrix chart
(See page AT±66).
3Check harness and connector between O/D off indicator light and ECM (Se\
e page IN±33).
Repair or replace harness or connector.
Check and replace ECM.
AT±114±
A304E (1UZ±FE) AUTOMATIC TRANSMISSION TROUBLESHOOTING
WhereEverybodyKnowsYourName
Page 358 of 4087
AT±66
IN±33
WIRING DIAGRAM
TE1 Terminal Circuit
CIRCUIT DESCRIPTION
ECM displays diagnostic trouble codes using the O/D OFF indicator light \
when terminals TE and E of the
DLC2 or DLC1 are connected.
DIAGNOSTIC CHARTDIAGNOSTIC CHART
AT±118±
A304E (1UZ±FE) AUTOMATIC TRANSMISSION TROUBLESHOOTING
WhereEverybodyKnowsYourName
Page 401 of 4087
WINDSHIELD
COMPONENTS
REMOVAL OF WINDSHIELD
1. REMOVE FOLLOWING PARTS:(a) Front pillar garnish (See step 2 on page BO±123)
(b) Interior light (See step 2 on page BO±85)
(c) Center visor and i nner rear view mirror (See page
BO±44 )
(d) Sun visor (See step 3 on page BO±123)
(e) Hood (See step 2 on page BO±20)
(f) Moulding (See page BO±96)
±
BODY WindshieldBO±45
WhereEverybodyKnowsYourName
Page 407 of 4087
18. INSTALL FOLLOWING PARTS:(a) Hood
HINT: Torque the hood support
Torque: 22 N Vm (225 kgf Vcm, 16 ft Vlbf)
(b) Front roof headlining
(c) Holders
(d) Center visor and inner rear view mirror
(e) Interior light
(f) Front pillar garnish
±
BODY WindshieldBO±51
WhereEverybodyKnowsYourName
Page 421 of 4087
ASSEMBLY OF FRONT SEAT
(See page BO±63)
ASSEMBLE FRONT SEAT PARTS BY FOLLOWING DIS-
ASSEMBLY SEQUENCE IN REVERSE HINT:
wUsing hog ring pliers, install the new hog ring.
wBefore installing the reclining adjuster, align the
matchmarks.
wIf creases occur in the front seat, stretch out the
creases by heating them with a dryer, etc.
If the creases still cannot be removed, spray them lightly
with a vaporizer before applying the hair dry again.
±
BODY Seat (Front Seat)BO±65
WhereEverybodyKnowsYourName