Page 877 of 1640

Replacement
SRS component s ar e locate d i n thi s area . Revie w th e
SR S componen t locations , precautions , an d procedure s
i n th e SR S sectio n 24 befor e performin g repair s o r ser -
vice .
1. Remov e th e cloc k (se e pag e 23-231 ).
2 . Remov e th e tw o screw s behin d th e clock , the n
remov e th e cente r ai r ven t (se e sectio n 20 ).
3 . Remov e th e fou r screws , the n remov e th e cente r
armrest .
4. Tak e ou t th e ashtray .
5 . Remov e th e fiv e screw s an d cente r consol e panel ,
the n disconnec t th e 3- P connecto r an d 4- P connec -
to r fro m th e floo r wir e harness .
ASHTRA Y
CENTERCONSOL EPANEL
CENTE R AI R VEN T
4- P CONNECTO R
3- P CONNECTO R
CENTE R ARMRES T
6. Disconnec t th e therm o fus e cas e fro m th e en d of
th e cigarett e lighte r socket .
7 . Remov e th e rin g nut , an d separat e th e cigarett e
lighte r socke t fro m th e therma l protector .
8 . Whe n installin g th e cigarett e lighter , alig n eac h lu g
o n th e fac e panel , illuminatio n rin g an d cigarett e
lighte r socke t wit h th e groov e in th e hole , the n posi -
tio n th e bul b housin g o n th e therma l protecto r
betwee n th e stop s o n th e cente r consol e panel .
9 . Mak e sur e tha t th e ground , bul b socke t an d therm o
fus e cas e ar e seate d agains t th e cigarett e lighte r
assembly .
CIGARETT ELIGHTERSOCKE T
ILLUMINATIO NRING
FACE PANE L
THERMA L
PROTECTO R
GROUNDWIRE
CENTE R CONSOL EPANELASHTRA Y LIGH T (1. 4 W )
RIN
G NU T
THERM O FUS E CAS E
CIGARETT E LIGHTE R
LIGH T (1. 4 W )
ProCarManuals.com
Page 878 of 1640
Cigarette Lighte r
Relay Tes t
1. Remov e th e glov e bo x (se e sectio n 20 ).
2 . Disconnec t th e 4- P connecto r fro m th e cigarett e
lighte r rela y (wir e color s o f 4- P connector : BLU /
GRN, YEL/RED , BRN/YEL , BLK) .
3. Chec k continuit y a t th e rela y terminals .
• Ther e shoul d b e continuit y betwee n th e C an d D
terminals .
• Ther e shoul d b e continuit y betwee n th e A an d B
terminal s whe n powe r an d groun d ar e connecte d
t o th e C an d D terminals .
• Ther e shoul d b e n o continuit y betwee n th e A
an d B terminal s whe n powe r i s disconnected .
ProCarManuals.com
Page 888 of 1640
Horns
Component Location Index
SRS components are located in this area. Review the
SRS component locations, precautions, and procedures
in the SRS section (24) before performing repairs or ser-
vice.
HORN RELAY
Test, page 23-249
UNDER-HOOD RELAY
BOX A
CABLE REEL
Test, page 23-250
HORN SWITCH
Test, page 23-249
Overhaul, section 17
SECURITY HORNTest, page 23-248
LEFT HORN
Test, page 23-248
RIGHT HORN
Test, page 23-248
SECURITY CONTROL
UNIT
Inpu
t
Test, page 23-320
('94-'96) ('93) ('91-'92)
UNDER-HOOD
FUSE/RELAY BOX
Description
Security Alarm System:
The security alarm system is an anti-theft alarm system. If someone tries to open the trunk, hood or either door without
the ignition key, or if the roof is not fully latched the security control unit senses a signal from the sensors and activates
relays to flash the headlights and sound the horn for about two minutes.ProCarManuals.com
Page 922 of 1640
Rear Window Defogger
Switch Replacement (cont'd)
5. Disconnect the 18-P and 10-P connectors.
CAUTION: Be careful not to damage the SRS wire
harness.
6. Remove the six screws, then remove the rear win-
dow defogger-light switch assembly.
10-P CONNECTOR
18-P CONNECTOR
REAR WINDOW DEFOGGER-
LIGHT SWITCH ASSEMBLY
7. If necessary, replace the rear window defogger
switch bulbs.
REAR WINDOW
DEFOGGER SWITCH
BULBS (0.91 W)ProCarManuals.com
Page 925 of 1640

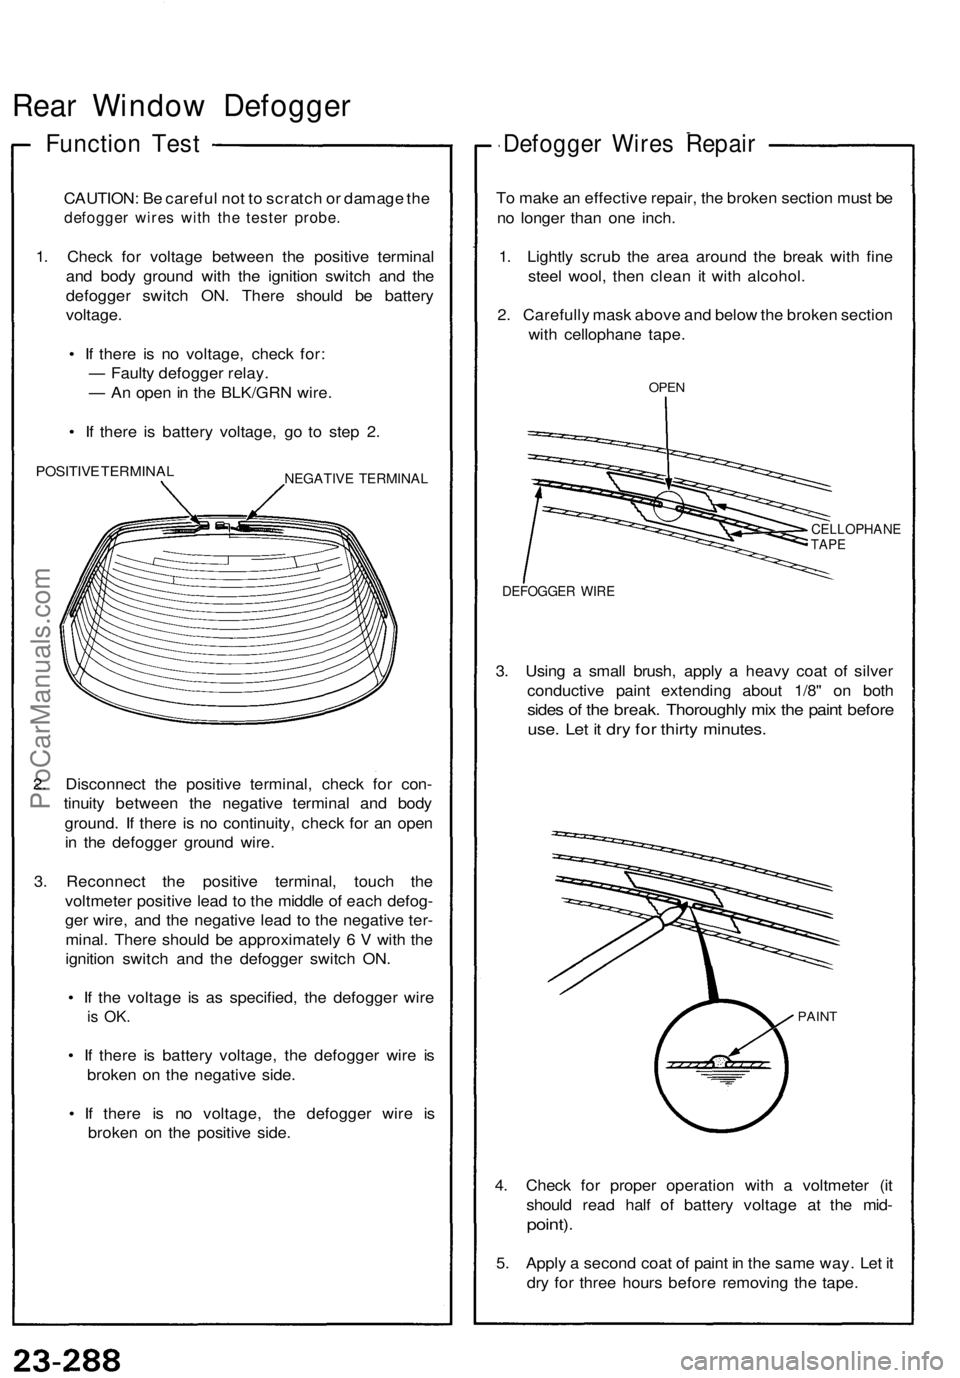
Rear Window Defogger
Function Test
CAUTION: Be careful not to scratch or damage the
defogger wires with the tester probe.
1. Check for voltage between the positive terminal
and body ground with the ignition switch and the
defogger switch ON. There should be battery
voltage.
• If there is no voltage, check for:
— Faulty defogger relay.
— An open in the BLK/GRN wire.
• If there is battery voltage, go to step 2.
POSITIVE TERMINAL
NEGATIVE TERMINAL
2. Disconnect the positive terminal, check for con-
tinuity between the negative terminal and body
ground. If there is no continuity, check for an open
in the defogger ground wire.
3. Reconnect the positive terminal, touch the
voltmeter positive lead to the middle of each defog-
ger wire, and the negative lead to the negative ter-
minal. There should be approximately 6 V with the
ignition switch and the defogger switch ON.
• If the voltage is as specified, the defogger wire
is OK.
• If there is battery voltage, the defogger wire is
broken on the negative side.
• If there is no voltage, the defogger wire is
broken on the positive side.
Defogger Wires Repair
To make an effective repair, the broken section must be
no longer than one inch.
1. Lightly scrub the area around the break with fine
steel wool, then clean it with alcohol.
2. Carefully mask above and below the broken section
with cellophane tape.
OPEN
CELLOPHANE
TAPE
DEFOGGER WIRE
3. Using a small brush, apply a heavy coat of silver
conductive paint extending about 1/8" on both
sides of the break. Thoroughly mix the paint before
use. Let it dry for thirty minutes.
PAINT
4. Check for proper operation with a voltmeter (it
should read half of battery voltage at the mid-
point).
5. Apply a second coat of paint in the same way. Let it
dry for three hours before removing the tape.ProCarManuals.com
Page 933 of 1640
Cruise Control
Component Location Index
SRS components are located in this area. Review the
SRS component locations, precautions, and procedures
in the SRS section (24) before performing repairs or ser-
vice.
BRAKE SWITCH
Test, page 23-308 ('93-'96) ('91-'92) INDICATOR LIGHT and
DIMMIN
G
CIRCUIT
(In tha gauge assembly)
Bulb Locations, page 23-128
('94-'96) ('91-'93)
MAIN SWITCH
Test, page 23-306 Replacement, page 23-305
SET/RESUME SWITCH
Test, page 23-307 ('93-'96) ('91-'92)
Replacement, page 23-307('93-'96) ('91-'92)
A/T GEAR POSITION
SWITCH
Test, 23-309 ('93-'96) ('91-'92) Replacement, page 23-161 ('93-'96) ('91-'92)
CABLE REEL
Test, page 23-250
Replacement, see section 24
CLUTCH SWITCH (M/T)
Test, page 23-308 ('93-'96) ('91-'92)ProCarManuals.com
Page 935 of 1640

Cruise Control
Description
The cruise control system uses mechanically and electri-
cally operated devices to maintain vehicle speed at a
setting selected by the driver.
The ECM receives command signals from the cruise con-
trol main switch and the cruise control set/resume switch.
It receives information about operating conditions from
the brake switch, vehicle speed sensor (VSS), the clutch
switch (with manual transmission), or the A/T gear posi-
tion switch (with automatic transmission). The ECM
sends operational signals to the devices that regulate the
throttle position. The throttle position maintains the
selected vehicle speed. Essentially, the ECM compares
the actual speed of the vehicle to the selected speed.
Then, it uses the result of that comparison to open or
close the throttle.
The brake switch releases the system's control of the
throttle at the instant the driver depresses the brake
pedal. The switch sends an electronic signal to the ECM
when the brake pedal is depressed; the ECM responds
by allowing the throttle to close. The clutch switch (man-
ual transmission) or the A/T gear position switch (auto-
matic transmission) sends a disengage signal to the
ECM that also allows the throttle to close.
Operation:
The cruise control system will set and automatically
maintain any speed above 25 mph (45 km/h). To set,
make sure that the main switch is in the "ON" position.
After reaching the desired speed, press the set switch.
The ECM will receive a set signal and, in turn, will actu-
ate the throttle valve control motor. When the set switch
is depressed and the cruise control system is on, the
"cruise control" ON indicator in the gauge assembly will
light up. You can cancel the cruise control system by
pushing the main switch to "OFF". This erases the set
speed from memory. If the system is disengaged tem-
porarily by the brake switch, clutch switch, or A/T gear
position switch and vehicle speed is still above 25 mph,
press the resume switch. With the resume switch
depressed and the set memory retained, the vehicle
automatically returns to the previous set speed.
For gradual acceleration without depressing the acceler-
ator pedal, push the resume switch down and hold it
there until the desired speed is reached. This will send
an acceleration signal to the ECM. When the switch is
released, the system will be reprogrammed for the new
speed. To slow down, depress the set switch. This will
send a deceleration signal to the ECM causing the car to
coast until the desired speed is reached. When the
desired speed is reached, release the set switch. This
will reprogram the system for the new speed.ProCarManuals.com
Page 936 of 1640
Troubleshooting
Cruise Control
NOTE:
• The numbers in the table show the troubleshooting sequence.
• Before troubleshooting:
— Check the No. 5 (15 A) fuse in the under-dash fuse box, and the No. 29 (50 A) and No. 45 (20 A) fuses in the under-
hood fuse/relay box.
— Check that the horns sound.
— Make sure that the headlights go off.ProCarManuals.com