1988 PONTIAC FIERO check engine
[x] Cancel search: check enginePage 1122 of 1825
AUTOMATIC TMNSMISSION ON-VEHICLE SERVICE 7A1-3
e Propeller shaft oil seal worn or damaged
o Governor cover
e Line pressure pipe plug loose
@ Porous casting
3. Leak at converter end:
Converter seal damaged
- Seal lip cut. (Check converter hub for
damage.)
- Bushing moved forward and damaged
- Garter spring missing from seal
o Converter leak in weld area. (Refer to
Torque Converter.)
Porous casting (Case or pump)
4. Fluid comes out vent pipe or fill tube:
Over-filled
Water or coolant in fluid. Fluid will appear
milky.
e Case porous
e Incorrect fluid level indicator
e Plugged vent
e Drain back holes plugged
Mispositioned oil pump to case gasket (if
equipped)
Case Porosity Repair
1. Clean the leak area with solvent and air dry.
CAUTION: Epoxy adhesive may cause
skin irritations and eye damage. Read
and follow all information on the
container label as provided by the
manufacturer.
2. Mix a sufficient amount of epoxy adhesive,
# 1052533, or equivalent, following the
manufacturer's recommendations.
3. While the transmission case is hot, apply epoxy
adhesive with a clean, dry soldering acid brush.
4. Allow the epoxy adhesive to cure for three hours
before starting the engine.
5. Repeat fluid leak diagnosis procedures.
TORQUE CONVERTER CLUTCH ELECTRICAL
CONTROLS
The Torque Converter Clutch (TCC) system uses
controls that are internal as well as external to the
transmission. For internal control components of the
TCC system, refer to the I-Iydraulic Diagnosis Section
for for wiring diagrams and switch locations.
The external control components of the TCC
system include:
1. Brake Release Switch - To avoid stalling the
engine when braking, the converter clutch is
released any time the brakes are applied.
2. Electronic Control ModuOe - Receives input
signals and grounds TCC solenoid to apply clutch
when proper operating conditions are met.
3. Throttle Position Sensor - Sends throttle
position information to Electronic Control
Module.
4. Vacuum Sensor - Sends engine vacuum (load)
information to Electronic Control Module.
5. Vehicie Speed Sensor - Sends vehicle speed
information to Electronic Control Module.
6. Coolant Temperature Sensor - Sends engine
coolant temperature information to Electronic
Control Module.
TORQUE CONVERTER CLUTCH DIAGNOSIS
To properly diagnose the Torque Converter
Clutch (TCC) system perform all electrical testing first
and then the hydraulic testing. Refer to the appropriate
Driveability and Emissions Section (6E) for additional
Torque Converter Clutch Information
ON-VEHICLE SERVICE
SI-IIFT CONTROL CABLE
Remove or Disconnect (Fig. 1)
1. Negative battery cable.
2. Raise car, see Section OA.
3. Cable attachments at transmission.
4. Lower car.
5. Console, see Section
8C.
6. Cable at control lever and base.
7. Cable from floor.
install or Connect
1. Cable to floor.
2. Cable at base and control lever.
3. Console, see Section 8C.
4. Place control lever in "NEUTRAL"
5. Raise car.
6. Cable attachments at transmission.
7. Adjust cable.
8. Lower car.
9. Negative battery cable.
Adjust (Fig. 1)
1. Place control lever in "N" (Neutral).
2. Raise car, see Section 0.4.
3. Loosen cable
attachment at shift lever.
4. Rotate shift lever "clockwise" to park detent and
then back to neutral.
5. Tighten cable attachment.
15
N-m (11 lbs. ft.)
Important
Levg must be held out of "PARK" when
torquing nut.
6. Lower car.
7. Check cable adjustment by rotating control lever
thru the detents.
Remove or Disconnect (Fig. 2)
1. Negative battery cable.
2. Console, see Section 8C.
3. Cable at control lever and base.
Page 1124 of 1825
AUTOMATIC TMNSMISSION ON-VEHICLE SERVICE 7A1-5
7. Depress two cable connector latches and remove
from shifter base.
8. Cable clips
Install or Connect
1. With cable lock button in the up position and
shift lever in the "Park" position, snap cable
connector into shifter base.
2. With ignition key in "run" position; snap cable
into inhibitor housing.
Important
e Do not attempt to insert cable with key in
any other position.
3. Turn ignition key to "Lock".
4. Snap cable end onto shifter park lock lever pin.
5. Push cable connector hose forward to remove
slack.
6. With no load applied to connector nose, snap
cable connector lock button down.
Inspect
Functional Operation
1. With the shift lever in "Park" and the key
in "Lock" position, make sure that you
cannot move the shifter lever to another
position. Ignition key should be removable
from column.
2. With the key in "run" and the shift lever in
"Neutral", make sure that you cannot turn
the key to "Lock".
3. If the above conditions are met, the system
is properly adjusted. Proceed to Step
5.
4. If the above conditions are not met, put
cable connector lock back to the up position
and readjust as indicated in Steps
5 and 6
above, then push cable connector lock
button down and recheck operation.
5. If key cannot be removed in "Park"
position, snap connector lock button to up
position and move cable connector nose
rearward until key can be removed from
ignition.
6. Snap lock button down.
7. Reinstall cable into clips to provide correct
routing.
PARK/NEUTRAL AND BACK-UP LAMP
SWITCH
Remove or Disconnect (Fig. 4)
1. Negative battery cable.
2. Console, see Section 8C.
3. Mounting bolts.
4. Switch
Using Old Switch
Install or Connect :
1. Place shift control lever shaft in "NEUTRAL" Align
carrier tang on switch with tang slot on
shift control.
Assemble mounting bolts-to-case, loosely.
Rotate switch to align service adjustment hole
with carrier tang hole.
Insert gage pin
(2.34mm/3/32") in service
adjustment hole and rotate switch until pin drops
in to a depth of 15 mm
(19/32").
Torque bolts.
- 2 N.m (1 8 lbs. in.).
Gage pin
Console, see Section
8C.
Negative battery cable.
Important
After switch adjustment, verify that engine
will only start in
"PARK" or
"NEUTRAL". If engine will start in any
other position readjust switch.
Using New Switch
Install or Connect
1. Place shift control lever in "NEUTRAL".
2. Insert carrier tang on switch in slot on shifter.
3. Mounting bolts and torque.
- 2 N-m (18 lbs. in.)
If bolt holes do not align with shift control verify
shift control lever is in "NEUTRAL" position,
do not rotate switch. Switch is pinned in
"NEUTRAL" position.
e If switch has been rotated and pin broken,
switch can be adjusted by using the Using
Old Switch" procedure.
4. Move shift control lever out of ""Neutral"
position to shear plastic pin.
Important
After switch installation verify that engine
will only start in "PARK" and
"NEUTRAL". If engine will start in any
other position, readjust switch using "Old
Switch" procedure.
5. Console, see Section
8C.
6. Negative battery cable.
T.V. CABLE
The T.V. cable used on the 700-R4 transmission
controls line pressure, shift points, shift feel, part
throttle downshifts and detent downshifts. The T.V.
cable operates the throttle valve lever
anu bracket
assembly in the control valve.
The Throttle Valve Lever and Bracket Assembly
serves two
(2) basic functions:
1. To
transfer the throttle lever movement to the
T.V. plunger in the control valve assembly. This
causes T.V. pressure and line pressure to increase
according to engine throttle
openiq : and controls
part throttle and detent downshifts.
2. To prevent the transmission from operating at
low (idle) pressures, if the
T.V. cable should
Page 1125 of 1825
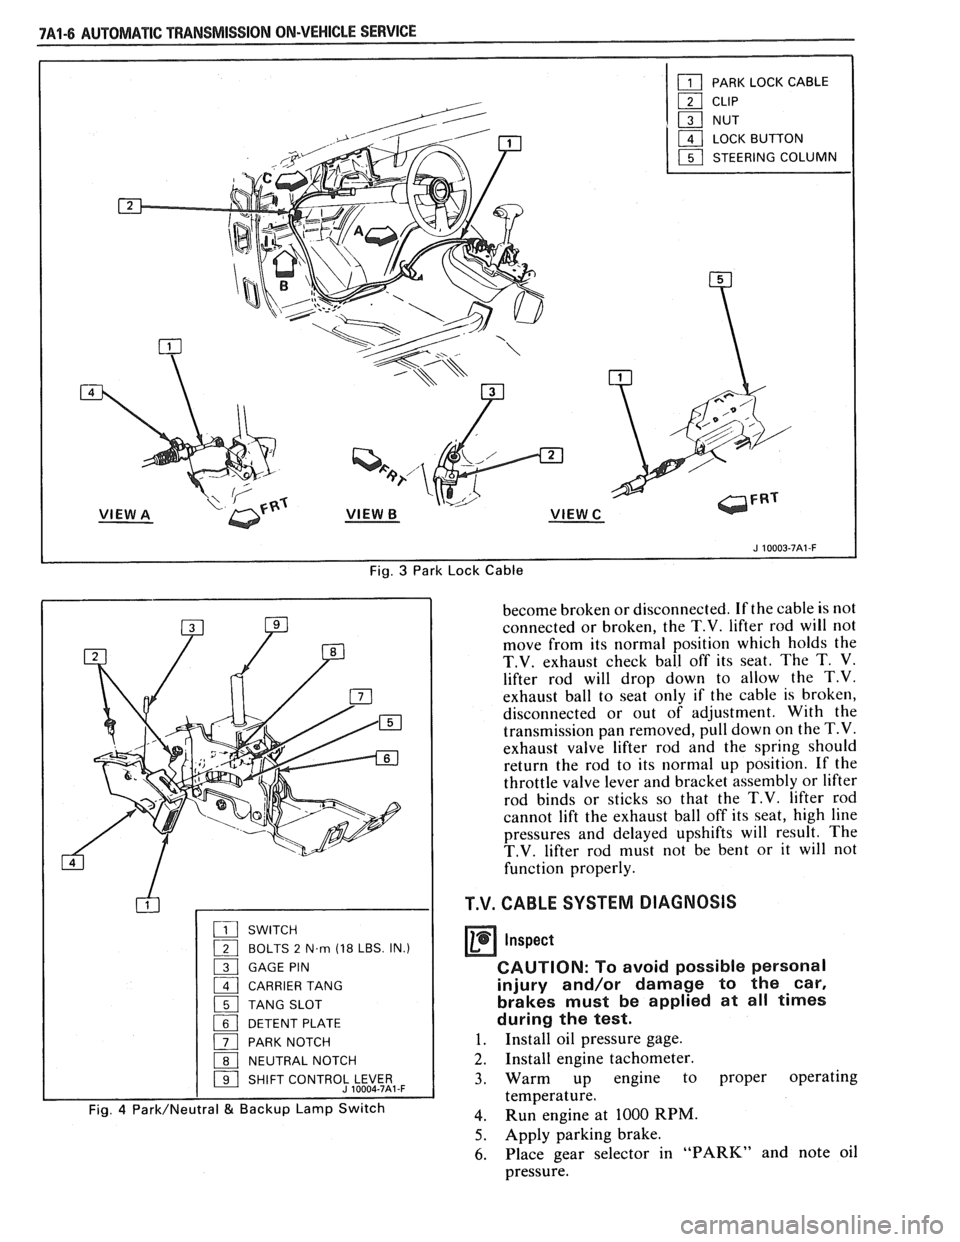
Fig. 3 Park Lock Cable
SWITCH
( BOLTS 2 N.m (18 LBS. IN.)
1 GAGE PIN
1 CARRIER TANG
1 TANG SLOT
1 DETENT PLATE
( PARK NOTCH
1 NEUTRAL NOTCH
1 SHIFT CONTROJLE$5t,-F
Fig. 4 Park/Neutral & Backup Lamp Switch
become broken or disconnected. If the cable is not
connected or broken, the
T.V. lifter rod will not
move from its normal position which holds the
T.V. exhaust check ball off its seat. The T. V.
lifter rod will drop down to allow the T.V.
exhaust ball to seat only if the cable is broken,
disconnected or out of adjustment. With the
transmission pan removed, pull down on the
T.V.
exhaust valve lifter rod and the spring should
return the rod to its normal up position. If the
throttle valve lever and bracket assembly or lifter
rod binds or sticks so that the
T.V. lifter rod
cannot lift the exhaust ball off its seat, high line
pressures and delayed upshifts will result. The
T.V. lifter rod must not be bent or it will not
function properly.
T.V. CABLE SYSTEM DIAGNOSIS
Inspect
CAUTION: To avoid possible personal
injury and/or damage to the car,
brakes must be applied at all times
during the test.
1. Install oil pressure gage.
2. Install engine tachometer.
3. Warm up engine to proper operating
temperature.
4. Run engine at 1000 RPM.
5. Apply parking brake.
6. Place gear selector in "PARK" and note oil
pressure.
Page 1126 of 1825
AUTOMATIC TRANSMISSION ON-VEHICLE SERVICE 7A1-7
7. Place
gear selector into "DRIVE". Oil Pressure
should be equal or not more than 10 psi
(34 kPa)
higher than in "PARK".
8. Increase engine speed to 1400 RPM. If oil
pressure does not increase, adjust
T.V. cable.
Refer to T.V. Cable Adjustment.
Remove or Disconnect (Figs. 5 thru 7)
1. Air cleaner.
2. T.V. cable terminal from throttle lever.
3. Cable housing from bracket while compressing
locking tangs.
4. Routing clips or straps.
5. Raise
car, see Section OA.
6. Bolt securing T.V. cable to transmission.
o Pull up on cable cover at transmission until
cable is visible.
7. Cable from transmission link.
8. Cable seal.
Install or Connect
1. New seal into transmission case hole.
2. Transmission end of cable to T.V. link and secure
to transmission case with bolt and washer
assembly. Torque to 10
Nam (7 Ib. ft.).
3. Cable routing clips or straps.
4. Lower car.
5. Pass cable through engine bracket and engage
locking tangs of cable on bracket.
6. Avoid damaging or kinking wire cable.
7. Cable terminal to throttle lever.
Inspect
o Pull on upper end of cable. It should travel
a short distance with light resistance caused
by the small return spring on the
T.V. lever.
When releasing the upper end of the T.V.
cable, it should return to the zero T.V.
position.
Adjust
o T.V. cable. Refer to Figs. 5 thru 7.
CHANGING FLUID AND FILTER
Remove or Disconnect
1. Raise the car and support properly, see Section
OA.
2. Place drain pan under transmission oil pan.
3. Oil pan bolts from the front and sides only.
4. Loosen rear oil pan bolts approximately 4 turns.
NOTICE: Do not damage the transmission case
or oil pan sealing surfaces.
5. Lightly tap oil pan with rubber mallet or pry to
allow fluid to drain.
- Inspect fluid color
- Refer to chart in Section 7A
6. Remaining oil pan bolts, oil pan and gasket. 7. Oil filter
and o-ring
- O-ring may be stuck in the case
e Transmission case and oil pan gasket
surfaces with solvent and air dry.
- All traces of old gasket material must
be removed
Install or Connect
o Coat o-ring seal with a small amount of
petrolatum
o New o-ring onto filter
e New filter into case
a Oil pan and new gasket
e Oil pan bolts 20 N.m (15 lbs. ft.)
8. Lower car.
9. Fill transmission to proper level with
DEXRONO I1 fluid or equivalent, see Section
7A.
10. Check "Cold"
fluid level reading for initial till.
Do not overfill.
11. Follow
the "Transmission Fluid Level Checking
Procedure" in Section 7A of this Service Manual.
12. Check
oil pan gasket for leaks.
700-R4 SERVICEABLE COMPONENTS
The following parts can be serviced with the
transmission in the vehicle:
o Throttle valve control cable and/or sleeve heal
Fill tube and/or seal
o Governor assembly
a Speedometer drive and/or driven gear
e Servo assembly
a Valve body assembly, spacer plate, gaskets,
throttle lever and bracket assembly, auxiliary
valve body, TCC solenoid, switch and
wir-iug.
a Converter to flexplate bolts.
a Oil pan and/or gasket, strainer assembly and "0"
ring.
e Pressure Regular Valve.
o Rear Oil Seal.
SERVO ASSEMBLY
Remove or Disconnect (Fig. 8)
Tool Required:
J 29714-A
1. Raise car and suitably support, see Section OA.
2. Torque Arm,
see Section
3D.
3. Propeller Shaft, see Section 4A.
4. Exhaust hanger.
5. Support transmission.
6. Crossmember and transmission moulll.
7. Two
transmission oil pan bolts below servo cover.
8. Install J 29714-A on oil pan and reinstall oil pan
bolts.
9. Depress servo cover
and remove retaining ring.
10. J 29714-A.
Page 1127 of 1825
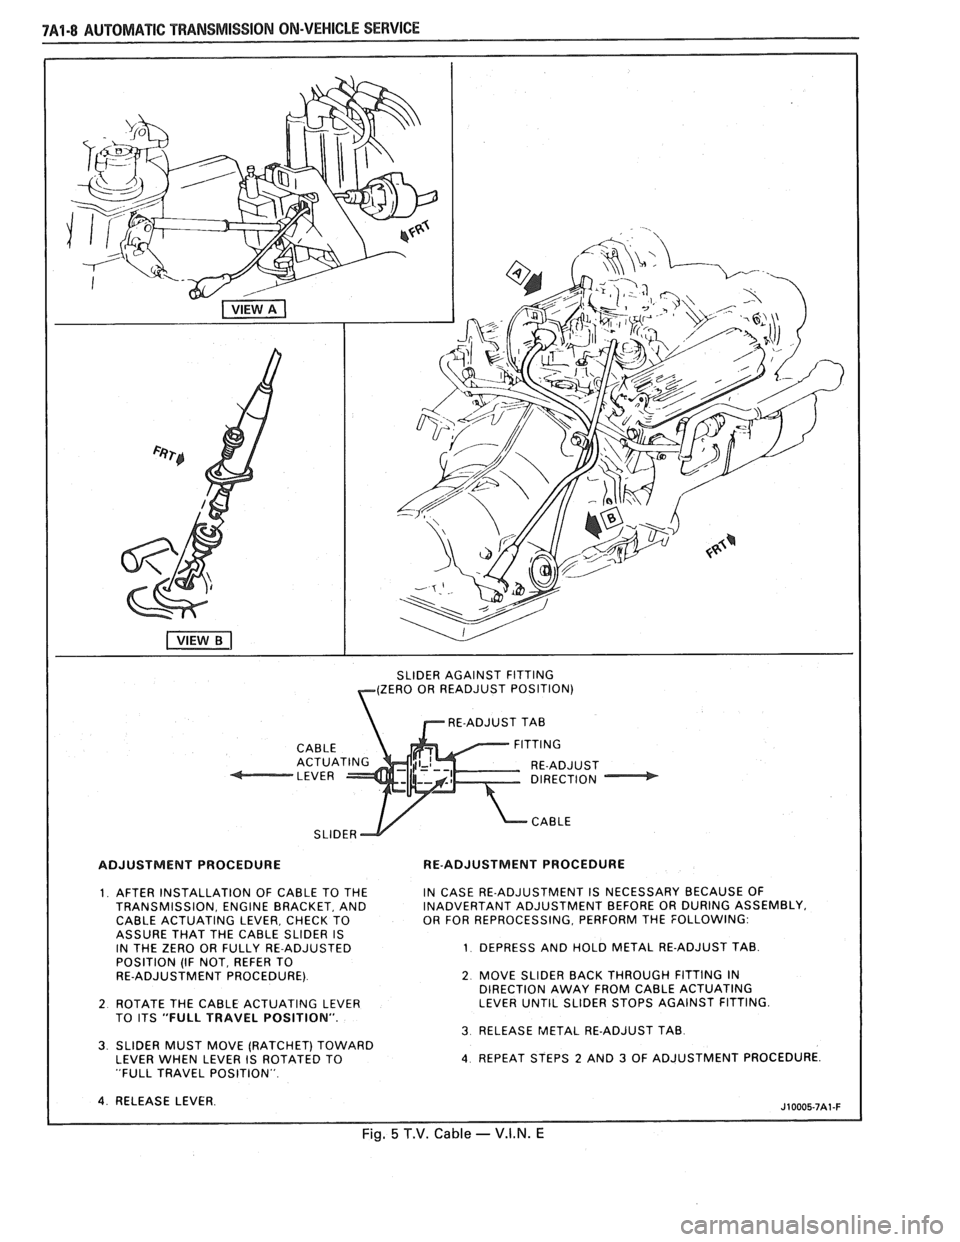
7A1-8 AUTOMATIC TRANSMISSION ON-VEHICLE SERVICE
RE-ADJUST TAB
ADJUSTMENT PROCEDURE RE-ADJUSTMENT PROCEDURE
1 AFTER INSTALLATION OF CABLE TO THE IN
CASE RE-ADJUSTMENT IS NECESSARY BECAUSE OF
TRANSMISSION, ENGINE BRACKET, AND INADVERTANT ADJUSTMENT BEFORE OR DURING ASSEMBLY,
CABLE ACTUATING LEVER, CHECK TO OR
FOR REPROCESSING. PERFORM THE FOLLOWING
ASSURE THAT THE CABLE SLIDER IS
IN THE ZERO OR FULLY RE-ADJUSTED
1 DEPRESS AND HOLD METAL RE-ADJUST TAB
POSITION (IF NOT, REFER TO
RE-ADJUSTMENT PROCEDURE)
2 MOVE SLIDER BACK THROUGH FITTING IN
DIRECTION AWAY FROM CABLE ACTUATING
2 ROTATE THE CABLE ACTUATING LEVER LEVER
UNTIL SLIDER STOPS AGAINST FITTING
TO ITS "FULL TRAVEL POSITION". 3 RELEASE METAL RE-ADJUST TAB 3 SLIDER MUST MOVE (RATCHET) TOWARD
LEVER WHEN LEVER IS ROTATED TO 4 REPEAT STEPS 2 AND 3 OF ADJUSTMENT PROCEDURE
"FULL TRAVEL POSITION"
Fig. 5 T.V. Cable - V.I.N. E
Page 1128 of 1825
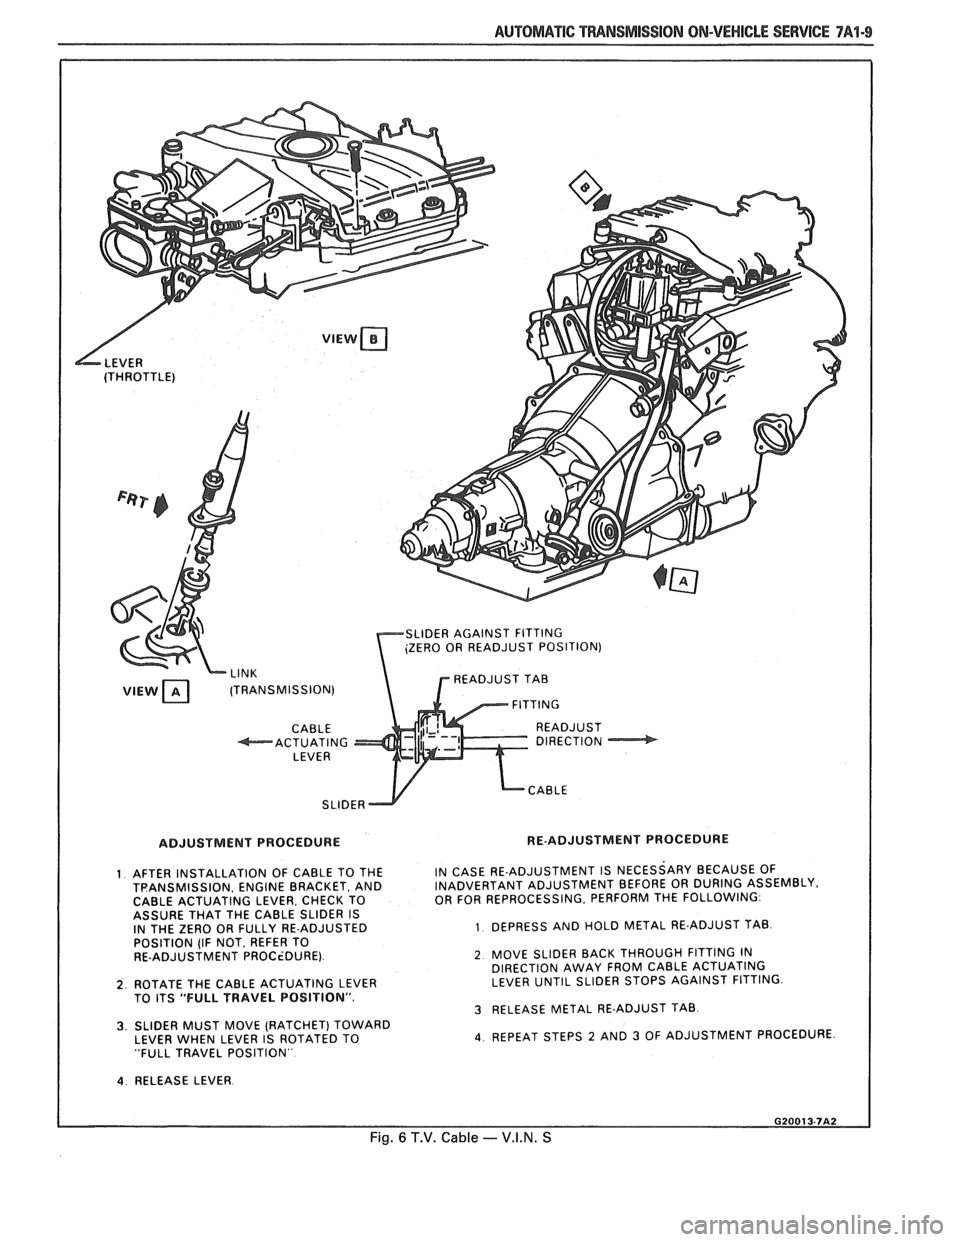
AUTOMATIC TMNSMISSION ON-VEHICLE SERVICE TA"1-9
LCABLE SLIDER
ADJUSTMENT PROCEDURE RE-ADJUSTMENT PROCEDURE
1 AFTER INSTALLATION OF CABLE TO THE IN CASE RE-ADJUSTMENT IS NECESSARY BECAUSE OF TPANSMISSION. ENGINE BRACKET, AND INADVERTANT ADJUSTMENT BEFORE OR DURING ASSEMBLY.
CABLE ACTUATING LEVER. CHECK TO OR
FOR REPROCESSING. PERFORM THE FOLLOWING
ASSURE THAT THE CABLE SLIDER IS
IN THE ZERO OR FULLY RE-ADJUSTED
1 DEPRESS AND HOLD METAL RE-ADJUST TAB
POSITION (IF NOT, REFER TO
RE-ADJUSTMENT
PROCiDURE) 2 MOVE SLIDER BACK THROUGH FITTING IN
DIRECTION AWAY FROM CABLE ACTUATING
2 ROTATE THE CABLE ACTUATING LEVER LEVER
UNTIL SLIDER STOPS AGAINST FITTING
TO ITS "FULL TRAVEL POSITION".
3 RELEASE METAL RE-ADJUST TAB 3. SLIDER MUST MOVE (RATCHET) TOWARD
LEVER WHEN LEVER IS ROTATED TO 4 REPEAT STEPS 2 AND 3 OF ADJUSTMENT PROCEDURE
"FULL TRAVEL POSITION"
4. RELEASE LEVER.
Fig. 6 T.V. Cable - V.I.N. S
Page 1129 of 1825
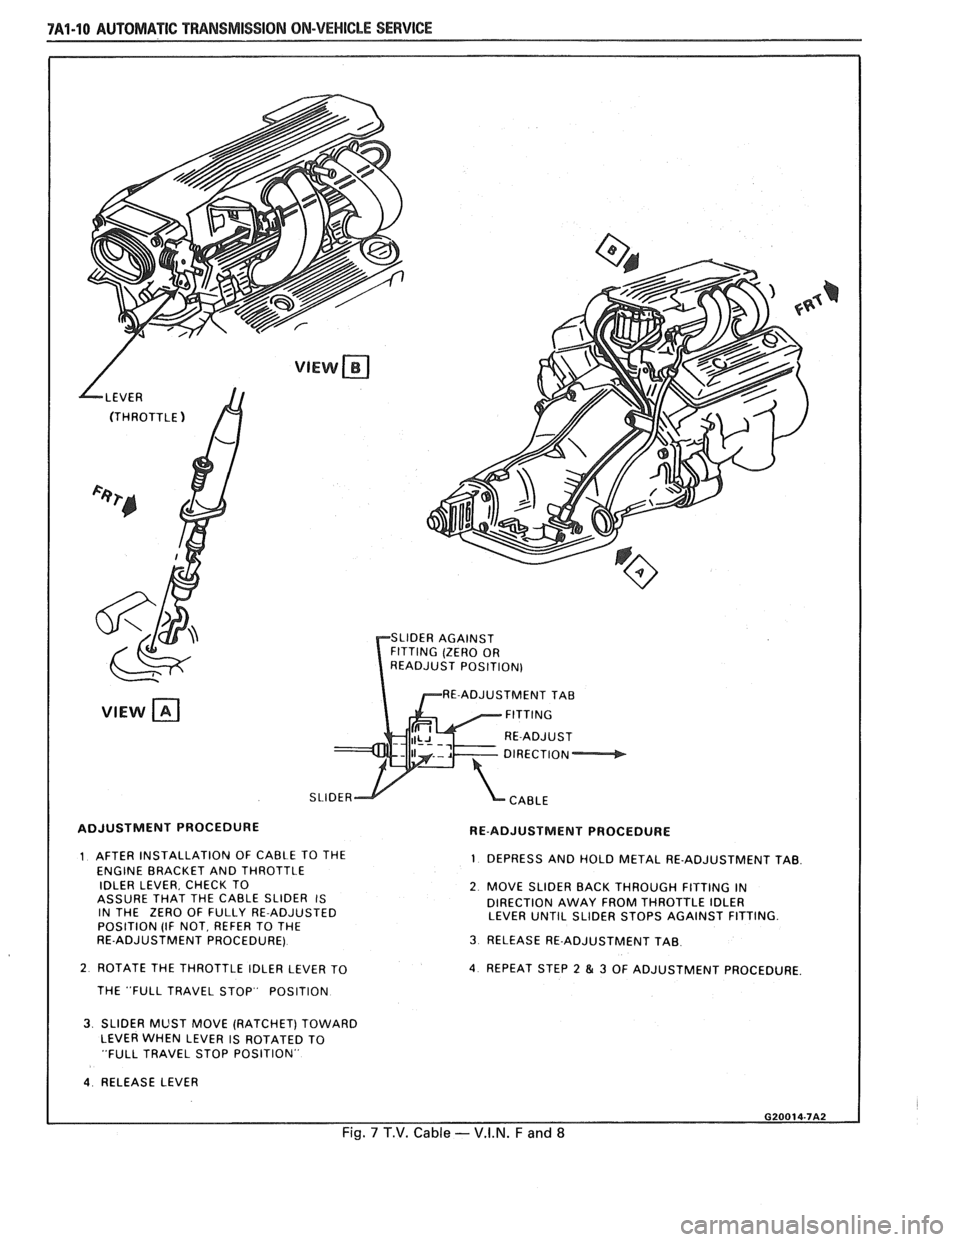
7A1-10 AUTOMATIC TRANSMISSION ON-VEHICLE SERVICE
rRE-ADJUSTMENT TAB
ADJUSTMENT PROCEDURE
RE-ADJUSTMENT PROCEDURE
1 AFTER INSTALLATION OF CABLE TO THE
ENGINE BRACKET AND THROTTLE 1 DEPRESS AND HOLD METAL RE-ADJUSTMENT TAB.
IDLER LEVER, CHECK TO
2 MOVE SLIDER BACK THROUGH FITTING IN ASSURE THAT THE CABLE SLIDER IS
DIRECTION AWAY FROM THROTTLE IDLER
IN THE ZERO OF
FULLY RE-ADJUSTED
LEVER UNTIL SLIDER STOPS AGAINST FITTING
POSITION (IF NOT, REFER TO THE
RE-ADJUSTMENT PROCEDURE)
3 RELEASE RE-ADJUSTMENT TAB
2 ROTATE THE THROTTLE IDLER LEVER TO 4 REPEAT STEP 2 81 3 OF ADJUSTMENT PROCEDURE
THE "FULL TRAVEL STOP POSITION
3. SLIDER MUST MOVE (RATCHET) TOWARD
LEVER WHEN LEVER IS ROTATED TO
"FULL TRAVEL STOP POSITION"
4. RELEASE LEVER
Fig. 7 T.V. Cable - V.I.N. F and 8
Page 1133 of 1825
7A1-44 AUTOMATIC TRANSMISSION ON-VEHICLE SERVICE
Inspect
e Refer to the Unit Repair Section for
disassembly and inspection procedures.
Install or Connect
1. Valve body, spacer, check balls and bolts as
outlined in the Unit Repair Section.
2. New
"0" ring
seal and oil filter.
- Coat "0" ring seal with petrolatum.
3. New gasket, oil pan and bolts.
- 20 N.m (15 lbs. ft.)
4. Lower car.
5. Fill
transmission to proper level with Dexron
I1
fluid or equivalent, see Section 7A.
Adjust
e T.V. cable, see Figs. 5 thru 7.
REAR OIL SEAL
Remove or Disconnect
Tool Required:
J 21426 Seal Installer
1. Raise car and suitably support, see Section OA.
2. Propeller shaft, see Section 4A.
3. Pry out lip seal with a suitable tool.
Install or Connect
I. Coat outer casing of new lip oil seal with
non-hardening sealer and tap in place with
J
2 1426.
2. Propeller
shaft, see Section 4A.
3. Lower car.
Adjust
e Transmission fluid level.
- Dexron 11 Automatic Transmission Fluid
OIL COOLER LINES AND/OR FITTINGS
Figs. 13 and 14
If replacement of transmission cooler lines is
required, use only double wrapped and brazed steel
tubing meeting
GM specification 123M or equivalent.
Tubing should be double flared.
NOTICE: Allow sufficient clearance around
cooler lines to prevent damage or wear which may
cause fluid loss.
OIL COOLER FLUSHING
Tools Required:
J 35944 Cooler Flushing Tool
J 35944-20 Flushing Solution
Water Supply
Air Supply (with water and oil fil-
ter)
Oil Drain Container
5 Gallon Pail
1. Remove the fill cap on J 35944 and fill with .6
liters (20-21 ounces) of J 35944-20 flushing
solution.
@ Do not over fill
@ Follow manufacture's suggested proce-
dures for solution handling.
Replace cap on
J 35944 and pressurize it to 550-
700
kPa (80-100 psi).
Connect
J 35944 to the transaxle end of the oil
cooler pipe that feeds the BOTTOM fitting of
the oil cooler.
Connect the discharge hose to the TOP oil
cooler pipe and clip the discharge hose to the oil
drain container.
With the water valve on
J 35944 in the "off'
position, connect the water supply to the tool.
Turn the water valve off.
Flush the transaxle fluid by opening the water
valve to the "on" position for about 10 seconds.
Important
@ If water does not flow thru the cooler the
system is completely plugged. Do not
complete the flushing procedure. Replace
the cooler
and/or the cooler pipes as
required.
8. Close the water valve and clip the discharge
hose to the 5 gallon pail. Cover the pail with a
shop towel to prevent splash.
9. Turn the water valve to
the
"on" positon and
depress the trigger to mix flushing solution into
the water flow. Use the bail clip provided to
hold the trigger down.
10. Flush the
cooler with water and solution for 2
minutes. During this flush, attach the air supply
to the air valve located on the tool, for 3 to 5
seconds every 15-20 seconds. This will create a
surging action to ensure complete cleaning.
11. Release the trigger and turn the water valve off.
12. Disconnect both hoses from the oil cooler pipes.
13. Reconnect the hoses to the pipes opposite the
initial flush to preform a backflush.
14. Repeat steps 9 and 10
15. Release the trigger and allow water to rinse
for
one minute.
16. Turn the water valve off.
17. Attatch the air supply to the air valve and dry the
system out with air until no moisture is seen
leaving the discharge hose.
18. Connect the Cooler Feed Pipe to the transaxle.
19. Clip the discharge hose to the oil drain con-
tainer.
20. After filling the transaxle with
fluid,
start the
engine and run for 30 seconds. This will remove
any residual
moistrue from the oil cooler. A
minimum of 2 quarts of fluid should flow during
the 30 second period. If fluid flow is sufficient,
check the fluid flow by disconnecting the feed