1988 PONTIAC FIERO throttle
[x] Cancel search: throttlePage 350 of 1825
ENGINE GENERAL INFORMATION 6-5
INSTRUMENT PANEL OIL WARNING LAMP "ON" AT IDLE
1. Oil cooler, or oil or cooler line restricted. Remove 2. Oil pump pressure low. See oil pump repair
restrictions in cooler or cooler line. procedures
in Section
6A.
ENGINE COMPRESSION EST
COMPRESSION TEST
Important
e Disconnect the "BAT." terminal from the - HE1 distributor or ignition module.
To determine if the valves or pistons are at fault,
a test should be made to determine the cylinder
compression pressure. When checking cylinder
compression, the throttle and choke should be open, all
spark plugs removed, and the battery at or near full
charge. The lowest reading cylinder should not be less
than
70% of the highest and no cylinder reading
should be less than
689 kPa (100 PSI). This
should be done with four
"puffs" per
cylinder.
Normal - Compression builds up quickly and
evenly to specified compression on each cylinder.
Piston Rings - Compression low on first
stroke, tends to build up on following strokes, but does
not reach normal. Improves considerably with addition
of oil.
Valves - Low on first stroke, does not tend to
build up on following strokes. Does not improve much
with addition of oil.
Use approximately three squirts from a plunger
type oiler.
Page 359 of 1825
6A2-8 2.8 LITER V-6
6. Install new mount.
7. Lower transmission.
8. Torque nuts to specifications.
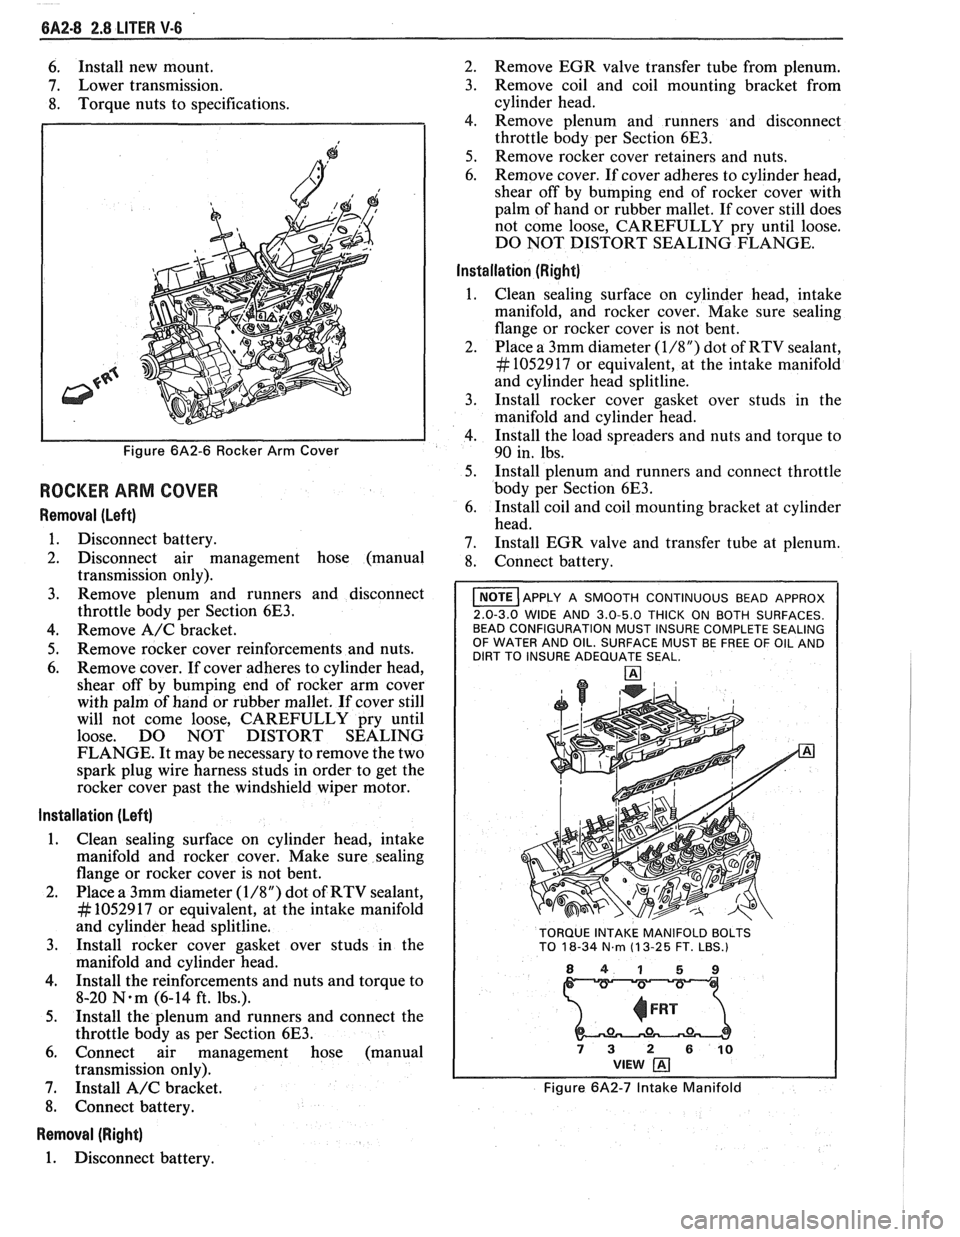
Figure 6A2-6 Rocker Arm Cover
ROCKER ARM COVER
Removal (Left)
1. Disconnect battery.
2. Disconnect air management hose (manual
transmission only).
3. Remove plenum and runners and disconnect
throttle body per Section
6E3.
4. Remove A/C bracket.
5. Remove rocker cover reinforcements and nuts.
6. Remove cover. If cover adheres to cylinder head,
shear off by bumping end of rocker arm cover
with palm of hand or rubber mallet. If cover still
will not come loose, CAREFULLY pry until
loose. DO NOT DISTORT SEALING
FLANGE. It may be necessary to remove the two
spark plug wire harness studs in order to get the
rocker cover past the windshield wiper motor.
Installation (Left)
1. Clean sealing surface on cylinder head, intake
manifold and rocker cover. Make sure sealing
flange or rocker cover is not bent.
2. Place a 3mm diameter
(1/8") dot of RTV sealant,
# 1052917 or equivalent, at the intake manifold
and cylinder head splitline.
3. Install rocker cover gasket over studs in the
manifold and cylinder head.
4. Install the reinforcements and nuts and torque to
8-20
N.m (6-14 ft. lbs.).
5. Install the plenum and runners and connect the
throttle body as per Section
6E3.
6. Connect air management hose (manual
transmission only).
7. Install
A/C bracket.
8. Connect battery.
Removal (Right)
1. Disconnect battery. 2.
Remove EGR valve transfer tube from plenum.
3. Remove coil and coil mounting bracket from
cylinder head.
4. Remove plenum and runners and disconnect
throttle body per Section
6E3.
5. Remove rocker cover retainers and nuts.
6. Remove cover. If cover adheres to cylinder head,
shear off by bumping end of rocker cover with
palm of hand or rubber mallet. If cover still does
not come loose, CAREFULLY pry until loose.
DO NOT DISTORT SEALING FLANGE.
Installation (Right)
Clean sealing surface on cylinder head, intake
manifold, and rocker cover. Make sure sealing
flange or rocker cover is not bent.
Place a 3mm diameter
(1/8") dot of RTV sealant,
# 1052917 or equivalent, at the intake manifold
and cylinder head splitline.
Install rocker cover gasket over studs in the
manifold and cylinder head.
Install the load spreaders and nuts and torque to
90 in. lbs.
Install plenum and runners and connect throttle
body per Section
6E3.
Install coil and coil mounting bracket at cylinder
head.
Install EGR valve and transfer tube at plenum.
Connect battery.
I NOTE ]APPLY A SMOOTH CONTINUOUS BEAD APPROX
2.0-3.0 WIDE AND 3.0-5.0 THICK ON BOTH SURFACES.
BEAD CONFIGURATION MUST INSURE COMPLETE SEALING
OF WATER AND OIL. SURFACE MUST BE FREE OF OIL AND
DIRT TO INSURE ADEQUATE SEAL.
TORQUE INTAKE MANIFOLD BOLTS
TO
18-34 N.m (1 3-25 FT. LBS.)
841 59
73 2 610 VIEW
Figure 6A2-7 Intake Manifold
Page 386 of 1825
V-8 ENGINE 6A3-7
-
3. Disconnect accelerator T.V. and cruise cables.
4. Remove air intake duct.
5. Disconnect coolant hoses at throttle body.
6. Disconnect wires at throttle body.
7. Disconnect vacuum and breather hoses at
throttle body.
8. Remove throttle body from plenum.
9. Remove distributor shield.
10. Disconnect brake vacuum hoses at plenum.
1 1. Disconnect vacuum hoses at plenum.
12. Refer to Section 6E3 for removal of:
a Plenum
Fuel Rail
a Cold Start Injector
e Runners
13. Remove distributor.
14. Disconnect EGR solenoid.
15. Disconnect all electrical wires that would
interfere.
16. Remove intake manifold bolts.
17. Remove intake manifold.
Installation
1. Clean all seal surfaces.
2. Install gaskets and place a 3/16 inch 5 (mm) bead
of RTV, No. 1052917 or
equivalent,on the front
and rear ridges of the cylinder case. Extend the
bead 1/2 inch
(13mm) up each cylinder head to
seal and retain the manifold side gaskets and
install intake manifold.
3. Torque manifold bolts to specified torque.
4. Reconnect electrical and vacuum wires.
5. Install distributor.
6. Refer to Section 6E3 for installation
of:
e Plenum
e Fuel Rail
e Cold Start Injectors
a Runners
7. Vacuum hoses at plenum.
8. Install distributor shield.
9. Install throttle body and related parts.
10. Fill cooling system.
1 1. Reconnect battery cable.
12. Start engine and look for leaks.
DIPSTICK TUBE
Removal
1.
Disconnect battery negative cable to prevent
possible contact of the dipstick tube with the
battery terminal on starter during removal.
2. Remove bolt attaching bracket to engine and
remove tube (loose fit).
lnstallation
1. Clean tube and apply sealant #I052080 or
equivalent, around tube
1/2" below bead.
2. Insert tube in block and rotate into position.
3. Install bolt (with starter brace on top of tube
bracket) and connect battery cable.
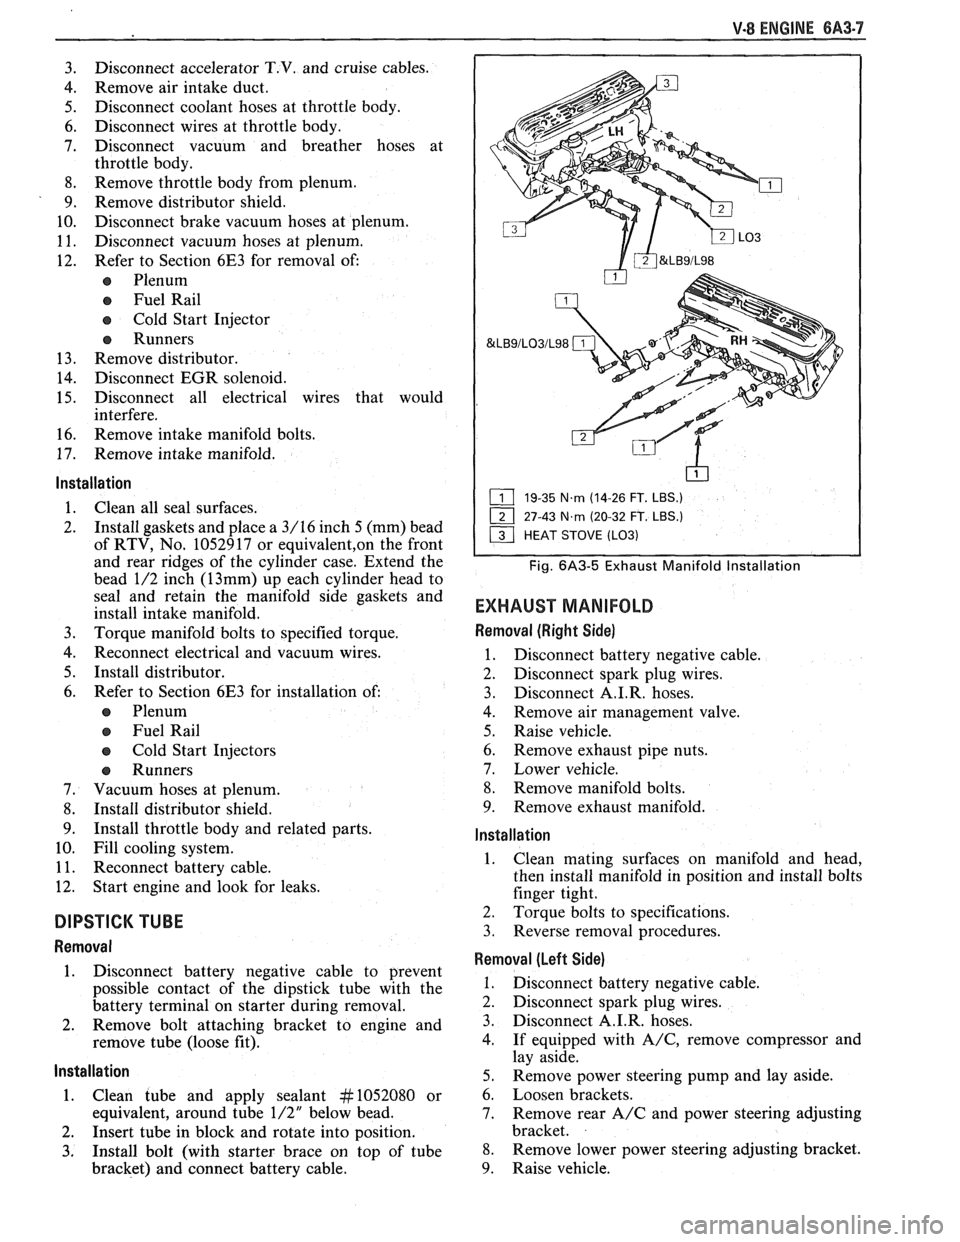
&LB9/LO3/L98
19-35 N.m (14-26 FT. LBS.)
27-43
N.m (20-32 FT. LBS.)
Fig. 6A3-5 Exhaust Manifold lnstallation
EXHAUST MANIFOLD
Removal (Right Side)
1. Disconnect battery negative cable.
2. Disconnect spark plug wires.
3. Disconnect
A.I.R. hoses.
4. Remove air management valve.
5. Raise vehicle.
6. Remove exhaust pipe nuts.
7. Lower vehicle.
8. Remove manifold bolts.
9. Remove exhaust manifold.
lnstallation
1. Clean
mating surfaces on manifold and head,
then install manifold in position and install bolts
finger tight.
2. Torque bolts to specifications.
3. Reverse removal procedures.
Removal (Left Side)
1. Disconnect battery negative cable.
2. Disconnect spark plug wires.
3. Disconnect A.I.R. hoses.
4. If equipped with
A/C, remove compressor and
lay aside.
5. Remove power steering pump and lay aside.
6. Loosen brackets.
7. Remove rear
A/C and power steering adjusting
bracket.
8. Remove lower power steering adjusting bracket.
9. Raise vehicle.
Page 425 of 1825
6B-I4 ENGINE COOLING
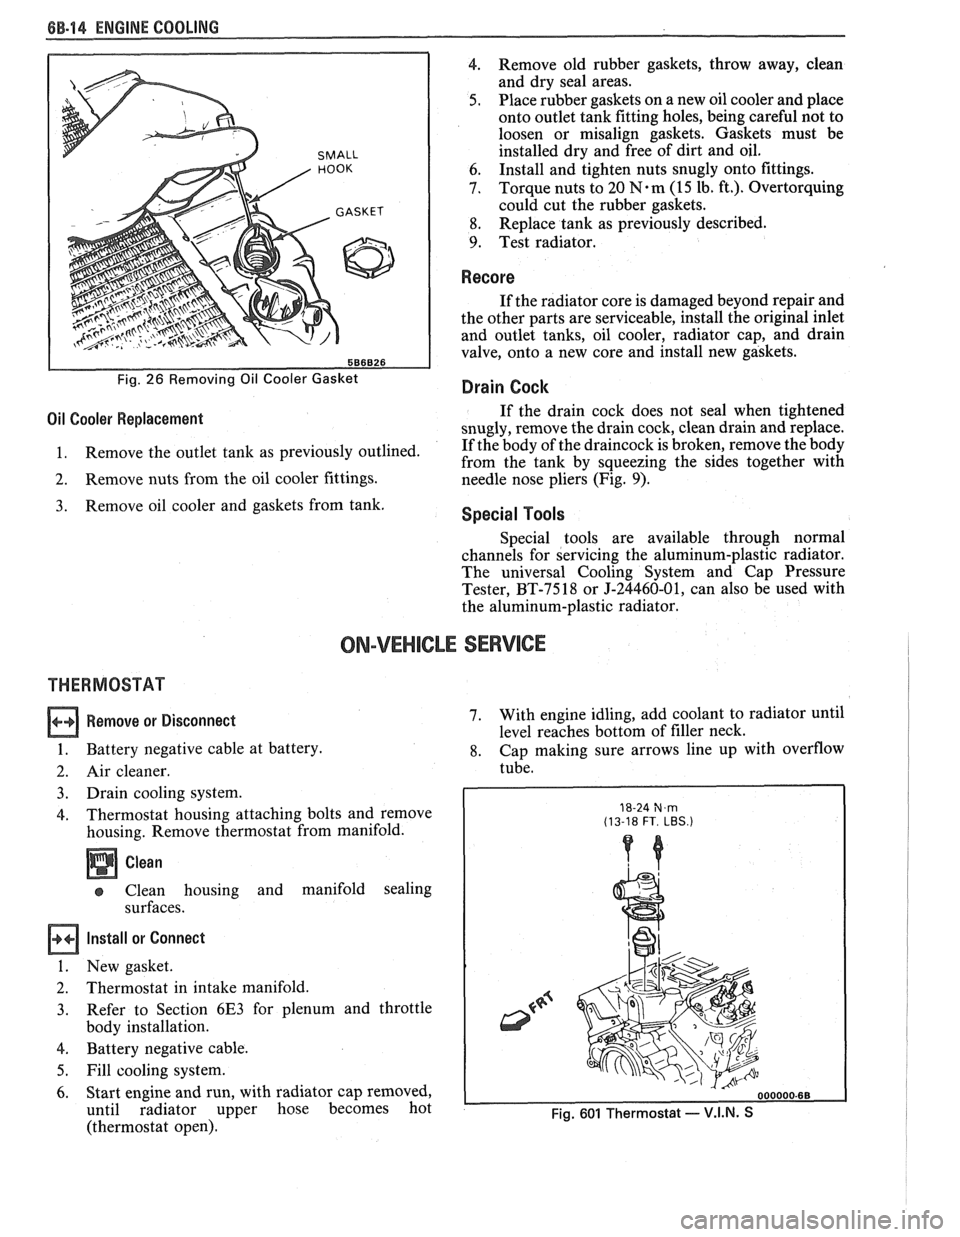
SMALL
586826
Fig. 26 Removing Oil Cooler Gasket
4. Remove old rubber gaskets, throw away, clean
and dry seal areas.
5. Place rubber gaskets on a new oil cooler and place
onto outlet tank fitting holes, being careful not to
loosen or misalign gaskets. Gaskets must be
installed dry and free of dirt and oil.
6. Install
and tighten nuts snugly onto fittings.
7. Torque nuts
to 20
N.m (15 lb. ft.). Overtorquing
could cut the rubber gaskets.
8. Replace
tank as previously described.
9. Test radiator.
Recore
If the radiator core is damaged beyond repair and
the other parts are serviceable, install the original inlet
and outlet tanks, oil cooler, radiator cap, and drain
valve, onto a new core and install new gaskets.
Drain Cock
Oil Cooler Replacement If the drain cock does not seal when tightened
snugly, remove the drain cock, clean drain and replace.
1. Remove
the outlet tank as previously outlined. If
the body of the draincock is broken, remove the body
from the tank by squeezing the sides together with
2. Remove nuts from the oil cooler fittings.
needle nose pliers (Fig. 9).
Remove oil cooler and gaskets from tank. Special Tools
Special tools are available through normal
channels for servicing the aluminum-plastic radiator.
The universal Cooling System and Cap Pressure
Tester, BT-7518 or J-24460-01, can also be used with
the aluminum-plastic radiator.
ON-VEHICLE SERVICE
THERMOSTAT
Remove or Disconnect
1. Battery negative cable at battery.
2. Air cleaner.
3. Drain cooling system.
4. Thermostat housing attaching bolts and remove
housing. Remove thermostat from manifold.
Clean
Clean housing and manifold sealing
surfaces.
Install or Connect
1. New gasket.
2. Thermostat in intake manifold.
3. Refer
to Section 6E3 for plenum and throttle
body installation.
4. Battery negative cable.
5. Fill cooling system.
6. Start engine and run, with radiator cap removed,
until radiator upper hose becomes hot
(thermostat open). 7.
With
engine idling, add coolant to radiator until
level reaches bottom of filler neck.
8. Cap making sure arrows line up with overflow
tube.
18-24 N,m (13-18 FT. LBS.)
Fig. 601 Thermostat - V.I.N. S
Page 432 of 1825
ENGINE FUEL BC-1
SECTION 6C
NE FUEL
CONTENTS
General Description ..................................... 6C-1 Fuel
Cap ........................................................... 6C-3
.................................................. ............................................. Alcohol-In-Fuel 6C- 1 Fuel Filter Neck 6C-3
................... ............ Fuel Metering .................................................. 6C-2 Fuel Gage Sending Unit .. 6C-4
....................... ............................... Throttle Body Injection (TBI) .... 6C-2 Diagnosis ,. 6C-4 ................... Service
Procedures ............................................. 6C-4
Port Fuel Injection ...................................... 6C-2
Pressure Relief ........................................... 6C-4
Fuel Feed and Return Pipe
............................... 6C-2
Flow Test .................................................... 6C-4
Fuel Pipes (MPFI)
.......................................... 6C-3
Pressure Test - TBI ................................... 6C-4
Fuel and Vapor Hoses
....................................... 6C-3
Pressure Test - MPFI .................................... 6C-4
Fuel Pump ........................................................ 6C-3 ...................................................... Fuel Pump Relay .............................................. 6C-3 Fuel Tank 6C-4
Fuel Filter
......................................................... 6C-3 Accelerator Controls ...................................... 6C-5
Fuel Tank
....................................................... 6C-3
All new General Motors vehicles are certified by
the United States Environmental Protection Agency as
conforming to the requirements of the regulations for
the control of air pollution from new motor vehicles.
This certification is contingent on certain adjustments
being set to factory standards. In most cases, these
adjustment points either have been permanently
sealed and/or made inaccessible to prevent
indiscriminate or routine adjustment in the field. For
this reason, the factory procedure for temporarily
removing plugs, caps, etc., for purposes of servicing the
product must be strictly followed and, wherever
practicable, returned to the original intent of the
design.
GENERAL DESCRIPTION
All gasoline engines are designed to use only
unleaded gasoline. Unleaded gasoline must be used for
proper emission control system operation. Its use will
also minimize spark plug fouling and extend engine oil
life. Using leaded gasoline can damage the emission
control system and could result in loss of emission
warranty coverage.
All cars are equipped with an Evaporative
Emission System. The purpose of the system is to
minimize the escape of fuel vapors to the atmosphere.
Information on this system will be found in Section
6E2, or 6E3.
When working on the fuel system, there are
several things to keep in mind.
@ Any time fuel system is being worked on,
disconnect the negative battery cable
except for those tests where battery
Adhere to all Notices and Cautions.
Always keep a dry chemical (Class B) fire
extinguisher near the work area.
-
Always use a backup wrench when loosening or
tightening a screw couple fitting.
The torque on a screw fitting is
30 N-m (22 lb.
ft.).
Pipe is used on all MPFI, TPI, SFI, and TBI
applications. Fittings require the use of an
"0"
Ring. Replace all pipe with the same type of pipe
and fittings that were removed.
All fuel pipes must meet GM Specification
124-M, or its equivalent.
All fuel hoses must meet GM Specification
6163-M, or its equivalent.
Do not replace fuel pipe with fuel hose.
voltage is required.
@ On MPFI, TPI, SF1 and TBI systems, always A1cohol-ln-Fuel
relieve the line pressure before servicing any fuel Certain driveability complaints such as
system components. hesitation, lack of power, stall, no start, etc., may be
@ Do not repair the fuel system until you have read caused
by an excessive amount of alcohol-in-fuel. The
the copy and checked the illustrations relating to complaints
may be due to fuel system corrosion and
that repair. subsequent
fuel filter plugging, deterioration of rubber
Page 433 of 1825

6C-2 ENGINE FUEL
components such as the accelerator pumps and/or
air-fuel mixture leaning effects.
Various types and concentrations of alcohols are
used in commercial gasoline. Some alcohols are more
detrimental to fuel system components than others. If
an excessive amount of alcohol in the fuel is suspected
as the cause of a driveability condition, the following
procedure may be used to detect the presence of
alcohol in the fuel.
In this procedure, water is used to
extract the alcohol from the fuel. However, the specific
type of alcohol is not determined.
The fuel sample should be drawn from the
bottom part of the tank so that any water, if already
present, can be detected. The sample should be bright
and clear. If the sample appears cloudy or
contaminated with water as indicated by a water layer
in the bottom part of the sample, this procedure should
not be used. The fuel system should then be cleaned
(See Fuel System Cleaning).
Testing Procedure
1. Using a 100 ml cylinder with 1 ml graduation
marks, fill with fuel to the 90 ml mark.
2. Add 10 ml of water to bring the total fluid volume
to 100 ml and install a stopper.
3. Shake vigorously for 10 to 15 seconds.
4. Carefully loosen stopper to release pressure.
5. Close the stopper and shake vigorously again for
10 to 15 seconds.
6. Carefully loosen
stopper to release pressure.
7. Put the graduated cylinder on a level surface for
approximately 5 minutes to allow adequate liquid
separation.
If alcohol is present in the fuel, the volume of the
lower layer, which would now contain alcohol and
water will be greater than 10 ml. For example, if the
volume of the lower layer is increased to 15 ml, it
would indicate at least 5 percent alcohol in fuel. The
actual amount of alcohol may be somewhat greater
because this procedure does not extract all of the
alcohol from the fuel.
FUEL METERING
Throttle Body lnjection
(TBI)
With Throttle Body Injection (TBI), an injection
unit is placed on the intake manifold where the
carburetor is normally mounted. The TBI unit is
computer controlled and supplies the correct amount
of fuel during all engine operating conditions. See
Section 6E2 for information relative to operation and
diagnosis of TBI units.
Port Fuel lnjection
The ECM is in complete control of this fuel
delivery system during all driving conditions.
The intake manifold is used only to let air into the
engine. Fuel is injected by separate injectors that are
mounted over the intake valve.
With the Port Injection System, there is no need
for a Thermac, EFE, Map Sensor, Baro Sensor, A.I.R.
System, or Dual Bed Converter. This
system provides better cold driveability,
lower exhaust emissions and better throttle response.
In Sequential Fuel Injection systems (SFI),
injectors turn on at every crankshaft revolution. The
ECM controls the injector "on" time so that the
correct amount of fuel is metered, depending on
driving conditions.
Two interchangeable
"0" rings are used on the
injector that must be inspected when the injectors are
removed. Check
"0" rings for cuts or other type of
damage and replace as necessary.
The air cleaner is remotely mounted near the
radiator. It is connected to the intake manifold by air
intake ducting.
Also, mounted between the air cleaner and
intake, are the mass air flow sensor and throttle body.
Cold driveability characteristics are greatly
improved with the aid of an engine coolant supply to
the throttle body for rapid warm up.
The throttle body design uses an integral Idle Air
Control to govern idle speed and a Throttle Position
Sensor (TPS). The IAC and TPS are both controlled
by the ECM.
A large diameter fuel rail is attached to the intake
manifold and supplies fuel to all the injectors.
A fuel pressure tap is located on the rail for quick
pressure checks.
Fuel is recirculated through the rail continually
while the engine is running. This removes air and
vapors from the fuel as well as keeping the fuel cool
during hot weather operation.
A fuel pressure regulator is mounted on the fuel
rail. It maintains a constant 36 psi pressure across the
injectors under all operating conditions. It is
accomplished by controlling the amount of fuel that is
recirculated back to the fuel tank, based on engine
demand.
The pressure regulator also uses an
"0" ring for
attachment. The
"0" ring used is the same one that is
used for the injectors.
Some engines also have an accumulator that is
located in the fuel feed line near the cowl area. It is used
to dampen the vibration that is caused by the
pressurized fuel and the pulsing of the injector.
See Section 6E3 for more information and
diagnosis.
Fuel Feed and Return Pipe
When replacing fuel feed and return pipes, always
replace them with welded steel tubing meeting GM
Specification
124M, or its equivalent. The replacement
pipe must use the same type of fittings as the original
pipes to ensure the integrity of the connection.
NOTICE: Do not replace fuel pipe with fuel hose
or any other type of tubing such as copper or
aluminum. Only tubing meeting the 124M
specification is capable of meeting all the pressure
and vibration characteristics necessary to ensure
the durability standard required.
Always check and replace any
"0" rings or
washers that appear damaged.
Page 436 of 1825
ENGINE FUEL CC-5
FUEL TANK
Draining Fuel Tank
1. Disconnect the negative battery cable. Also have
a dry chemical (Class B) fire extinguisher near the
work area.
2. Use a hand operated pump device when possible
to drain as much fuel through the filler tube as
possible.
3. If
a hand operated pump device cannot be used
to complete the draining process, use a siphon at
the main (not return) fuel pipe at the fuel pump
or the fuel tank gage unit.
CAUTION: Never drain or store
gasoline in an open container due to
the possibility of fire or explosion.
4. Reinstall any removed hoses, lines and cap.
Removing Fuel Tank
1. Remove all fuel, see "Draining Fuel Tank".
2. Support
fuel tank and disconnect the two fuel
tank retaining straps.
3. Lower tank enough to disconnect sending unit
wire, hoses, and ground strap, if so equipped.
4. Remove tank from vehicle.
5. Remove sending unit.
Installing Fuel Tank
1. Reverse removal procedure.
2. Always replace "0" ring when tank unit has been
removed.
3. When reinstalling fuel tank, be sure to reinstall
anti-squeak pieces on top of the tank to reduce
rattles and other annoying noises.
4. Tighten fuel tank retaining strap bolts or screws.
Fuel System Cleaning
CAUTION: This procedure will NOT
remove all fuel vapor. Do not attempt
any repair
on tank or filler neck where
heat or flame is required, as an
explosion resulting in personal injury
could occur.
If trouble is due to contaminated fuel or foreign
material that is in the tank, it can usually be cleaned.
If tank is rusted internally, it should be replaced.
1. Disconnect negative battery cable.
2. Disconnect ignition engine harness connector.
Have dry chemical (Class B) fire extinguisher
near the work area.
3. Relieve fuel system pressure.
4. Drain fuel tank (see "Draining Fuel Tank").
5. Remove fuel tank (see "Fuel Tank Removal").
6. Remove external fuel filter and inspect for
contamination. If filter is plugged, replace.
7. Locate tank away from heat, flame, or other
source of ignition. Remove fuel gage sending unit
and fuel pump assembly, if so equipped, and
inspect condition of strainer. If strainer is
contaminated, a new strainer should be installed.
8. Complete draining of tank by rocking it and
allowing fuel to run out of fuel sending unit
opening.
9. Flush fuel tank with running hot water for at least
five minutes. Pour water out of fuel sending unit
opening. (Rock tank to be sure that removal of
water is complete.)
10. Disconnect fuel feed pipe and use air pressure to
clean fuel line. Apply air pressure in the opposite
direction fuel normally flows through the line. On
vehicles equipped with a fuel return line, clean
line in similar manner. Disconnect pipe at
throttle body unit and apply air pressure to clean
return line. Reconnect and torque all pipes to 30
N-m (22 1b. ft.).
11. Use low air pressure to clean pipes on fuel gage
sending unit.
112. Install new strainer on fuel gage sending unit, if
required. Install fuel gage sending unit and fuel
pump, with new gasket, into tank and install fuel
tank. Connect fuel gage wire harness to body
harness. Connect all fuel lines except feed line to
external fuel filter.
13. Disconnect fuel feed hose to chassis pipe at front.
Connect a hose to front end of chassis fuel feed
pipe and insert other end of hose into a one gallon
fuel can.
14. Connect battery cable.
15. Put six gallons of clean fuel into fuel tank and
apply 12 volts to Terminal
"G" of ALCL to
operate fuel pump. Pump two quarts of fuel into
fuel can. This will purge fuel pump.
16. Remove hose and connect fuel hose to chassis
pipe.
17. Check all connections
for leaks; tighten all hose
clamps.
Fuel Tank Purging Procedure
The following procedure is used prior to repairing
of fuel tank.
1. Remove fuel sending unit and fuel pump and
drain all remaining fuel from tank.
2. Visually inspect interior cavity of tank. If any fuel
is evident, drain again.
3. Move tank to flushing area (wash rack).
4. Fill tank completely with tap water, agitate
vigorously and drain.
5. Add gasoline emulsifying agent to the tank, refill
with water, agitate mixture for 10 minutes, and
drain tank completely.
For correct gasoline emulsifying agent-to-water
mixture, refer to the
manufacturer's
specifications. Use an available emulsifying
agent, such as "Product-Sol No.
913", or
equivalent.
6. When empty, refill the tank to overflowing with
water. Completely flush out remaining mixture
and empty tank.
7. If available, an explosion meter should be used Lo
check for negative reading.
8. Perform required service work.
Page 437 of 1825
86-8 ENGINE FUEL
Fuel Tank Leak Test Procedure
Plug all outlets. Before removing a fuel tank for
a suspected fuel leak, make sure that it is not one of the
fuel hoses that is leaking onto the tank.
On-Car Test
If fuel is leaking from tank, replace tank.
Off-Car Pest
Apply a small amount of air pressure to tank
through vent tube (approximately
7 to 10 kPa or 1 to
1-1/2 lbs. of pressure).
NOTICE: More than 1-1/2 pounds of pressure
will damage tank permanently.
Test repaired area for leaks with soap solution, or
by submersion. If leak is noted, replace tank.
ACCELERATOR CONTROLS
The accelerator control system is cable type.
There are no linkage adjustments.
As there are no adjustments, the specific cable for
each application must be used. Only the specific
replacement part will work.
When work has been performed on accelerator
controls, always check to ensure that all components
are installed as removed and that all linkage and cables
are not rubbing or binding in any manner.
Accelerator Control Cable
Refer to On-Car Service for removal and
installation of accelerator control cable.
When performing service on the accelerator
control cable, observe the following:
s Retainer must be installed with tangs secured
over head of stud.
s Conduit fitting at both ends of cable must have
locking tangs expanded and locked in attaching
holes.
s The braided portion of the accelerator cable
assembly must not come in contact with the front
of dash sealer during assembly, repair or
replacement of the assembly.
e Flexible components (hoses, wires, conduits, etc.)
must be routed within
50.0mm (2.0 in.) of moving
parts of accelerator linkage, outboard of support,
unless routing is positively controlled.
Whenever disconnecting or replacing parts, lube
pivot points with Accelerator Linkage Lubricant
1052541, or equivalent.
Accelerator Pedal
When performing service on the accelerator
pedal, observe the following:
s The mounting surface between support and dash
panel must be free of insulation. The carpet and
padding in pedal and tunnel area must be
positioned to lay flat and be free of wrinkles and
bunches.
s Slip accelerator control cable through slot in rod
and then install retainer in rod, being sure it is seated.
Care must be utilized in pressing the
retainer into hole in rod, to assure the cable is not
kinked or damaged in any way.
s After securing all components of the accelerator
linkage, linkage must operate freely, without
binding, between full closed throttle and full wide
open throttle.
e Wire, hoses, cables or other obstructions must
not be placed within 13mm
(33/64 in.) of cable
or rod at any point in their travel.
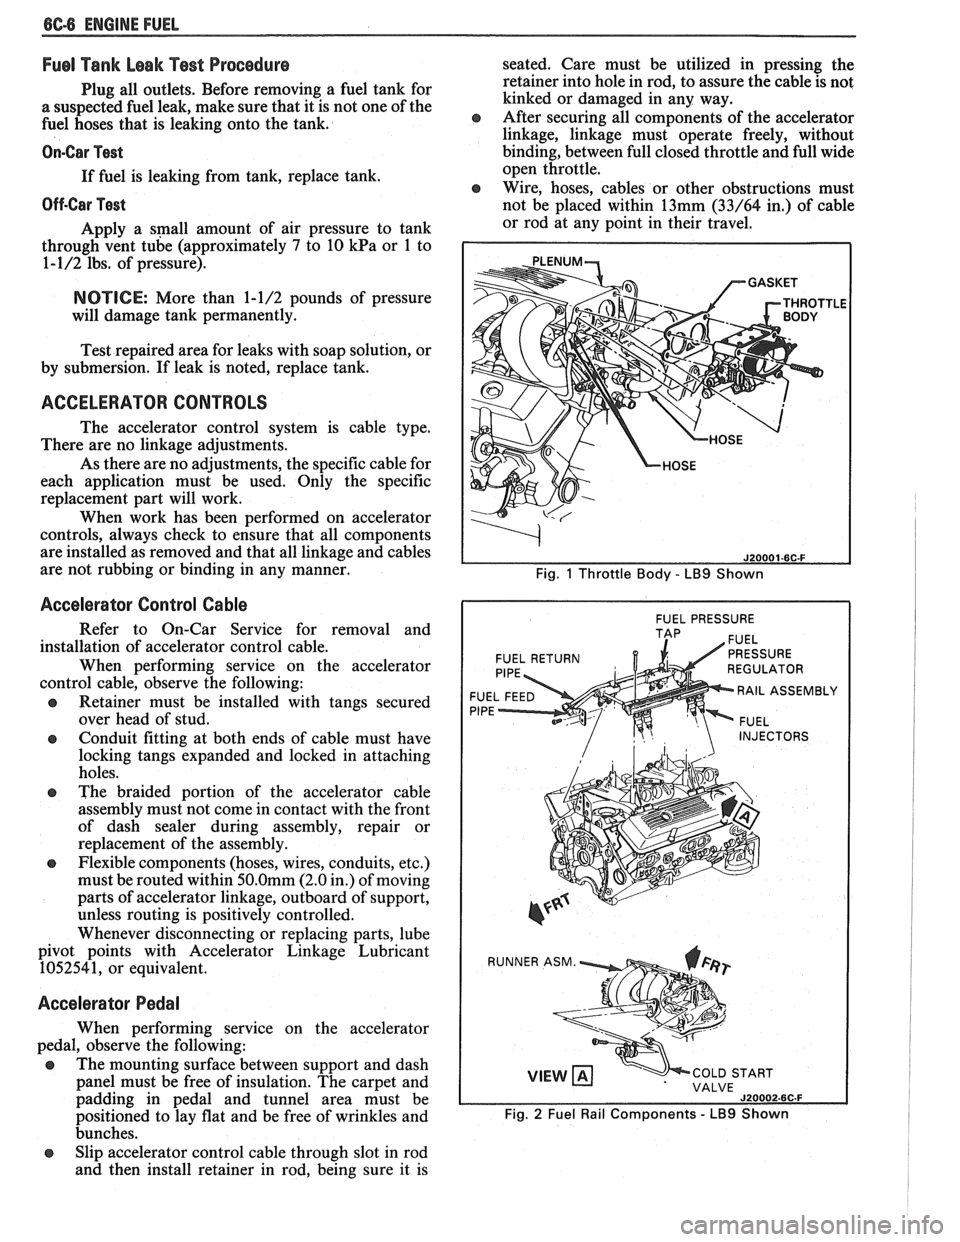
Fig. 1 Throttle Body - LB9 Shown
I FUEL PRESSURE I
FUEL RETURN
F
RAIL ASSEMBL
P
INJECTORS
VIEW COLD START
VALVE
J20002-6C-F
Fig. 2 Fuel Rail Components - LB9 Shown