Page 430 of 962
2) Parking brake lever stroke adjustment
a) If parking brake lever stroke was found out of
specification when checked as described on
the previous page, adjust parking brake cable.
NOTE:
Make sure for following conditions before cable
adjustment.
No air is trapped in brake system.
Brake pedal travel is proper.
Brake pedal has been depressed a few times
with about 30 kg (66 lbs) load.
Parking brake lever has been pulled up a few
times with about 20 kg force.
Rear brake shoes are not worn beyond limit,
and self adjusting mechanism operates proper-
ly.
b) After confirming that above 5 conditions are
all satisfied, adjust parking brake lever stroke
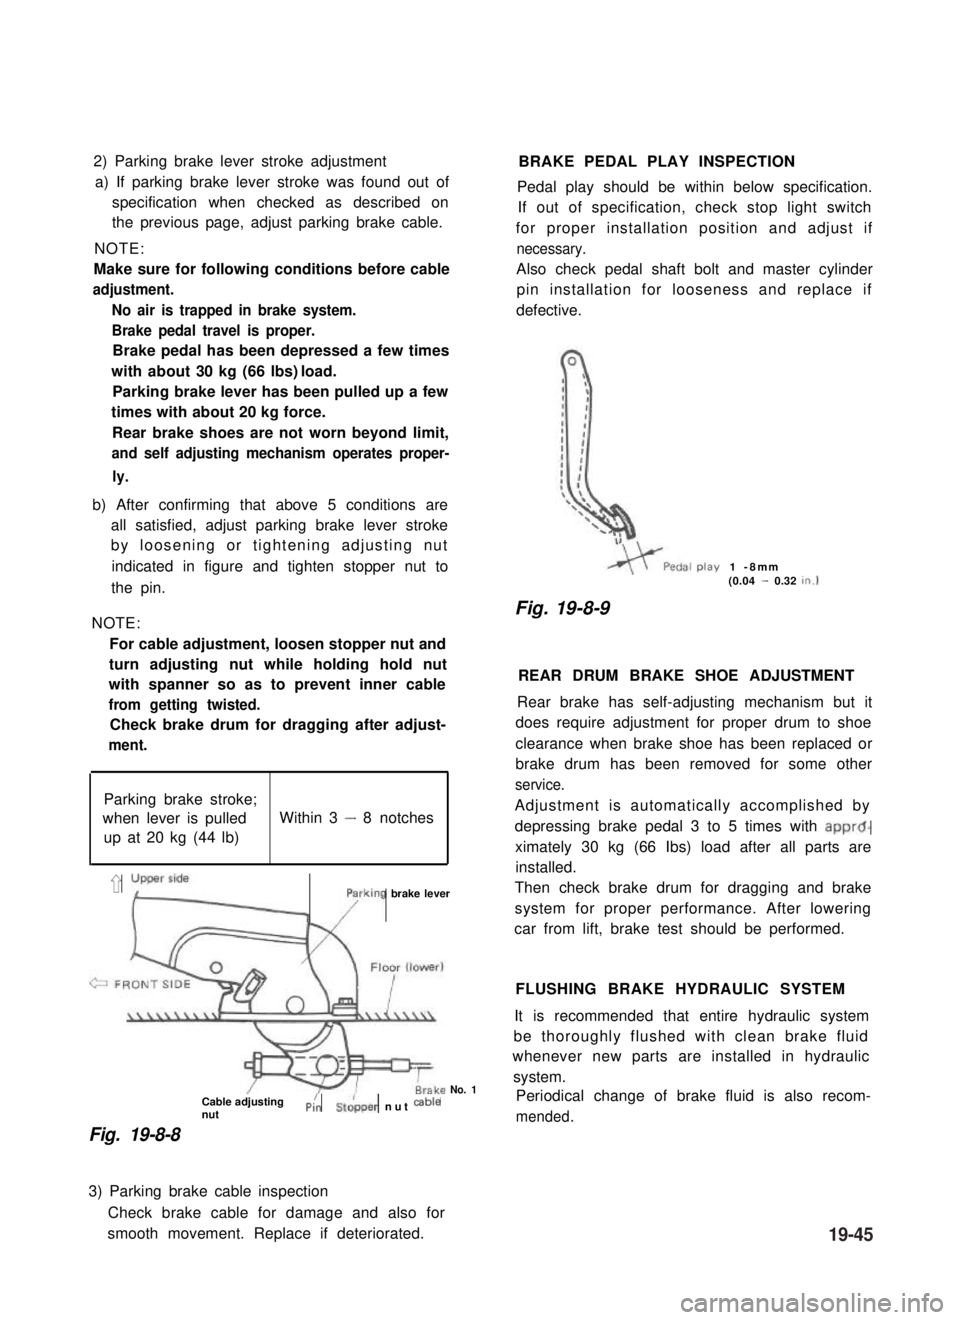
by loosening or tightening adjusting nut
indicated in figure and tighten stopper nut to
the pin.
NOTE:
For cable adjustment, loosen stopper nut and
turn adjusting nut while holding hold nut
with spanner so as to prevent inner cable
from getting twisted.
Check brake drum for dragging after adjust-
ment.
Parking brake stroke;
when lever is pulledWithin 3 - 8 notches
up at 20 kg (44 lb)
’ yLyFrking brake lever
Cable adjustingnutPi:St&per nut cab’e
Fig. 19-8-8
No. 1
BRAKE PEDAL PLAY INSPECTION
Pedal play should be within below specification.
If out of specification, check stop light switch
for proper installation position and adjust if
necessary.
Also check pedal shaft bolt and master cylinder
pin installation for looseness and replace if
defective.
play1 -8mm(0.04 - 0.32tn.1
Fig. 19-8-9
REAR DRUM BRAKE SHOE ADJUSTMENT
Rear brake has self-adjusting mechanism but it
does require adjustment for proper drum to shoe
clearance when brake shoe has been replaced or
brake drum has been removed for some other
service.
Adjustment is automatically accomplished by
depressing brake pedal 3 to 5 times with apprd-
ximately 30 kg (66 Ibs) load after all parts are
installed.
Then check brake drum for dragging and brake
system for proper performance. After lowering
car from lift, brake test should be performed.
FLUSHING BRAKE HYDRAULIC SYSTEM
It is recommended that entire hydraulic system
be thoroughly flushed with clean brake fluid
whenever new parts are installed in hydraulic
system.
Periodical change of brake fluid is also recom-
mended.
3) Parking brake cable inspection
Check brake cable for damage and also for
smooth movement. Replace if deteriorated.19-45
Page 448 of 962
21-1.COMBINATION METER..................................
21-2.HEAD LIGHT..........................................
21-3.TURN SIGNAL LIGHT AND HAZARD WARNING LIGHT.......
21-4.WINDSHIELD WIPER MOTOR.............................
21-5.WATER TEMPERATURE METER AND GAUGE...............
21-6.FUEL LEVEL METER AND GAUGE........................
21-7.BRAKE WARNING LAMP ...............................
21-8.OIL PRESSURE LAMP..................................
4 WHEEL DRIVE LAMP.................................
21-10. SEAT BELT WARNING LAMP/BUZZER.....................
...................
...~I-I
.....
21-14. .............................................
21-15. WIRING HARNESS ROUTING............................
21-16. WIRING DIAGRAM....................................
SECTION 21
BODY ELECTRICAL EQUIPMENT
CONTENTS
21-9.
21-11. MAIN SWITCH KEY WARNING BUZZER
21-12. ILUMINATION CONTROLLER..............................................
21-13. REAR DEFOGGER ( hard-top )......................................
FUSE BOX
21-2
21-4
21-7
21-9
21-11
21-12
21-13
21-14
21-15
21-15
21-16
21-16
21-16
21-18
21-19
21-22
21-1
Page 450 of 962
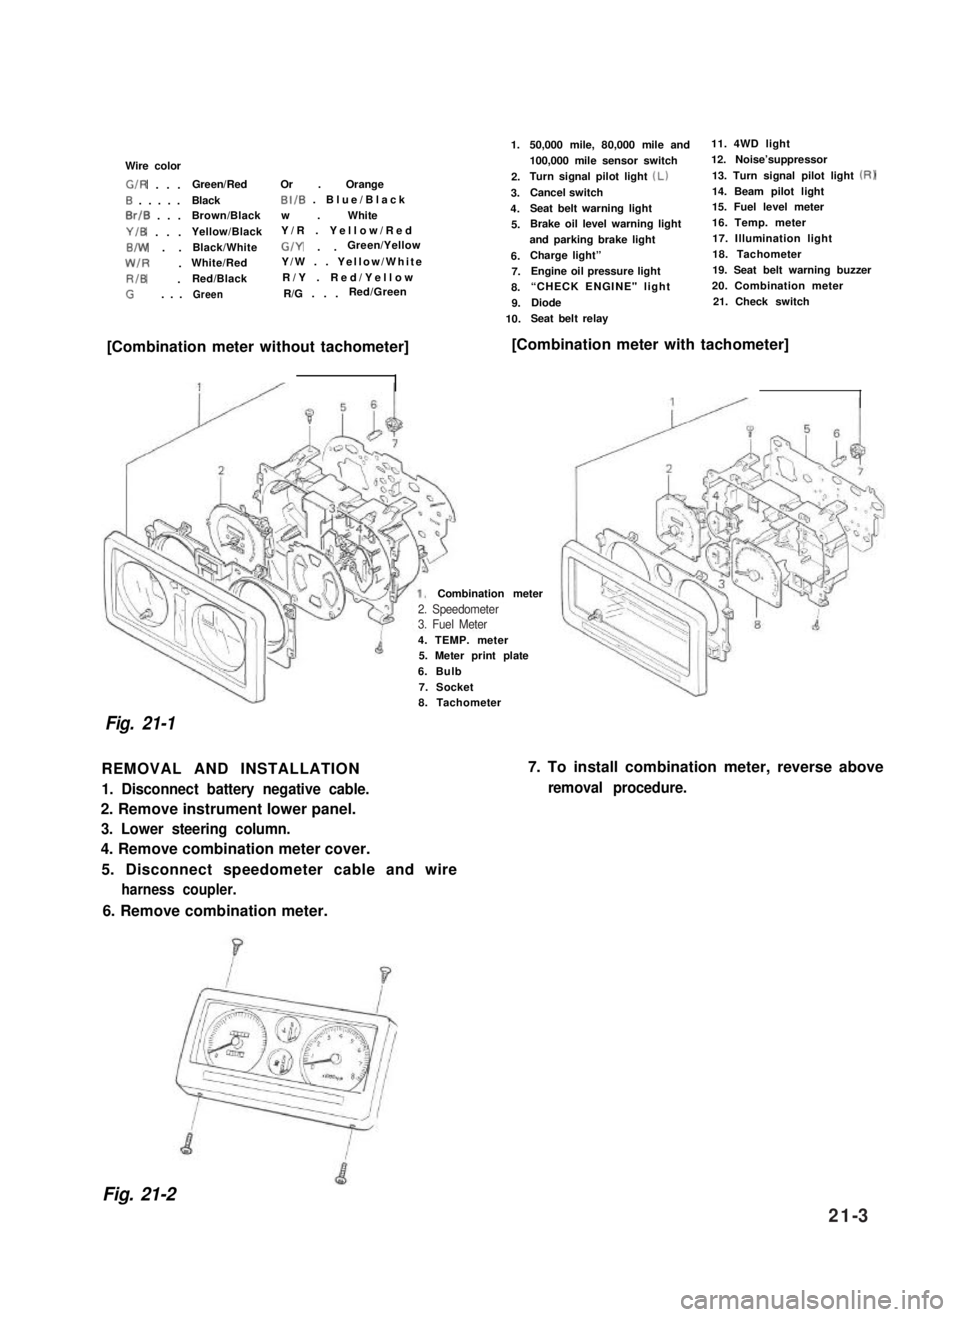
Wire color
G/R . . .Green/RedOr . Orange
0 . . . . .BlackBI/B . Blue/Black
0rlB . . .Brown/Blackw . White
Y/B . . .Yellow/BlackY/R . Yellow/Red
B/W . .Black/WhiteG/Y . .Green/Yellow
W/R .White/RedY/W . . Yellow/White
RIB .Red/BlackR/Y . Red/Yellow
G. . .GreenR/G . . .Red/Green
1.
2.
3.
4.
5.
6.7.
8.
9.
10.
50,000 mile, 80,000 mile and11. 4WD light
100,000 mile sensor switch12. Noise’suppressor
Turn signal pilot light (Lb13. Turn signal pilot light (RI
Cancel switch14. Beam pilot light
Seat belt warning light15. Fuel level meter
Brake oil level warning light16. Temp. meter
and parking brake light17. Illumination light
Charge light”18. Tachometer
Engine oil pressure light19. Seat belt warning buzzer
“CHECK ENGINE" light 20. Combination meter
Diode21. Check switch
Seat belt relay
[Combination meter without tachometer][Combination meter with tachometer]
4. TEMP. meter5. Meter print plate
6. Bulb
7. Socket
Combination meter
Fig. 21-1
8. Tachometer
REMOVAL AND INSTALLATION
1. Disconnect battery negative cable.
2. Remove instrument lower panel.
3. Lower steering column.
4. Remove combination meter cover.
5. Disconnect speedometer cable and wire
harness coupler.
7. To install combination meter, reverse above
removal procedure.
6. Remove combination meter.
Fig. 21-2
2. Speedometer3. Fuel Meter
21-3
Page 451 of 962
21-2. HEAD LIGHT
WIRING CIRCUIT
Headlight
HeadlightI
Meter pilot light (Beam)II
I
4
Lighting switchDimmer & passing switch
To license light,illumination light,
meter illumination light
Wire color
B. . . .Black
Br/Y . .Brown/Yellow
R.....Red
R/w . . .Red/White
RIBI . .Red/Blue
B/Y . . .Black/Yellow
WIBI . .White/Blue
W/R .WhitelRed
W/Y .White/Yellow
To right side position &tail light and side markerRIGlights
iIB
To left side position 81tail light and side’RIBId
marker lightsFuse box
Fig. 21-3
21-4
Page 452 of 962
HEADLIGHT INSPECTION
1.Lighting (Low beam, High beam, Passing)
2. Mounting
3.Dirt and cracks on lenses
4.Main beam axis direction and brightness
HEADLIGHT BEAM SETTING (STANDARD PROCEDURE)
Before setting the headlight beams, adjust air pressures of four tires to a specified value respectively. Move
the vehicle up and down by hand to settle its attitude. Then move it over a flat surface. There are available
a variety of headlight beams setting methods (e.g., the screen method using a focusing tester, etc.). How-
ever, the method described here does not use such tester.
Beam alignment
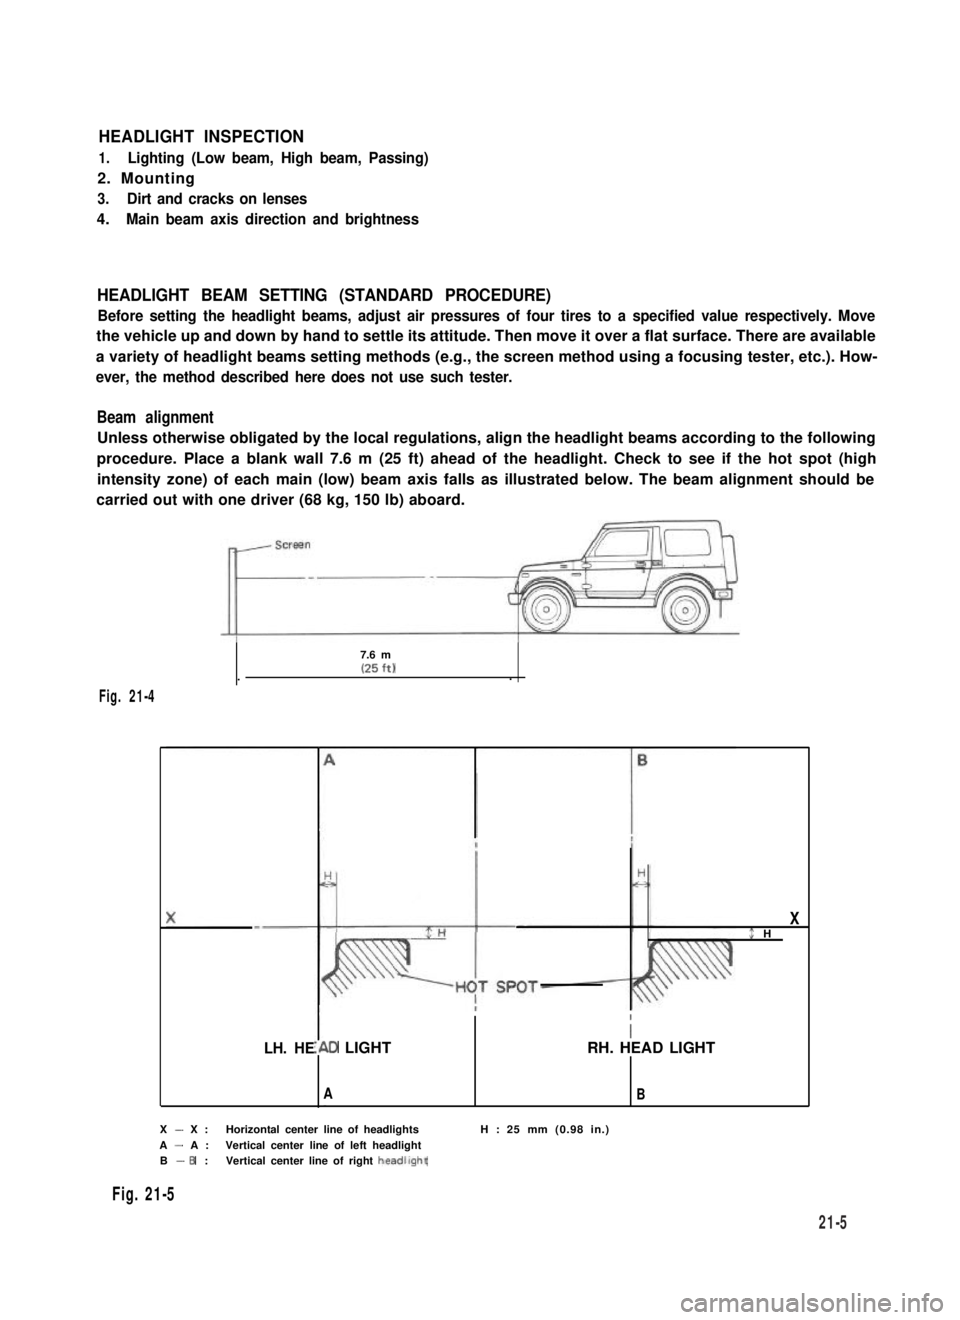
Unless otherwise obligated by the local regulations, align the headlight beams according to the following
procedure. Place a blank wall 7.6 m (25 ft) ahead of the headlight. Check to see if the hot spot (high
intensity zone) of each main (low) beam axis falls as illustrated below. The beam alignment should be
carried out with one driver (68 kg, 150 lb) aboard.
7.6 m(25 ft)..
Fig. 21-4
LH. HE
X$ H
I
I\D LIGHTRH. HEAD LIGHT
AB
X - X :Horizontal center line of headlightsH : 25 mm (0.98 in.)
A - A :Vertical center line of left headlightB - 6 :Vertical center line of right headllght
Fig. 21-5
21-5
Page 453 of 962
MAINTENANCE
(1) Headlight adjustment
There are two screws (1)and (2)which can be
used for adjustment. Use these screws to
adjust the headlight position for the vertical
and horizontal alignment of each beam.
(2) Head light dimmer switch
Using circuit tester, check each circuit for
continuity by putting tester probe pins to
the terminals shown in Fig. 21-7. With switch
kept in LOW BEAM position, tester should
indicate continuity between terminals 0 and
@ . Similarly, there should be continuity
between terminals @ and @ when in HIGH
BEAM position.
Fig. 21-6
Switch connector
1”mmmm-J
1.Green/Red (Green/Black)8.Red2.Green/Yellow9.Blue/Green
3.Green10.Brown/Yellow
4.Yellow11.Red/Blue
5.White/Blue12.Red/Yellow
6.Yellow/Blue13.White7.Red/White
1 17 1 18 119 1
14.Yellow/White
15.Blue16.Blue/Red
Fig. 21-7
17.Blue/Black
18.Black19.Blue/White
Combination switch (Lighting switch circuit)
Fig. 27-8
II
II I, Brown(Yellow
21-6
Page 454 of 962
21-3. TURN SIGNAL LIGHT AND HAZARD WARNING LIGHT
CIRCUIT DESCRIPTION
1 Right turn signal
2.. Left turn signal
3. Battery4. Main switch
5. Fuse
6. Turn signal and hazard warning switch
7. Turn signal and hazard warning relay
Fig. 21-9
8.Green/Yellow
9.White/Yellow
10.Yellow11.Yellow/Blue
12.Green
13. Black/Blue
14. Green/Red
15.Meter pilot light(Right)
16.Meter pilot light(Left)
17.White/Green
When hazard warning switch is “OFF”, Yellow lead @ is connected to Yellow/Blue lead 0.
When the hazard warning switch is “ON”,White/Green lead @I is connected to Yellow/Blue lead @I, and
Green lead (12)to both Green/Yellow lead @ and Green/Red lead @.
When Turn-signal switch is “ON” for right turn, Green lead @ is connected to Green/Yellow lead @.
When Turn-signal switch is “ON” for left turn, Green lead @ is connected to Green/Red lead @.
21-7
Page 455 of 962
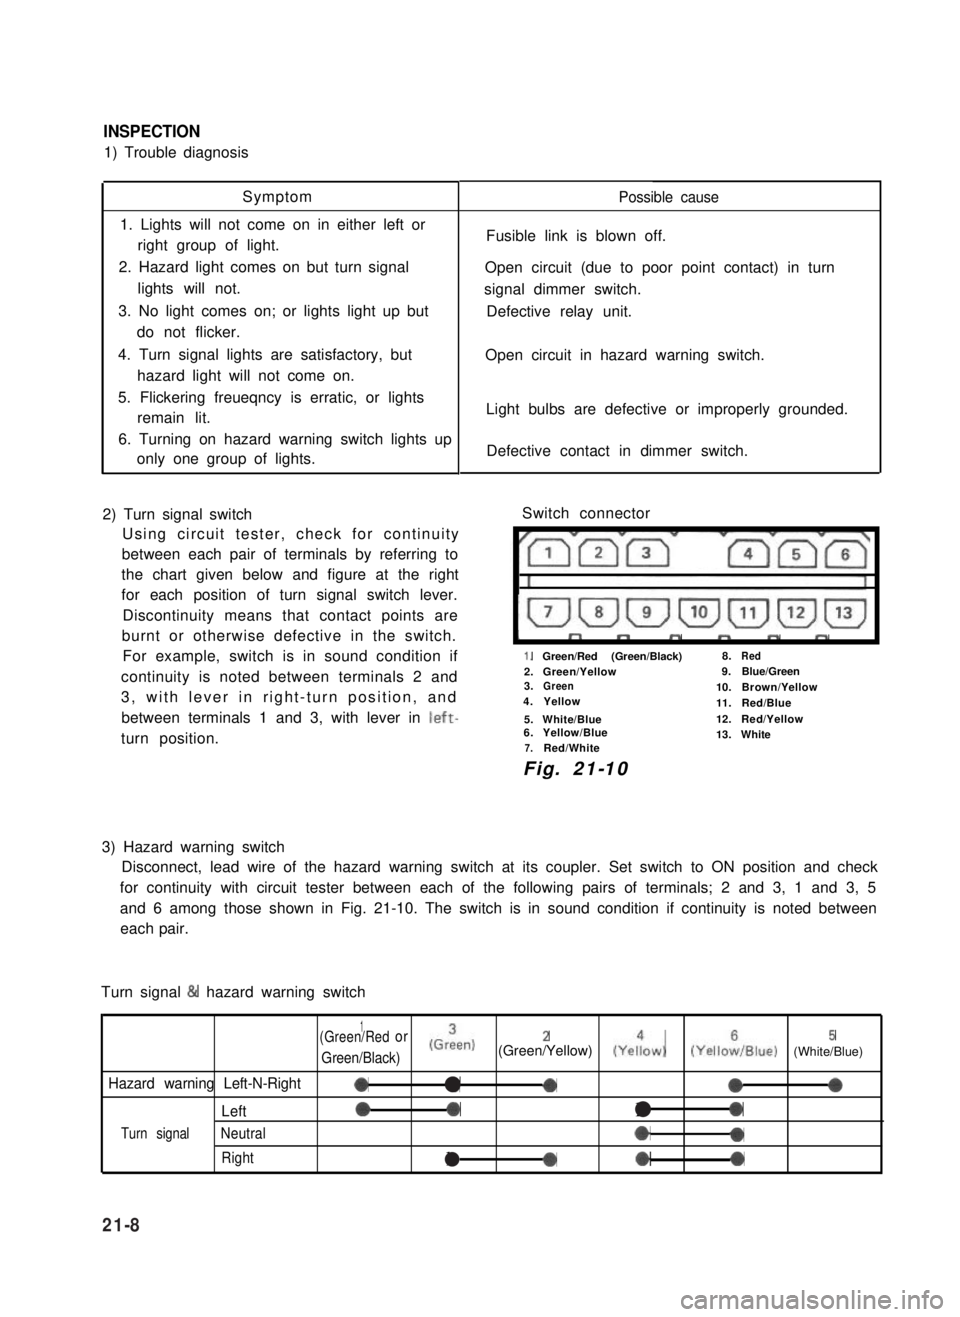
INSPECTION
1) Trouble diagnosis
Symptom
1. Lights will not come on in either left or
right group of light.
2. Hazard light comes on but turn signal
lights will not.
3. No light comes on; or lights light up but
do not flicker.
4. Turn signal lights are satisfactory, but
hazard light will not come on.
5. Flickering freueqncy is erratic, or lights
remain lit.
6. Turning on hazard warning switch lights up
only one group of lights.
2) Turn signal switch
Using circuit tester, check for continuity
between each pair of terminals by referring to
the chart given below and figure at the right
for each position of turn signal switch lever.
Discontinuity means that contact points are
burnt or otherwise defective in the switch.
For example, switch is in sound condition if
continuity is noted between terminals 2 and
3, with lever in right-turn position, and
between terminals 1 and 3, with lever in left-
turn position.
Possible cause
Fusible link is blown off.
Open circuit (due to poor point contact) in turn
signal dimmer switch.
Defective relay unit.
Open circuit in hazard warning switch.
Light bulbs are defective or improperly grounded.
Defective contact in dimmer switch.
Switch connector
I”””yrm-
1.Green/Red (Green/Black)8.Red
2.Green/Yellow9.Blue/Green3.Green10.Brown/Yellow4.Yellow11.Red/Blue
5.White/Blue12.Red/Yellow6.Yellow/Blue13.White7.Red/White
Fig. 21-10
3) Hazard warning switch
Disconnect, lead wire of the hazard warning switch at its coupler. Set switch to ON position and check
for continuity with circuit tester between each of the following pairs of terminals; 2 and 3, 1 and 3, 5
and 6 among those shown in Fig. 21-10. The switch is in sound condition if continuity is noted between
each pair.
Turn signal & hazard warning switch
1(Green/Redor
Green/Black)
(Grien)2(Green/Yellow) (Yeiow)5(YelloiIBlue) (White/Blue)
Hazard warning Left-N-Right0a-000
Left00l0
Turn signalNeutral*0
Rightla*0
21-8