Page 432 of 962

5) Repeat this operation until there are no more
air bubbles in hydraulic line.
6) When bubbles stop, depress and hold brake
pedal and tighten bleeder plug.
7) Then attach bleeder plug cap.
Fig. 19-8-14
8) After completing bleeding operation, apply
fluid pressure to pipe line and check for
leakage.
9) Replenish fluid into reservoir up to specified
level.
Fig. 19-8-15
INSPECT BOOSTER OPERATION
There are two ways to perform this inspection,
with and without a tester. Ordinarily, it is possi-
ble to roughly determine its condition without
using a tester.
NOTE:
For this check, make sure that no air is in
hydraulic line.
INSPECTION WITHOUT TESTER
Check Air Tightness
1) Start engine.
2) Stop engine after running for 1 or 2 minutes.
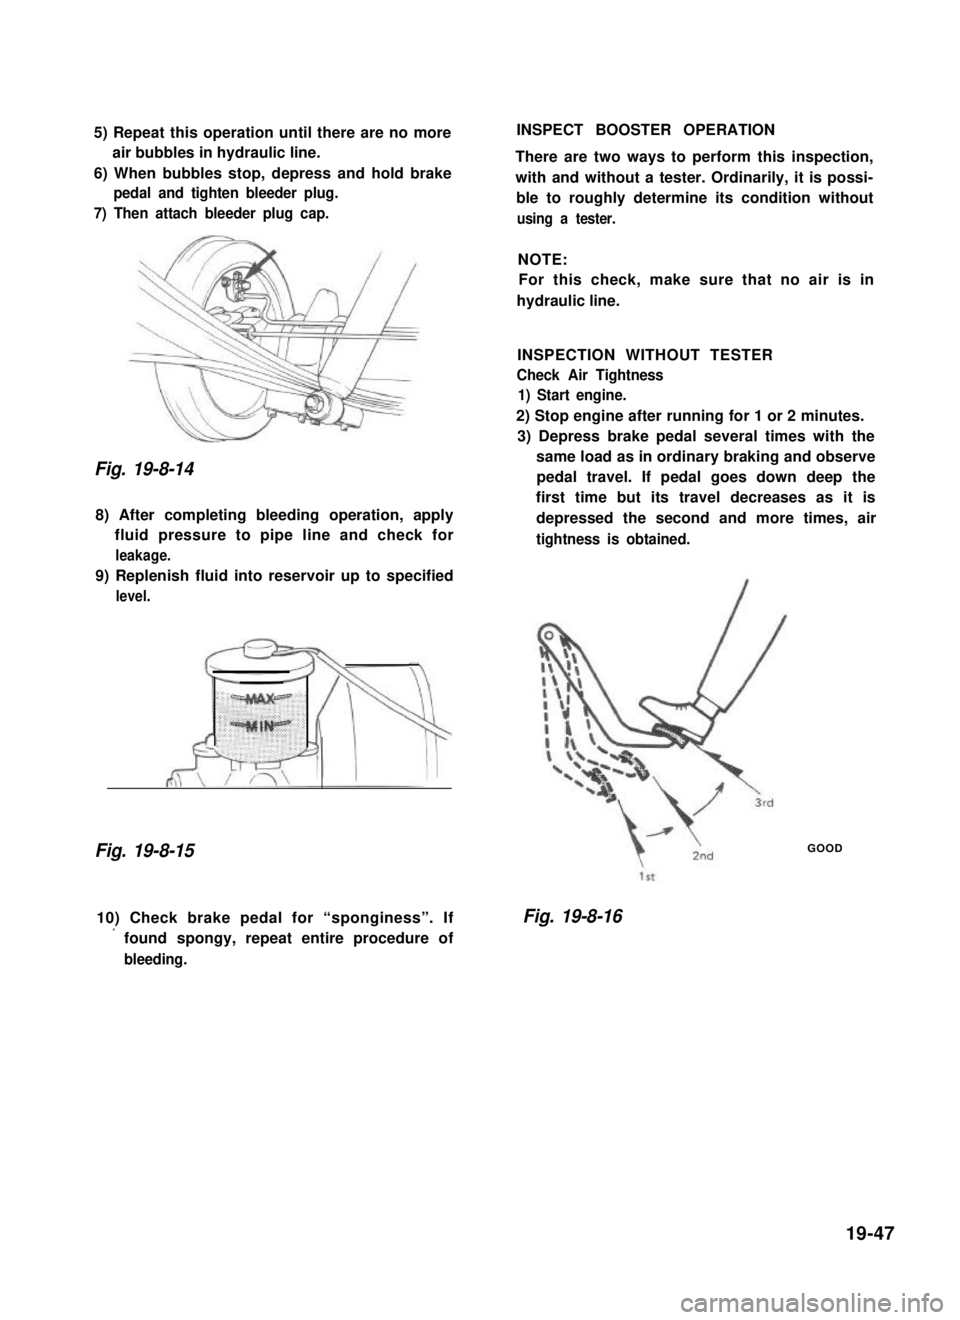
3) Depress brake pedal several times with the
same load as in ordinary braking and observe
pedal travel. If pedal goes down deep the
first time but its travel decreases as it is
depressed the second and more times, air
tightness is obtained.
GOOD
10) Check brake pedal for “sponginess”. If
’ found spongy, repeat entire procedure of
bleeding.
Fig. 19-8-16
19-47
Page 460 of 962
![SUZUKI GRAND VITARA 1987 Service Repair Manual [Gauge unit]21-7. BRAKE WARNING LAMP
Use ohmmeter to confirm that level gauge unit
changes in resistance with change of the float
position. Float position-to-resistance relation-
ship can be plotted i SUZUKI GRAND VITARA 1987 Service Repair Manual [Gauge unit]21-7. BRAKE WARNING LAMP
Use ohmmeter to confirm that level gauge unit
changes in resistance with change of the float
position. Float position-to-resistance relation-
ship can be plotted i](/manual-img/20/57437/w960_57437-459.png)
[Gauge unit]21-7. BRAKE WARNING LAMP
Use ohmmeter to confirm that level gauge unit
changes in resistance with change of the float
position. Float position-to-resistance relation-
ship can be plotted in a graph as shown below.
The brake warning lamp system consists of the
brake fluid level switch installed to the master
cylinder reservoir and the lamp inside the
combination meter.
This circuit includes a parking brake switch
which gives a warning for unreleased parking
brake.
F-E
Fig. 21-20 Resistance-Fuel Level Relationship
Fig. 21-21
F : Full
E : Empty
OPERATION
Brake fluid level warning lamp circuit consists of
brake fluid level switch installed in master
cylinder reservoir, brake fluid level warning lamp
in gage cluster and check relay.
Also, this circuit is additionally provided with
parking brake switch which warns that parking
brake is applied.when engine is stopped,
warning lamp comes on, if ignition switch is
turned ON and parking brake is applied.
For bulb check, warning lamp comes on briefly
during engine starting regardless of brake fluid
level position and parking brake operation.
Because point of check relay is closed.
After engine is started, release parking brake.
If lamp gose off, brake fluid level is adequate.
When warning lamp dose not operate, use circuit
diagram as reference to check bulb, wiring, etc.
r---i
check relayl-2-l
B/Y : Black/Yellow1. Fluid level switch
R/B : Red/Black2. Warning lamp
B: Black3. Parking brake switch
B/W : Black/White4. Main switch
B/BI : Black/Blue5. Battery
Fig. 27-22
21-13
Page 461 of 962
INSPECTION21-8. OIL PRESSURE LAMP
[Brake fluid level switch]
Use ohmmeter to check switch for resistance
and continuity.
If found defective, replace switch.
The oil pressure lamp circuit consists of the oil
pressure switch installed to the cylinder block
and the lamp (warning lamp) inside the combi-
nation meter.
The oil pressure switch so operates that it is
switched OFF when oil pressure is produced by
the started engine and then fed to switch.
Fig. 21-23W/R : White/Red
6 : Black
RI0 : RedlBlack
1. Battery
2. Main switch
3. Fuse4. Oil pressure lamp
6. Oil pressure switch
B/El : Black/Blue
B/W : Black/White
Y/0 : Yellow/Black
W/Y : White/Yellow
Fig. 21-24
INSPECTION
[Oil pressure switch]
Use a ohmmeter to check the switch continuity.
During engine
Running
No continuity
obtained (- 52 1
IAt Engine StopContinuity obtained
(052)
1. To wiring harness
2. Cylinder block
Fig. 21-2521-14
Page 466 of 962
21-15. WIRING HARNESS ROUTING
When reinstalling wire harness, be careful for the following.
l When doing wiring harness related work, make always sure to disconnect battery negative cable from
battery.
l Clamp wire harness securely at prescribed positions.
l Try to route wire harness so as to avoid contact with other parts as much as possible. Use special care
not to let it contact sharp edges of body or other parts.
0 Connect connectors securely.
Engine Room Wiring
1.Wire harness No. 2
2.Battery3. To starter, alternator, head light, small light, horn and etc.
4. To license light, stop/tail light, 4WD switch
5.Earth
6.To wiring harness No.17. To head light, small light, etc.
8.To distributor
9. To ignition coil
10. To back up light switch
11. To fifth switch
12.To TWSV
13.Duty check coupler
14. Thermal engine room switch
15. HAC
16.Ignition coil
17.Brake fluidreservoir
Fig. 27-37
21-19