Page 1367 of 2389
5. REMOVE AXLE HUB FROM STEERING KNUCKLE
(a) Using SST, push out the axle hub.
HINT: If the axle hub has been removed, be sure to replace.
SST 09950±20017
(b) Remove the bearing inner race (inside) from the
bearing.
7. REMOVE BEARING
(a) First install the inner race (outside) of the bearing to
be removed.
(b) Using a brass bar and a hammer, remove the bearing.
NOTICE: Always replace the bearing as an assembly.
4. SEPARATE DISC BRAKE DUST COVER ANY STEERING
KNUCKLE
Remove the three bolts and separate the disc brake dust
cover and the steering knuckle.
6. REMOVE OUTER OIL SEAL
Using a screwdriver, remove the oil seal from the steer-
ing knuckle.(c) Using SST, remove the bearing inner race (outside)
from the axle hub.
SST 09950±20017
± FRONT AXLE AND SUSPENSIONFront Axle HubFA±10
Page 1368 of 2389
2. INSTALL OUTER OIL SEAL
(a) Rotate and insert the side tip of a new oil seal into the SST.
SST 09608±32010
(b) Using SST, install the oil seal into the steering knuckle.
SST 09608±32010 and 09710±14012 (09710±00050)
4. INSTALL AXLE HUB
(a) Apply MP grease between the oil seal lip, oil seal and the bear-
ing.
(b) Using SST, install the axle hub into the steering knuckle.
SST 09310±35010
ASSEMBLY OF FRONT AXLE HUB
(See page FA ± 7)
1. INSTALL BEARING
Using SST, install a new bearing into the steering knuckle.
SST 09608±32010
5. INSTALL HOLE SNAP RING
Using snap ring pliers, install the hole snap ring into the
steering knuckle. 3. INSTALL DISC BRAKE DUST COVER
± FRONT AXLE AND SUSPENSIONFront Axle HubFA±11
Page 1370 of 2389
2. CONNECT STEERING KNUCKLE TO SHOCK
ABSORBER
NOTICE: Apply engine oil to the threads of the two bolts.
(a) Connect the steering knuckle to the shock absorber
lower bracket.
(b) Insert the bolts and align the matchmarks of the camber
adjusting cam.
(c) Torque the nuts.
Torque: 3,100 kg±cm (224 ft±Ib, 304 N±m)
3. CONNECT TIE ROD END TO STEERING KNUCKLE
Torque the castle nut and secure it with a new cotter pin.
Torque: 500 kg±cm (36 ft±Ib, 49 N±m)
INSTALLATION OF FRONT AXLE HUB
(See page FA ± 7)
1. INSTALL STEERING KNUCKLE TO LOWER
SUSPENSION ARM
install the steering knuckle to the lower suspension arm,
and temporarily install the nut.
4. TORQUE BALL JOINT TO LOWER ARM
Install and torque the castle nut and secure it with a new
cotter pin.
Torque: 1,250 kg±cm (90 ft±lb, 123 N±m)
5. INSTALL ROTOR DISC TO AXLE HUB
6. INSTALL DISC BRAKE CALIPER TO STEERING
KNUCKLE
Torque: 1,190 kg±cm (86 ft±Ib, 117 N±m)
± FRONT AXLE AND SUSPENSIONFront Axle HubFA±13
Page 1371 of 2389
7. INSTALL BEARING LOCK NUT, LOCK NUT CAP AND
COTTER PIN
(a) Torque the bearing lock nut while depressing the brake
pedal.
Torque: 1,900 kg±cm (137 ft±lb , 186 N±m)
(b) Install the lock nut cap, and secure it with a new cotter
pin.
8. CHECK FRONT WHEEL ALIGNMENT
(See page FA ± 3)
REPLACEMENT OF FRONT AXLE HUB BOLT
1. MOVE DISC BRAKE CALIPER
Remove the disc brake caliper from the steering knuckle and
suspended it with wire.
2. REMOVE ROTOR DISC
3. REMOVE FRONT AXLE HUB BOLT
(a) Align the disc brake dust cover cutting portion and axle
hub bolt.
(b) Using SST, remove the axle hub bolt.
SST 09650±17011
6. INSTALL DISC BRAKE CALIPER TO STEERING
KNUCKLE
Torque: 1,190kg±cm (86 ft±lb , 117 N±m)
4. INSTALL FRONT AXLE HUB BOLT
(a) Hold the front axle hub, and install a new hub
bolt.
5. INSTALL ROTOR DISC
± FRONT AXLE AND SUSPENSIONFront Axle HubFA±14
Page 1373 of 2389
REMOVAL OF FRONT DRIVE SHAFT
1. REMOVE COTTER PIN, LOCK NUT CUP AND LOCK NUT
(a) Remove the cotter pin and lock nut cap.
(b) Loosen the bearing lock nut while depressing the
brake pedal.
2. REMOVE ENGINE UNDER COVER
4. DRAIN OUT GEAR OIL FLUID
5. DISCONNECT TIE ROD END FROM STEERING
KNUCKLE
(a) Remove the cotter pin and nut from the steering
knuckle.
(b) Using SST, disconnect the tie rod end from the steer-
ing knuckle.
SST 09628±62011
NOTICE: The hub bearing could be damaged if it is
subjects to the vehicle weight, such as when moving
the vehicle with the drive shaft removed. Therefore, if
it is bearing first support it with SST.
SST 09608±16041 (09608±02020,09608±02040)
6. DISCONNECT STEERING KNUCKLE FROM LOWER
BALL JOINT
Remove the two bolts and disconnect the steering
knuckle from lower ball joint. 3. REMOVE FRONT FENDER APRON SEAL
± FRONT AXLE AND SUSPENSIONFront Drive Shaft (FWD SV21 )FA±16
Page 1386 of 2389

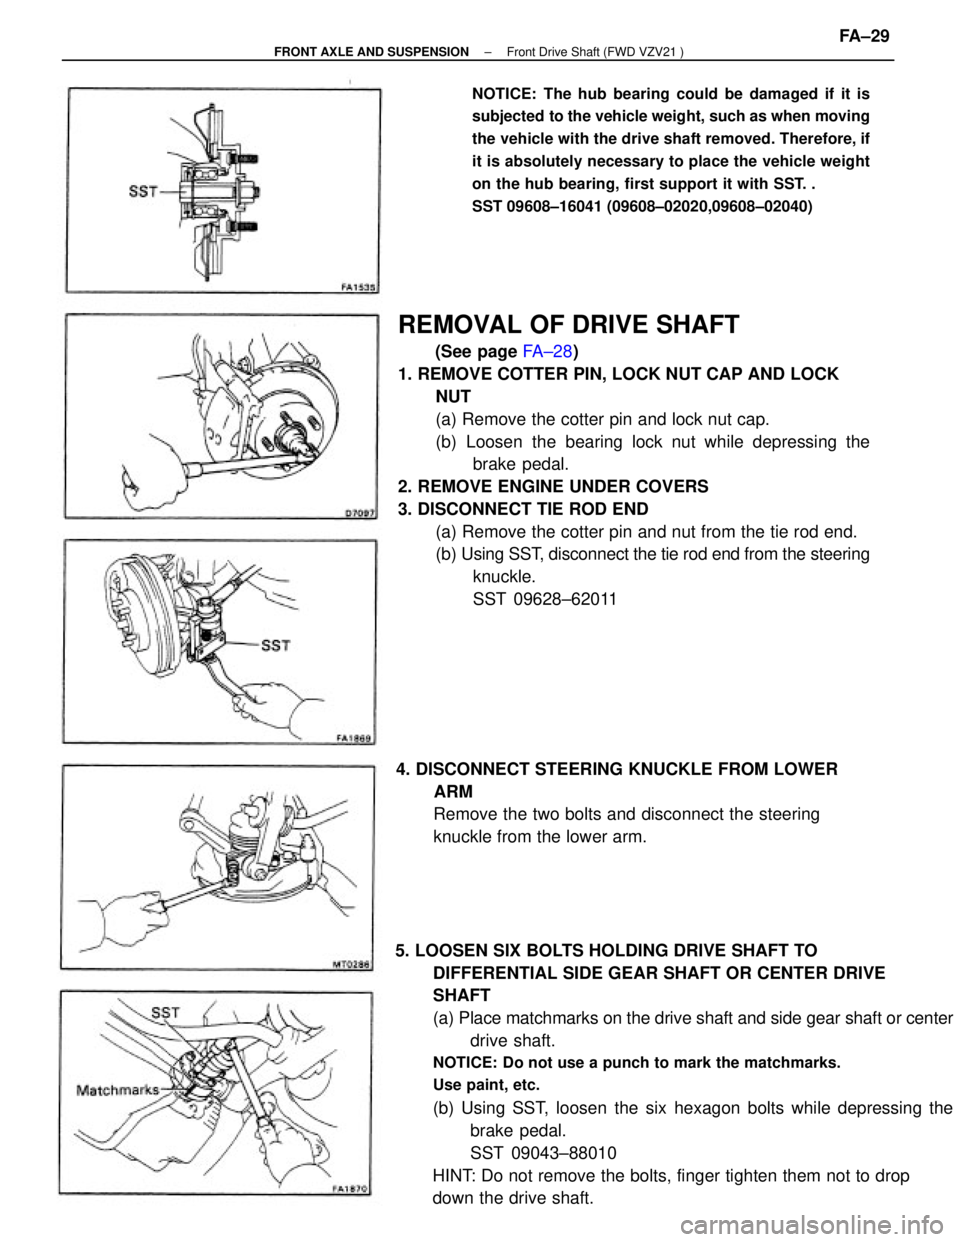
REMOVAL OF DRIVE SHAFT
(See page FA±28)
1. REMOVE COTTER PIN, LOCK NUT CAP AND LOCK
NUT
(a) Remove the cotter pin and lock nut cap.
(b) Loosen the bearing lock nut while depressing the
brake pedal.
2. REMOVE ENGINE UNDER COVERS
3. DISCONNECT TIE ROD END
(a) Remove the cotter pin and nut from the tie rod end.
(b) Using SST, disconnect the tie rod end from the steering
knuckle.
SST 09628±62011
5. LOOSEN SIX BOLTS HOLDING DRIVE SHAFT TO
DIFFERENTIAL SIDE GEAR SHAFT OR CENTER DRIVE
SHAFT
(a) Place matchmarks on the drive shaft and side gear shaft or center
drive shaft.
NOTICE: Do not use a punch to mark the matchmarks.
Use paint, etc.
(b) Using SST, loosen the six hexagon bolts while depressing the
brake pedal.
SST 09043±88010
HINT: Do not remove the bolts, finger tighten them not to drop
down the drive shaft.
NOTICE: The hub bearing could be damaged if it is
subjected to the vehicle weight, such as when moving
the vehicle with the drive shaft removed. Therefore, if
it is absolutely necessary to place the vehicle weight
on the hub bearing, first support it with SST. .
SST 09608±16041 (09608±02020,09608±02040)
4. DISCONNECT STEERING KNUCKLE FROM LOWER
ARM
Remove the two bolts and disconnect the steering
knuckle from the lower arm.
± FRONT AXLE AND SUSPENSIONFront Drive Shaft (FWD VZV21 )FA±29
Page 1397 of 2389
9. INSTALL BEARING LOCK NUT, LOCK NUT CAP AND
NEW COTTER PIN
(a) Torque the bearing lock nut while depressing the brake
pedal.
Torque: 1,900 kg±cm (137 ft±Ib, 186 N±m)
(b) Install the lock nut cap and, using pliers, install a new
cotter pin. 8. TIGHTEN SIX HEXAGON BOLTS
Using SST, tighten the six hexagon bolts while depress-
ing the brake pedal.
SST 09043±88010
Torque: 660 kg±cm (48 ft±Ib, 65 N±m)
10. FILL TRANSAXLE WITH GEAR OIL
(See page MT±45)
11. INSTALL ENGINE UNDER COVERS
12. CHECK FRONT WHEEL ALIGNMENT7. CONNECT STEERING KNUCKLE TO LOWER ARM
Torque: 1,150 kg±cm (83 ft±Ib, 113 N±m)
± FRONT AXLE AND SUSPENSIONFront Drive Shaft (FWD VZV21 )FA±40
Page 1399 of 2389

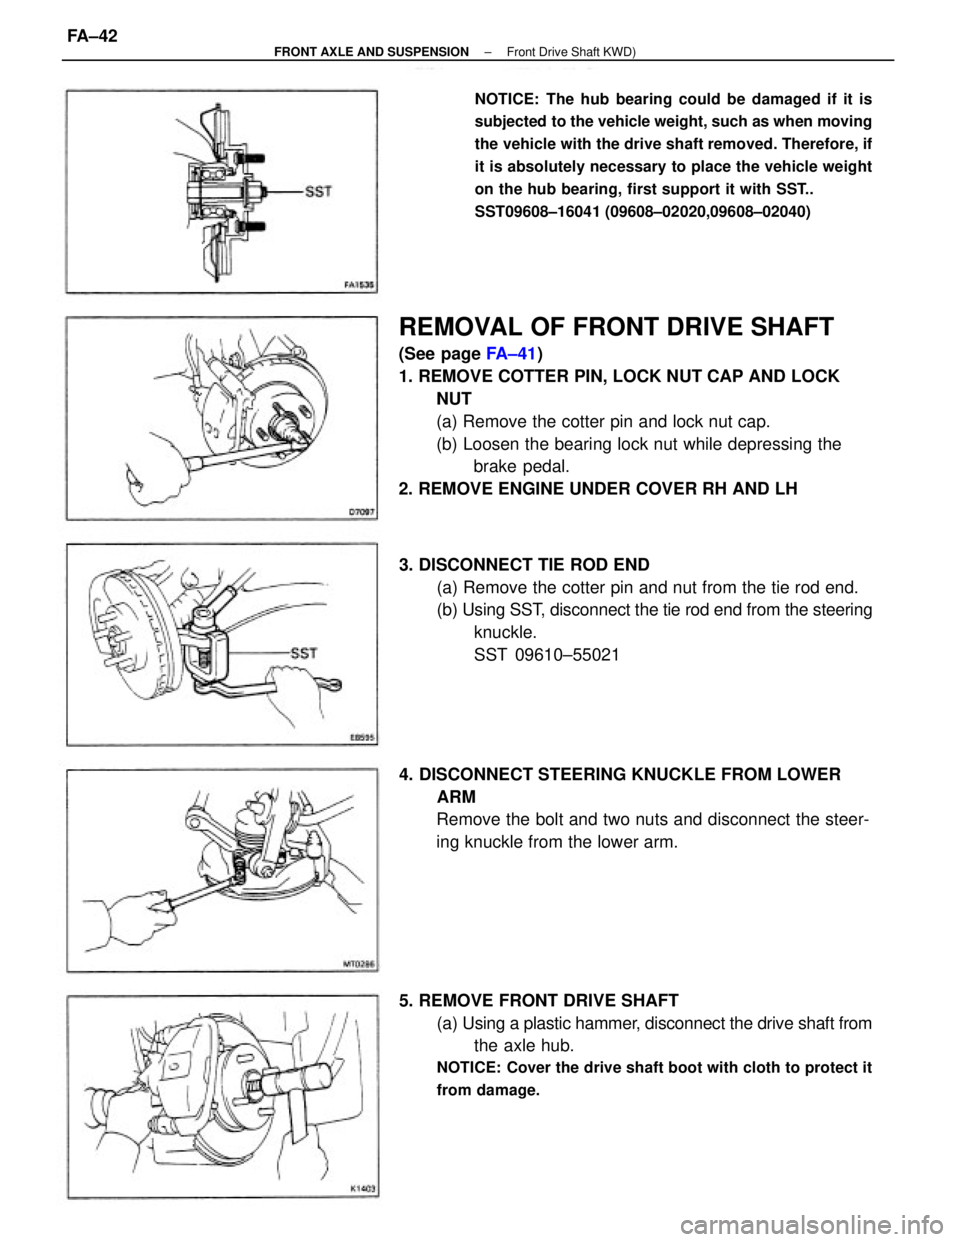
REMOVAL OF FRONT DRIVE SHAFT
(See page FA±41)
1. REMOVE COTTER PIN, LOCK NUT CAP AND LOCK
NUT
(a) Remove the cotter pin and lock nut cap.
(b) Loosen the bearing lock nut while depressing the
brake pedal.
2. REMOVE ENGINE UNDER COVER RH AND LH
3. DISCONNECT TIE ROD END
(a) Remove the cotter pin and nut from the tie rod end.
(b) Using SST, disconnect the tie rod end from the steering
knuckle.
SST 09610±55021
NOTICE: The hub bearing could be damaged if it is
subjected to the vehicle weight, such as when moving
the vehicle with the drive shaft removed. Therefore, if
it is absolutely necessary to place the vehicle weight
on the hub bearing, first support it with SST..
SST09608±16041 (09608±02020,09608±02040)
5. REMOVE FRONT DRIVE SHAFT
(a) Using a plastic hammer, disconnect the drive shaft from
the axle hub.
NOTICE: Cover the drive shaft boot with cloth to protect it
from damage.
4. DISCONNECT STEERING KNUCKLE FROM LOWER
ARM
Remove the bolt and two nuts and disconnect the steer-
ing knuckle from the lower arm.
± FRONT AXLE AND SUSPENSIONFront Drive Shaft KWD)FA±42