Page 1125 of 2389
REMOVAL OF THROTTLE BODY
(See page FI±107)
INSPECTION OF THROTTLE BODY
1. CLEAN THROTTLE BODY
(See step 1 on page FI±107)
2. INSPECT THROTTLE VALVE
(See step 2 on page FI±108)
3. INSPECT THROTTLE POSITION SENSOR
(See step 2 on page FI±110)
4. IF NECESSARY, ADJUST THROTTLE POSITION
SENSOR
(a) Loosen the two set screws of the sensor.
(b) Insert a 0.60 mm (0.024 in.) feeler gauge, between the
throttle stop screw and stop lever.
(c) Connect the test probe of an ohmmeter to the terminals
IDL and E2 of the sensor.
(d) Gradually turn the sensor clockwise until the ohmme±
ter deflects, and secure it with the two set screws.
INSTALLATION OF THROTTLE BODY
(See page Fl ±109)(e) Recheck the continuity between terminals IDL and E2.
Clearance between fever
and stop screwContinuity (IDL ± E2)
± EFI SYSTEMAir Induction System (Throttle Body (3S±FE w ECT))FI±111
Page 1128 of 2389

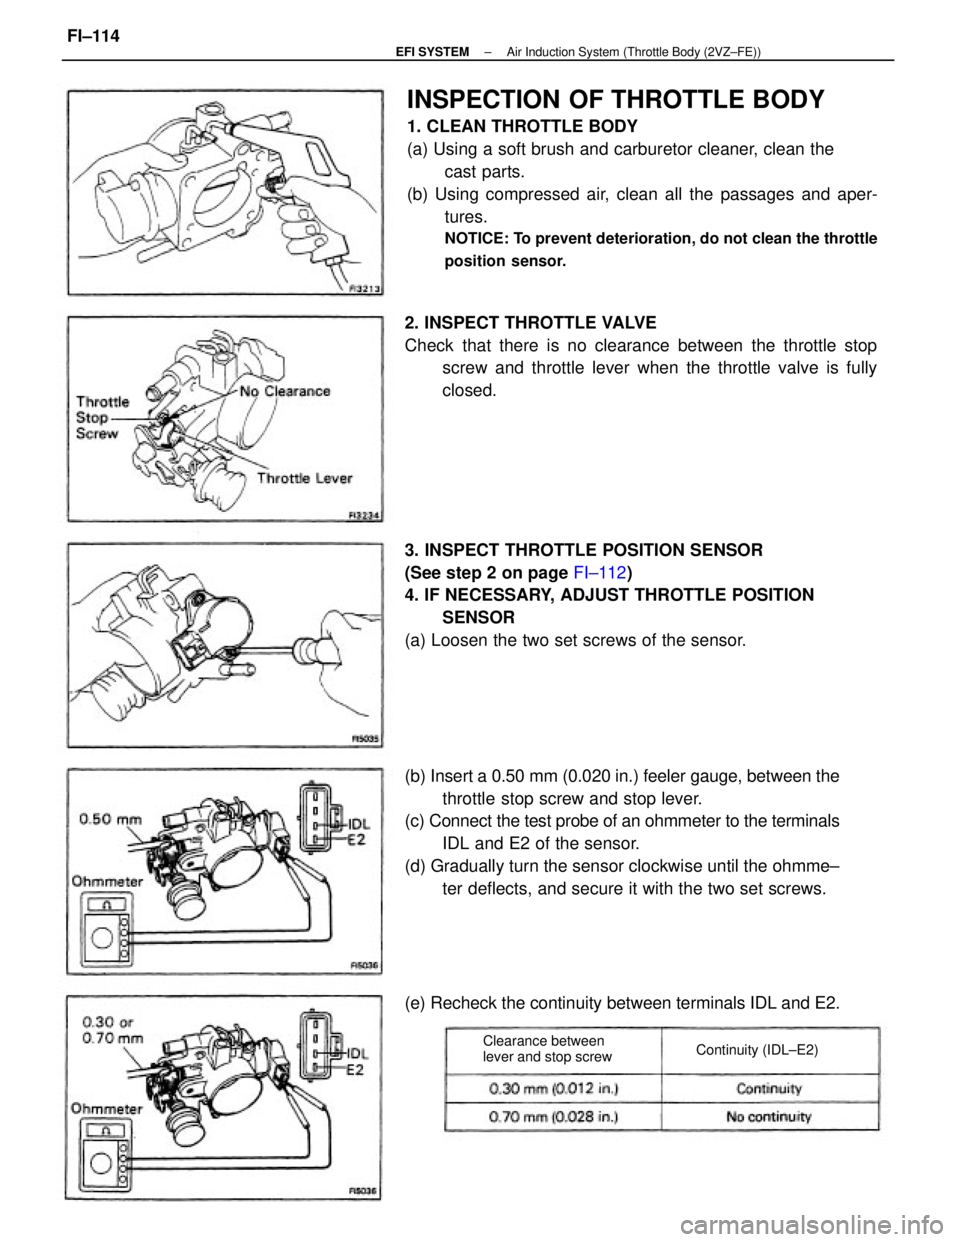
INSPECTION OF THROTTLE BODY
1. CLEAN THROTTLE BODY
(a) Using a soft brush and carburetor cleaner, clean the
cast parts.
(b) Using compressed air, clean all the passages and aper-
tures.
NOTICE: To prevent deterioration, do not clean the throttle
position sensor.
(b) Insert a 0.50 mm (0.020 in.) feeler gauge, between the
throttle stop screw and stop lever.
(c) Connect the test probe of an ohmmeter to the terminals
IDL and E2 of the sensor.
(d) Gradually turn the sensor clockwise until the ohmme±
ter deflects, and secure it with the two set screws. 3. INSPECT THROTTLE POSITION SENSOR
(See step 2 on page FI±112)
4. IF NECESSARY, ADJUST THROTTLE POSITION
SENSOR
(a) Loosen the two set screws of the sensor. 2. INSPECT THROTTLE VALVE
Check that there is no clearance between the throttle stop
screw and throttle lever when the throttle valve is fully
closed.
(e) Recheck the continuity between terminals IDL and E2.
Clearance between
lever and stop screwContinuity (IDL±E2)
± EFI SYSTEMAir Induction System (Throttle Body (2VZ±FE))FI±114
Page 1130 of 2389
(b) Using SST, connect terminals TE1 and E1 of the check
connector.
SST 09843±18020
(c) After engine rpm are kept at 1,000 ± 1,300 rpm for 5
seconds, check that they return to idle speed.
If the rpm operation is not as specified, check the ISC
valve, wiring and ECU.
(d) Remove the service wire.
2. INSPECT ISC VALVE RESISTANCE
(a) Disconnect the ISC valve connector.
(b) Using an ohmmeter, measure the resistance between termi-
nal +B and other terminals (ISC1, ISC2).
Resistance: 16.0 ± 17.0
�
If the resistance is not as specified, replace the ISC valve.
(c) Reconnect the ISC valve connector.
ON±VEHICLE INSPECTION
1. INSPECT ISC VALVE OPERATION
(a) Initial conditions:
wEngine at normal operating temperature
wIdle speed set correctly
wTransmission in ºNº range
Idle Speed Control (ISC) Valve
(3S±FE)
± EFI SYSTEMAir Induction System (Idle Speed Control (ISC) Valve (3S±FE)FI±116
Page 1143 of 2389

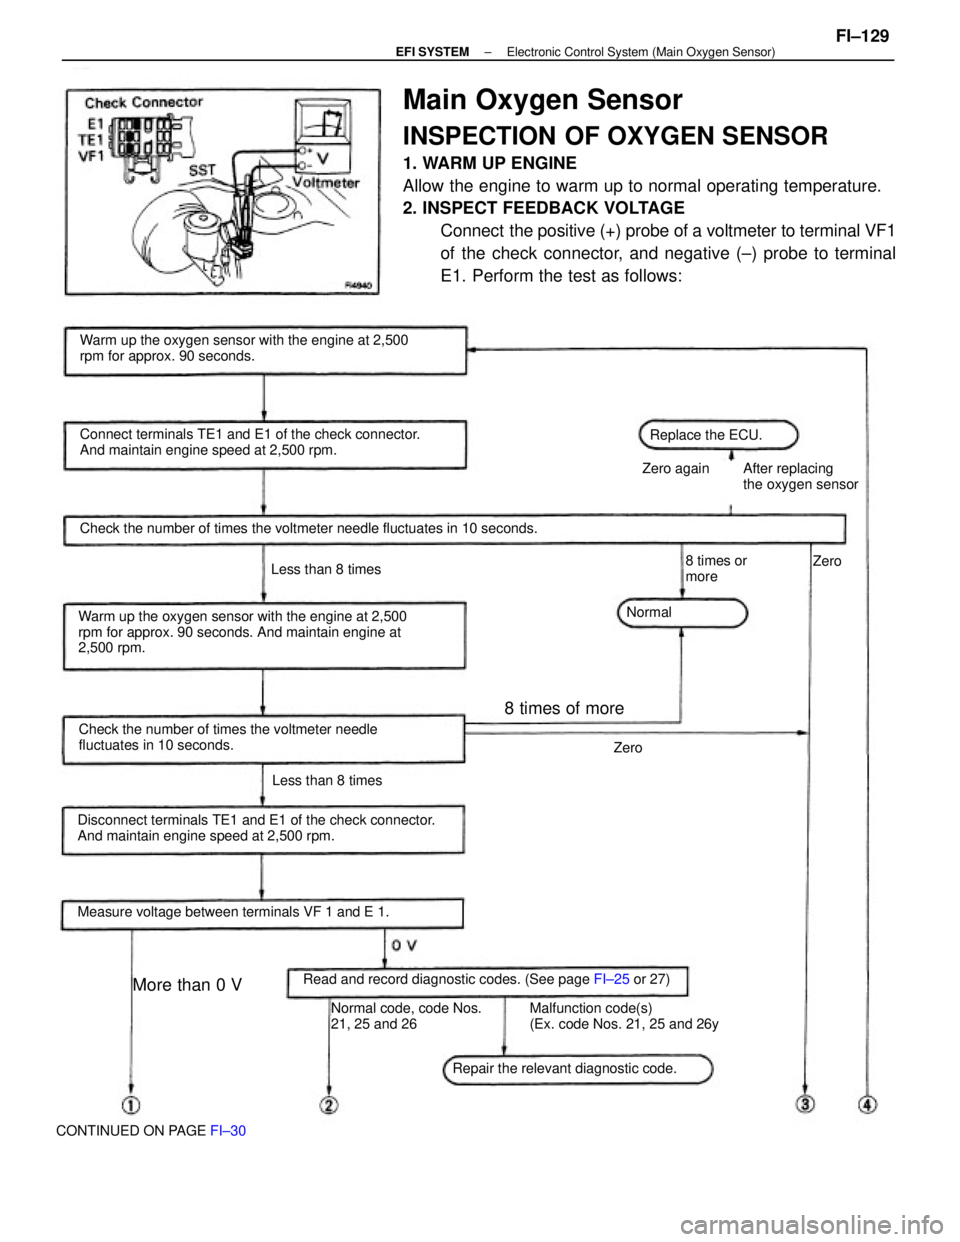
Main Oxygen Sensor
INSPECTION OF OXYGEN SENSOR
1. WARM UP ENGINE
Allow the engine to warm up to normal operating temperature.
2. INSPECT FEEDBACK VOLTAGE
Connect the positive (+) probe of a voltmeter to terminal VF1
of the check connector, and negative (±) probe to terminal
E1. Perform the test as follows:
Warm up the oxygen sensor with the engine at 2,500
rpm for approx. 90 seconds. And maintain engine at
2,500 rpm.
Normal code, code Nos. Malfunction code(s)
21, 25 and 26 (Ex. code Nos. 21, 25 and 26y Warm up the oxygen sensor with the engine at 2,500
rpm for approx. 90 seconds.
Disconnect terminals TE1 and E1 of the check connector.
And maintain engine speed at 2,500 rpm.Connect terminals TE1 and E1 of the check connector.
And maintain engine speed at 2,500 rpm.
Check the number of times the voltmeter needle
fluctuates in 10 seconds.Check the number of times the voltmeter needle fluctuates in 10 seconds.
Read and record diagnostic codes. (See page FI±25 or 27)Zero again After replacing
the oxygen sensor
Measure voltage between terminals VF 1 and E 1.
Repair the relevant diagnostic code.
CONTINUED ON PAGE FI±30Less than 8 times
Less than 8 timesReplace the ECU.
8 times of more
More than 0 V
8 times or
more
NormalZero
Zero
± EFI SYSTEMElectronic Control System (Main Oxygen Sensor)FI±129
Page 1147 of 2389
2. INSPECT VOLTAGE OF ECU
Check the voltage between each terminal of the wiring con-
nectors.
wTurn the ignition switch ON.
wMeasure the voltage at each terminal.
HINT:
wPerform all voltage measurements with the connectors
connected.
wVerify that the battery voltage is 11 V or more when the
ignition switch is ON.
Electronic Controlled Unit (ECU)
INSPECTION OF ECU
HINT: The EFI circuit can be checked by measuring the
resistance and voltage at the wiring connectors of the ECU.
1. (2VZ±FE)
PREPARATION (See page FI±50)
± EFI SYSTEMElectronic Control System (Electronic Controlled Unit
(ECU))FI±132
Page 1148 of 2389
Voltage at ECU Wiring Connectors (3S±FE)
No trouble (ºCHECKº engine warning light off) and engine running
Stop light SW 4N (Brake pedal depressed) or defogger SW ONCheck connector TE1 ± E1 not connected
Check connector TE 1 ± E 1 connectedMeasuring plate fully closed
Ex. shift position P or N rangeIntake air temp. 20°C (68°F)
Coolant temp. 80°C (1 760F) Measuring plate fully open
Shift position P or N rangeThrottle valve fully closedThrottle valve fully closed
Heater blower SW ON Air conditioning ONThrottle valve open
Throttle valve open
Throttle valve open
Cranking or idlingIG SW ONSTD voltage (V) Condition
3,000 rpm
IG SW ONIG SW ON1G SW ON
IG SW ON Terminals
IG SW ON
CrankingIdling
± EFI SYSTEMElectronic Control System (Electronic Controlled Unit(ECU))
FI±133
Page 1149 of 2389
Voltage at ECU Wiring Connectors (2VZ±FE)
No trouble (ºCHECKº engine warning light off) and engine running
Stop light SW ON (Brake pedal depressed)Check connector TE1 ± E1 not connected
Check connector TE1 ± E1 connected
Ex. shift position P or N range Measuring plate fully closed
Intake air temp. 20°C (68°F)
Coolant temp. 80°C (176°F) Measuring plate fully open
Shift position P or N range Throttle valve fully closed
Heater blower SW ON Air conditioning ON Throttle valve open Throttle valve open
Cranking or idlingSm voltage (V)
3,000 rpm IG SW ON
IG SW ON
IG SW ON
IG SW ON
IG SW ON 1G SW ON Terminals
Cranking Idling
± EFI SYSTEMElectronic Control System (Electronic Controlled Unit(ECU))
FI±134
Page 1150 of 2389
2. INSPECT RESISTANCE OF ECU
NOTICE:
wDo not touch the ECU terminals.
wThe tester probe should be inserted into the wiring
connector from the wiring side.
Check the resistance between each terminal of the wiring
connectors.
wDisconnect the connectors from the ECU.
wMeasure the resistance at each terminal.
Resistance of ECU Wiring Connectors (3S±FE)
Measuring plate fully closed
Intake air temp. 20
°C (68°F)
Coolant temp. 80°C (176°F)
Measuring plate fully openThrottle valve fully closed
Throttle valve fully closedThrottle valve fully closed
Throttle valve fully closedThrottle valve fully open
Throttle valve fully openThrottle valve open
STD resistance (�)
Throttle valve open
Condition Terminals
± EFI SYSTEMElectronic Control System (Electronic Controlled Unit
(ECU))FI±135