1982 CHEVROLET CAMARO lock
[x] Cancel search: lockPage 4 of 875

GM – CAMARO 1982-1992 – Repair Guide (Checked by WxMax) 4
1. On doors that are equipped with
power operated components, do the
following:
• Remove the door trim panel an d inner panel water deflector.
• Disconnect the wire harness from all components in the door.
• Remove the rubber conduit from t he door, then remove the wire harness
from the door through t he conduit access hole.
2. Tape the area (on the door pillar and b ody pillar) above the lower hinge with
cloth backed body tape.
CAUTION - Before performing the following step, cover the spring with a shop
cloth or rag to prevent the spring fr om flying and possibly causing personal
injury or damage.
3. Insert a long, flat-blade screwdriver under the pivot point of the hold-open
link and over the top of the spring. T he screwdriver should be positioned so
as not to apply pressure to the hol d-open link. Cover the spring with a shop
cloth or rag and lift the screwdriver to disengage the spring. The spring can
also be removed by using tool J- 36604 (or equivalent) door hinge spring
compressor tool.
The tool is stamped right side and left side. The tool stamped left side is used to
service the right-hand hinge spring and vi se-a-versa for the tool stamped right
side.
4. With the aid of a helper to suppor t the door, remove the lower hinge pin
using a soft-headed hammer and locking type pliers. The helper can aid the
hinge pin removal by raising and lowering the rear of the door.
5. Insert a bolt into the hole of the lo wer hinge to maintain the door attachment
during upper hinge removal.
6. Using a 13mm socket, remove the upper hinge bolts from the pillar. Remove
the bolt from the lower hinge and re move the door from the body.
To install:
7. Replace the hinge pin clip.
8. With the aid of a helper, position t he door and insert the bolt in the hole of
the lower hinge.
9. Bolt the upper hinge to the body. The lower hinge pin is installed with the
pointed end down.
10. Remove the screw from the lower hi nge and install the lower hinge pin. The
use of tool J-36604 or equi valent is recommended for installing the hinge
spring.
If the spring is installed before inst alling the lower hinge pin, damage to the
hinge bushings may result.
11. If the spring was removed using a screw driver, install the spring as follows:
Page 24 of 875

GM – CAMARO 1982-1992 – Repair Guide (Checked by WxMax) 24
forward edge using adhesive on the flaps and rails. Ensure seams are
aligned evenly on both rails. Trim excess material.
26. Raise No. 5 bow. Raise the tonneau panel and lower No. 5 bow. Slide the
No. 2 and 3 bow top cover retainers into listing pockets and align screw
holes. Install the screws to the underside of No. 2 and 3 bows.
27. Install the headliner to No. 2 and 3 bows.
28. Latch the top to the wi ndshield header and pull the to p cover straight forward
at the seams over the No. 1 bow to desired fullness. While maintaining
tension on the top cover over the No. 1 bow, make a pencil mark on the
outer surface along the forwar d edge of the No. 1 bow.
29. Unlatch the top from the windshield header and lowe r the top halfway. Pull
the top cover
1/4 in. (6mm) past the reference mark over the No. 1 bow and
attach it to the No. 1 bow, first attach ing cover side flaps. Fold the side flaps
around the bow using adhesive on both the cover and bow surfaces. Fold
the top cover over the No. 1 bow al ong the edge and over the cover side
flap, once again using adhesive. Lower t he top and check for proper tension,
if more is needed, repeat the procedur e. Trim off excess material.
30. Install all moldings, pillar seals, side seals and retainers. Replace dried out,
deteriorated or cracked seals to prevent air and water leaks.
31. Adjust the top upstops and downstops, as required.
ADJUSTMENT
UPSTOP
The upstops may be adjusted to obtain pr oper alignment between the top latch
guide pins and the windshield header receivers.
1. Lower the top. Loosen the upstop ja m nut and turn screw clockwise.
2. Raise and latch the top.
3. Raise No. 5 bow to the full vertical position.
4. Turn the upstops counterclockwis e until they contact the linkage.
5. Unlatch and lower the top. Tight en the upstop jam nut while holding the
upstop from turning.
6. Raise the top and inspect the alignment of the top latch guide pins to the
header receivers.
DOWNSTOP
The downstops can be adjusted for proper clearance between the main rail and
No. 4 bow when the top is lowered comple tely. The downstops have right angle
bends and face outward.
1. Raise and latch the top.
2. Loosen the downstops nuts and adjust as required.
3. Tighten the downstop nuts while holding downstops in position.
4. Lower the top and inspec t the clearance between the main rail and the No. 4
bow. Also inspect the clear ance of the tonneau panel.
Page 28 of 875
GM – CAMARO 1982-1992 – Repair Guide (Checked by WxMax) 28
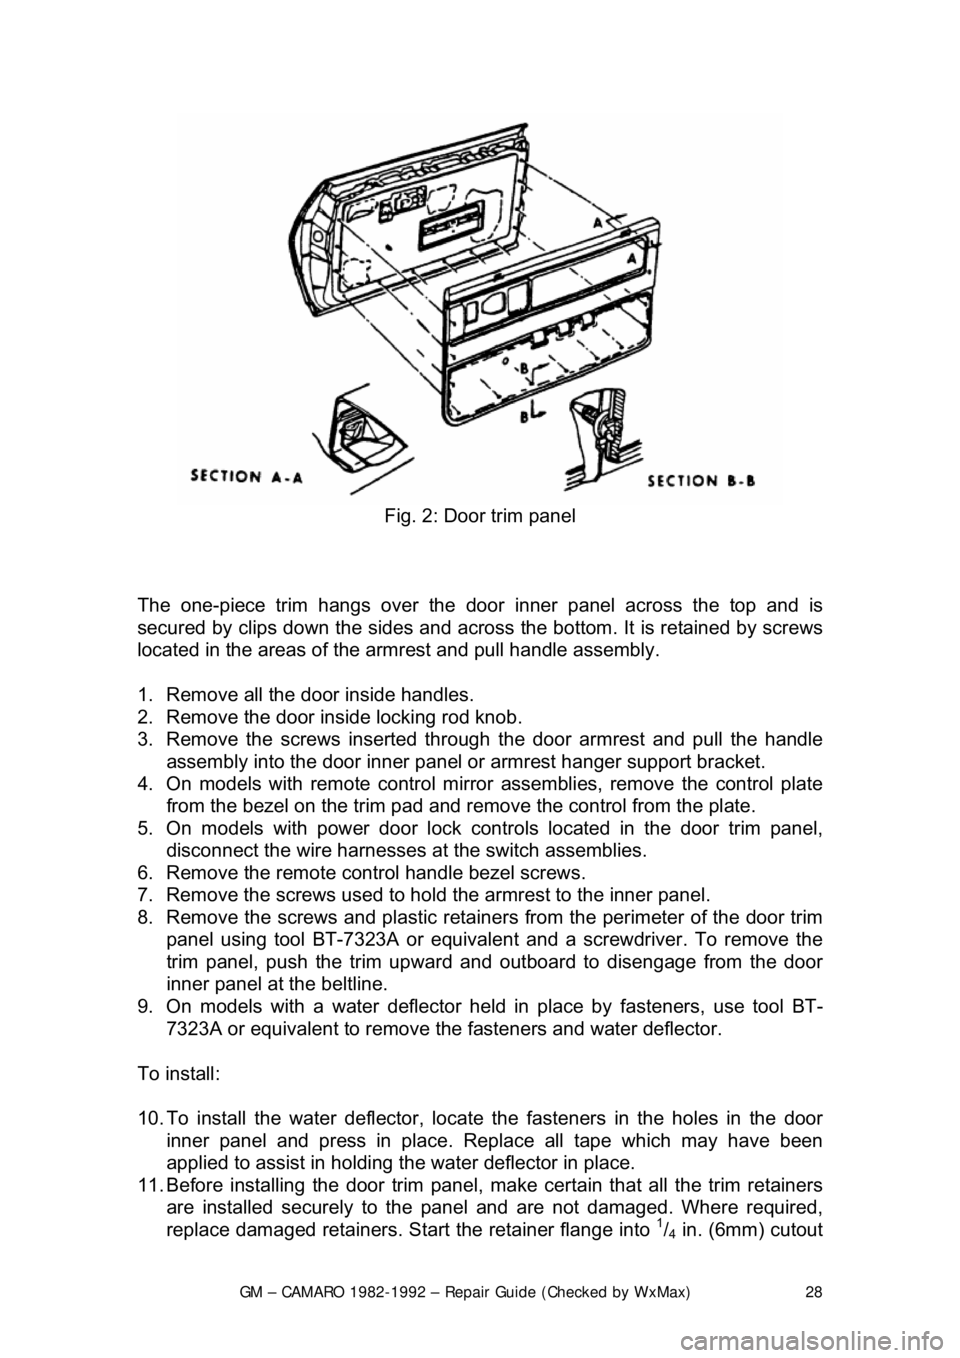
Fig. 2: Door trim panel
The one-piece trim hangs over the door inner panel across the top and is
secured by clips down the sides and across the bottom. It is retained by screws
located in the areas of the armrest and pull handle assembly.
1. Remove all the door inside handles.
2. Remove the door inside locking rod knob.
3. Remove the screws inserted through the door armrest and pull the handle
assembly into the door inner panel or armrest hanger support bracket.
4. On models with remote control mirror assemblies, remove the control plate
from the bezel on the trim pad and remo ve the control from the plate.
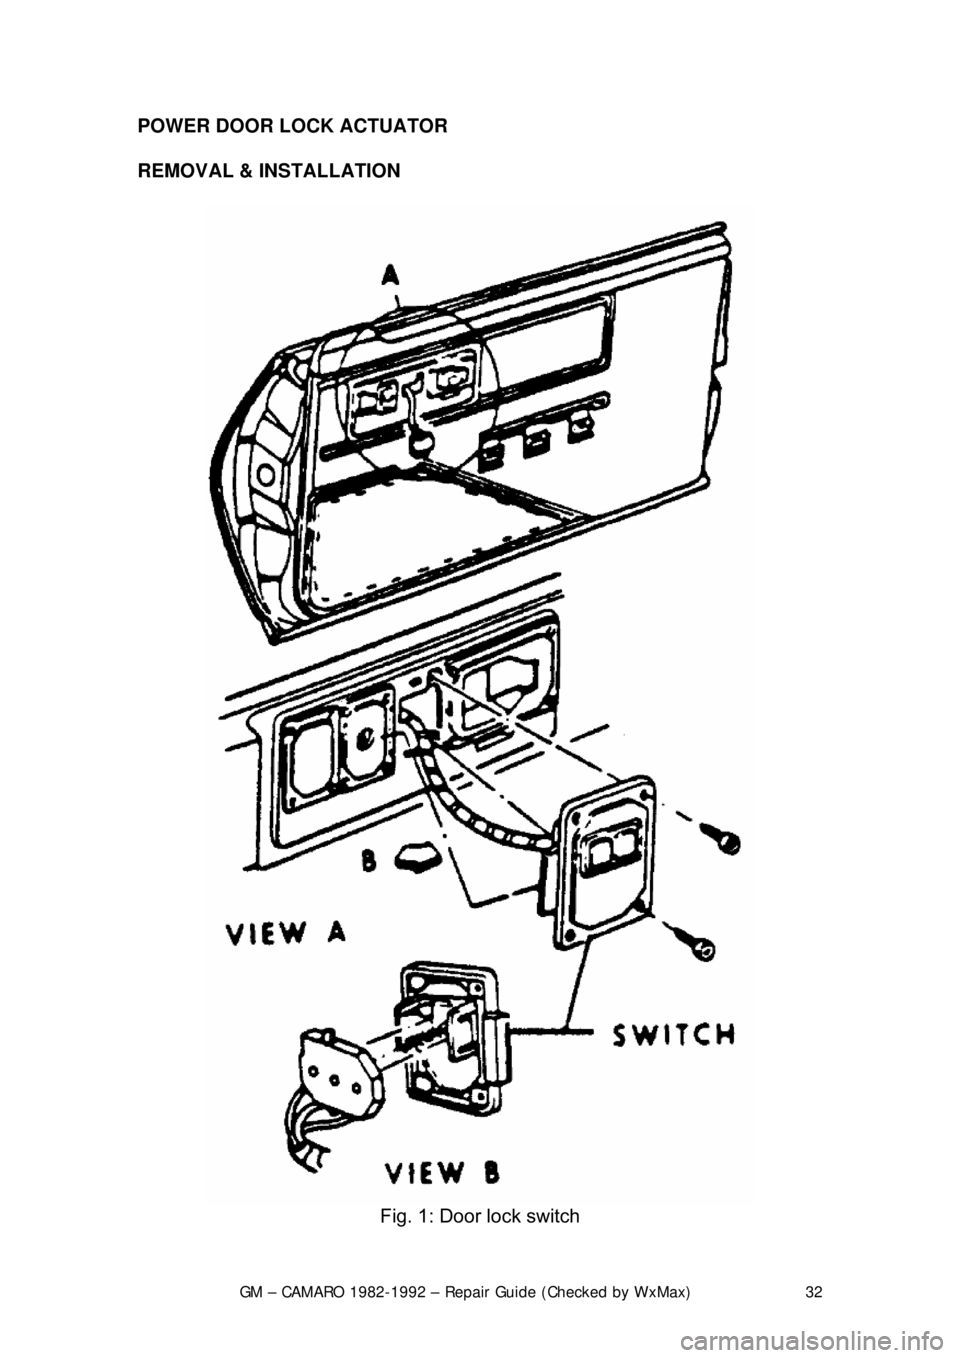
5. On models with power door lock contro ls located in the door trim panel,
disconnect the wire harnesses at the switch assemblies.
6. Remove the remote control handle bezel screws.
7. Remove the screws used to hold the armrest to the inner panel.
8. Remove the screws and plastic retainer s from the perimeter of the door trim
panel using tool BT-7323A or equivalent and a screwdriver. To remove the
trim panel, push the trim upward and out board to disengage from the door
inner panel at the beltline.
9. On models with a water deflector held in place by fasteners, use tool BT-
7323A or equivalent to remove th e fasteners and water deflector.
To install:
10. To install the water deflector, locate the fasteners in the holes in the door
inner panel and press in place. R eplace all tape which may have been
applied to assist in holding t he water deflector in place.
11. Before installing the door trim panel, make certain that all the trim retainers
are installed securely to the panel and are not damaged. Where required,
replace damaged retainers. St art the retainer flange into
1/4 in. (6mm) cutout
Page 29 of 875

GM – CAMARO 1982-1992 – Repair Guide (Checked by WxMax) 29
attachment hole in the trim panel, rotate the retainer until the flange is
engaged fully.
12. Connect all electrical components where present.
13. To install the door trim panel, locate the top of the assembly over the upper
flange of the door inner panel, inserting the door handle through the handle
slot in the panel and press down on the trim panel to engage the upper
retaining clips.
14. Position the trim panel to the door inner panel so the trim retainers are
aligned with the attaching holes in t he panel and tap the retainers into the
holes with the palm of hand or a clean rubber mallet.
15. Install the screws used to hold the armrest to the inner panel.
16. Install the remote control handle bezel screws.
17. On models with power door lock contro ls located in the door trim panel,
connect the wire harnesses at the switch assemblies.
18. On models with remote control mirror assemblies, install the control to the
plate. Install the control plate to the bezel on the trim pad.
19. Install the handle assemb ly and install the screws inserted through the door
armrest.
20. Install the door inside locking rod knob.
21. Install all the door inside handles.
HEADLINER
REMOVAL & INSTALLATION
Fig. 1: Headliner installation
1. Disconnect the negative battery cable.
2. Remove the dome lamp and sunshade.
3. Remove the coat hooks and seat bel t escutcheon, by unsnapping from the
headliner.
4. Remove the rear window opening molding.
Page 30 of 875
GM – CAMARO 1982-1992 – Repair Guide (Checked by WxMax) 30
5. Remove the rear quarter interior
trim panels, body lock pillar panels and
windshield side upper moldings.
6. Remove the headliner retaining clips and remove the headliner.
7. Installation is the revers e of the removal procedure.
DOOR LOCKS
REMOVAL & INSTALLATION
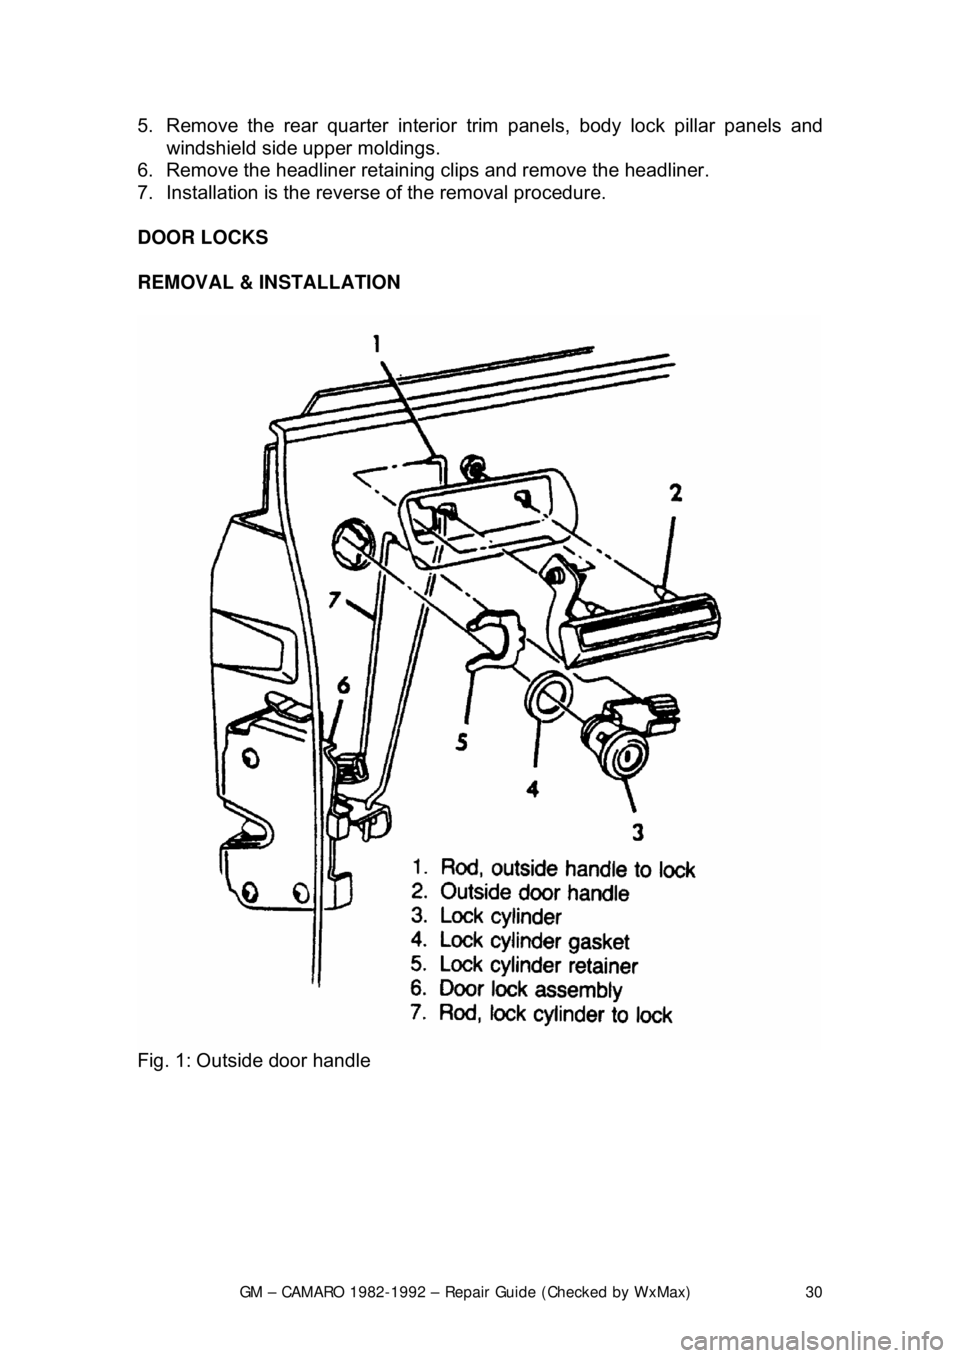
Fig. 1: Outside door handle
Page 31 of 875
GM – CAMARO 1982-1992 – Repair Guide (Checked by WxMax) 31
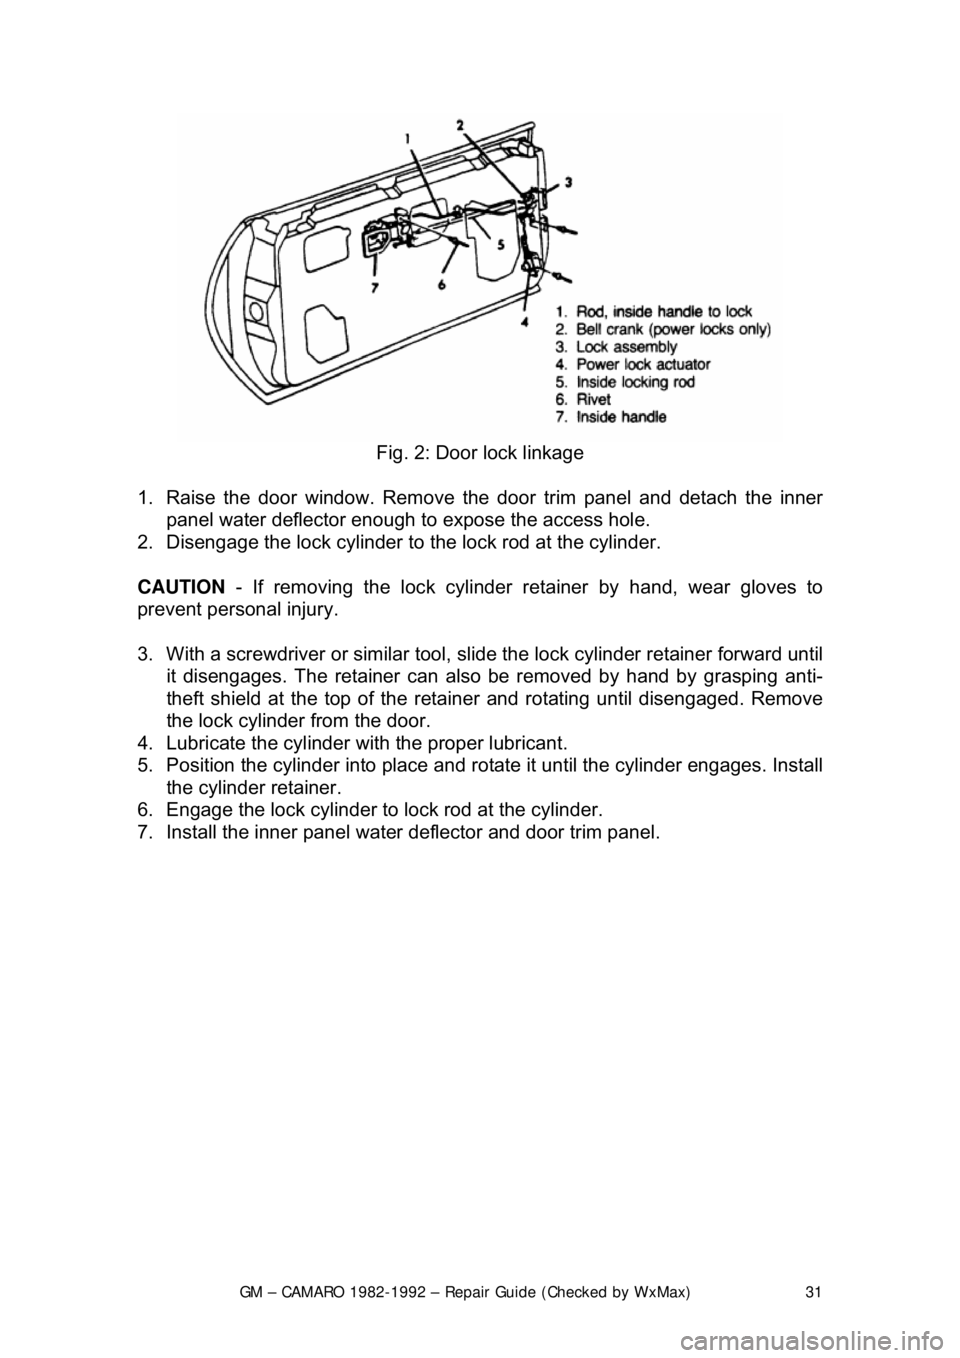
Fig. 2: Door lock linkage
1. Raise the door window. Remove the door tr im panel and detach the inner
panel water deflector enough to expose the access hole.
2. Disengage the lock cylinder to t he lock rod at the cylinder.
CAUTION - If removing the lock cylinder reta iner by hand, wear gloves to
prevent personal injury.
3. With a screwdriver or similar tool, s lide the lock cylinder retainer forward until
it disengages. The retainer can also be removed by hand by grasping anti\
-
theft shield at the top of the retainer and rotating until disengaged. Remove
the lock cylinder from the door.
4. Lubricate the cylinder wit h the proper lubricant.
5. Position the cylinder into place and ro tate it until the cylinder engages. Install
the cylinder retainer.
6. Engage the lock cylinder to lock rod at the cylinder.
7. Install the inner panel wate r deflector and door trim panel.
Page 32 of 875
GM – CAMARO 1982-1992 – Repair Guide (Checked by WxMax) 32
POWER DOOR LOCK ACTUATOR
REMOVAL & INSTALLATION
Fig. 1: Door lock switch
Page 33 of 875
GM – CAMARO 1982-1992 – Repair Guide (Checked by WxMax) 33
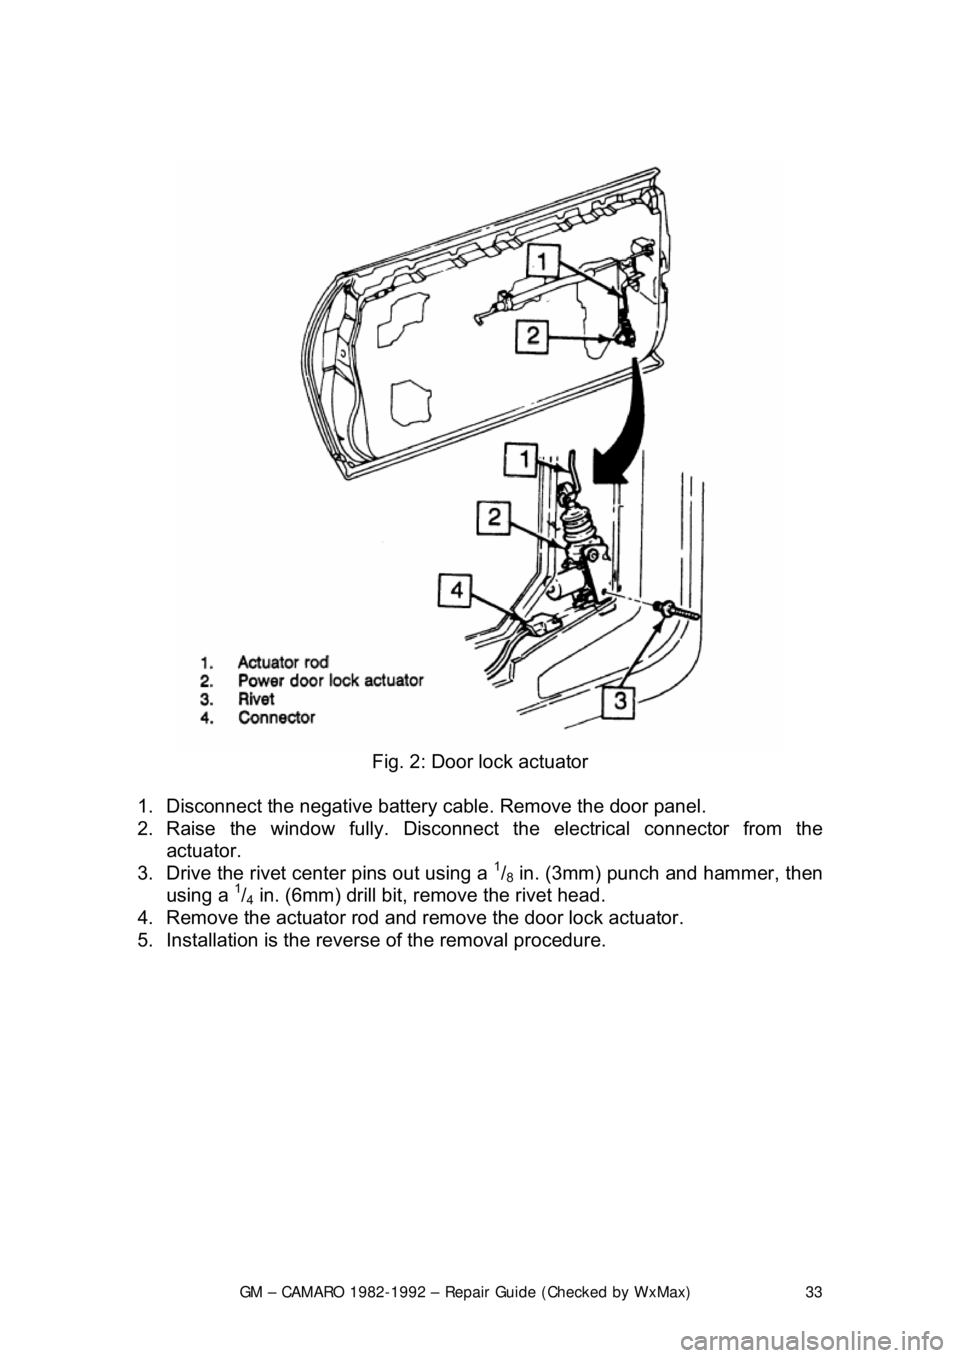
Fig. 2: Door lock actuator
1. Disconnect the negative battery c able. Remove the door panel.
2. Raise the window fully. Disconnect t he electrical connector from the
actuator.
3. Drive the rivet cent er pins out using a
1/8 in. (3mm) punch and hammer, then
using a 1/4 in. (6mm) drill bit, remove the rivet head.
4. Remove the actuator rod and remove the door lock actuator.
5. Installation is the revers e of the removal procedure.