1982 CHEVROLET CAMARO brake rotor
[x] Cancel search: brake rotorPage 50 of 875

GM – CAMARO 1982-1992 – Repair Guide (Checked by WxMax) 50
DISC BRAKES
Instead of the traditional ex
panding brakes that press out ward against a circular
drum, disc brake systems utilize a disc (rotor) with brake pads positioned on
either side of it. An easily-seen analog y is the hand brake arrangement on a
bicycle. The pads squeeze onto the rim of the bike wheel, slowing its motion.
Automobile disc brakes use the identical principle but apply the braking effort to
a separate disc instead of the wheel.
The disc (rotor) is a casting, usually eq uipped with cooling fins between the two
braking surfaces. This enables air to ci rculate between the braking surfaces
making them less sensitive to heat bui ldup and more resistant to fade. Dirt and
water do not drastically affect braking ac tion since contaminants are thrown off
by the centrifugal action of the rotor or scraped off the by the pads. Also, the
equal clamping action of the two brake pad s tends to ensure uniform, straight
line stops. Disc brakes are inherently se lf-adjusting. There are three general
types of disc brake:
1. A fixed caliper.
2. A floating caliper.
3. A sliding caliper.
The fixed caliper design uses two pistons mounted on either side of the rotor (in
each side of the caliper). The caliper is mounted rigidly and does not move.
The sliding and floating designs are quite similar. In fact, these two types are
often lumped together. In both designs, the pad on the inside of the rotor is
moved into contact with the rotor by hy draulic force. The caliper, which is not
held in a fixed position, moves slightly, bringing the outside pad into contact with
the rotor. There are various methods of attaching floating calipers. Some pivot
at the bottom or top, and some slide on mounting bolts. In any event, the end
result is the same.
DRUM BRAKES
Drum brakes employ two brake shoes mounted on a st ationary backing plate.
These shoes are positioned inside a circul ar drum which rotates with the wheel
assembly. The shoes are held in place by springs. This allows them to slide
toward the drums (when they are applied) while keeping the linings and drums
in alignment. The shoes are actuated by a wheel cylinder which is mounted at
the top of the backing plat e. When the brakes are app lied, hydraulic pressure
forces the wheel cylinder's actuating links outward. Since these links bear
directly against the top of the brake s hoes, the tops of the shoes are then forced
against the inner side of the drum. This action forces the bottoms of the two
shoes to contact the brake drum by rotati ng the entire assembly slightly (known
as servo action). When pressure within the wheel cylinder is relaxed, return
springs pull the shoes back away from the drum.
Most modern drum brakes are designed to self-adjust themselves during
application when the vehicle is moving in reverse. This motion causes both
Page 82 of 875

GM – CAMARO 1982-1992 – Repair Guide (Checked by WxMax) 82
Avoid inhaling any dust from
any brake surface! When cleaning brake surfaces,
use a commercially available brake cleaning fluid.
1. Remove
2/3 of the brake fluid from the mast er cylinder. Raise the vehicle and
remove the wheel.
2. Place a C-clamp across the caliper, positioned on the brake pads. Tighten it
until the piston is forced into its bore.
3. Remove the C-clamp. Remove the bolt holding the brake hose to the caliper.
4. Remove the Allen head caliper mounting bolts. Inspect them for corrosion
and replace them if necessary. Remove the caliper.
To install:
5. Position the caliper with the brake pad installed and install Allen head caliper
mounting bolts. Mounting bo lt torque is 21-35 ft. lbs. (28-47 Nm.) for the
caliper.
6. Install the bolt holding the brake hos e to the caliper and tighten to 18-30 ft.
lbs. (24-40 Nm.).
7. Fill the master cylinder with brake fluid.
8. Install the wheels and lower the vehicle.
CAUTION - Before moving the vehicle, pump the brakes several times to seat
the brake pad against the rotor
OVERHAUL
Some vehicles may be equipped dual piston calipers. The procedure to
overhaul the caliper is e ssentially the same with t he exception of multiple
pistons, O-rings and dust boots.
1. Remove the caliper from the ve hicle and place on a clean workbench.
CAUTION - NEVER place your finger s in front of the pistons in an attempt to
catch or protect the pistons when applying compressed air. This could result in
personal injury!
Depending upon the vehicle, there are two different ways to remove the piston
from the caliper. Refer to the brake pad replacement procedure to make sure
you have the correct procedure for your vehicle.
2. The first method is as follows: a. Stuff a shop towel or a block of wood into the caliper to catch the piston.
b. Remove the caliper piston using co mpressed air applied into the caliper
inlet hole. Inspect the piston for scor ing, nicks, corrosion and/or worn or
damaged chrome plating. The piston mu st be replaced if any of these
conditions are found.
Page 88 of 875

GM – CAMARO 1982-1992 – Repair Guide (Checked by WxMax) 88
BRAKE DISC (ROTOR)
CAUTION - Some brake pads contain as
bestos, which has been determined to
be a cancer causing agent. Never clean the brake surfaces with compressed
air! Avoid inhaling any dust from any brake surface! When cleaning brake
surfaces, use a commercially available brake cleaning fluid.
REMOVAL & INSTALATION
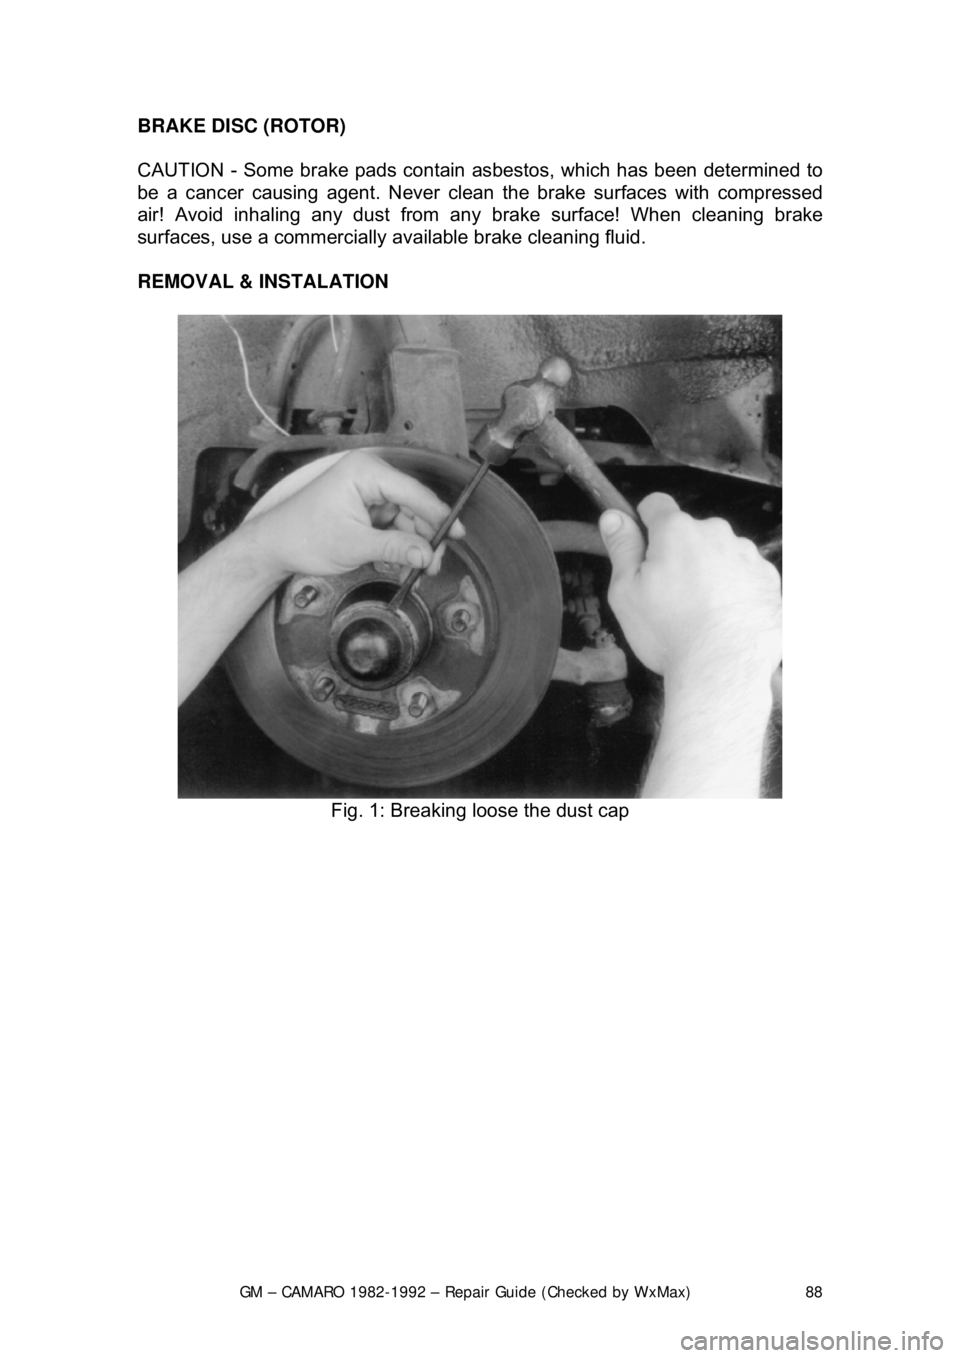
Fig. 1: Breaking loose the dust cap
Page 92 of 875

GM – CAMARO 1982-1992 – Repair Guide (Checked by WxMax) 92
1. Check the rotor surface for wear, sco
ring, grooves or rust pitting. Rotor
damage can be corrected by refacing, cons ult your local garage or machine
shop. If the damage exceeds the minimu m thickness, which is stamped on
the rotor, replace the rotor.
2. Check the rotor parallelism at four or more points around the circumference,
it must not vary more than 0.0005 in . (0.013mm). Make all measurements at
the same distance in from the edge of the ro tor. Refinish the rotor if it fails to
meet specification.
3. Measure the disc runout with a dial indicator. If runout exceeds 0.004 in.
(0.10mm), and the wheel bearings are okay (runout is measured with the
disc on the car), the rotor must be refaced or replaced.
REAR DRUM BRAKES
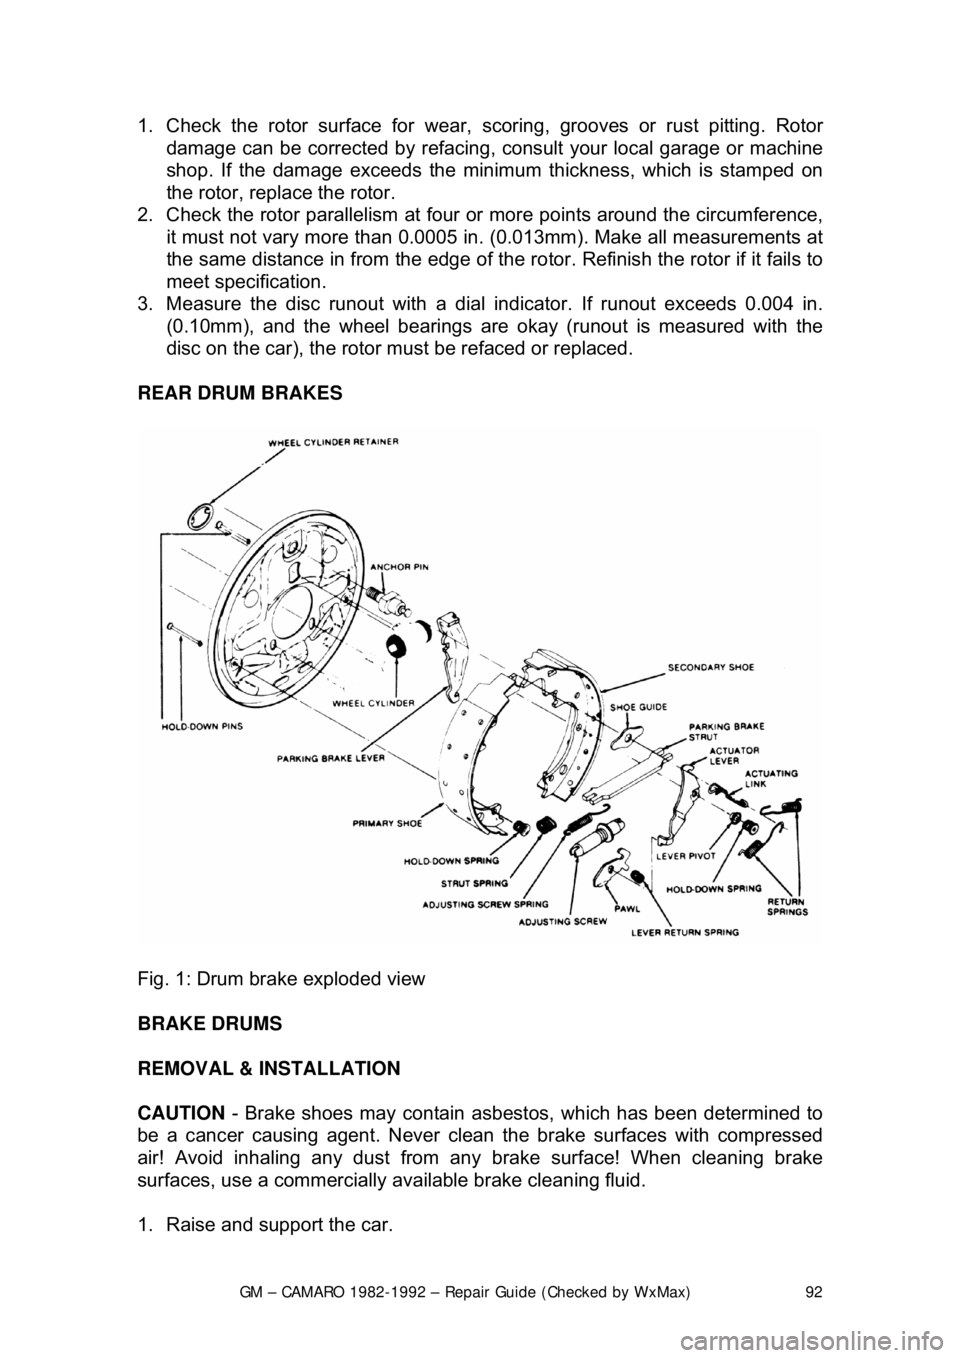
Fig. 1: Drum brake exploded view
BRAKE DRUMS
REMOVAL & INSTALLATION
CAUTION - Brake shoes may contain asbest os, which has been determined to
be a cancer causing agent. Never clean the brake surfaces with compressed
air! Avoid inhaling any dust from any brake surface! When cleaning brake
surfaces, use a commercially available brake cleaning fluid.
1. Raise and support the car.
Page 111 of 875

GM – CAMARO 1982-1992 – Repair Guide (Checked by WxMax) 111
1989-92 MODELS
Fig. 3: Exploded view of t
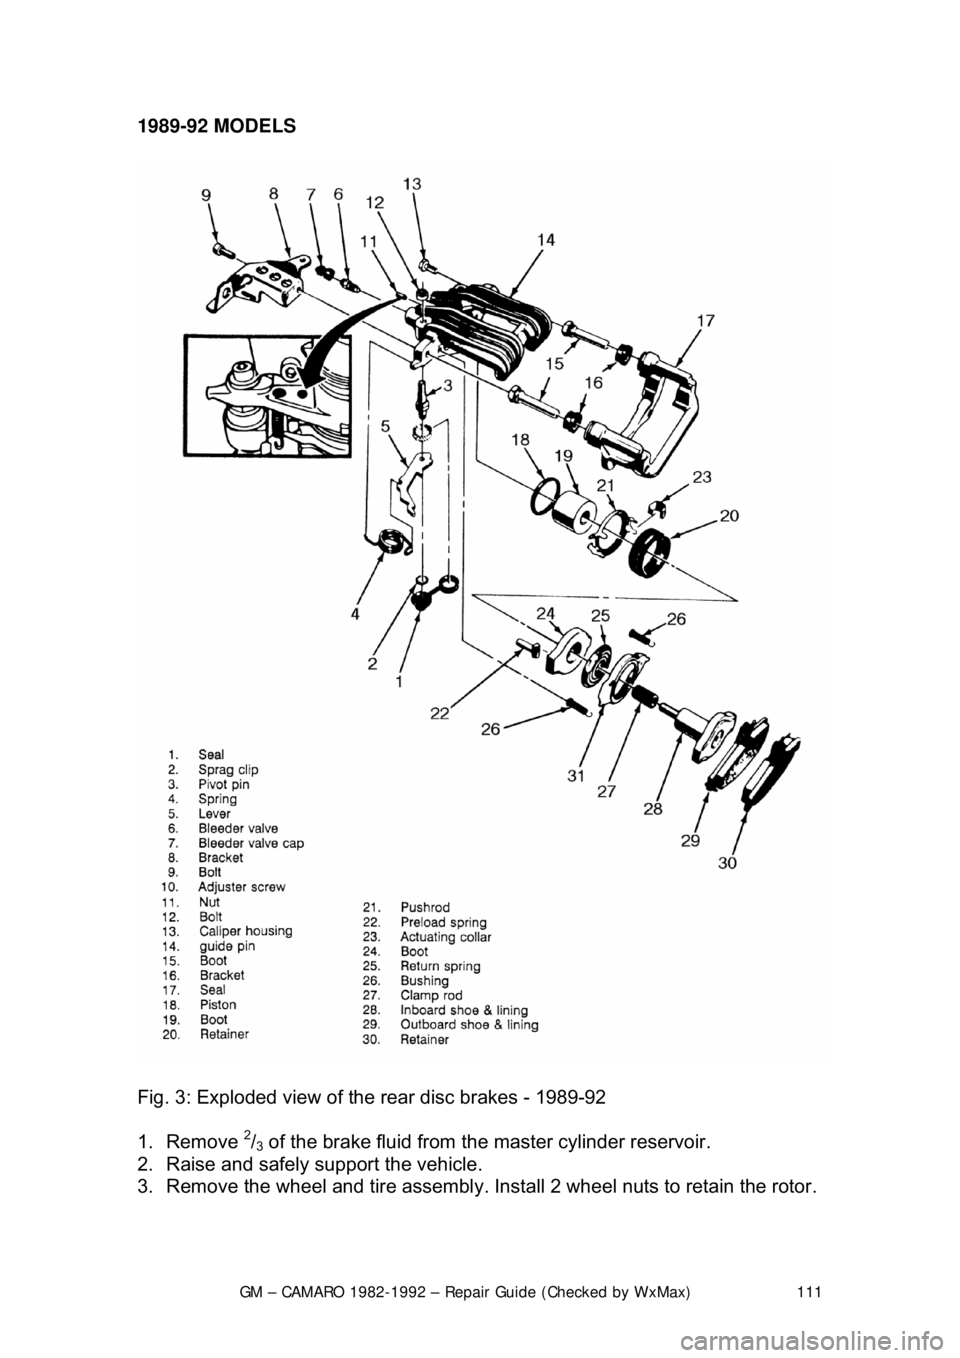
he rear disc brakes - 1989-92
1. Remove
2/3 of the brake fluid from the master cylinder reservoir.
2. Raise and safely support the vehicle.
3. Remove the wheel and tire assembly. Inst all 2 wheel nuts to retain the rotor.
Page 112 of 875

GM – CAMARO 1982-1992 – Repair Guide (Checked by WxMax) 112
4. Position a C-clamp a
nd tighten until the piston bottoms in the base of the
caliper housing. Make sure 1 end of the C-clamp rests on the inlet fitting bolt
and the other against the outboard disc brake pad.
It is not necessary to remove the parki ng brake caliper lever return spring to
replace the disc brake pads.
5. Remove the upper caliper guide pin bolt and discard.
6. Rotate the caliper housing. Be careful not to strain the hose or cable conduit.
7. Remove the disc brake pads.
To install:
8. Clean all residue from the pad guide surfaces on the mounting bracket and
caliper housing. Inspect the guide pins for free movement in the mounting
bracket. Replace the guide pins or boot s, if they are corroded or damaged.
9. Install the disc brake pads. The out board pad with insulator is installed
toward the caliper housing. The inboard pad with the w ear sensor is installed
nearest the caliper piston. The wear sens or must be in the trailing position
with forward wheel rotation.
10. Rotate the caliper housing into it 's operating position. The springs on the
outboard brake pad must not stick through the inspection hole in the caliper
housing. If the springs are sticking thr ough the inspection hole in the caliper
housing, lift the caliper housing and make the necessary corrections to the
outboard brake pad positions.
11. Install a new upper cali per guide pin bolt and tight en to 26 ft. lbs. (35 Nm).
Tighten the lower caliper guide pin bolt to 16 ft. lbs. (22 Nm).
12. With the engine runni ng, pump the brake pedal slo wly and firmly to seat the
brake pads.
13. Check the caliper parking brake levers to make sure they are against the
stops on the caliper housing. If the leve rs are not on their stops, check the
parking brake adjustment.
14. Remove the 2 wheel nuts from t he rotor and install the wheel and tire
assembly.
15. Lower the vehicle, che ck the master cylinder fluid level and road test the
vehicle.
BRAKE CALIPER
REMOVAL & INSTALLATION
CAUTION - Brake pads contain asbestos, which has been determined to be a
cancer causing agent. Never clean the brake surfaces with compressed air!
Avoid inhaling any dust from any brake surface! When cleaning brake surfaces,
use a commercially available brake cleaning fluid.
1982-88 MODELS
Page 113 of 875

GM – CAMARO 1982-1992 – Repair Guide (Checked by WxMax) 113
1. Remove 2/3 of the brake fluid from the ma
ster cylinder. Raise the car.
Remove the wheel. Reinstall a wheel nut, with the flat side toward the rotor,
to hold the rotor in place.
2. Loosen the parking brake cable at the equalizer. At the caliper, remove the
parking brake cable, damper and spring from the lever.
3. Hold the parking brake lever and re move the lock nut. Remove the lever,
seal and anti-friction washer.
4. Position a C-clamp ov er the caliper and force the piston into its bore.
Remove the C-clamp. Rein stall the lever, seal and nut to the caliper.
5. Loosen the brake tube nut and disc onnect the brake tube from the caliper.
Plug the tube to prevent t he loss of brake fluid.
At the right rear wheel, it may be necessary to remove the rear bolt from the
lower control arm to allow the lower caliper mounting bolt to be removed.
6. Remove the mounting bolts using a
3/8 in. Allen head socket. Remove the
caliper and inspect the mounting bolts for corrosion. If necessary, replace
the mounting bolts.
To install:
7. Place the caliper onto the rotor and install the m ounting bolts. Torque the
mounting bolts to 30-45 ft . lbs. (40.7-61 Nm).
8. Install a new anti-friction washer and lubricate the lever with silicone brake
lube. Install the lever on the actuator with the lever pointing down. Rotate the
lever toward the front of the car and hol d while installing the nut. Torque the
nut to 30-40 ft. lbs. (40.7-54.2 Nm), then rotate the lever back against the
stop on the caliper.
9. Install damper and spring. Connect the parking brake cable. Tighten the
cable at the equalizer until the lever starts to move off the stop on the
caliper, then loosen the adjustment unt il the lever moves back against the
stop.
10. Remove the nut holding the rotor in place and install the wheel. Lower the
car and fill the master cylin der with brake fluid.
1989-92 MODELS
1. Raise and safely support the vehicle.
2. Loosen the parking brake cable at the equalizer.
3. Remove the wheel and tire assembly. Inst all 2 wheel nuts to retain the rotor.
4. Remove the bolt, inlet fitting and was hers from the caliper housing. Plug the
holes in the caliper housing and inlet fitting.
5. Remove the caliper lever return spri ng only if it is defective. Discard the
spring if the coils are opened.
6. Disconnect the parking brake cable from the caliper lever and caliper
bracket.
7. Remove the 2 caliper guide pin holes.
8. Remove the caliper housing from the rotor and mounting bracket.
To install:
Page 114 of 875

GM – CAMARO 1982-1992 – Repair Guide (Checked by WxMax) 114
9. Inspect the guide pins and boots and re
place if corroded, worn or damaged.
Check the inlet fitting bolt for blockage.
10. Install the caliper housing over t he rotor and into the mounting bracket.
Install the 2 caliper guide pin bolts. Tighten the upper caliper guide pin bolt
to 26 ft. lbs. (35 Nm) and the lower gui de pin bolt to 16 ft. lbs. (22 Nm).
11. Connect the parking brake cable to t he caliper bracket and caliper lever.
Install the caliper lever return spring, if removed.
12. Install the inlet fitting, bolt and 2 new washers to the caliper housing. Tighten
the bolt to 22 ft. lbs. (30 Nm).
13. Bleed the brake system.
14. Adjust the parking brake free trav el if the caliper was overhauled.
15. Lower the vehicle and cycle the parking brake.
16. Raise and safely support the vehicle.
17. Inspect the caliper parking brake levers and ensure they are against the
stops on the caliper housing. If the levers are not on their stop, refer to the
parking brake adjustment.
18. Remove the 2 nuts securing the roto r and then install the wheel and tire
assembly. Lower the vehicle.
19. With the engine running, pump the br ake pedal slowly and firmly 3 times to
seat the disc brake pads. Check the hydraulic system for leaks.
OVERHAUL
1982-88 MODELS
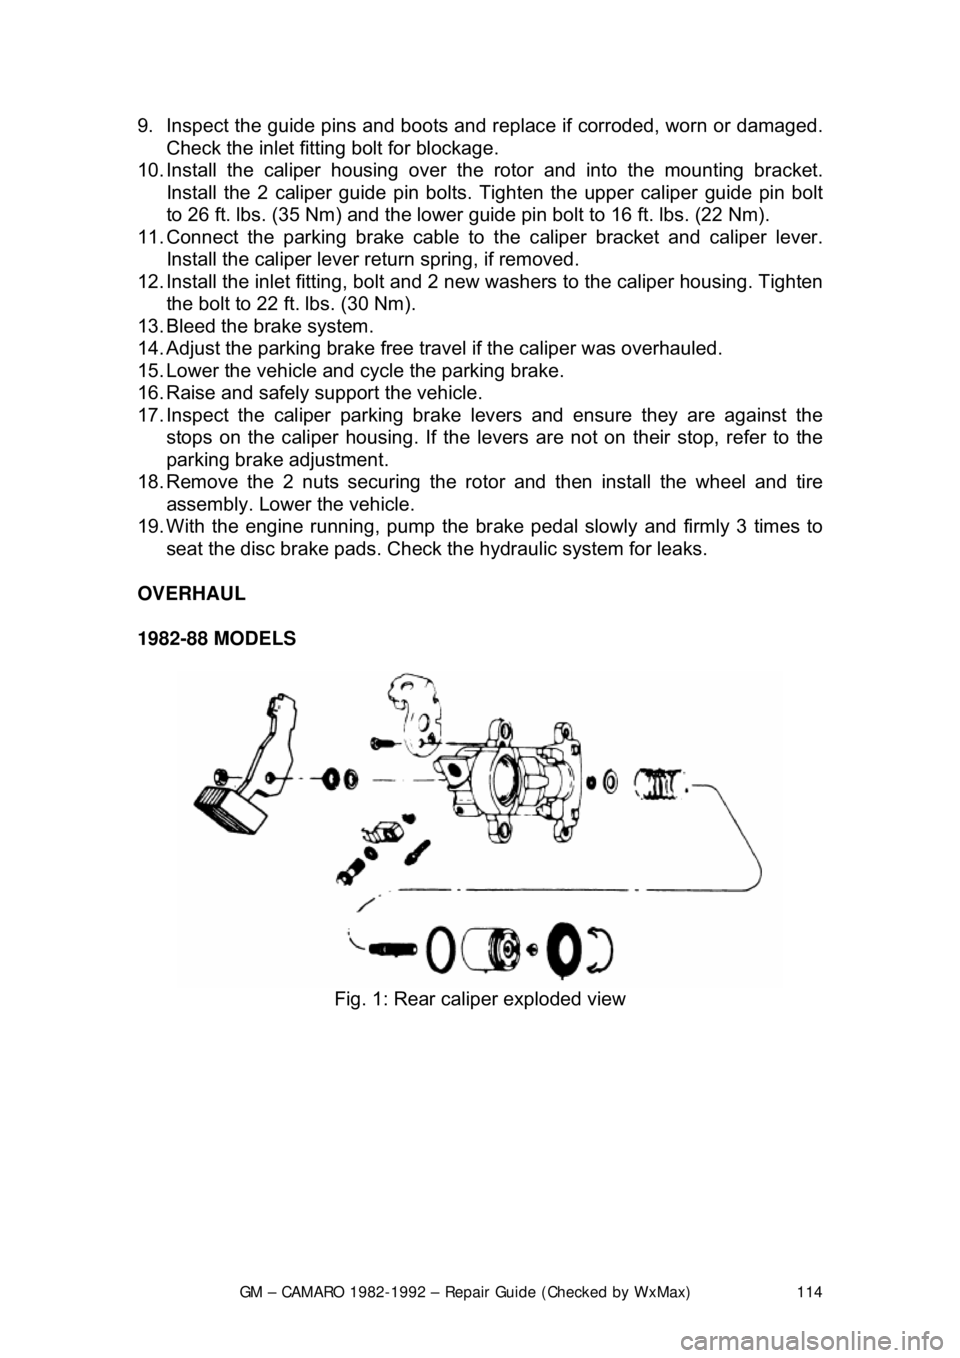
Fig. 1: Rear caliper exploded view