1982 CHEVROLET CAMARO wheel torque
[x] Cancel search: wheel torquePage 322 of 875

GM – CAMARO 1982-1992 – Repair Guide (Checked by WxMax) 322
CAUTION - The transmission must be secu red to the transmission jack
17. Remove the transmission from the vehicle. Be careful not to damage the oil cooler lines, throttle valve cable, or the shift control cable. Also, keep
the rear of the transmissi on lower than the front to avoid the possibility of
the torque converter disengagi ng from the transmission.
To install: 18. Position the transmission and converter into place.
19. Install the transmission -to-engine mounting bolts.
20. Connect the throttle valve cable and oil cooler lines to the transmissio\
n.
21. Install the transmission cro ssmember and secure with bolts.
22. Install the transmission mount bolt.
23. Matchmark the torque converter-to-f lywheel. Install the torque converter-
to-flywheel attaching bolts.
Before installing the converter-to-flywheel bolts, be sure that the weld nuts on
the converter are flush with the flywheel, and that the converter rotates freely by
hand in this position.
24. Install the flywheel cover.
25. Install the torque arm-to-transmission bolts.
26. Connect the speedometer cable, el ectrical connectors and the shift
control cable from the transmission.
27. Connect the catalytic converter s upport bracket at the transmission.
28. Align the matchmark m ade earlier, then install the driveshaft to the axle
pinion. Bolt the universal joint straps to the pinion flange.
29. Lower the vehicle.
30. Install the dipstick tube using a ne w dipstick tube O-ring and secure with
the bolt. Install the tran smission oil dipstick.
31. Connect the throttle valve (TV) c ontrol cable at the carburetor.
32. Install the air cleaner assembly.
33. Connect the negative battery cable at the battery.
DRIVELINE
DRIVESHAFT AND U-JOINTS
The U-joint is secured to the yoke in one of two ways. Dana and Cleveland
shafts use a conventional snapring to ho ld each bearing cup in the yoke. The
snapring fits into a groove located in eac h yoke end just on top of each bearing
cup. The Saginaw design shaft secures its U-joints in another way. Nylon
material is injected through a small hole in the yoke and flows along a circular
groove between the U-joint and the yoke , creating a synthetic snapring.
Disassembly of the Saginaw U-joint requi res the joint to be pressed from the
yoke. This results in damage to the be aring cups and destruction of the nylon
rings.
Page 338 of 875

GM – CAMARO 1982-1992 – Repair Guide (Checked by WxMax) 338
seal preload. Turn the torque wrenc
h smoothly for several rotations and
record the amount of preload as the a ssembly is turning, not the initial
force required to start the assembly moving.
Preload is measured as the amount of torque required to turn the assembly.
5. Using a suitable tool to hold the pi nion yoke in place, remove the pinion
yoke nut and washer.
6. Place a suitable contai ner under the differential to catch any fluid that
may drain from the rear axle. Using a suitable tool, remove the pinion
flange.
7. Use a suitable tool to remove the pinion seal.
To install: 8. Inspect the seal surface of the pinion flange for tool marks, nicks or
damage and replace, as necessary. Examine the carrier bore and
remove any burrs that might cause leaks around the outside of the seal.
9. Install the seal 0.010 in. (0.2 5mm) below the flange surface using a
suitable seal installer.
10. Apply suitable seal lubricant to t he outer diameter of the pinion flange
and the sealing lip of the new seal.
11. Install the pinion flan ge on the drive pinion by taping with a soft hammer
until a few pinion threads projec t through the pinion flange.
12. Install the washer and pinion fla nge nut. While holding the pinion flange,
tighten the nut a little at a time and turn the drive pinion several
revolutions after each tightening, to set the bearing rollers. Check the
preload each time with a suitable inch pound to rque wrench until the
preload is 5 inch lbs. (0.6 Nm) more then the reading obtained during
disassembly.
13. Install the driveshaft.
14. Install the rear wheels and tires. Check and add the correct lubricant, as
necessary.
AXLE HOUSING
REMOVAL & INSTALLATION 1. Raise the vehicle and support it sa fely. Be sure that the rear axle
assembly is supported safely.
2. Disconnect shock absorbers from ax le. Remove the wheel assemblies.
3. Mark driveshaft and pinion flange, then disconnect driveshaft and support out of the way.
4. Remove brake line junction block bolt at axle housing. If necessary,
disconnect the brake lines at the junction block.
Page 359 of 875

GM – CAMARO 1982-1992 – Repair Guide (Checked by WxMax) 359
3. Disconnect all wiring from the star
ter solenoid. Replace each nut as the
connector is removed (as thread sizes differ from connector to
connector). Note or tag the wiring positions for installation.
4. Remove the bracket from the st arter and the two mounting bolts. On
engines with a solenoid heat shield, remove the front bracket upper bolt
and detach the bracket fr om the starter.
5. Remove the front bracket bolt or nut. Lower the starter front end first, and
then remove the unit from the car.
To install: 6. Position the starter into place and se cure it with the front bracket bolt and
nut. Torque the two mounting bolts to 25-35 ft. lbs.
CAUTION - If shims were removed, they must be replaced to ensure proper
pinion-to-flywheel engagement.
7. On engines with a solenoid heat shield, attach the bracket to the starter.
Install the bracket to the starter and the two mounting bolts. Install the
front bracket upper bolt.
8. Connect all wiring to the starte r solenoid and tighten the nuts.
9. Lower the vehicle.
10. Connect the negative battery cable.
SOLENOID REPLACEMENT 1. Remove the screw and washer from the motor connector strap terminal.
2. Remove the two solenoid retaining screws.
3. Twist the solenoid housing clockwis e to remove the flange key from the
keyway in the housing. Then remove the housing.
4. To re-install the unit, place the re turn spring on the plunger and place the
solenoid body on the driv e housing. Turn counterclockwise to engage the
flange key. Place the two retaining screws in position and install the
screw and washer which secures the strap terminal. Install the unit on
the starter.
SENDING UNITS AND SENSORS
For additional information on engine sensors, refer to Engine Performance &
Tune-up and Engine Controls in this repair guide.
Page 424 of 875

GM – CAMARO 1982-1992 – Repair Guide (Checked by WxMax) 424
11. Clean all old RTV from the mating surfaces.
12. Install the rear gasket into the
rear main bearing cap and apply a small
amount of RTV where the gasket engages into the engine block.
13. Install the front gasket.
14. Install the side gaskets, using grease as a retainer. Apply a small amount
of RTV where the side gaskets meet the front gasket.
15. Install the oil pan.
Install the oil pan-to-timing cover bolts la st, as these holes will not align until the
other pan bolts are snug.
16. Torque the pan bolts to 53 inch lbs. (6 Nm) for 1982-1985 models and 90
inch lbs. (10 Nm) for 1986 models.
17. Lower the engine and install the fr ont mount through-bolts. Torque bolts
to 48 ft lbs. (65 Nm).
18. Install the flywheel dust cover.
19. Install the starter assembly.
20. Connect the exhaust pipe at the manifold.
21. Tighten the exhaust pipe hanger bracket.
22. Lower the vehicle.
23. Connect the negative battery cable at the battery.
24. Fill the engine with engine oil and start engine. Check for leaks.
OIL PUMP
REMOVAL & INSTALLATION
Fig. 1: Oil pump - V8
Page 451 of 875

GM – CAMARO 1982-1992 – Repair Guide (Checked by WxMax) 451
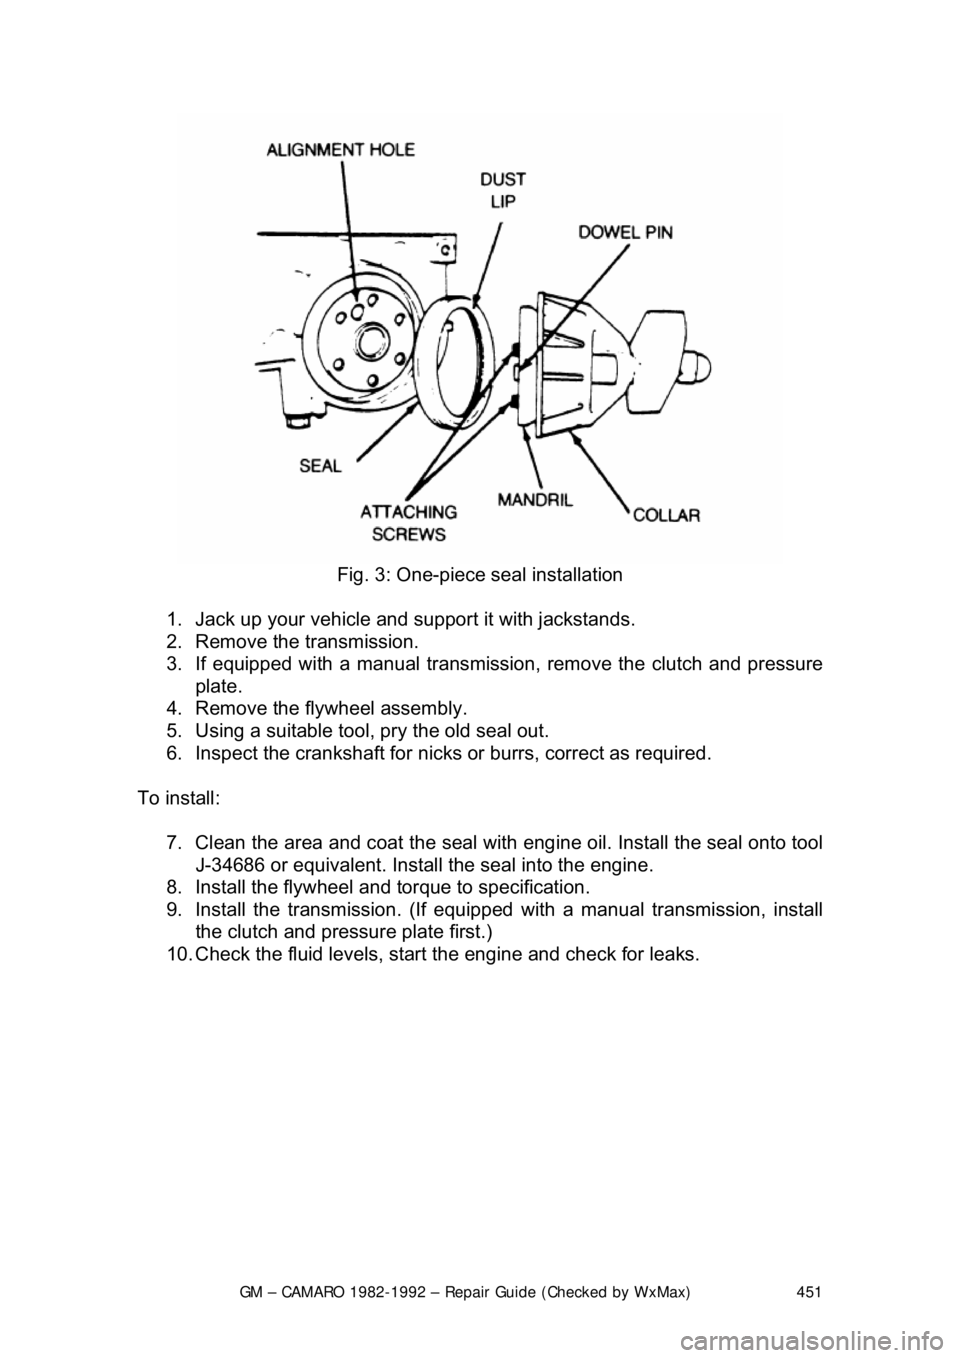
Fig. 3: One-piece seal installation
1. Jack up your vehicle and support it with jackstands.
2. Remove the transmission.
3. If equipped with a manual transmission, remove the clutch and pressure
plate.
4. Remove the flywheel assembly.
5. Using a suitable tool, pry the old seal out.
6. Inspect the crankshaft for nicks or burrs, correct as required.
To install: 7. Clean the area and coat the seal with eng ine oil. Install the seal onto tool
J-34686 or equivalent. Install the seal into the engine.
8. Install the flywheel and torque to specification.
9. Install the transmission. (If equipped with a manual transmission, install
the clutch and pressure plate first.)
10. Check the fluid levels, star t the engine and check for leaks.
Page 456 of 875

GM – CAMARO 1982-1992 – Repair Guide (Checked by WxMax) 456
2. Drain the engine oil and remove the oil pan.
3. Remove the rear main bearing cap.
4. Insert packing tool J-29114-2 or equi
valent, against 1 end of the seal in
the cylinder block. Drive the old seal gently into the groove until it is
packed tight. This will vary from
1/4 in. (6mm) to 3/4 in. (19mm) depending
on the amount of pack required.
5. Repeat the procedure on t he other end of the seal.
6. Measure the amount the seal wa s driven up on one side and add
1/16 in.
(1.6mm). Using a suitable cutting tool, cut that length from the old seal
removed from the rear main beari ng cap. Repeat the procedure for the
other side. Use the rear main bear ing cap as a holding fixture when
cutting the seal.
7. Install guide tool J-29114-1 or equi valent, onto the cylinder block.
8. Using the packing tool, work the shor t pieces cut in Step 6 into the guide
tool and then pack into the cylinder block. The guide tool and packing
tool are machined to provide a built in stop. Use this procedure for both
sides. It may help to use oil on the short pieces of the rope seal when \
packing them into the cylinder block.
9. Remove the guide tool.
10. Apply Loctite® 414 or equivalent, to the seal groove in the rear main
bearing cap. Within 1 minute, insert a new seal into the groove and push
into place with tool J-29590 until the seal is flush with the block. Cut the
excess seal material with a sharp cu tting tool at the bearing cap parting
line.
11. Apply a thin film of chassis grease to the rope se al. Apply a thin film of
RTV sealant on the bearing cap mati ng surface around the seal groove.
Use the sealer sparingly.
12. Plastigage® the rear main bea ring cap as outlined in MEASURING
REAR MAIN CLEARANCE in this section and check with specification. If
out of specification, check for fr ying of the rope seal which may be
causing the cap to not seat properly.
13. Install all remaining com ponents and inspect for leaks.
FLYWHEEL AND RING GEAR
REMOVAL & INSTALLATION
The ring gear is an integral part of the flywheel and is not replaceable.
1. Remove the transmission.
2. Remove the six bolts attaching t he flywheel to the crankshaft flange.
Remove the flywheel.
3. Inspect the flywheel for cracks, and inspect the ring gear for burrs or
worn teeth. Replace the flywheel if any damage is apparent. Remove
burrs with a mill file.
4. Install the flywheel. Th e flywheel will only attach to the crankshaft in one
position, as the bolt holes are unevenly spaced. Install the bolts and
torque to specification. Tighten bolts in crisscross pattern.
Page 803 of 875

GM – CAMARO 1982-1992 – Repair Guide (Checked by WxMax) 803
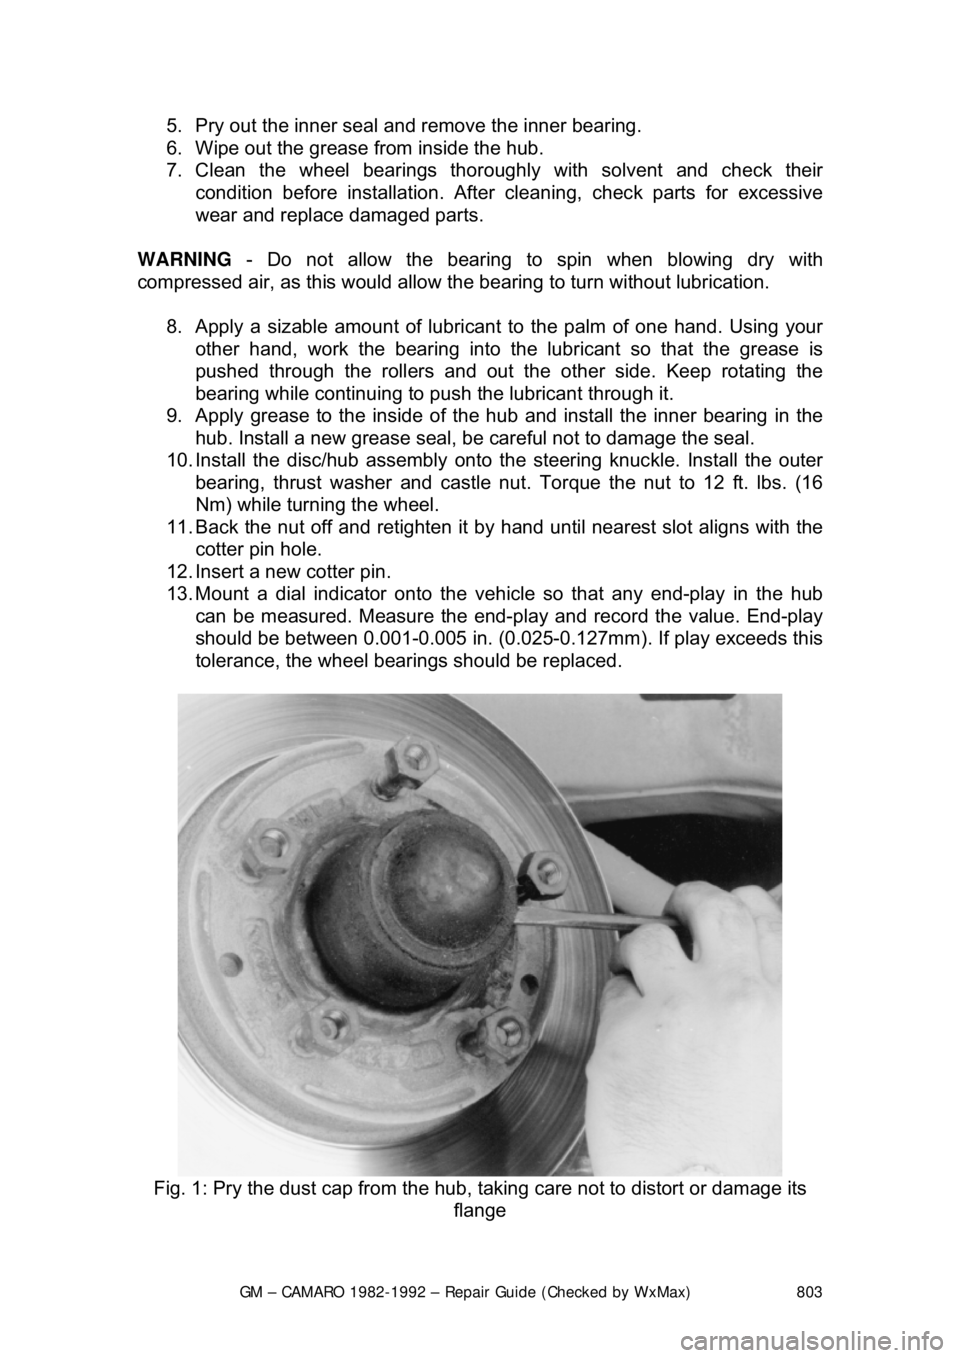
5. Pry out the inner seal and
remove the inner bearing.
6. Wipe out the grease from inside the hub.
7. Clean the wheel bearings thor oughly with solvent and check their
condition before installation. Afte r cleaning, check parts for excessive
wear and replace damaged parts.
WARNING - Do not allow the bearing to spin when blowing dry with
compressed air, as this would allow t he bearing to turn without lubrication.
8. Apply a sizable amount of lubricant to the palm of one hand. Using your
other hand, work the bearing into the lubricant so that the grease is
pushed through the rollers and out t he other side. Keep rotating the
bearing while continuing to push the lubricant through it.
9. Apply grease to the inside of t he hub and install the inner bearing in the
hub. Install a new grease seal, be careful not to damage the seal.
10. Install the disc/hub assembly onto t he steering knuckle. Install the outer
bearing, thrust washer and castle nu t. Torque the nut to 12 ft. lbs. (16
Nm) while turning the wheel.
11. Back the nut off and retighten it by hand until nearest slot aligns with the
cotter pin hole.
12. Insert a new cotter pin.
13. Mount a dial indicator onto the vehi cle so that any end-play in the hub
can be measured. Measure the end-play and record the value. End-play
should be between 0.001-0.005 in. (0.025- 0.127mm). If play exceeds this
tolerance, the wheel bearings should be replaced.
Fig. 1: Pry the dust cap fr om the hub, taking care not to distort or damage its
flange
Page 818 of 875

GM – CAMARO 1982-1992 – Repair Guide (Checked by WxMax) 818
•
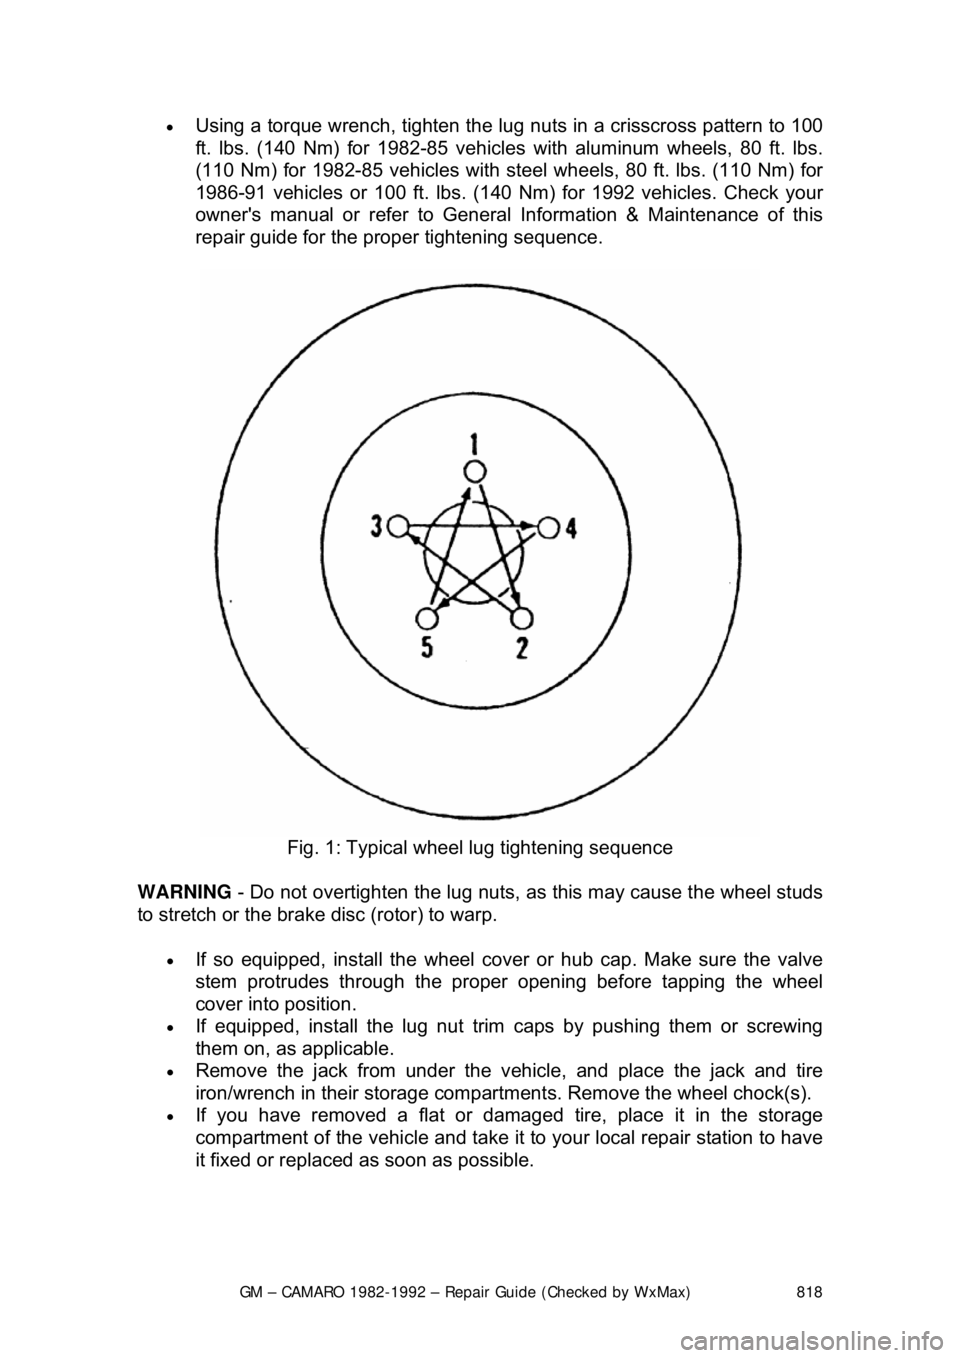
Using a torque wrench, tighten the lug nuts in a crisscross pattern to 100
ft. lbs. (140 Nm) for 1982-85 vehicles with aluminum wheels, 80 ft. lbs.
(110 Nm) for 1982-85 vehicles with st eel wheels, 80 ft. lbs. (110 Nm) for
1986-91 vehicles or 100 ft. lbs. (140 Nm) for 1992 vehicles. Check your
owner's manual or refer to General Information & Maintenance of this
repair guide for the proper tightening sequence.
Fig. 1: Typical wheel lug tightening sequence
WARNING - Do not overtighten the lug nuts, as this may cause the wheel studs
to stretch or the brake disc (rotor) to warp.
• If so equipped, install the wheel cover or hub cap. Make sure the valve
stem protrudes throu gh the proper opening bef ore tapping the wheel
cover into position.
• If equipped, install the lug nut trim caps by pushing them or screwing
them on, as applicable.
• Remove the jack from under the v ehicle, and place the jack and tire
iron/wrench in their storage compartment s. Remove the wheel chock(s).
• If you have removed a flat or damaged tire, place it in the storage
compartment of the vehicle and take it to your local repair station to have
it fixed or replaced as soon as possible.