1980 CHEVROLET CITATION heating
[x] Cancel search: heatingPage 17 of 95
Downloaded from www.Manualslib.com manuals search engine NOTICE: Use only trailer hitches which permit normal operation of the Energy Absorbing Bumper System. if so equipped. For example. a rigid fore and .iUt connection between the bumper and any other part.of. the car may increase .damage in the event of II collision.
TRAILER TOWING TIPS
Getting Started
Before entering traffic with a frailer that has electric brakes, start the car and
trailer moving and apply the trailer brakes
by hand to be sure the trailer brakes
are working and the trailer electrical system
is connected .
. Engine Cooling
:
When going up long grades, you, can reduce the chance 'of engine overheating by
turning
off the air conditioner, if so equipped.
Transaxle
,See the method for checking the transaxle fluid le ve l. in "Service and
,.;.Maintenance," Section 5 of this manual .
Parking
You should not park cars with trailers on a grade (hill). However, if you must
park on a grade, these steps must be followed:
1. Apply the regular brakes.
2. Have someone place wheel' chocks under the trailer wheels.
3. When the wheel chocks are in place, release the regular brakes until the
chocks absorb the load .
4; Apply Ihe parking brake.
S. Shift Ihe transaxle 10 ··P"(Park).
If the car is parked on a grade. don't shift the transaxle 10 "P"(Park) until the
trailer wheels
are chocked and the parkinghrake, is set~ If you do, the weight of . the car and trailer may put so much force on the parking pawl in the transaxle
.
that it may be hard to shift oul of "P"(Park).
When starting , after being parked ' on a grade:
(; Apply the regular brakes and hold.
2 .
Stan th e engine in ··P"(Park) .
-3. Shift into gear and release the parking brake.
4. Release the regular brakes and drive until the chock s are free.
5. Apply the regular brakes and have your helper remove the chocks.
J.]3
Page 18 of 95
Downloaded from www.Manualslib.com manuals search engine SECTION 2
STARTING AND OPERATING
ENGINE EXHAUST GAS CAUTION
(CARBON MONOXIDE)
Do not breathe exhaust gas becau~ it contains carbon monoxide, which by itself
- has no color or odor. Carbon monoxide is a dangerous gas . .It can cause
un consc iousness and can
be lethal.
If at any time you think that exhaust fumes are entering the vehicle. have the cause determined and corrected as soon· as possible. If you must drive under these
conditi<:ms, drive only with ALL windows fully OPEN.
Prptect
against carbon monoxide entry ihtp the vehicle body. The best way is to
keep the engine -exhaust system, vehicle
body. and body ventilation system
properly maintained. We recommend that the exhau st system and body be "inspected by a competent mechanic: '
• each time the vehicle is raised for an oil change;
• whenever a change is noticed in the',sound ofthe~exhaust system;
• wh enever the exhaust sys.tem. underbody . or rear of the vehicle is damaged.
See your Maintenan ce Schedule fo.~4er for parts requiring inspection .
To allow proper operation of the vehicle's ventilation system, keep the air inlet
grill e
in front of the win(fshield clear of snow, leaves or other obstru ctions at all
times.
SITTING IN A PARKED VEI:iICLE WITH THE ENGINE RUNNING FOR A LONG TIME IS NOT RECOMMENDED.
Do n ot fun , the engine in co nfined areas (such as garages or next to a building)
any more than needed to move the vehicle. When the, vehicle is stopped in an
UNCONFINED area with the engine running for any, more than a sho rt time, tak e the following steps:
A. Adju st the heating or cooling system to force outside air into the vehicle as
follows:
1. On cars not equipped with air co nditioning . se t the fan to medium or
high speed.
2. On cars equipped with air conditioning, serthe fan to medium or high
spe ed
a!1;d right hand control lever' to any position except "orr' or ·'Max."
-B. Keep the exhau st tailpipe -area clear of snow and other material to help"reduce
the buildup of exhaust gases' under the vehicle .
The ,trunk lid or hatchba ck should be closed while driving to help prevent drawing
exhaust gas into
the car. If the trunk lid or hatchback mu st' remain open for some
rea son while moving , or
if electrical wiring or other cable conn_ection s to a trai ler
_mu st pass through the sea l between the trunk lid or hatchba ck and -the body . follow
thes e precautions:
• Close all wind ows.
2-1
Page 19 of 95
Downloaded from www.Manualslib.com manuals search engine • Adjust the heating or cooling system to force outside air into the car as . d esc ribed abo ve bUI set the fan to high speed .
• On cars with outside air vents in or under the instrument panel, open the vents fully.
New. Car "Break-In" Period
You can drive your new car from its very first mile/kilometer without following .
a
formal"break~in" schedule. However, there'are things you can do during the
fir st few hundred miles/kilometers of driving that will add to the future
perf orm ance and econ omy of your car.
We recommend you limit your speed during the first 500 miles (800 kiJomet ers) ~
to a maximum of 55 mph (90 km/h) ; but do not drive for long period s al any'
one constant speed, either Jast
or slow. During this time , avoid fulllhronJe start s _ and, if possible, avoid h"ard stops especially during the first 200 miles (320
kilometers) of driving.
Always drive at moderate speed until the engine has completely warmed
up.
If yo u plan to use your new car for trailer towing, see additional information in Section 1 under "Trailer Towing."
GUARD AGAINST THEFT
Your new Citation has many features to help prevent theft of the car itself, its
equ ipment, and its content s. But these ami-theft features depend upon you to
work .
THE TIME TO BE MOST ON GUARD IS WHEN LEAVING THE CAR ...
• PARK IN A LIGHTED SPOT WHEN YOU CAN.
• LOCK THE STEERING COLUMN AND TAKE THE KEYS,
•
Turn the key to "Lock," and remove the key. This locks the igniti on and
both steering and shift connols unless your car has a manual transaxle.
In that case, the shift control- is not locked .
• If you must leave a key with the car, leave the square-head key .only .
Take the oval-Read key with you. This will help prevent unwanted entry into your car at a later date, or into your -trunk.
•
FULLY CLOSE ALL WINDOWS AND ANY ROOF PANELS. AND LOCK ALL DOORS.
•
KEEP COSTLY ITEMS OUT OF SIGHT AND LOCKED UP,
•
Never leave things of value in plain sight on seats or noor.
• The glove box offers a place -to hide small items.
• Lock larger items in the trunk or place them in the rear storage .
FUEL REQUIREMENTS
Your engine is designed to use only unleaded gasoline. Unleaded gasoline must
be' used for the emission control $ystem to operate properly. Its use will also reduce
s park plug fouling , -exhaust system corrosion and engine oil deterionition .
Using leaded gasoline can damage the emiS5ion control system and could result
in loss of warranty coverage. This is especially true on cars that have the C-4
System . Leaded gasoline will damage tbe oxygen sensor, which may affect
emission control, fuel economy
and drivabiJity . See "C-4 (Computer Controlled
Catalytic Converter) System" in "Service and Maintenance" Section 5 of this
manual for more information.
2-2
Page 37 of 95
Downloaded from www.Manualslib.com manuals search engine When the parking lamps or headlamps are to be operated with the key in the OFF position. the reminder buzzer can be shut off by turning the light switch knob
until the instrument cluster lights are not on.
Electric Clock
Reset the clock, . if your vehicle is so equipjled. by pulling out the knob and turning the hands clockwise if slow, counterclockwise if fast. This win, if the clock error
is five minutes or more, automatically compensate for time' gain or lag. Several
reseuings, several days apart. may be needed to properly adjust the c10ck
mechanism.
Cigarette Lighter
The optional cigarette lighter is located "in-the ash tray. To operate,- -push it in.
When it becomes heated, it automatically pops out ready for use. ,
VENTILATION. SYSTEM
Your Citation has a power verttiI3:tion system' that provides ventilation comfort by forcing air out through valves in the rear body lock. pillars. You can get a steady
flow of outside air into the car when the heater ot air conditioning blower is turned
on, On cars without air conditioning, you can get a "'ram" fresh .air supply while
the car is moving, with the heater blower· turiled off.
With the side windows closed, outside air will flow into the front grilles. through the car and out the rear air exhaust valves. (See illustration.)
fRONrlNLET
G~.
LOCt
R!AR BODY LOCK
~~~m
• Always keep the fro'nt inlet' grilles clear of obstructions ' (leaves, ice, snow,
etc .).
• Alw.ays keep the underseat ai r path clear of objects.
• When you want heating or air COllditioning, close aU windows while driving
for
the best comfort.
The following pages of this mlin,ual provi.de more operating tips for gettina
maximum heating and cooling , comfort. (Also see "Engine Exhaust Gas Caution
(Carbon Monoxide)" 'at the begiiuling of "Starting and Operating," Section 2 of
this manual.
• Clear snow and ice from the hood 'and air inlet in front of the windshield . This helps the heater and defroster work better and lowers the chance of fogging on the' inside of the windshield.
• Run the blower on "High" for a few moments before driving off. This helps
clear the intake ducts of snow and further lessen s the chance of fogging on
the inside of the windshield.
2-20
Page 38 of 95
Downloaded from www.Manualslib.com manuals search engine lower Air Vents
Two control handles lOCated beneath the steering column open and close the tower
air vents. To compliment this system there is a power upper vent in the instrument
panel which is operated from the heater
control. The amount of air coming from the lower cutlets ~epends -on vehicle speed and the upper outJet~ depend on fan
'poed.
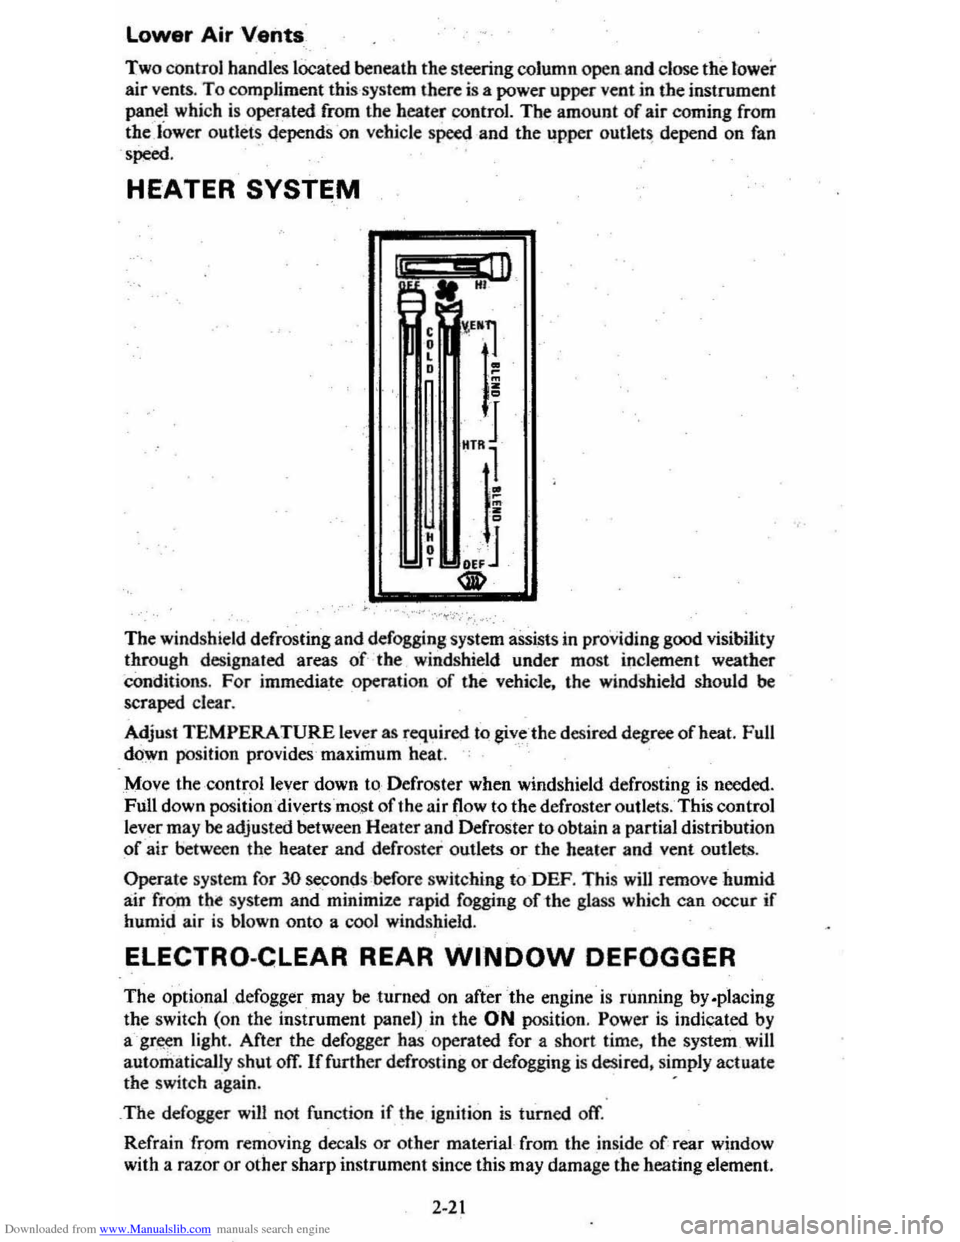
HEATER SYSTEM
I" .. ill A. HI
The windshield defrosting and defogging system assists in providing good visibility through designated areas of the windshield under most inclement weather
Conditions. For immedia_te operation of the vehicle. the windshield should be scraped clear.
Adjust
TEMPERATURE lever as required to giv_c -the desired degree afheat. Full
down position provides'maximum heat.
Move the ·
controllever down to-Defroster when windshield defrosting is needed.
Full down position diverts most of the air (low to the defroster outlets. This control
lever may
be adjusted between Heater and Defroster to obtain a partial distribution
of air between the heater and defroster outlets or the heater and vent outlets.
Operate system for 30 seconds before switching to-DEF. This will remove humid
air from tht system and minimize rapid fogging of-the glass which can occur if humid air is blown onto a cool windshield.
ELECTRO-CLEAR REAR WINDOW DEFOGGER
The optional ,defogger may be turned on after the engine is running by.placing
the switch (on the instrument panel) in the ON position. Power is indicated by
agr~n light. After the defogger has operated for a short time. the system _will
automatically
shut ofT. If further defrosting or defogging is desired. simply actuate the switch again. .
_
The defogger will not function if the ignition is turned off.
Refrain from removing decals
or other material from the inside of rear window
with a
razor or other sharp instrument since this may damage the heating element.
2-21
Page 39 of 95
Downloaded from www.Manualslib.com manuals search engine Clear snow and ice from the rear window to improve the efficiency of the reaT
window defogger.
Air Outlets
The twin barrel vertical type center outlets maybe rotated or vanes turned to direct
air flow in direction desired. The outlets at each end of the instrument panel-may
be rotated or vanes adjusted as desired.
AIR CONDITIONING SYSTEM
This system combines heating and cooling capabilities for comfort in all weather
conditions.
During some air conditioning operation conditions, slight increases and decreases
of engine speed/power may be noticed. This should be considered normal, as the
system
is designed to cycle the compressor -ON and OFF to maintain desired
cooling. The reduced compressor operation should benefit fuel economy.
III
~" HI
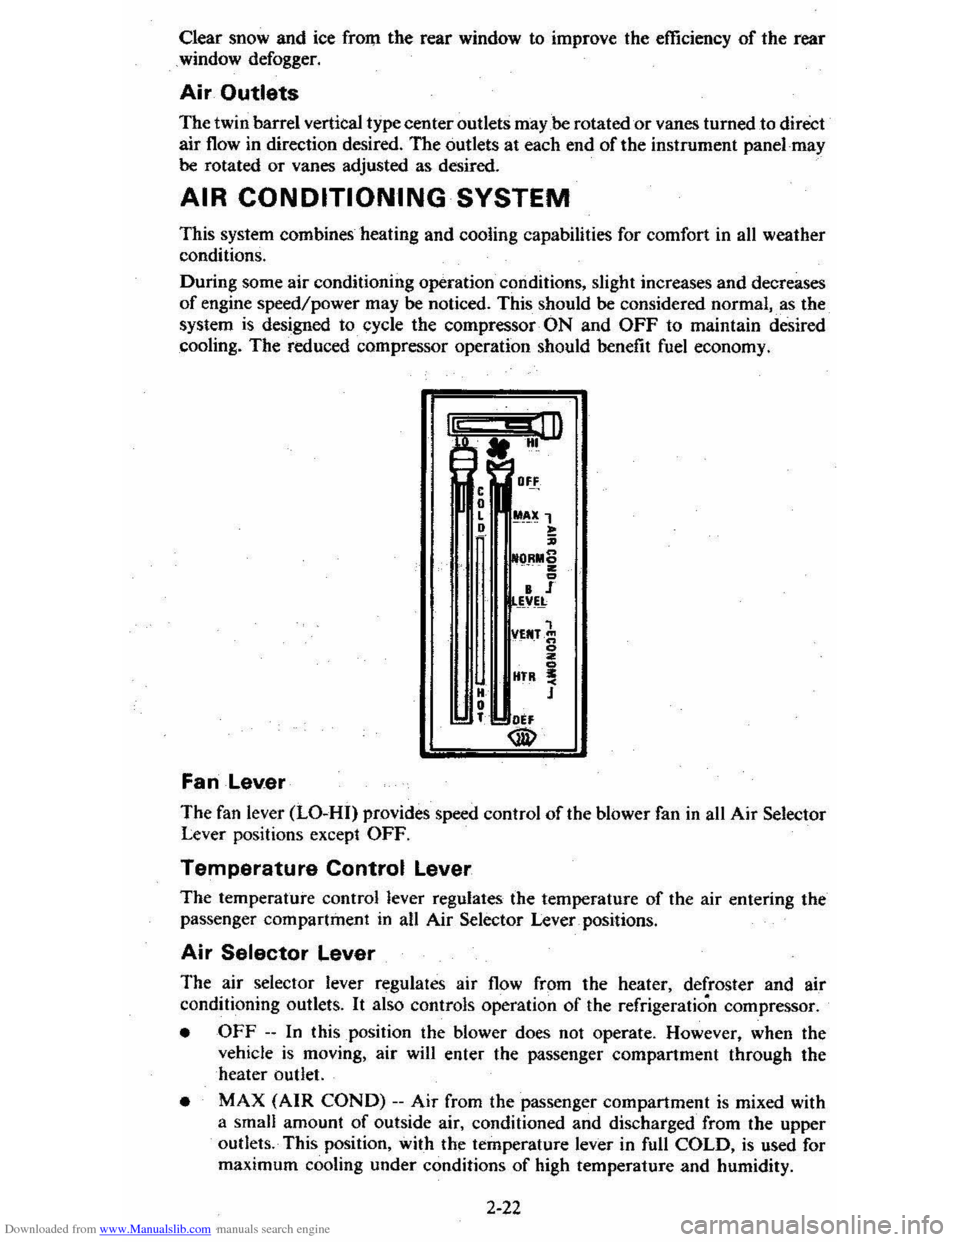
Fan Lever
,
• L •
H • T
O,!
!1~)t 1 ~ ~ ORMS . 2
• I _~v~
VEN.T_~ o ;; HTR ! J
." ®
The fan lever (LO-HI) provides speed control of the blower fan in all Air Selector Lever positions except OFF.
Temperature Control Lever
The temperature control lever regulates the temperature of the air entering the
passenger compartment in an Air Selector Lever _ positions.
Air Selector Lever
The air selector lever regulates air flow from the heater, defroster and air
conditioning outlets.
It also controls operation of the refrigeration compressor.
• OFF --In this position the blower does not operate. However, when the
vehicle is moving, air will enter the passenger compartment through the
heater outlet.
• MAX (AIR COND) --Air from the passenger compartment is mixed with
a small amount
of outside air, conditioned and discharged from the upper
outlets. This position, with the temperature lever in full
COLD, is used for
maximum cooling under conditions
of high temperature and humidity.
2-22
Page 68 of 95
Downloaded from www.Manualslib.com manuals search engine 3. Stop the engine. Open the radiator drain valve to drain the coolant. (Drainage
may be speeded by removing the drain plugs in the block.)
4. Close the drain valve (install block drain plugs, if removed). Add water until
the system is filled and run the engine until the upper radiator hose is hot again.
5. Repeat steps 3 and 4 several times until the drained liquid is nearly colorless.
6. Drain the system and then close the radiator drain valve tightly. (Install block
drain plugs, if removed.)
7. Disconnect all hoses from the coolant recovery tank. Remove the tank and
pour out any fluid. Scrub and clean the inside of the tank with soap and water.
Flush it well with clean water,
then drain it. Reinstall the tank and hoses.
8. Add enough water and ethylene glycol antifreeze (meeting GM Specification
1899-M)to provide the required cooling, freezing, and corrosion protection. Use a solution that is at least 50 percent antifreeze, but no more than 70
percent antifreeze. Fill the radiator to the base of the filler neck and fill the
coolant recovery
tank to the "Full Hot" mark. Put the recovery tank cap back
on.
9. Run the engine, with the radiator cap removed, until the upper radiator hose
is hot.
10. With the engine idling, add coolant to the radiator until it reaches the bottom
of the filler neck. Install the radiator cap, making sure the arrows on the cap line up with the overflow. tube.
It is the owner's responsibility to:
• Maintain cooling system freeze protection at _37°C (_34°F) to ensure
protection against corrosion and loss of coolant from boiling. (A SO/50
mixture of water and ethylene glycol antifreeze will provide freeze protection
to ~ 37°C ore -34°P.) You should do this even if you don't expect freezing
temperatures.
• Add ethylene glycol base antifreeze that meets GM Specification 1899-M
when antifreeze
hasto be added because of coolant loss or for more protection
' against freezing at temperatures lower than _37°C (-·J4°P).
NOTICE: Do not use alcohol or methanol-base antifreeze. or plain water alone. in your vehicle at any time. They will boil at a lower pOint than that at which the hot light indicator (or temperature gage) works. and they do not provide proper protection against corrosion.
Radiator Pressure Cap
The radiator cap, a 105 kPa(15 psi) pressure type, must be installed tightly,
otherwise coolant may be lost and damage to engine may result from overheating.
Radiator pressure caps should be checked periodically for proper operation.
If
replacement is required, an AC cap is recommended.
Thermostat
The engine coolant temperature is controlled by a thermostat. It stops coolant flow
through the radiator until a preset temperature is reached. This thermostat is
installed in
the engine coolant outlet on the engine block. The same thermostat is used in both winter and summer. When a replacement is needed, AC~Delco parts
are recommended.
5-7
Page 88 of 95
Downloaded from www.Manualslib.com manuals search engine Air Cleaner ...... . Air Conditioner
Automat ic ............ . Malnt.nance Air Pre •• ur •. Tire .... A ir Vents ..... Alternator (GEN) Light .. Aluminum Car •.. AM or AM·fM R.dios ..... Antifra.z . ..... ......... .......... . App.aranc. Car ...... Ashtrays & l ighters. Assi.tance. Owner .. Autom.tic DOOf lOCks
Autom.tic: Trann.l. Malnt.mimc. Operation .. Operating Tip$ ..... Axl. , Drive .. Sabies, Reatraint of . San Joints S.ttary
5-8
2 -
22 5·10 5·11 2·21 2·17 .-. 2·24 (S •• "Coolant") '-1 2-20 0-1 1-2
5-. ,-a 2 ·10 5-8 1·10 5-8
Em.rgency SIIHting.. 3-1 Fr •• dom .... 5·9 G •• Caution... 3-1 ; GEN Light ... 2·11 T •• t Indicator... 5·9 Befortl Oriylng Your V.hicle ,., Belt •. Seat .... M. (S .. "Seat Baits",
Blower, H.at.r &. Air Cond.... 2-20 Body Oamag... 4·4 Brak.s Adjustment P.dal Trav.l Traller 'Towing .. Warning Light Bre.ka,., Circuit
Break·ln Period, N.w V.hicl •... Bright Headlights .....
2-14 2·14 1 -11 2·17 7-4 2-' 2·7,2·14 4-4 1 -3.7·4 1-12 3-6 {S •• "Sound"l 2·18, 5-2
Bright Metal CI.aning ......... .. Bl,llbs lit Fu ••• Bumpe ... lit Hitch ••.. 81,1mper Jack Operetion Bun.r •.. C·4 Syst.m .. C •• Coolant RaeoV.ry Tenk .. FI,I.I. Powar St •• ring .... R.diator ..... . Cap.city. Cargo W.ight ... .•. Cap3Cme •. Fluid .. C.r Br.ak·ln Period , N.w ..... . C.r Chemic. I ......... .. C.rbon Monoxid. Caution
'-5 Inside Back Cover .-a '-7 6-12 7-1 2-' '-7 '-1 C.r. &. CI.aning, Appear.nce 4-1 C.rgo Capacity. 5-10 Cargo on Roof, C.rrying.. ......... ............... 1·3 CargoR.ck, Roof ..... 2·29 Cargo Coyer .. ................ ........... 2-27 CATALYST Indic.tor..... 2 ·18 C.t.lytic Conv.n.r C ·4 System ......... . Chains, Tir • ..... Ch.nging Whe.'s • Tiras .. Ch.rging Systam Indicator .... CHECK ENGINE light..
2·18,5--2 5·14 3-6 3-2 2-18, 5-2
7-6
Checklist. Driver ....... . Child Seats lit Ra.traint •.. Chrome Protection .. Cigarette lightar .... Circuit Breakars . Citizens Band Radio ... " .... " .... " .. M ••••••• Cleening .. Clock
Cloth Trim Car." .. Clutch Pedal Adjl,lstment.. .. Cold Welther Stlrting ..... Compla int Procedure ..
1-1 1-10 .-. 2·20 7-' 2·2 ~ 4-1 2·20 .-, 5-8 '-a 6-1
Conditionar, Air ....... (See "Air Conditi on.r") Con.umer Relations... 6-1
Cony.)! Mirror ... C ooling System Antifraet. ICoolant, .. Overheating .. Recovary Tank .. S.rvice .. Thermostat .. CorrOSion Protection Countries. Oper.ting in Foraign ..... Cruise Control .. Cu.tomer Sarvice .. Oamage. Sheet M.tal...-. D.fogger. Rear Window. Defro.hlT , Windshiflld .. Oalay Wipers .. Descend .ing a Grade Trail.ring .. Dimen.ion. Dimmer Switch, H.adlight Dipsticks
Engine Oil .. Power Staering .. Diractional Sign." .... . Oi.c Br~ ••.. Door lock ......
Drrve lOOe
1-3
'-5 3-3 5-S '-5 5-7 .-. 2 -3 2·12 6-1 '-5 2-21 2 -20, 2·23 '-7 '-8 1-11 7-1 2-14
'-3 .-a ,-u 2·1S 1-2 5-8 Driver Checklist.... 1·1 Driving Down Steep Gr.de........ 2·9 In Ou.ty Ar......... 5·3 on Slippery Surfaces ....... .......... ,.... 2·9 Ec;Gnomy Tips , Fu" 2·4 Electric-Powered Option...... (See "Power")
Ele<:tricel System 8IttMY ... ... .
Bulbs ...... .
Circuit Brlak.rs. , .... GEN (Glnerator) light ...... Jump Scarting .. .. Sparil Plugs .. Voltm.ter ... Erne:rg.ncy , In Ca •• of Brak. Warning Light Engine Hot light .. Freeing Vahicle When Stuck ... Hazard Warning Fla.h.r .... J.cking ..... Jump 51anlng._. Towing Clr. Emission Caution .................................. . Emi .. ion Control CAT AL YST Indicator
5-S 7-3 7-. 7-' 2·17 3-1
7-2
2·19
2·17 2·17 3-7
3-1
3 ·4 .3·5 3-1
3-7
'-1
2·19
,