1980 CHEVROLET CITATION recommended oil
[x] Cancel search: recommended oilPage 18 of 95
Downloaded from www.Manualslib.com manuals search engine SECTION 2
STARTING AND OPERATING
ENGINE EXHAUST GAS CAUTION
(CARBON MONOXIDE)
Do not breathe exhaust gas becau~ it contains carbon monoxide, which by itself
- has no color or odor. Carbon monoxide is a dangerous gas . .It can cause
un consc iousness and can
be lethal.
If at any time you think that exhaust fumes are entering the vehicle. have the cause determined and corrected as soon· as possible. If you must drive under these
conditi<:ms, drive only with ALL windows fully OPEN.
Prptect
against carbon monoxide entry ihtp the vehicle body. The best way is to
keep the engine -exhaust system, vehicle
body. and body ventilation system
properly maintained. We recommend that the exhau st system and body be "inspected by a competent mechanic: '
• each time the vehicle is raised for an oil change;
• whenever a change is noticed in the',sound ofthe~exhaust system;
• wh enever the exhaust sys.tem. underbody . or rear of the vehicle is damaged.
See your Maintenan ce Schedule fo.~4er for parts requiring inspection .
To allow proper operation of the vehicle's ventilation system, keep the air inlet
grill e
in front of the win(fshield clear of snow, leaves or other obstru ctions at all
times.
SITTING IN A PARKED VEI:iICLE WITH THE ENGINE RUNNING FOR A LONG TIME IS NOT RECOMMENDED.
Do n ot fun , the engine in co nfined areas (such as garages or next to a building)
any more than needed to move the vehicle. When the, vehicle is stopped in an
UNCONFINED area with the engine running for any, more than a sho rt time, tak e the following steps:
A. Adju st the heating or cooling system to force outside air into the vehicle as
follows:
1. On cars not equipped with air co nditioning . se t the fan to medium or
high speed.
2. On cars equipped with air conditioning, serthe fan to medium or high
spe ed
a!1;d right hand control lever' to any position except "orr' or ·'Max."
-B. Keep the exhau st tailpipe -area clear of snow and other material to help"reduce
the buildup of exhaust gases' under the vehicle .
The ,trunk lid or hatchba ck should be closed while driving to help prevent drawing
exhaust gas into
the car. If the trunk lid or hatchback mu st' remain open for some
rea son while moving , or
if electrical wiring or other cable conn_ection s to a trai ler
_mu st pass through the sea l between the trunk lid or hatchba ck and -the body . follow
thes e precautions:
• Close all wind ows.
2-1
Page 55 of 95
Downloaded from www.Manualslib.com manuals search engine SECTION 4
APPEARANCE CARE
CAUTION: Some cl .. n .... may be poi8Of10ua or flammable, and their improper UH may cau .. per.,nal Injury or damage the inside of the vehicle. Therefore, when cleaning the inside of the vehicle. 00 NOT USE volatile cleaning solvents such as:
acetone. lacquer thinnere. enamel reducers. nail polish removers; or such cl •• ning
materials •• 'aundry soaps. bleach .. or reducing agents except as noted In the fabric cteenlng advice on stein removal that ~Iowa. . NEVER UH carbon tetrachloride, paolin., benzene or naphtha for any cleaning purpose.
Overexposure to the .. vapors may .... ult!n II health problem. This is even more likely to occur In small. unventilated .~. It is recommended that all vehicle doors
be opened for ventilation when any cleaning agents or other chemicals are uNCI in the interior. Approved respiratory protection equipment may be nMded. Follow the manufacturer's advice whenever cleaning agents or other chemicals are used,
Inside or outside the vehicle.
NOTICE: To avoid pouible permanent discoloration of white or light colored nata. DO NOT let materlala with unstabl. dyes come In contact with seat trim materials until the trim meterlals are totally dry. (This would Include certain types of casual
clothing. such a8 colored denims. corduroys. leathers and suedes: also decorative paper, etc.)
CARE AND CLEANING OF INTERIOR TRIM
With the use of modern trim materials, it is VERY IMPORTANT that proper
cleaning techniques
and cleaners be used. Failure to do this on the first cleaning
may result
in water spots, spot rings, or setting of stains or soilage, all of which
make it more difficult to remove in a second cleaning.
The portions of the following cleaning instructions that are in BOLD TYPE are especia11y important and MUST be performed.
Dust and loose dirt that accumulate on interior fabrics should be removed often
with a vacuum cleaner or soft brush. Vinyl or leather trim should be wiped
regularly with a clea:1 damp cloth. Normal trim soilage, spots, or stains can be cleaned with these GM cleaners:
Description
G.M. Spot Lifter 8 oz. (.237L) Solvent Type
G.M. Multi-Purpose Powdered Cleaner
G.M. Part No.
1051398
6
lb. (2.72 Kg) Foam Type 1050429 The above products are excellent cleaners when used property.
They are available through your Authorized dealer.
Remember these basic staps before claaning :
1. Remove stains as quickly as possible before they become "set."
2. Use a clean cloth or sponge, and change to a clean area often. (A SOFT brush
may
be used if stains persist.)
3.
Use solvent type cleaners only in a well ventilated area; also, do not saturate
the stained area.
4-1
Page 64 of 95
Downloaded from www.Manualslib.com manuals search engine On all C-4 cars, a "CHECK ENGINE" light on the instrument panel is
designed to come on during engine starting , to let you know the bulb is working. (The light will stay on a short time after the engine starts.) If the light comes on while driving, service to the emission control system
may be required. See your Chevrolet dealer' as soon as possible for an inspection of the system. Continued driving without having the C-4 System serviced _ could eventually
cause damage
to the emission control system . It could also affect fuel
e conomy and drivabili -ty.
ENGINE OIL AND FILTER RECOMMENDATIONS • Engine oils' are labeled on 'the containers with various API (American
Petroleum Institute) designations 6f quality. Use engine oils that are labeled
5E or SE/CC. Do not use oils labeled only SA, 5B, 5C, SD, CA, CB, CC or CD; _or oils with the combination label SE and CD (SE/CD). Higher
quality oils labeled SF will be introduced soon (late 1979, or 1980). These SF oils are preferred and should be used when available.
• The oil and filter change intervals for your engine are based on the use of SE-quality or SF-quality oils and ,high- quality filters such as AC oil filters. Using oils other than SE-quality or SF-quality oils, or oil change intervals
longer than recommended. could reduce -engine life and might affect your
warranty.
• Your engine was filled with a high·quality engine oil when it was built. You do ,not have to change this oil before the suggested change period.
•
If your normal driving does nQt include one or more of the four "severe service" conditions listed below. change the oil every 7,500 miles (12 000 ' kilometers) or 12 months, whichever comes first. Change the oillilter at the
first oil change. then every second oil change, if mileage (7,500 miles or 12
000. kilom~ters) determines .w ,hen you change the oil. If _time (12 months)
determines when you change the oil, change the filter with every oil change.
• Change the oil and oil filter every 3,000 miles (4 800 kilometers) , or three
months if you often drive under one or more of these 'severe service·,~.
conditions: • Driving in dusty areas
• Towing ,3 trailer
• Frequent idling or idling for long periods
• Driving 4 miles (6 kilometers) br'less in freezing weather,o~other short trips in cold weather, where the engine does not thoTough ,ly warm up.
• Change the oil and oil filter as soon as -possible after driving in a dust
storm.
Oil Viscosity
Engine oil viscosity (thickness) has an effect on fuel economy. Lowec viscosity
engine oils can provide increased , fuel " economy; however, higher temperature
weather conditions require higher viscosity engine oils for satisf~ctory lubrication.
To. get the best fuel economy with your-1980 Chevrolet, -iou should use -,, ' .
fuel. 'saviiJ.&:_engine oil ohhe_ proper viscosity. These oils call_ be found. in serviCe
stations and other retail stores. They are-identified by words such as: "Energy Saving," "Conserves Gasoline," "Gas Saving," "Gasoline Saving," '''Friction
Reducing," "Improved Gasoline Mileage" or "Fuel Saving."
The following chart lists the engine ' oil viscosities recommended for the
temperature range you expect before the next oil change. For lemperalures above ,_18°C (O"F),SAE lOW-30 is -the preferred viscosity grade. Ircold-weather starting
problems
are encountered at temperatures below -lSoC (
5-3
Page 68 of 95
Downloaded from www.Manualslib.com manuals search engine 3. Stop the engine. Open the radiator drain valve to drain the coolant. (Drainage
may be speeded by removing the drain plugs in the block.)
4. Close the drain valve (install block drain plugs, if removed). Add water until
the system is filled and run the engine until the upper radiator hose is hot again.
5. Repeat steps 3 and 4 several times until the drained liquid is nearly colorless.
6. Drain the system and then close the radiator drain valve tightly. (Install block
drain plugs, if removed.)
7. Disconnect all hoses from the coolant recovery tank. Remove the tank and
pour out any fluid. Scrub and clean the inside of the tank with soap and water.
Flush it well with clean water,
then drain it. Reinstall the tank and hoses.
8. Add enough water and ethylene glycol antifreeze (meeting GM Specification
1899-M)to provide the required cooling, freezing, and corrosion protection. Use a solution that is at least 50 percent antifreeze, but no more than 70
percent antifreeze. Fill the radiator to the base of the filler neck and fill the
coolant recovery
tank to the "Full Hot" mark. Put the recovery tank cap back
on.
9. Run the engine, with the radiator cap removed, until the upper radiator hose
is hot.
10. With the engine idling, add coolant to the radiator until it reaches the bottom
of the filler neck. Install the radiator cap, making sure the arrows on the cap line up with the overflow. tube.
It is the owner's responsibility to:
• Maintain cooling system freeze protection at _37°C (_34°F) to ensure
protection against corrosion and loss of coolant from boiling. (A SO/50
mixture of water and ethylene glycol antifreeze will provide freeze protection
to ~ 37°C ore -34°P.) You should do this even if you don't expect freezing
temperatures.
• Add ethylene glycol base antifreeze that meets GM Specification 1899-M
when antifreeze
hasto be added because of coolant loss or for more protection
' against freezing at temperatures lower than _37°C (-·J4°P).
NOTICE: Do not use alcohol or methanol-base antifreeze. or plain water alone. in your vehicle at any time. They will boil at a lower pOint than that at which the hot light indicator (or temperature gage) works. and they do not provide proper protection against corrosion.
Radiator Pressure Cap
The radiator cap, a 105 kPa(15 psi) pressure type, must be installed tightly,
otherwise coolant may be lost and damage to engine may result from overheating.
Radiator pressure caps should be checked periodically for proper operation.
If
replacement is required, an AC cap is recommended.
Thermostat
The engine coolant temperature is controlled by a thermostat. It stops coolant flow
through the radiator until a preset temperature is reached. This thermostat is
installed in
the engine coolant outlet on the engine block. The same thermostat is used in both winter and summer. When a replacement is needed, AC~Delco parts
are recommended.
5-7
Page 70 of 95
Downloaded from www.Manualslib.com manuals search engine CAUTION: If the air cleaner is removed during repair or maintenance, be sure to . put It back on correctly. If the air cleaner is not correctly installed, there could be II fire In the engine compartment (if there should happen to be a backfire), or other engine malfunction.
Power Steering System
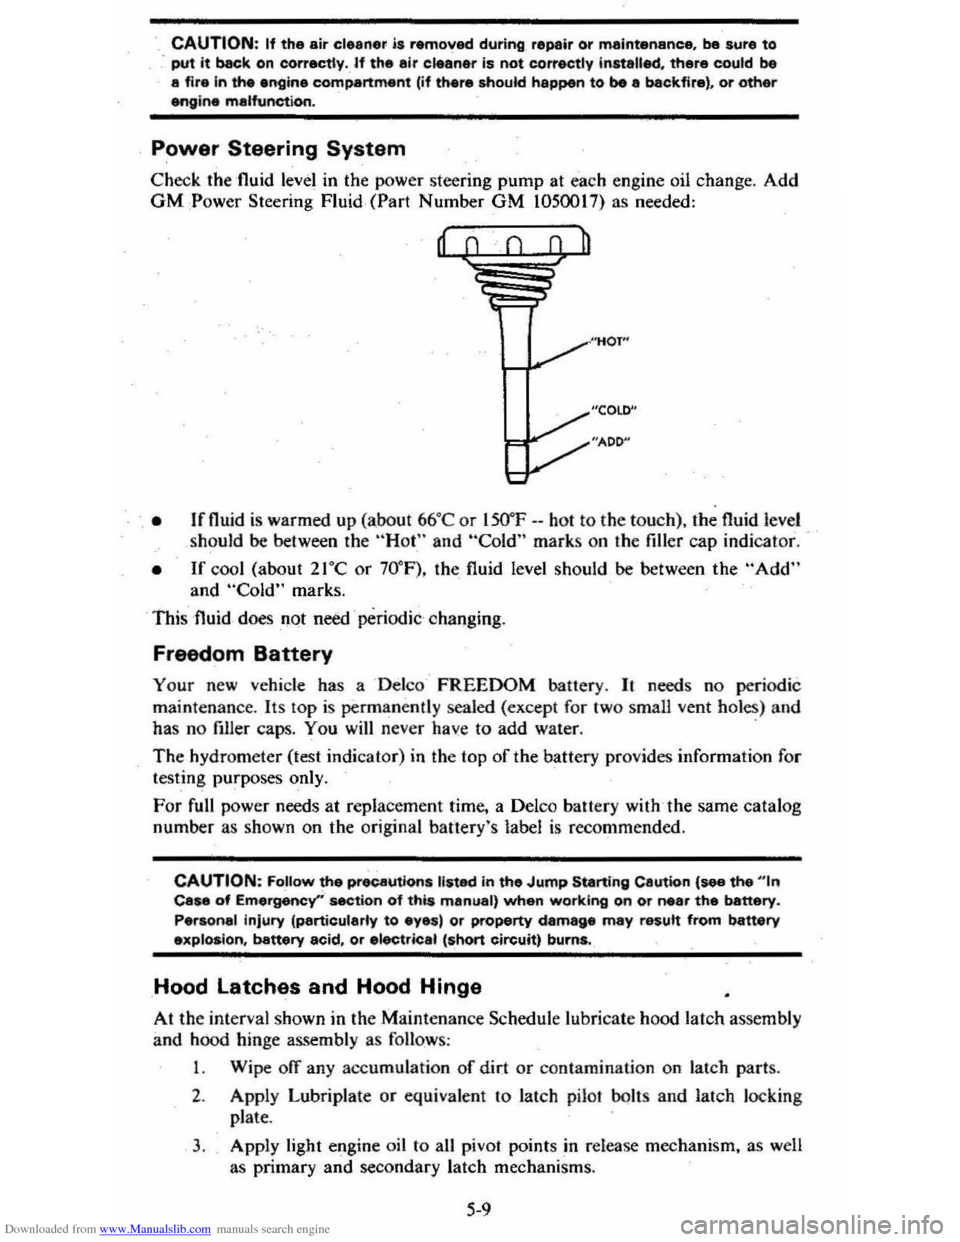
Check the 'fluid level in the power steering pump at each engine oil change. Add GM :Power Steering Fluid, (Part Number GM 1050017) as needed:
, • Ifnuid is warmed up (abo ut 66°C or lSO"F --hot to the to uch), the fluid level
should be between the "Hot" and "Cold" marks on the filler cap indicat or.
• If cool (about 21°C or 70° F), the fluid level should be between the "Add" and "Cold" marks.
This fluid
does not need ' periodic changing.
Freedom Battery
Your new vehicle has a Delco FREEDOM battery. It needs no periodic
maint enance . Its
lOp is permanently sealed (except for two small vent holes) and
has no filler caps. You will never have to add water. .
The hydrometer (test indicat or) in the top of the battery provides information for
testing purposes only.
For full power needs at repla cement time, a Delco battery with ,the same catalog
number as shown on the original banery's label
is recommended.
CAUTION: FoUow the precautions listed in the Jump Starting Cautton {see the "'n Case of Emergency''' section o"f this manual, when working on or near the battery.
Personal injury (particularly to eyes) or property damage may result from battery explosion, battery acid, or electric.1 (short circuit) burns.
Hood latches and Hood Hinge
At the interval shown in the Maintenance Schedule lubricate hood latch assembly
and hood hinge assembly as follows :
1 . Wipe off any accumulation
of dir.t or contamination on latch parts.
2. Apply Lubriplate or equivalent to latch pilaf bolts and latch loc king
plate .
3. Apply light engine oil to all pivot points in release mechanism, as well
as primary
and secondary latch mechanisms.
5-9
Page 84 of 95
Downloaded from www.Manualslib.com manuals search engine TIRE INFORMATION
Wheel Nut Torque ................. 140 N'm (100 ft. Ibs.)
Complete
tire information will be found in Section 5.
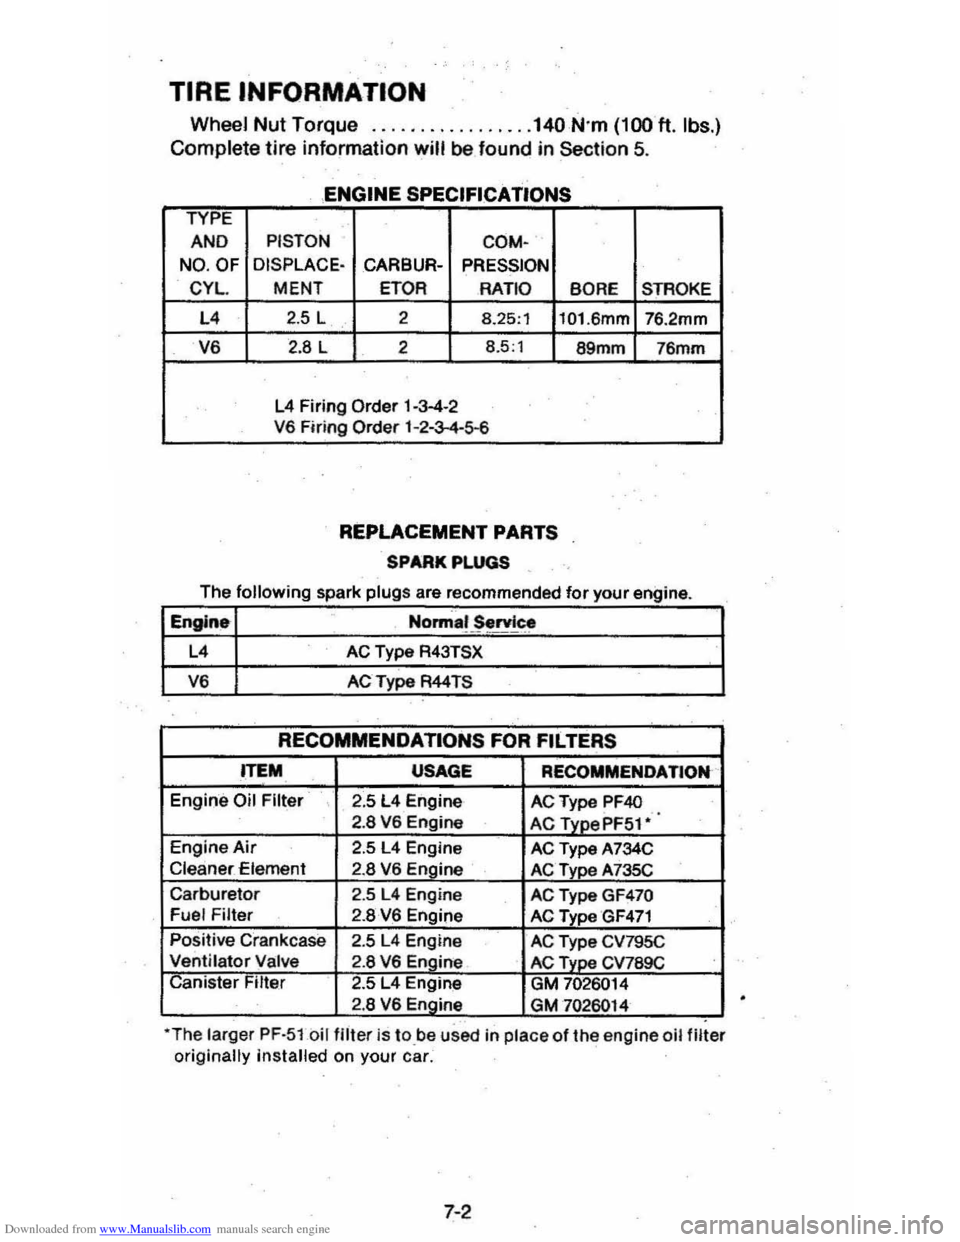
ENGINE SPECIFICATIONS
TYPE
AND PISTON
COM-
NO . OF DISPLACE·
CARBUR-PRESSION
CYL.
MENT ETOR RATIO
BORE STROKE
L4 2.5 L 2 8.25,1
101.6mm 76.2mm
V6 2.8 L 2 8.5'1 89mm 76mm
L4 Firing Order 1-3-4-2
V6 Firing Order 1-2-3-4-5-6
REPLACEMENT PARTS
SPARK PLUGS
The following spark plugs are recommended for your eng'ine
Englne Norma~ ~rvlc.~
L4 AC Type R43TSX
V6 AC Type R44TS
RECOMMENDATIONS FOR FILTERS
ITEM USAGE RECOMMENDATION
Engin'e Oil Filter 2.5 L4 Engine ACType PF40 2.8 V6 Engine AC TYDePF51·
Engine Air 2.5 L4 Engine AC Type A734C Cleaner -Element 2.8 V6 Engine AC Type A735C
Carburetor 2.5 L4 Engine AC Type GF470 Fuel Filter 2.8 V6 Engine AC Type GF471
Positive Crankcase 2.5 L4 Engine AC Type CV795C Ventilator Valve 2.8 V6 Engine AC Type CV789C Canister Filte.r 2.5 L4 Engine GM 7026014 2.8 V6 Engine GM 7026014
I
*The larger PF·5lbil filter is tO,be used in place of the engine oil filter originally installed on your car.
7-2