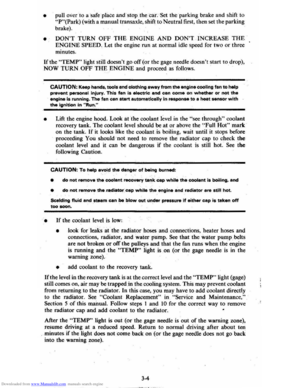
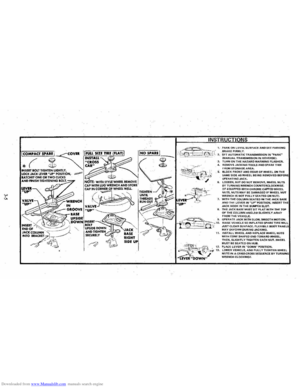
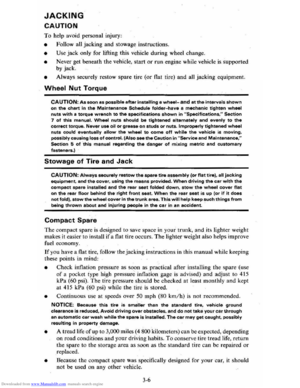
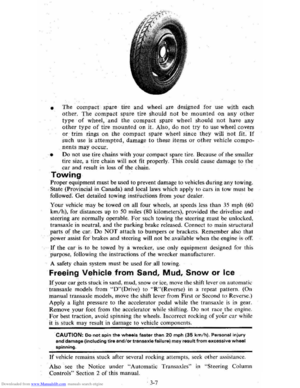
Page 1 of 95
Downloaded from www.Manualslib.com manuals search engine 1980
CHEVROLET
OWNER'S MANUAL
Contains Important Operating,
Safety and Maintenance Instructions.
Keep with car at all times.
Page 2 of 95
Downloaded from www.Manualslib.com manuals search engine file:///C|/Documents%20and%20Settings/Tim/Desktop/carburetor-manual-welc\
ome/index.htm[4/25/2009 11:42:20 AM]
www.carburetor-manual.com
Would you like some Free Manuals?
http://carburetor-manual.com/free-shop-manual-club-t-13.html
Also visit http://freeshopmanual.com for more Free Manuals
Also Visit my website for 7 FREE Download Manuals starting
with this one.
"The ABC's of Carburetion"
Click Here Now
Page 3 of 95

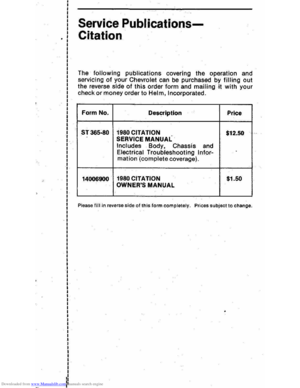
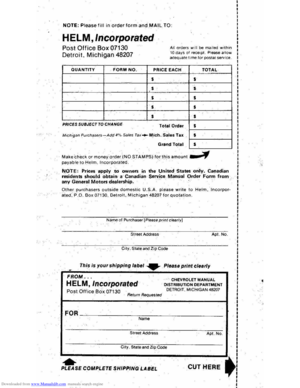
Downloaded from www.Manualslib.com manuals search engine A WORD TO CITATION OWNERS
:;':'.'1'.;.-:,-, 32 ~ This manual has beet} prepared to acquaint vou-:withtheoperation and maintenance of your 1980 Citation, and to provide importa~t~afeJY infc?rmation. It is supplemented by a Maintenance Schedule and a Warranty Information folder. We urge you to read these three publications carefully. Follow the recommendations to help assure the most enjoyable, safe and troublefree operation of your vehicle.
While reading this manual, you will notice that specifications are given in both metric and customary measures. Where precise accuracy is not needed, some conversions
have been rounded to even numbers for your handy use.
When it comes to service, remember that your Chevrolet dealer knows your vehicle
best and is interested in your complete satisfaction.
Be
sure to discuss the GM Continuou's'Protection Plan with your dealer, if you haven't already done so. The Plan is an optional service contract which goes beyond the New Vehicle Limited Warranty and gives you added mechanical and electrical protection for a total of 36 months or 36,000 miles (60 000 kilometers in Canada), whichever comes first. In the U.S., the Plan is also available at extra cost for a total of 36 months or 50,000 miles, whichever comes first See your dealer for the full details. The Plan is available for up to 60 days after you take delivery of your new vehicle.
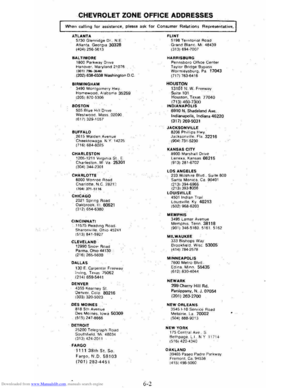
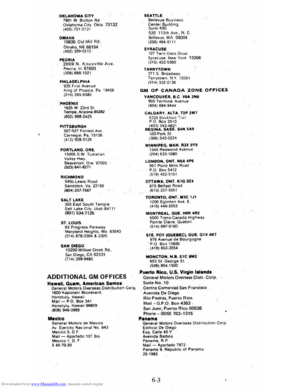
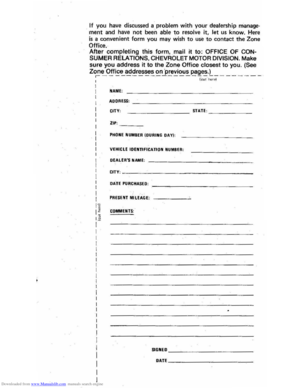
To help dealers handle your needs, Chevrolet has a number of Zone Offices throughout the country. If you have a problem that has not been handled to your satisfaction, follow the steps in "Owner Assistance," Section 6 of this manual.
We thank you for choosing a Chevrolet product, and want to assure you of our continuing interest in your motoring pleasure and satisfaction.
CHEVROLET MOTOR DIVISION
FOR CONTINUING SATISFACTION,
KEEP YOUR GM CAR ALL GM.
GENERAL
MOTORS PARTS ARE IDENTIFIED BY ONE OF THESE TRADEMARKS:
NOTE TO CANADIAN OWNERS:
If preferred, a French Owner's Manual can be obtained either from your Dealer or by writing to General Motors of Canada Limited, Technical Publications Department, Oshawa, Ontario L1J 5Z6.
Aux propriehaires canadiens
On peut se procurer un exemplaire de ce guide en francais aupres du concessionnaire ou du service des publications techniques, General Motors of Canada Limited, Oshawa, Ontario L 1J 5Z6.
Page 4 of 95

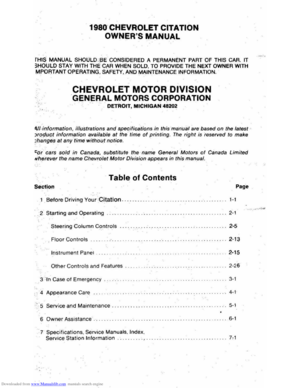
Downloaded from www.Manualslib.com manuals search engine 1980 CHEVROLET CITATION
OWNER'S
MANUAL
rHIS "lANUAL SHOULDSE CONSIDERED A PERMANENT PART OF THIS CAR. IT 3HOULD STAY WITH THE CAR WHEN SOLD. TO PROVIDE THE NEXT OWNER WITH "lPORTANT OPERATING. SAFETY. AND MAINTENANCE INFORMATION.
CHEVROLET MOTOR DIVISION
GENERAL MOTORS CORPORATION
DETROIT, MICHIGAN 48202
4lrinformatlon, illustrations and specifications in thisma'n 'ual are ' based on the latest t. )roduct information available at the time of printing. The right is rese rved to make ~hanges at any time without notice.
Co" cars sold in Canada , substitute the name General Motors of Canada Limited ",herever the name Chevro-'et Motor D;vision appears in this manual.
Table of Contents
Section
.1 Before Driving Your · Citation .... . ,-,
-__ 2 Starting and Operating .. . ..... 2-'
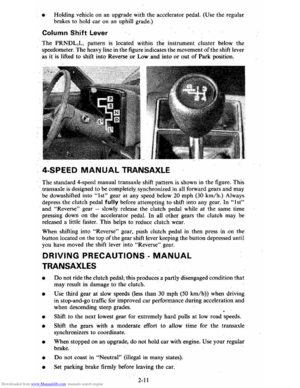
Steering Column Contr~!s 2-5
.
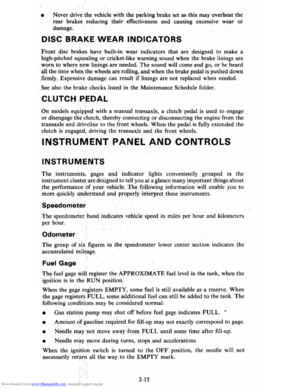
Floor Controls .. 2-13
Instrument Panel 2-15
Other Controls and Features . 2-26
3--'ln Case of Emergency . 3-1
4 Appearance Care .. ..... 4-'
:' 5 Service and Maintenance 5-'
6 Owner Assistance. 6-1
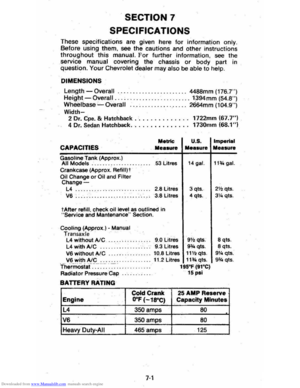
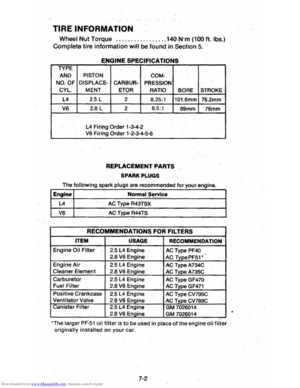
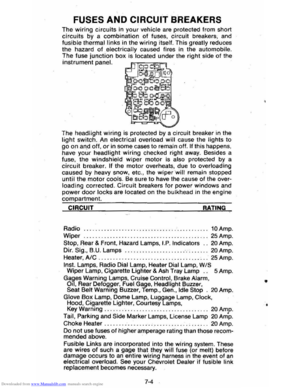
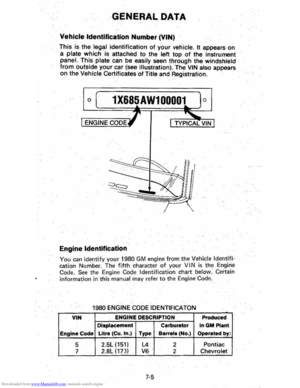
7 Specifications, service Manuals , Ind ex, Service Station Information .... ". _ .... , ................... 7~ 1
Page 5 of 95

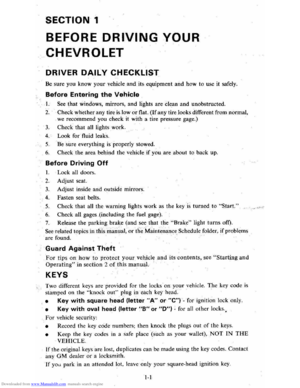
Downloaded from www.Manualslib.com manuals search engine SECTION 1
BEFORE DRIVING YOUR
CHEVROLET
DRIVER DAILY CHECKLIST
Be sure you know your vehicle and its, equipment and how to use it safely.
Before Entering the Vehicle
1. See that windows, mirrors, and lights are clean and unobstructed.
2. Check whether any tire is low or flat. (If any tire looks different from nonnal,
we recommend you check
it with a tire pressure gage.)
3. Check that all lights work.
4. Look for fluid leaks.
5. Be sure everything is properly stowed.
6. Check the area behind the vehicle if you are about to back up.
Before Driving Off
1. Lock all doors.
2. Adjust seat.
3. Adjust inside and outside mirrors.
4. Fasten seat belts.
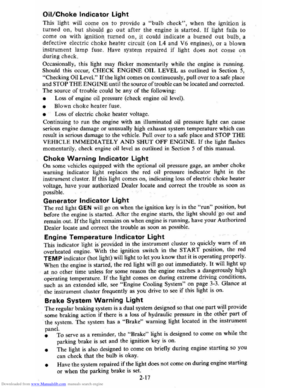
5. Check that all the warning lights work as the key is turned to "'Start."
6. Check all gages (including the fuel gage).
7. Release the parking brake (and see that the "Brake" light turns om.
Seerelated topics in this manual, or the Maintenance Schedule folder, if problems
are found.
Guard Against Theft
For tips on how to protect your vehicle and its contents, see "Starting and
Operating" in section 2 of this manuaL
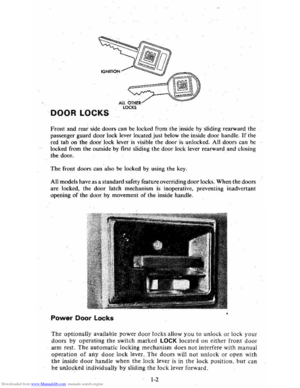
KEYS
Two different keys are· provided for the locks on your vehicle. The key code is
stamped on the "knock out" plug in each key head.
• Key with square head (letter "A" or "e") -for ignition lock only.
• Key with oval head (letter "8" or "0") ~ for all other locks.,
For vehicle security:
• Record the key code numbers; then knock the plugs out of the keys.
• Keep the key codes in a safe place (such as your wallet), NOT IN THE
VEHICLE.
If the original keys are lost, duplicates can
be made using the key codes. Contact
any
OM dealer or a locksmith.
If yO~i park in an attended lot, leave only your square-head ignition key.
1-1
Page 6 of 95

Downloaded from www.Manualslib.com manuals search engine DOOR LOCKS
ALL OTHER LOCKS
Front and rear side doors can be lock ed from the inside by sliding rearward the
passenger guard
door lock. lever located just below the ins ide door handle . If the
red tab on the door loc k lever is visible the doo r is unlocked . All doors can be
lock ed from the outsid e by
fir st sliding the door lock lever rearw ard and closin g
the d oo L
The front doors can also be loc ked by using the key .
All models have as a stan
dard sa fety fe ature overriding doo r locks. When the doors
are loc ked, the door latch mechani sm is inoperative, preventing inadvertant
opening of th e door by movem ent of the inside handle.
Power Door Locks
The optionally available power door locks aH ow yo u to unloc k or lock your doors by o perating the sw itch marked LOCK loca ted on either front door
arm rest. The automatic locking mechanism does not interfe re with manual
operation of any door lock lever. The doors will not unlock or open with
the in sid e door h andle wh en the loc-k lev er is in the lo ck posi tion. but can
be unlocked individually by sliding the lock levl!r forward.
1-2
Page 7 of 95

Downloaded from www.Manualslib.com manuals search engine CAUTION: For safety's s~ke, always lock the doors and any hatchback when driving. Along with using the seat belts properly, locking the doors, etc. helps prevent occupants from being thrown from the vehicl~ during accidents. It also helps prevent unintended opening of the doors and helps keep out intruders when stopped.
STOWING THINGS IN (OR ON) THE CAR
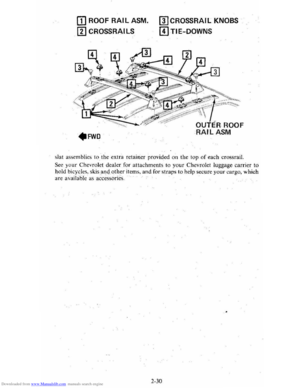
CAUTION: luggage or other cargo should not be piled higher than the seatbacks. When at all possible. luggage or cargo should be carried in the trunk area. The filler panel or cargo cover, betWeen the rear seatback and the rear window should not be used to carry objects-.even those that are small and light. All items should be secured in place. This will help keep such things from being thrown about and iniurying people in the car during an accident. Cargo weight. whether inside or on the roof, should be positioned as evenly as possible from front to rear.
INSIDE REARVIEW MIRROR
The mirror can be adjusted up, down, or sideways to obtain the best view to the
front
and rear. Move the optional mirror lever to the night position to reduce glare
from headlights of vehicles behind you.
OUTSIDE REARVIEW MIRROR
Adjust the outside mirror so you can just see the side of your vehicle in the portion of the mirror closest to the vehicle; This helps you determine your relation to
objects seen
in the mirror.
CONVEX MIRROR
Your vehicle may have an optional convex outside rearview mirror. (A convex
mirror has a curved surface.) Adjust the convex mirror so you can
just see the
side of your vehicle in the portion of the mirror closest to the vehicle. This type
of mirror is designed to give a much wider view to the rear, and especially of the
lane next to your vehicle. This
may· be most helpful when you want to change
lanes, or in some cases when you want to back up. However, cars and other objects
seen in a convex mirror
willLOOK smaller and farther away than when seen in
a flat mirror. Therefore, use care when Judging the size or distance of a car or
object seen in this convex
.. mirror. Use your inside mirror. (or ·glance .rearward)
to determine the size and distance of objects seen in the convex mirror.
1-3
Page 8 of 95

Downloaded from www.Manualslib.com manuals search engine SEAT CONTROLS
ADJUSTMENT OF SEAT POSITION
Manually Operated Front Seats
The front seats may be adjusted forward or rearward by moving the control lever
at the front of the seat and exerting slight body pressure in the direction desired.
The seat
is locked in position when the lever is released.
After adjusting a manually operated seat. push forward and rearwardon the scal
to be sure the seat adjusters have latched. Take the vehicle 10 Y(lur dealer for
service if you find that either seat adjuster does IIi)! lakh.
NOTICE: Do not adjust a manually operated driver's seat while the car is moving. The seat could move suddenly and unexpectedly and could cause the driver to lose control of thecaf.
Bucket Seats , The front seats may be adjusted forward or rearward by moving the control lever at the front of the seat. Move the control lever to release the locking mechanism;
then exert slight body pressure to. move seat to desired position. Release lever to lock seat into position.
After adjusting a manually operated seat. push forward and rearward Oil the scat to be sure the seat adjusters have latched. Take the vehicle to your dealer fo!
service if you find that either seat adjuster docs not latch.
NOTICE: Do not adjust a manually operated driver's seat while the car is moving. The seat could move suddenly and unexpectedly and could cause the driver to lose control of the car.
MULTI-POSITION RECLINING SEAT The optional reclining seat back can be tilted forward or rearward of the
normal position by first pushing on the seatback. then lifting the control
lever O!l the outer side of the seat. Release the lever to lock the seat back
in place.
To return the seatback to an upright position. push rearward slightly on
the seatback, then move the control lever. Release the seatba.:k to allow
it to move forward. If you do not first push on the seat back before moving
the lever, the seat back may jam. To release it. you must push firmly rear
ward on the seat back before moving the lever, then move the control lever.
CAUTION: For the optional reclining seat. to reduce the risk of sliding under the belt during an accident, do not recline any more than needed for comfort while the vehicle is moving. The seats and seat belts provide best restraint only when the rider is Sitting up straight and well back in the seat and, General .Motors urges that people riding in the vahicle be properly restrained at all times. In the event of a
1-4


![CHEVROLET CITATION 1980 1.G Owners Manual Downloaded from www.Manualslib.com manuals search engine file:///C|/Documents%20and%20Settings/Tim/Desktop/carburetor-manual-welc\
ome/index.htm[4/25/2009 11:42:20 AM]
www.carburetor-manual.com
Would](/manual-img/24/8083/w960_8083-1.png "CHEVROLET CITATION 1980 1.G Owners Manual Downloaded from www.Manualslib.com manuals search engine file:///C|/Documents%20and%20Settings/Tim/Desktop/carburetor-manual-welc\
ome/index.htm[4/25/2009 11:42:20 AM]
www.carburetor-manual.com
Would")