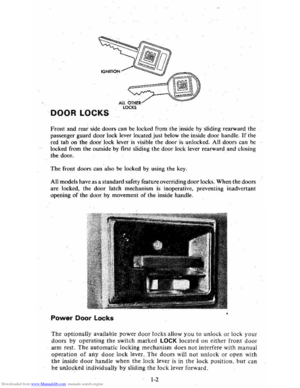
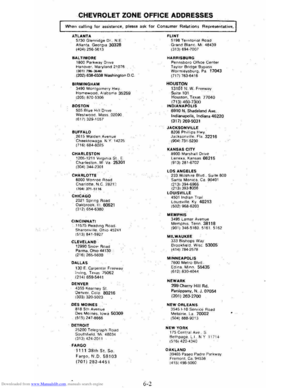
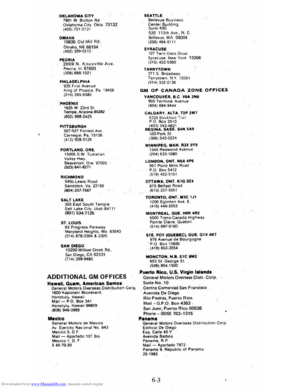
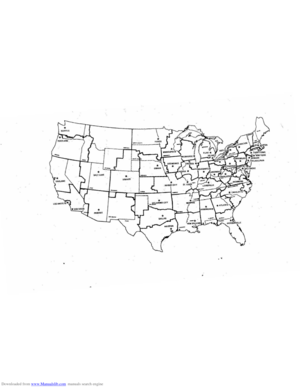
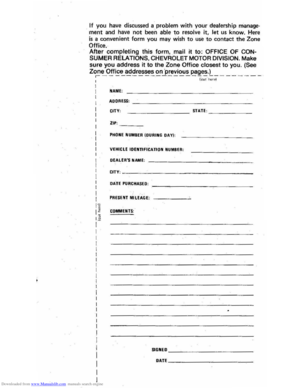
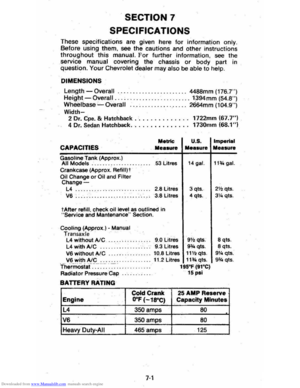
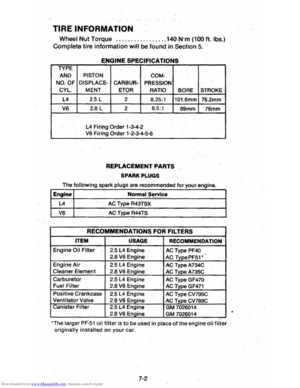
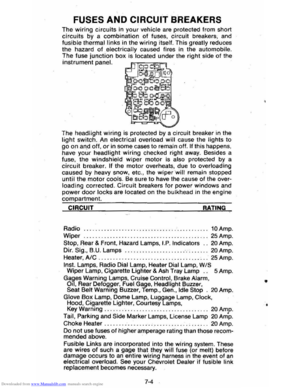
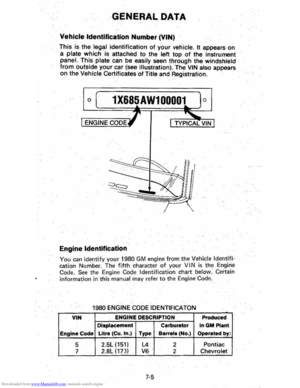
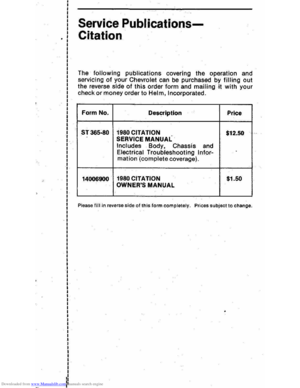
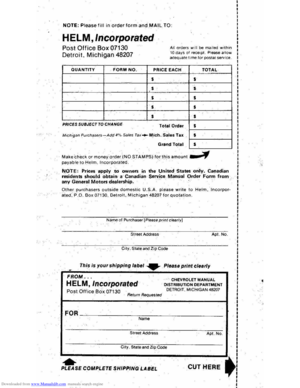
Page 9 of 95

Downloaded from www.Manualslib.com manuals search engine frontal collision, the chance and/or severity of injury may increase with increasing
recline of the saatbeck. The -lap belt is d .. ignad to spread the force of a collision over the strong hlp bone instead of across the abdomen. However, if the hips are
reclined, the lap bett may slide past the hips and ilpply restraint forceS directly to the abdominal region.
Front Seatback Latches
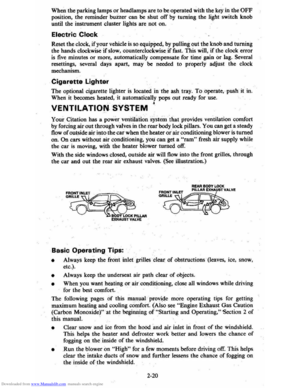
Vehicles with folding front seats have inertial seatback latches. The latches are
designed to prevent forward movement of the front seatback only during a sudden
slowing
of the vehicle. Normally, the seatback can be tilted forward without
unlatching, to get in
or out of the rear seat. But when the vehicle is ""nose down"
such as on a very steep hill, the inertial latch may keep the seat back from being
moved forward. If this happens, there is a latch release lever at the bottom, in
the center rear
of each front seatback. pun rearward slightly on the seat back while
pulling up on the seatback latch release lever .. This will release the latch and alJow
the seat back to be moved forward.
The latch release lever must.
be in the "down" position for the inertial latch to
work properly during a sudden slowing of the vehicle. Checkrtow and then to
see
if each seatback latch release lever moves up and down freely. If the lever does
not move freely, take the vehicle to your dealer for service. There is no convenient
owner test of the inertial seatback latch.
If you suspect the latch is not working,
ask the dealer to inspect
it.
Keep seat belt webbing and hardware clear of seat parts when you tilt folding seats
forward or rearward. This helps prevent damage to these belt systems.
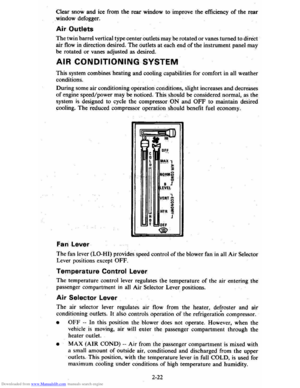
Manual Window Controls
Crank type handles located in the door panels anow the side windows to be
manually raised or lowered.
Power Windows (Optional)
Power windows have an ignition interlock so the windows cannot be operated
unless the ignition switch is in the "run" position.
A master control for all windows
is provided at the driver's position. Individual
switches are provided under each window for passenger use.
1-5
Page 10 of 95

Downloaded from www.Manualslib.com manuals search engine SEAT BELTS
1'0 help lessen the chalice of injury and/or the severity of injury in accidents or
sudden,'stops, General Motors urges that people riding in the-car be properly
restrained at aU times" using the seat belts provided. This includes women who
are pregnant, and children of all ages. (See the following pages for· the use of
restraints by children and pregnant women). General Motors provides a seat belt
at each position designed for occupant seating. Thus the front seat of this vehicle
is equipped
with seat belts for two occupants, and the rear seat for three occupants.
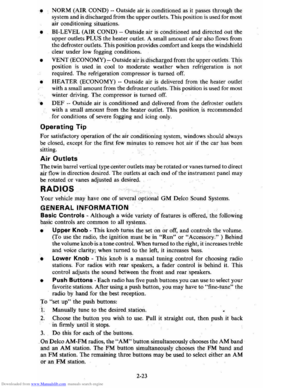
Front S",at Lap-Shoulder Belt
• Close the front door fully (this activates the tension reliever).
• Adjust the front seat as needed and sit up straight and well back in the seat.
• There are a number of ways the lap-shoulder belt may be put on easily. For example ...
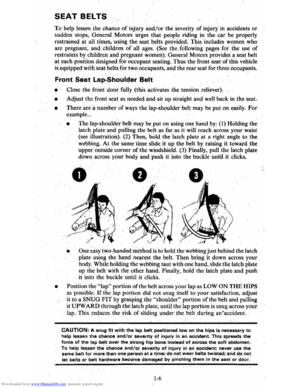
• The lap-shoulder belt may be put on using one hand by: (1) Holding the
latch plate and pulling the belt as far as it will reach across your waist
(see illustration). (2) Then, hold the latch plate
at a right angle to the
webbing.
At the sametimesJide itup the belt by raising it toward the
upper outside corner
of the windshield. (3) Finally, pull the latch plate
down across your body and push it into the buckle until it clicks.
o
• One easy two-handed tm:thod is to hold the webbing just behind the latch
plate using the hand nearest the belt. Then bring it down across your
body. While holding the webbing taut with one hand, slide the latch plate
up the
belt with the other hand. Finally, hold the latch plate and push
it into the buckle until it clicks.
• Position the "lap" portion of the belt across your lap as LOW ON THE HIPS as possible. If the lap portion did not snug itself to your satisfaction, adjust
it
to a SNUG FIT by grasping the "shoulder" portion of the belt and pulling
it UPWARD through the latch plate, until the lap portion is snug across your
lap. This reduces the
risk of sliding under the belt during an·accident.
CAUTION: A snug fit with the lap beilt positioned low on the hips is necessary to help lessen the chance and/or saverity of injury in an accident. This spreads the force of the lap belt over the strong hip bone instead of across the soft: abdomen. To help lessen the chance and/or severity of injury in an accident never use the same belt for more than one person at 8 time; do not wear belts twisted; and do not let belts or belt hardware become damaged by pinching them in the seat or door.
1-6
Page 11 of 95

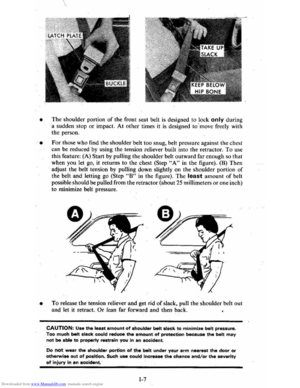
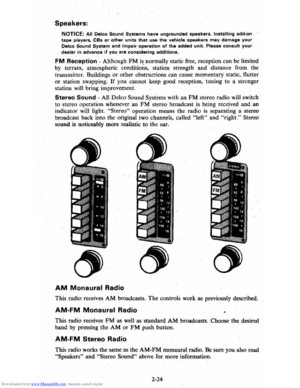
Downloaded from www.Manualslib.com manuals search engine • The shoulder portion of the front seat belt is design ed to lock only durin g
a sudden stop or impact. At othe r times it is designed to'move freely with
the person,
•
F or those who find the. should er belt too snug, belt pressure against the chest
can be reduced by using the tension reliever built into the ret rac tor , To use
this feature: (A) Start by pulling the s houlder belt outward far enough so that
when you let go, it returns to the chest
(Step "A" in the figure). (B) Then
adj ust the belt tension by pulling down slightly on the shou lder portion of
the belt and letting go (Step "B" in the figure), The least amount of belt
pos
sible should be pulled from the retractor (about 25 millimeters or one inch )
to minimize belt pressure ,
•
To release the tension reliever and get rid of slack, puB the shoulder belt out
and let it retract. Or lean far forward and then back.
CAUTION: Us. the least amount of shoulder belt slack to minimize belt pressure . Too much bett slack could reduce the emount of protection because the bett may not be able to property restnlin you in an accident.
00 not wur the shoulder portion of the Mit under your .rm nurest the door or otherwl .. out,of position. Such u .. could incr .... the chance and/or the severity of injury In an accident.
1-7
Page 12 of 95

Downloaded from www.Manualslib.com manuals search engine • To unfasten the belt,. push in the button in the center of the buckle.
• To stow the belt, pull it out about 150 millimeters (six incbt::s) and let go.
Hold the latch plate as it retracts to keep it from possibly striking people or things nearby. If you forget, the-retractor is designed to rewind the_belt when
the front door
is opened. If needed, slide the latch plate down the webbing
to let the belt retract fully. Be sure that the belt is fully retracted and the
latch plate is out of the way before closing the door to help prevent damage
to interior trim and the seat belt assembly.
Restreint Of Pregnant Women
General Motors urges that-pregnant women lise a lap-shoulder belt whenever one
is present. This will help lessen the chance of a pregnant woman and her unborn
child being injured
and/or will help reduce the severitYClf their injury in an
accident. The lap belt should be used alone if a shoulder belt is not present. In
either case, the lap belt should be worn as low and snug over the hips as possible,
as advised for regular seat belt
·use (see the preceding instructions).
Seat Belt Light/Buzzer Reminder
• When the key is turned to "Run" or "Start," a reminder light is designed
to come on for four to eight seconds.
It is to remind riders to fasten their
seat belts.
• .If the driver's seat belt has not been buckled before turning the key to "Run" or "Start," a buzzer is designed to sound for four to eight seconds (or until
buckled) as a reminder.
If the seat belt or reminder system does not work as de~cribed. see your dealer
for service.
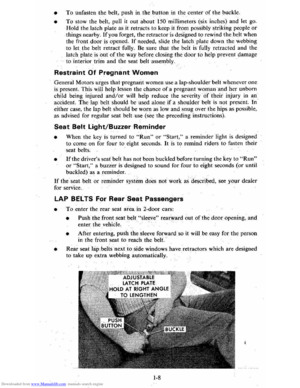
LAP BELTS For Rear Seat Passengers
• To enter the rear seat area in 2-door cars:
• Pushthe front seat belt "sleeve " rearward out of the door opening, and
enter the vehicle.
• After entering, push the sleeve forward so it wiil be easy for the person
in the front seat to reach the belt.-
• Rear seat lap belts next to side windows have retractors which are designed
to take up extra webbing automatically.
1-8
Page 13 of 95

Downloaded from www.Manualslib.com manuals search engine • In a single motion, pull the rear seat outboard lap belt across your lap far
enough to-push the latch plate into the buckle. un Iii it clicks._ If the belt is
not pulled out far enough to rcadi the-buckle, let the lap bell rewind fully
into its retractor. This unlocks
it so the belt can be puBed .out to the proper length .
• These belts should be positioned, worn, and released as described above under "Front Seat Lap~ShouJder Belt." After fastening, check that the belt is SNUG by pulling the belt firmly across', your lap toward the Jap belt retractor. This
will allow the retractor to take up slack.
• The lap belt at the center seat also should be positioned, worn, and relea sed
as described above-however , it does not have a retractor. It should be
adju sted 10 a SNUG FIT by pulling on the end of the belt coming from the
adju stable latch plate .
• To lengthen the center seat lap belt. place the latch plate at a right angle to
the belt webbing and pull on the latch plate. The belt should then slide easily.
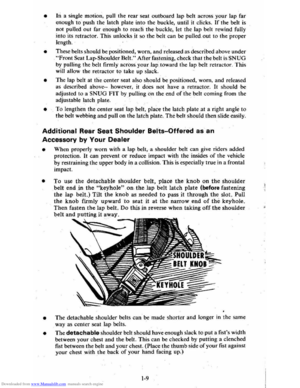
Additional Rear Seat Shoulder Belts-Offerad as an
Accessory by Your Dealer
• When properly worn with a lap beh,--a -shoulder belt can give riders added
protection . II can prevent or reduce impact with the insides of the vehicle
'by restraining the upper body in a collision. This is especially true in a frontal
impact.
• To use the detachable shoulder belt. place the' knob on the shoulder belt end.in the "keyhole"on.the lap belt latch plate (before fastening
the lap belt.) Tilt the knob as needed
to pass it through the slot. Pull
the knob firmly upward to seat it at the narrow end of the keyhole. Then fasten the lap belt. Do this in reverse when taking off-the shoulder
belt and putting it away.
• The detachable shoulder belts can be made shorter and longer in the same
way as center seat lap belts .
• The detachable shoulder belt should have enough slack to put a fist's width
between your chest and the belt. This can be checked by putting a clenched
fist between the belt and your chest. (Place the thumb side of your fist against
your chest with the back of your hand facing up.)
1-9
Page 14 of 95

Downloaded from www.Manualslib.com manuals search engine CAUTION: Use the least amount of shoulder belt slack to minimize belt pressure. Too much belt slack could reduce the amount of protection because the belt may not be able to· properly restrain you in an accident.
Do not wear the shoulder belt under your arm nearest the door or otherwise out of position. Such use could increase the chance and/or the severity of injury in an accident.
Seat Belt Inspection
• Now and then check that belts. buckles, :latch plates, retractors,reminder systems , and guide loops work properly. Also check for loose parts or damage
that could keep the restraint system from doing its job.
• Keep sharp edges and damaging objects away from the belts and other parts of the restraint system.
• Do not put anything into the opening where the seat belt webbing
passes through the trim panel. This may jam the· retractor and/or damage the belt.
• Replace belts if they are cut, weakened, or frayed. Also have belts· replaced if they have been worn ina collision.
• If there is any' question; have parts replaced.
• Keep belts dean and dry.
• Clean only with mild soap and lukewarm water.
• Do not bleach or dye _belts sinCe this may greatly weaken them.
Child Restraint
Children in cars should be restrained to help lessen the chance and/or severity of injury in accidents·· or sudden stops. General Motors dealers offer restraint
systems designed by
GMfor use with infants and small children. For babies up
to 9
kilograms (20 pounds), General Motors recommends use of the GM "Infant
Love Seat." For children weighing 9 to 18 kilograms (20 to 40 pounds), up to 1
meter(3 feet-4 inches) in height, and who are able to sit up alone, General Motors
recommends use of the GM "Child Love Seat ...
In using
any infant or child restraint system, be sure to read and follow all
instructions on installation
and uSe that come with the restraint system.
If a child is riding in the car without a General Motors (or other) infant or child
restraint system, take care as foHows: 1-10
Page 15 of 95

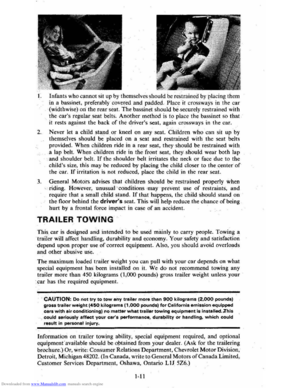
Downloaded from www.Manualslib.com manuals search engine L Infants who cannot sit up by themselves should be restr~ined b y placing them
in a bassinet, preferably cove~ed and padded .- Pl ace il crossways in the car
(widthwise) on-the rear seat.
The bassi net should bi!.secure ly restrained with
the car's reg ular seat belt
s. Another method is to pla ce the bassinet so that
it rests aga,inst the back of the driver's seat, again crossways in the car.
2. Never let a child sta~d or kneel on any seat. Children who can sit up by
them selves should be placed on a seat and restrained with the seat belts
provided. When children ride in a rear se:at, they should be restrained with
a lap
belt. When children ride in the fronf seat, they . ,should wear both lap
and
shou'lder belt. If the shoulder bell irritates the neck or face due to th e
child's size, this may be reduced by placing the child closer to the center of the car. If irritation is not red uced, place the child in the rear seat.
3. General Motors advises that children should be restr ained properly when
riding . However, unusual'~conditions 'may prevent use of restraints, and
requir e that a small child,
sland. If that happens, the c hild should stand on
the floo r behind the driver's seat. This will help reduce the chance of being
hurt
by a frontal force impact in case of an accident.
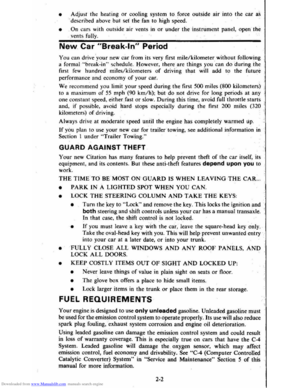
TRAILER TOWING
This car is designed and intended to be used mainly to car ry people. Towing a
trailer will affect handling, durability and economy_ Your'"safcty and satisfaction
depend upon,proper use
of correct equipment. Also. you should avoid overloads
and other abusive use.
The maximum loaded trailer weight you can pull with your car depends
on what special equipment has-been inst alled o n it. We do-n o t recommend towing any
trailer more than 450
kilograms (1,000 pounds) -gross trailer weight unless your
'car ha s .he required equipment.
CAUTION: Do not try to tow any trailer more than 900 kilograms (2.000 pounds)
gross trailer weight (450 kilograms (' .000 pounds) for California emission equipped
cars with air conditioning) no matter what trailer towing equipment is installed. ;This ,could .eriously affect your car'S performance. durability or handling. which could
result in personel injury.
Infonnati on on trailer towing ability, special equipment requir ed, and optional
equipm e
nfavailable should be o~lained from your dea ler . (Ask for the trailering
brochur e.)
Or, write: Consumer Relat ions Department , Chevrolet Motor Division ,
Detroit , Mi chigan
48202. (In Canada, write to General Motors of Canada Limited .
Custom
er Services Department, Oshawa. Ontario LlJ 5Z6.)
Page 16 of 95

Downloaded from www.Manualslib.com manuals search engine Tir,s
When lowing trailers using a dead-weight hitch, inflate tires to the "Cold Tire
Pressure" for ·'Max . Load" show n on the Tire Placard on the left front door.
The allowable passenger and cargo load for this car,
also sh o wn on· the Tire
Placard, is reduced by the trailer tongue weight whenever the trailer is attached
t o the car.
Maintenance
More frequen.t servic e is requi red when using your car to pull a trailer. See Section
A of the Maint enance Schedule folder for Tran saxle Fluid and Engine Oil chang e
requirement~ for traitering.
Now and then. check that all trailer hitch bolts an d nuts are tight. Also see
"the Maintenance Schedule rol_def, and the Index in this manual , for important facts
o n
belts, coo ling system care and brake adjustment.
Break-In Schedule
See the new car break~in instru ctions in this manual. Also,. we recommend you
drive your new car for
500 mil es (800 kilometer s) before trailer tOwing. At the
" end
of this 500 mile (800 kilome te r) break-in period, avoid speeds over 50 mph (80 km/h) and full throttl e start s during the first 500 miles (800 kilometers) of
trailer towing.
If a new engine or transaxle is ins talled in you r car, observe the
same
care.
CAUTIONS:
Brakes -To help avoid personal injury due to poor braking action:
• Trailer brakes of adequate size are required on trailer s over 450 kilograms
(1,000 pounds) loaded weight.
• If you use trailer brakes with this car, follow the installation and balan ce
instructi ons
of the trailer brake maker.
• Do nol lap into the car's brake system if the trailer brake system uses more than 0.3 cubic centimeter (0.02 cubic inch) of nuid from the ca r's master
cylinder. In this case, the car's brake fluid capacity will not be enough to
operate
both the car and trailer brakes under all kind s, of use.
• All brak e fluid parts must be able to stand 20 685 kPa (3,000 psi). The brake
fluid tap must be made al th e upper rear master cylinder port. Copper tubing is subject to fatigue failure and must no t be used.
• Before going down a sleep or long grade , reduce speed and shift the tran saxle
into a lower gear to control your car's speed.
Try not to hold the brake pedal
down too long or too often. This could cause the brake s to get hot and not
work
as well.
Hitches -To help avoid personal injury due to sway caused by such things as
c rosswind
s, big trucks passing or road roughn ess, or due to sepa ration of the
trailer :
• Keep the trailer tongue load at 10% of the loaded trailer weight for
dead-w eight hitches. Tongue loads can be adjusted by proper distribution of the load in the trailer. This can be checked by weighing separately the loaded
trailer and then the tongue,
• When you remove a frailer hitch, be sure to seal any mountin g h'oles in the
body . This will help prevent entry of exhaust fumes, dirt or water. (See
"Engine Exhaust Gas Caution (Carbon Monoxide) " at the beginning of "Starting and Operating," Section 2 of this manual.)
1-12