1980 CHEVROLET CITATION trunk
[x] Cancel search: trunkPage 7 of 95
Downloaded from www.Manualslib.com manuals search engine CAUTION: For safety's s~ke, always lock the doors and any hatchback when driving. Along with using the seat belts properly, locking the doors, etc. helps prevent occupants from being thrown from the vehicl~ during accidents. It also helps prevent unintended opening of the doors and helps keep out intruders when stopped.
STOWING THINGS IN (OR ON) THE CAR
CAUTION: luggage or other cargo should not be piled higher than the seatbacks. When at all possible. luggage or cargo should be carried in the trunk area. The filler panel or cargo cover, betWeen the rear seatback and the rear window should not be used to carry objects-.even those that are small and light. All items should be secured in place. This will help keep such things from being thrown about and iniurying people in the car during an accident. Cargo weight. whether inside or on the roof, should be positioned as evenly as possible from front to rear.
INSIDE REARVIEW MIRROR
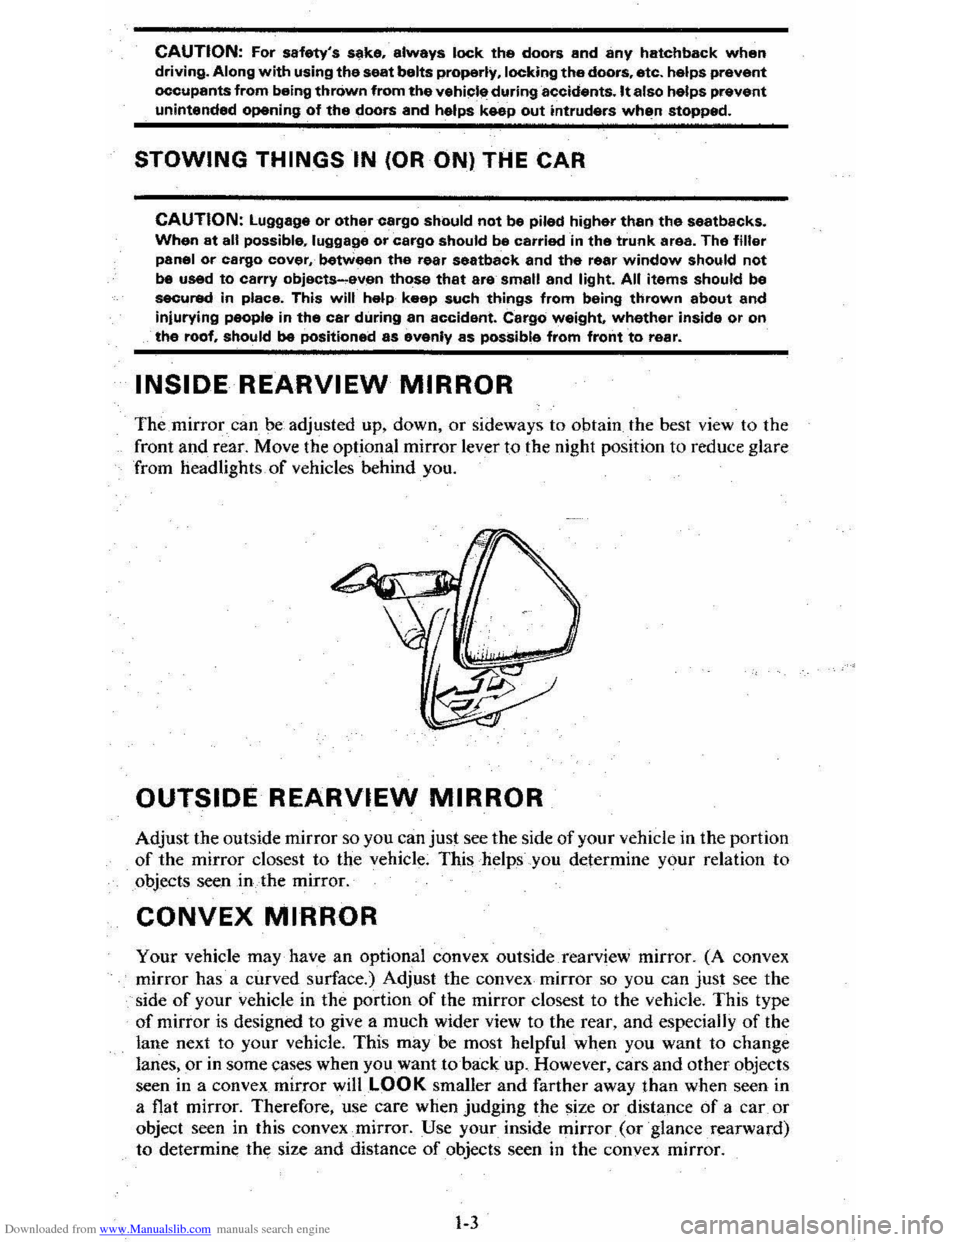
The mirror can be adjusted up, down, or sideways to obtain the best view to the
front
and rear. Move the optional mirror lever to the night position to reduce glare
from headlights of vehicles behind you.
OUTSIDE REARVIEW MIRROR
Adjust the outside mirror so you can just see the side of your vehicle in the portion of the mirror closest to the vehicle; This helps you determine your relation to
objects seen
in the mirror.
CONVEX MIRROR
Your vehicle may have an optional convex outside rearview mirror. (A convex
mirror has a curved surface.) Adjust the convex mirror so you can
just see the
side of your vehicle in the portion of the mirror closest to the vehicle. This type
of mirror is designed to give a much wider view to the rear, and especially of the
lane next to your vehicle. This
may· be most helpful when you want to change
lanes, or in some cases when you want to back up. However, cars and other objects
seen in a convex mirror
willLOOK smaller and farther away than when seen in
a flat mirror. Therefore, use care when Judging the size or distance of a car or
object seen in this convex
.. mirror. Use your inside mirror. (or ·glance .rearward)
to determine the size and distance of objects seen in the convex mirror.
1-3
Page 18 of 95
Downloaded from www.Manualslib.com manuals search engine SECTION 2
STARTING AND OPERATING
ENGINE EXHAUST GAS CAUTION
(CARBON MONOXIDE)
Do not breathe exhaust gas becau~ it contains carbon monoxide, which by itself
- has no color or odor. Carbon monoxide is a dangerous gas . .It can cause
un consc iousness and can
be lethal.
If at any time you think that exhaust fumes are entering the vehicle. have the cause determined and corrected as soon· as possible. If you must drive under these
conditi<:ms, drive only with ALL windows fully OPEN.
Prptect
against carbon monoxide entry ihtp the vehicle body. The best way is to
keep the engine -exhaust system, vehicle
body. and body ventilation system
properly maintained. We recommend that the exhau st system and body be "inspected by a competent mechanic: '
• each time the vehicle is raised for an oil change;
• whenever a change is noticed in the',sound ofthe~exhaust system;
• wh enever the exhaust sys.tem. underbody . or rear of the vehicle is damaged.
See your Maintenan ce Schedule fo.~4er for parts requiring inspection .
To allow proper operation of the vehicle's ventilation system, keep the air inlet
grill e
in front of the win(fshield clear of snow, leaves or other obstru ctions at all
times.
SITTING IN A PARKED VEI:iICLE WITH THE ENGINE RUNNING FOR A LONG TIME IS NOT RECOMMENDED.
Do n ot fun , the engine in co nfined areas (such as garages or next to a building)
any more than needed to move the vehicle. When the, vehicle is stopped in an
UNCONFINED area with the engine running for any, more than a sho rt time, tak e the following steps:
A. Adju st the heating or cooling system to force outside air into the vehicle as
follows:
1. On cars not equipped with air co nditioning . se t the fan to medium or
high speed.
2. On cars equipped with air conditioning, serthe fan to medium or high
spe ed
a!1;d right hand control lever' to any position except "orr' or ·'Max."
-B. Keep the exhau st tailpipe -area clear of snow and other material to help"reduce
the buildup of exhaust gases' under the vehicle .
The ,trunk lid or hatchba ck should be closed while driving to help prevent drawing
exhaust gas into
the car. If the trunk lid or hatchback mu st' remain open for some
rea son while moving , or
if electrical wiring or other cable conn_ection s to a trai ler
_mu st pass through the sea l between the trunk lid or hatchba ck and -the body . follow
thes e precautions:
• Close all wind ows.
2-1
Page 19 of 95
Downloaded from www.Manualslib.com manuals search engine • Adjust the heating or cooling system to force outside air into the car as . d esc ribed abo ve bUI set the fan to high speed .
• On cars with outside air vents in or under the instrument panel, open the vents fully.
New. Car "Break-In" Period
You can drive your new car from its very first mile/kilometer without following .
a
formal"break~in" schedule. However, there'are things you can do during the
fir st few hundred miles/kilometers of driving that will add to the future
perf orm ance and econ omy of your car.
We recommend you limit your speed during the first 500 miles (800 kiJomet ers) ~
to a maximum of 55 mph (90 km/h) ; but do not drive for long period s al any'
one constant speed, either Jast
or slow. During this time , avoid fulllhronJe start s _ and, if possible, avoid h"ard stops especially during the first 200 miles (320
kilometers) of driving.
Always drive at moderate speed until the engine has completely warmed
up.
If yo u plan to use your new car for trailer towing, see additional information in Section 1 under "Trailer Towing."
GUARD AGAINST THEFT
Your new Citation has many features to help prevent theft of the car itself, its
equ ipment, and its content s. But these ami-theft features depend upon you to
work .
THE TIME TO BE MOST ON GUARD IS WHEN LEAVING THE CAR ...
• PARK IN A LIGHTED SPOT WHEN YOU CAN.
• LOCK THE STEERING COLUMN AND TAKE THE KEYS,
•
Turn the key to "Lock," and remove the key. This locks the igniti on and
both steering and shift connols unless your car has a manual transaxle.
In that case, the shift control- is not locked .
• If you must leave a key with the car, leave the square-head key .only .
Take the oval-Read key with you. This will help prevent unwanted entry into your car at a later date, or into your -trunk.
•
FULLY CLOSE ALL WINDOWS AND ANY ROOF PANELS. AND LOCK ALL DOORS.
•
KEEP COSTLY ITEMS OUT OF SIGHT AND LOCKED UP,
•
Never leave things of value in plain sight on seats or noor.
• The glove box offers a place -to hide small items.
• Lock larger items in the trunk or place them in the rear storage .
FUEL REQUIREMENTS
Your engine is designed to use only unleaded gasoline. Unleaded gasoline must
be' used for the emission control $ystem to operate properly. Its use will also reduce
s park plug fouling , -exhaust system corrosion and engine oil deterionition .
Using leaded gasoline can damage the emiS5ion control system and could result
in loss of warranty coverage. This is especially true on cars that have the C-4
System . Leaded gasoline will damage tbe oxygen sensor, which may affect
emission control, fuel economy
and drivabiJity . See "C-4 (Computer Controlled
Catalytic Converter) System" in "Service and Maintenance" Section 5 of this
manual for more information.
2-2
Page 43 of 95
Downloaded from www.Manualslib.com manuals search engine Remote Control Rear Quarter Swing-Out Windows
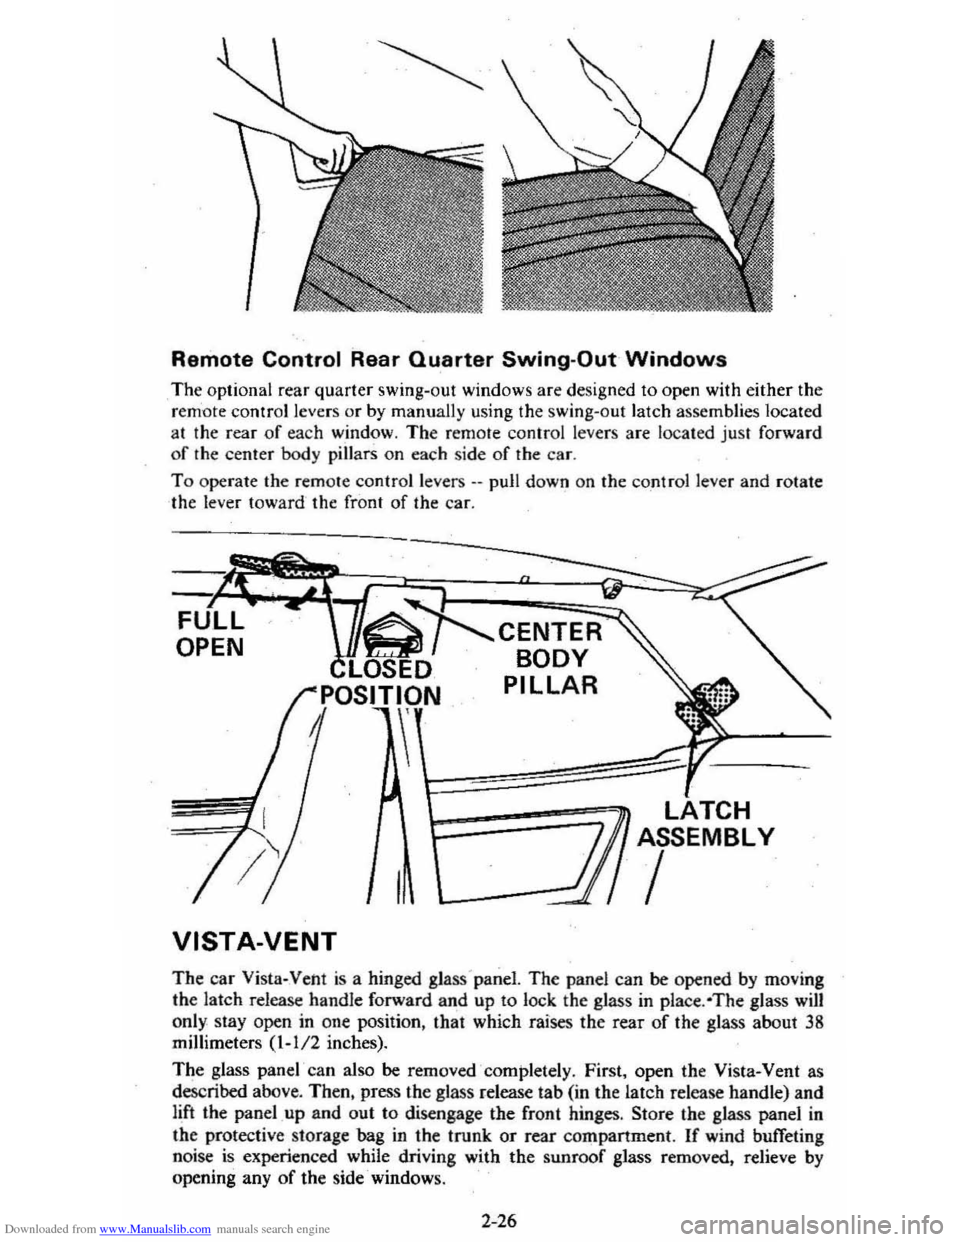
The optional rear quarter swing~oul windows are designed to open with either the
r e m 'ote control levers Of by manually using the swing-out latch assemblies located
at the rear of each window. The remote control levers are located just forward
o f the center
bod y pillars on each side of the car.
T o operate the remote control levers .-pull down on the cont ro l lever and rotate
the lever toward the front of the car.
OPEN
VISTA-VENT
CENTER
BODY
PILLAR
1========7.~ TCH r: ASSEMBLY
/
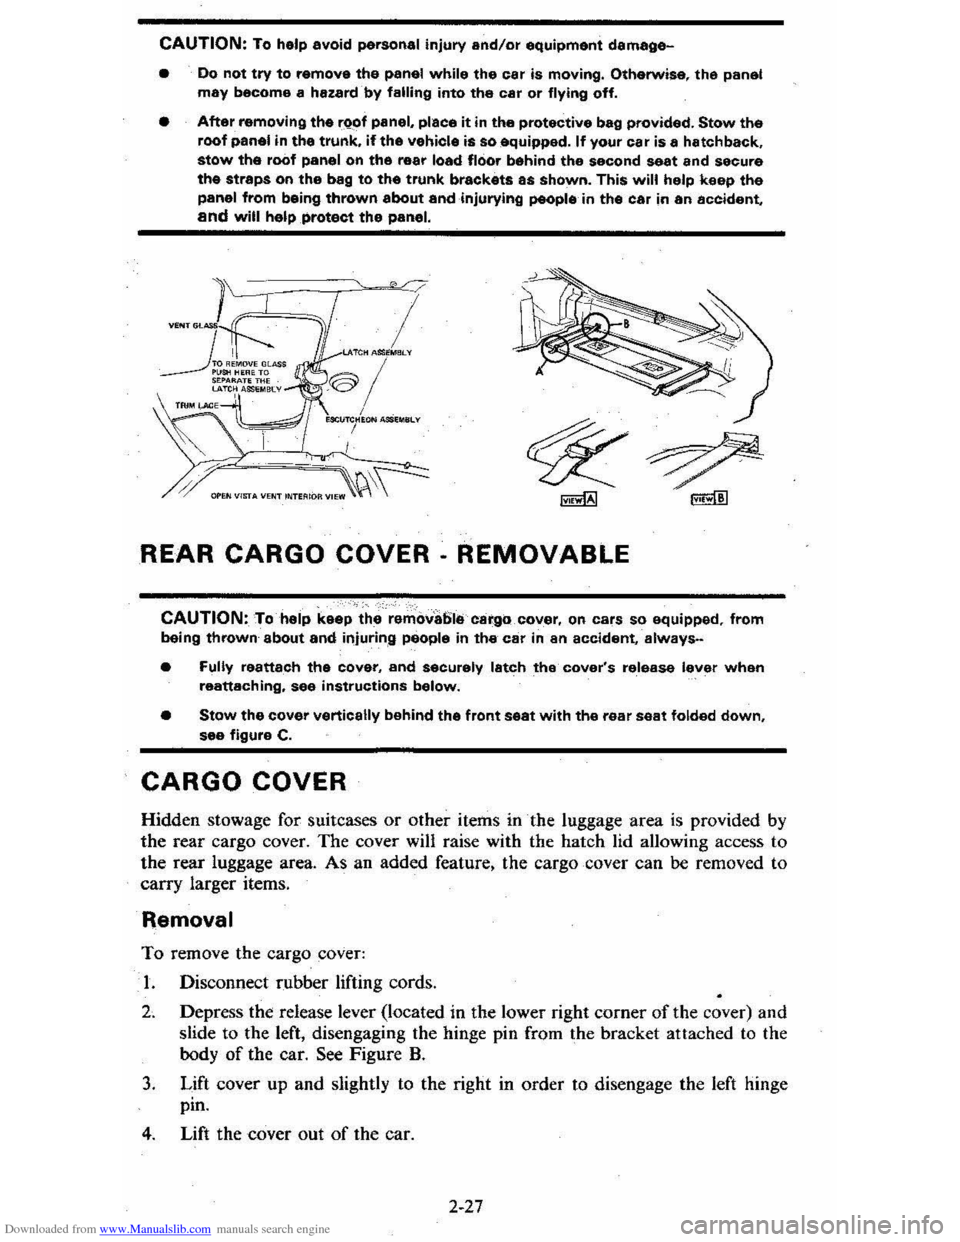
The car Vista-Vent is a hinged glass'panel. The panel can be opened by moving
the latch release handle forward and up
to lock the glass in place . ·The glass will
only. stay open in one position, that which raises the fear of the glass about 38 millimeters (1-112 inches).
The glass
panel' can also be removed completely . First, open the Vista-Vent as
described above.
Then, press the glass release tab (in the latch release handle) and
lift the panel up and out to disengage the front hinges . Store the glass panel in
the protective storage bag in the trunk or rear companment. If wind buffeting
noise is experienced while driving with the sunroof glass removed. relieve by opening any of the side· windows .
2-26
Page 44 of 95
Downloaded from www.Manualslib.com manuals search engine CAUTION: To help avoid personal injury and/or equipment damage-
• Do not try to remove the panel while the car is moving. Otherwise. the panel may become a hazard by falling into the car or flying off.
• After removing the rQof panel, place it in the protective bag provided. Stow the roof panel in the trunk. if the vehicle is so equipped. If your car is a hatchback. stow the roof panel on the rear load floor behind the second seat and secure the straps on the bag to the trunk brackets as shown. This will help keep the panel from being thrown about andinjurying people in the car in an accident, and will help protect the panel.
I LAlCH ASIl~MElLV
®/ , MClI~HION MSl .. SLv
I
REAR CARGO COVER· REMOVABLE
CAUTION: To help keep the remova61e cargo cover, on cars so equipped, from being thrown about and injuring people in the car in an accident, always-
• Fully reattach the cover, and securely latch the cover's release lever when reattaching, see instructions below.
• Stow the cover vertically behind the front seat with the rear seat folded down. see figure C.
CARGO COVER
Hidden stowage for suitcases or other items in the luggage area is provided by
the rear cargo cover. The cover will raise with the hatch lid allowing access to
the rear luggage area. As an added feature. the cargo cover can be removed to
carry larger items.
Removal
To remove the cargo cover:
1. Disconnect rubber lifting cords.
2. Depress the release lever (located in the lower right corner of the cover) and
slide to the left, disengaging the hinge pin from the bracket attached to the
body
of the car. See Figure B.
3. Lift cover up and slightly to the right in order to disengage the left hinge
pin.
4. Lift the cover out of the car.
2-27
Page 46 of 95
Downloaded from www.Manualslib.com manuals search engine Insta"ation
To install the cargo cover:
1. Insert the left hinge pin in the bracket attached to the body of the car.
2. Slide the release lever to the right to engage hinge pin in the 'bracket. See figure
B.
3. Move the lever up to lock the cover in place.
4. Reconnect the rubber 'lifting cords.
STOWING THINGS IN (OR ON) THE CAR
CAUTION: luggage or other cergo should not be piled higher than the seatbacks, When at all possible, luggage or cargo should be C8rrifHj in the trunk area. The filler panel or cargo cover, between the rear 88atback and the rear window should not be used to carry objects-even those that are small and light. All nems should be secured in place. This will help keep such things from being thrown about and Injurying people in the car during an accident. Cargo weight whether inside or on the roof, should be positioned as evenly as possible from front to rear.
ROOF LUGGAGE CARRIER
The optional roof luggage carrier is designed to allow loading of items onto the
roof
of your car. The roof luggage carrier does not increase the total load carrying
capacity of th e car , as shown opposite "Max Load" on the Tire Placard located
on the left front door. Be sure the total weight of the cargo on the roof, plus the
weight
of the cargo and passe ngers inside the car, plus the tongue load of any
trailer you are towing does
,1;10t exc_eed this "Max Load" vehicle capacity weight. See Section 5, page "5-11 for more information on Vehicle Loading . Also see the
infonnation on Trailer Towing
in Section 1 of this manual . if needed .
NOTICE:To helpayoid pOSSible damage, do not exceed 70 kilograms (1 50 pounds), cargo weight on the roof. Position the cargo in the luggage carrier as evenly as: pOssible. If carrying long items, never exceed car length and fasten such loads securely at the front and rear of the car, as well as to the luggage rack.
The roof luggage carrier consists of: five roof slats bolted to the top of the car,
two crossrails with knobs at each end th~t allow the crossrails to be adjusted or removed, and six' adjustable tie-downs.
The operation
of each item is as follows: the crossrails are easily adjusted forward
or rearward in order to help position your load. To move the crossrails , rotate
the large adjustable knob, ··No. 3" in the figure above. counterclockwise to loosen
(or remove) the crossrails and 'clockwise to tighten down the cros srails. Attached
to the top
of the crossrails are two adjustable tie-downs, "No.4" in the figure.
Ther e is also one adjustable lie-down located in the center of each outer roof slat
assembly (also called
"No.4" in the figure) . The tie-downs may be easily moved
forward and rearward within the outer slat assembly and across the top
of the
crossrails to the desired position.
To move the tie-down . rotate it countetclockwise
to loosen and clockwise to tighten down. If needed to sec ure a certain type of lead,
the tie-downs on the
crossratls may be removed and repos itioned on the outer roof
slat assemblies. While underway, periodically check to make sure that
the crossrails and the tie-downs are securely fastened to help
prevent loss of cargo, or the roof rack equipment itself.
The crossrails may be removed when not in use and stowed in the trunk or behind
the second seat on the rear load floor (with the carg o cover installed) in hatchback
style
s. When stowing the cressrails, al5..1 attach the tie-downs from the outer roof
2-29
Page 53 of 95
Downloaded from www.Manualslib.com manuals search engine JACKING
CAUTION
To help avoid personal injury:
• Follow all jackin g and stowag e instructions.
• Use jack only fo r liftin g this venicle du -rin g wheel c h a ng e.
• Nev er ge t ben eath th e vehiCle, start or run en g in e while vehicle is supported b y jac k.
• Always securely res tow spare tire (o r flat tire ) an d all jackin g equipment.
Wheel Nut Torque
CAUTION: As soon as possible after Installing 8 wheel-and at the intervals shown on the chart-in the Maintenance Schedule foldet-han 8 m.chanic tighten whe&l nuta with II torque wrench to the specifications shown in "SpeCifications ," Section 7 of this manual. Wheel nuts should be tightened alternately and evenly to the correct torque. Never us. oil or grease on studs or nuts. Improperly tightened wheel nuts could eventually allow the wheel to come off while the vehicle is moving, possibty causing loss of control.IAlso see the Caution in "Service and Maintenance," Seetion 5 of this manual regarding the danger of mixing metric and customary fasteners.)
Stowage of Tire and Jack
CAUTION:·AlwaYs MOurely restow the spare tire assembty (or flat tire). all jacking equipment. and the cover, using the means provided. When driving the car with the compact spare installed and the reer seat folded down, stow the wheel cover flat on the rear floor behind the-right front seat. When the rear seat is up (or If It does not fold), stow the wheel cover in the trunk area. This will help keep such things from being thrown about and injuring peopla In the car in an accident.
Compact Spare
The compa ct sp are is des ig ned to save space in yo ur trunk, and its lighler weig ht
m ak es
it easi er to in stall if a flat tire occurs. The light~r weig ht als o helps improve fuel eco no my.
If you have a flat tire, follow the jack ing in struction s in this manual while keeping
t h ese point s in min d:
• Chec k inflati on press ure as soo n as practical after in sta llin g the s pa re ( use of a pocke t type: high pressure inflatio n gage is adv ised) and adjust to 415
k Pa (60 psi). The tire pressur e sh o uld be checked at least monthl y and kept at 415 kPa (60 ps i) while the tire is s tored.
• Co ntinuou s use at spe eds over 50 mph (80 km/h) is not re c omme nded .
NOTICE: Because this tire is amaUer than the standar d tire, vehicle ground clearance is reduced, Avoid driving over obstacles, and do not take your car U,rough an automatic car wash whila the spare is installed. The car may get caught possibly resulting in property damage.
• A trea d life of up to 3,000 mil es (4 800 kilomet ers) ca n b e expe cted, depe nding
on roa d condi tions and you r
driv ing habits . T o co nserve tire t read life. return the spar e to the sto rage area as soo n as the sta nd ard tir e ca n be repa ir ed -or
r
epl ac ed .
• Beca use the co mpac t spare was spec ifica lly designe d for your car, it s hould
no t be used on any other vehicle.
3-6
Page 60 of 95
Downloaded from www.Manualslib.com manuals search engine PART
NUMBER
1051516
1050017
1052277
1050172 1050173
1050174
1050214
t 1050237
1050244
1052280
1050427 1050429
1052349
1050729
1051055 1051398 1051515
1051772 1051855
1051858
1052103
1052271 1052272
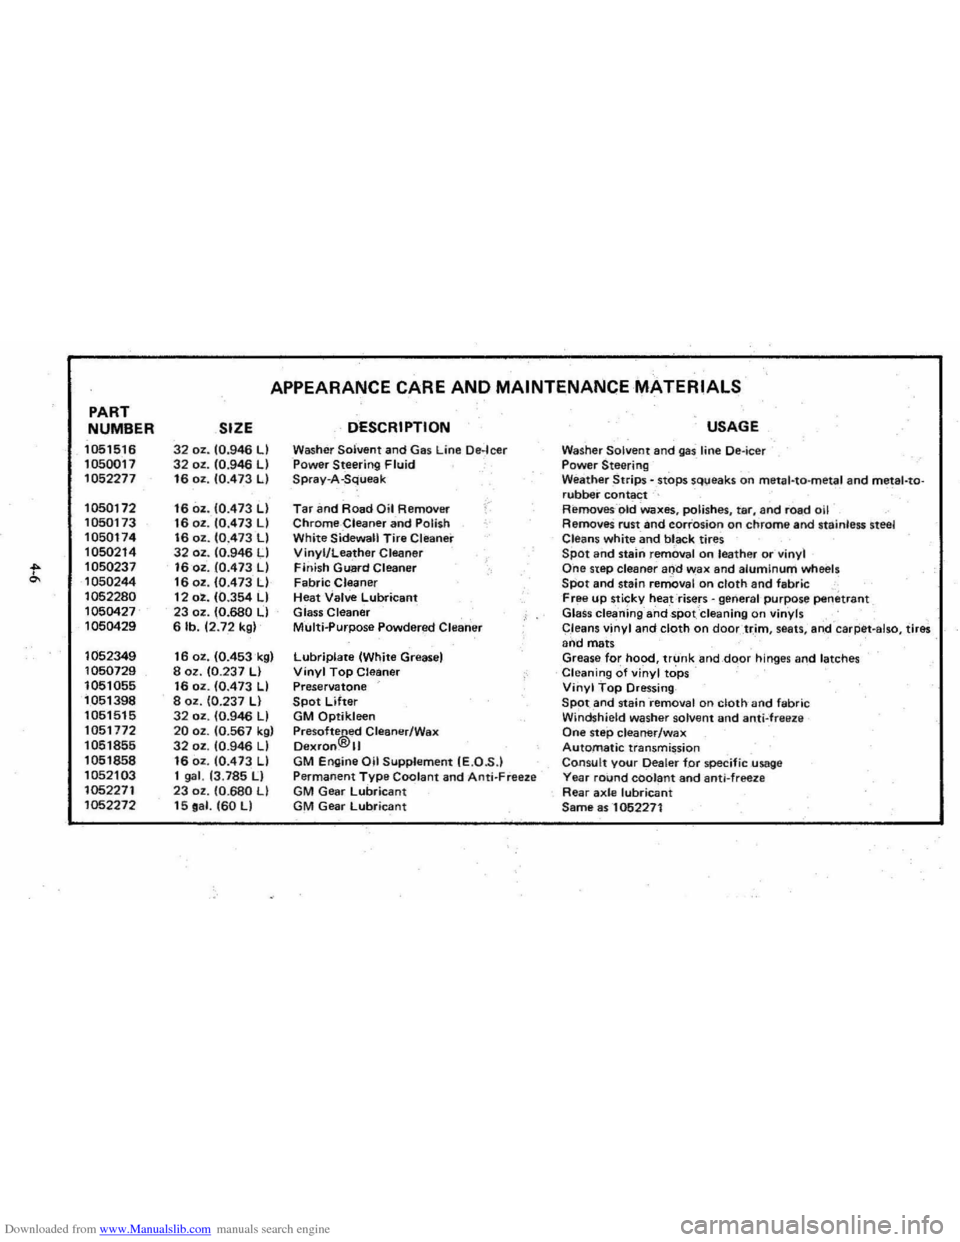
APPEARANCE CARE AND MAINTENANCE MATERIALS
SIZE DESCRIPTION
32 oz. 10.946 LI Washer Solvent and Gas Line De·leer 32 oz. 10.946 LI Power Steering Fluid 16 oz. 10.473 LI Spray-A-Squeak
16 oz. 10.473 LI Tar an d Road Oil Removirr /"
16 oz . 10.473 LI Chrome-Cleaner and Polish 16 oz. 10.473 LI White Sidewall Tire Cleaner 32 oz. 10:946 LI Vinyl/Leather Cleaner 16 oz . 10.473 LI Finish Guard Cleaner 16 oz. 10.473 LI Fabric Cleaner 12 oz. 10.354 LI Heat Valve Lubricant 23 oz. (0.680 LI Glass Cleaner 6 lb. 12.72 kgl Multi..purpose Powdered Clearier
16 oz. 10.453k91 Lubriplate (White Greasel 8 oz. 10.237 LI Vinyl Top Cleaner 16 oz. 10.473 LI Preservatone 8 oz. 10.237 LI Spot Lifter 32 oz. 10.946 LI GM Qptikleen 20 oz. 10.567 kgl Pre softe®ed Cleaner/Wax 32 oz. 10.946 LI Dexfon. II 16 oz. 10.473 LI GM Engine Oil Supplement IE.O .S .) 1 gal. 13.785 II Permanent Type Coolant and Anti- Freeze 23 oz . 10.680 LI GM Gear lubricant 15 oa l. 160 LI GM Gear Lubricant
USAGE
Washer Solvent and gas line Oe-ieer Power Steering Weather Strips - .stops sq\;leaks on meta l-ta-metal and metal-torubber contact Removes- -old Waxes, polishes, tar, and road oil RemoveS rust and corrosion on chrome and stainless steel
Cleans white and bl _ack tires Spot and stalrl removal o n leather or vinyl One step cleaner and wax and alumInum wh eels SPot and stain removal on cloth and fabric , Free up sticky heat risers -general 'purpose penetrant Glass cleaning ahdspot Cleaning on vinyls
C,leans vinyl and cloth on doortr,im , seats , ari,d -caq:iet -also, tires and mats Grease for hood, trunk and,dQor hinges and latches Cleaning of vinyl tops Vinyl Top Dressing SPOt and staini-emoval on cloth and fabric Windshield washer solvent and anti-freeze One step cleaner/wax Automatic transmission Consult your Dealer for specific usage Yea r round coolant and anti-freez e Rear axle lubricant Same as -1052271