1980 CHEVROLET CITATION warning light
[x] Cancel search: warning lightPage 5 of 95
Downloaded from www.Manualslib.com manuals search engine SECTION 1
BEFORE DRIVING YOUR
CHEVROLET
DRIVER DAILY CHECKLIST
Be sure you know your vehicle and its, equipment and how to use it safely.
Before Entering the Vehicle
1. See that windows, mirrors, and lights are clean and unobstructed.
2. Check whether any tire is low or flat. (If any tire looks different from nonnal,
we recommend you check
it with a tire pressure gage.)
3. Check that all lights work.
4. Look for fluid leaks.
5. Be sure everything is properly stowed.
6. Check the area behind the vehicle if you are about to back up.
Before Driving Off
1. Lock all doors.
2. Adjust seat.
3. Adjust inside and outside mirrors.
4. Fasten seat belts.
5. Check that all the warning lights work as the key is turned to "'Start."
6. Check all gages (including the fuel gage).
7. Release the parking brake (and see that the "Brake" light turns om.
Seerelated topics in this manual, or the Maintenance Schedule folder, if problems
are found.
Guard Against Theft
For tips on how to protect your vehicle and its contents, see "Starting and
Operating" in section 2 of this manuaL
KEYS
Two different keys are· provided for the locks on your vehicle. The key code is
stamped on the "knock out" plug in each key head.
• Key with square head (letter "A" or "e") -for ignition lock only.
• Key with oval head (letter "8" or "0") ~ for all other locks.,
For vehicle security:
• Record the key code numbers; then knock the plugs out of the keys.
• Keep the key codes in a safe place (such as your wallet), NOT IN THE
VEHICLE.
If the original keys are lost, duplicates can
be made using the key codes. Contact
any
OM dealer or a locksmith.
If yO~i park in an attended lot, leave only your square-head ignition key.
1-1
Page 26 of 95
Downloaded from www.Manualslib.com manuals search engine NOTICE: If the engine runs for a long time (5 minute. or more) without pressing down the accelerator pedal. overheeting cOuld calise damage to the engine end exhaust system.
Do not INve your car unattend4Mt with the engine running . If the engine shoukt overheat you would not be there to react to the temperature warning light or gage. This could r.sult in costly damage to your car and its contents.
• WARM ENGINE -Be ,sur e to follow the instructi ons which apply to your engine . (The Engine Code is 'th e 5th digit on the YIN plate at the lower left
sid e o f yo
ur windshield . (See "Specifications," Secti o n 7 for more details .)
• Engine Code 5 • Press down the accelerator pedal to 1/3 of
its travel and hold. Crank the engine by turnin g the igniti on ke y to "Star .. " Rel ease the key and accelerator pedal when the _ engine s tart s.
• Engine Code 7 . Do not press down the accelerator pedal.
With your foot off the pedal. crank th e engine by turning the
ignition key to ·'Start." If t he engine does no t start after 3 seconds ,o f
. c ranking, press'
down the accelerator pedal to 1/3 of its travel while
c ranking. Release the key ,(ap.d accelerator pedal) when the engine starts .
• Very Cold Weather (Below·' B OC or O °F Or After Car Has Been
Standing Idle Several Days) - Befor e crankin g th e en gine , fully depress
and release the acce le rat or pedal one or two times more than slated fo r your
engine under "Cold Engine" s ta rt ing . Then . with your foot off the accelerator pedal,-cra nk the engine -b y-turnin g the ig nit io n key to "St art ."
Rdease the key when the e ngin e s tarts.
4 . Appl y th e regular brakes and shift into the prop
er g~r. Release the parkin g
b ra k e a nd drive off.
," '. ."
If Engine Fails To Start
t. Fully depr ess and release the acce le rat or pedal severa l times~ then tak e your
foo t ofT th e peda _' and cra nk the e ngine by turnin g the key to ··St art."
2. If th e e ng in e still does not sta rt, press the accele ra to r peda l to the floo r an d
h old it ther e while cra nkin g the· e ng ine. -Thi s sh ould clear the eng in e i f it is
floode d.
3. If th e en gine has been floode d' with too much fuel , it m ay start to run but
n ot h ave enough power to keep running.
In that case, continue cranking with
th e accel erator pedal all th e way to the floor until t he e ngin e clears itsel f of
excess ' gaso line an d run s sm oo thly.
TRANSAXlE
CAUTION: Before going down ,e steep of'long grade . reduce speed and shift the transa.xle into a lower gear or lower g.ar range to control vehicle speed . (Do this with either 8n automatic or a manual ,transaxle).Try not to hold the brakcl pedal down too long or too often. This could,cause the brakes to get hO,t and not work as well.
Driving on Slippery Surfaces
Take ca re w he n speedin g up . or when shiftin g into a l ower gear, or lower gea r
r a n
ge w hile drivin g o n slippe ry surf aces. Sudde n acce le ra tio n or en gine bra kin g
a c tion (du e to shifting
to a lower gear) could -ca use the f ron t wheels to s kid .
N orm al
skid correction and cautio us :dr iving are call ed for at these times .
2·9
Page 30 of 95
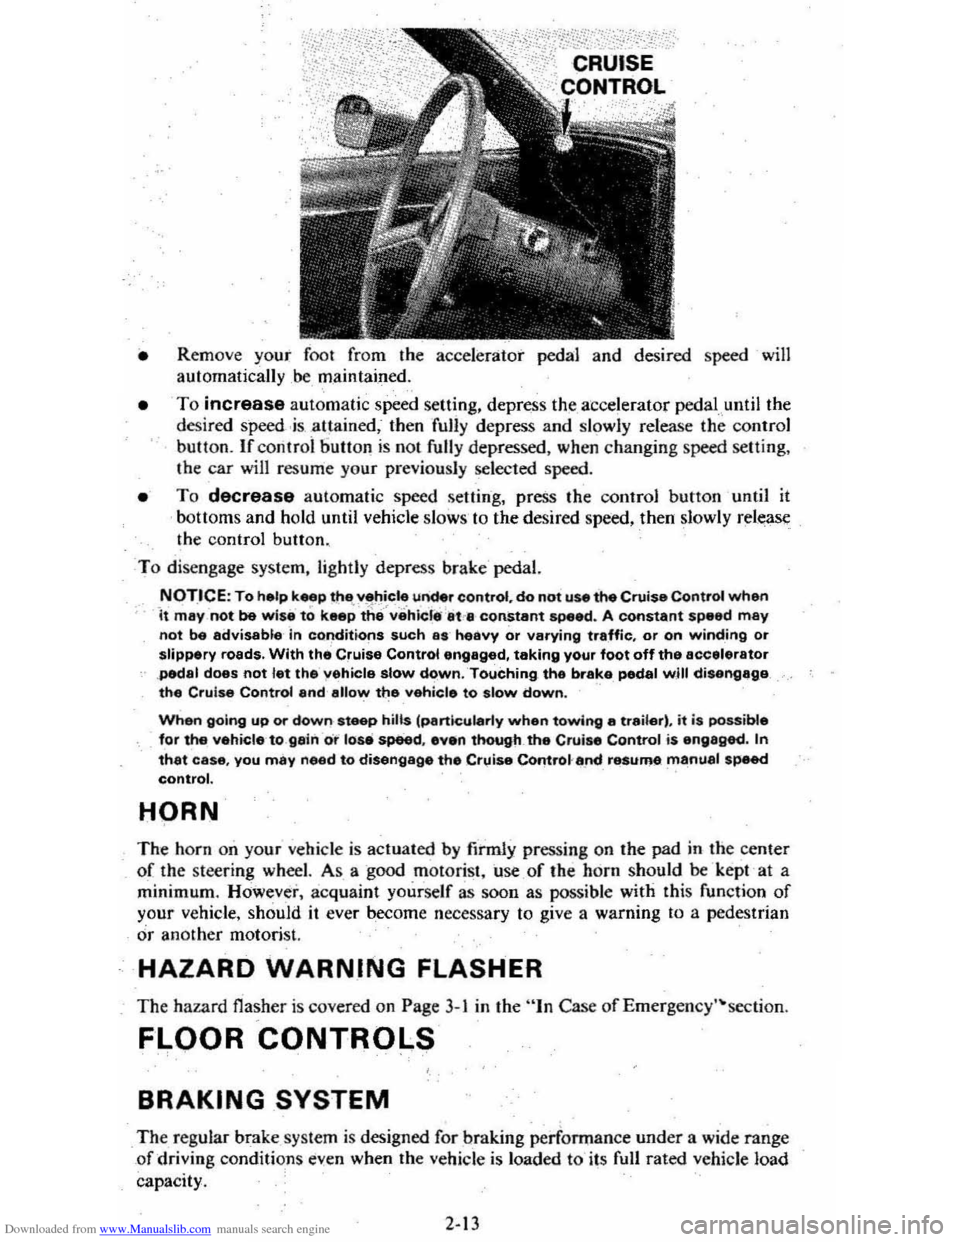
Downloaded from www.Manualslib.com manuals search engine • Rem ove yo ur foo t f rom the accelerat or ped al and desir ed speed will
auto matically ,be, maintained .
• To increase autom atic speed setting , depress the a' ccelerator pedal.,until the
desi re d speed .i s atta ined , then full y depres s and slo wly releas e the co ntrol butt on. If co nlr oi 6 ullon is no t fully depressed , when ch angin g speed se tting.
the ca r will resum e yo ur previ ously selected speed.
• To decrease aut omatic speed se llin ·g. press the control button until it
b o tt oms and ho ld until vehicle slo w s' to the desir ed speed, then slowly release
t h e c ontrol button.
T o dise n
gage system, lightly depr ess brak epedal.
.NOT.ICE: To help k~p thlt~f}.~C.,! under controf, do not use the Cruise Controf when It may not be wise to keep the vehier.· at'. constant speed . A constant speed may not be advisable 'in conditions such as heavy or varying traffic, or on winding or slippery roads. With the Cruise Control engaged, taking yOur foot off the accelerator ,pedal does not let the yahicla slow down. 'Touching. the b rake pedal will disengage the Cru ise Controf and allow the vehicle to slow down.
When going up or down steep h ills fpa"~ularly when towing a tr ailer) , it is possible for the vehicle·to ga in o r lose speed .• ven though. the Cruise Control is engaged. In that case , you may need to disengage the Cruise Control'~.nd resume manual speed control.
HORN
The ho rn on your vehicl e is ac tuated by firml y pressing o n the pad in the c ent er
of th e stee ring wheel. As a good m otorist. use .of the ho rn should be k ept 'at a
minimum . However, ac quaint yourself as soon as possible with this f u nct io n of
you r ve hicle, should it ever becom e necess ary to give a warning to a pede strian
or anot her motorist.
HAZARD WARNING FLASHER
Th e haza rd fla sher is covered on P age 3-1 in the "In Cas e of Emerg ency·~section.
FLOOR CONTROLS
BRAKING SYSTEM
The reg ular brake syste m i s desig ned fo r bra king perfonnanc e und er a wide range
o f
driving conditi ons even when the vehicle is load ed to its full rated veh icl e lo ad
capac ity.
2-13
Page 31 of 95
Downloaded from www.Manualslib.com manuals search engine CAUTION: Driving thr~gh water deep enough to wet the brakes may cause the brakes not to work as well. As 8 result the vehicle will not slow down at the usual
rate ; and it may pull to the right or left. After checking to the rear for other vehicle., apply the brakes lightly to check whether this has happened. To dry them quickly, lightly apply the brakes. At the-same time, k .. p a safe forward speed, with plenty of clear space ahead, to the rear, and to the side •. 00 this until the brakes return to normal.
The brake system warning light is covered in the "Instrument Panel" section.
Power Brakes
• If optional power assis t is lost because of a stalled engine or other reasons .
the brakes can normally still be applied with power assist at leas t two times
u sing reserv e power.
• Th e system is designed to bring the vehicle to a full stop on reserve power if the brake pedal is applied once and held down . However . the reserve power
is partly used up each time the brake pedal is applied and rele ased. Do not
pump the brakes when ,brake power assist has been lost, except when needed
to maintain steering control on slippery surfaces.
• Without power assist, the vehicle can still be stopped by pushing much harder
o n the brake pedal. However, the stopping distance may be longer. even
though the brakes themselves remain fully operational.
Self-Adjusting Brakes
• The brakes on this vehicle (exc,ept for the parking brake) are self-adjusting.
They have been design ed so
that periodic brake adjustment is not required.
• The drum brakes adjust themselves when the brakes are firml y applied while
the vehicle is moving backwards.
• The disc brakes adjust themselve s each time the brakes are used.
• If the brak e pedal goes down farther than nonnal. it may be due to a lack
of adjustment. To find out if this is the case, drive backward and forward
a few times , applying the brakes firmly when going each way.
• See yo ur dealer if pedal height does not return to normal, or if there is a rapid
increase in pedal travel, which could be a sign of other brake trouble .
• Also see your dealer if the parking brake needs adjustment' .
NOTICE: "Riding the brake" by resting your foot on the brake pedal when not intending to brake can cause overheated brakes. This can waar out the brake linings faster and damage the brakas thamselvas, 85 well 8S waste fuel.
DIMMER SWITCH
The dimmer switch that controls the headlight high/lo w beam is built into the
turn signal control. See the "Steering Column Controls" Section 2 of this manual.
PARKING BRAKE
• To set the parking brake, fully depress the foot pedal at the far left side.
• For better holding power, first press down the regular brake pedal with your
right foot. Then hold it while setting the parking brake with your lefl foo[.
•
To release the parking brake, pull the "Brake Release" handle located at the
lower left of the instrument panel.
• To help remind you. the brake system warning light is designed to come on if the parking brake control is not fully released and the ignition key is on.
2-14
Page 32 of 95
Downloaded from www.Manualslib.com manuals search engine • Never drive-the vehicle _with the parking brake set as this -may overheat the
reaf brakes reducing their effectiveness and causing excessive wear or damage,
DISC BRAKE WEAR INDICATORS
Front disc brakes have built-in wear indicators that are designed to make a
high-pitched
squealing or cricket-like warning sound when the brake linings are
worn 10 where -new linings are needed. The sound will come and go, or be heard
all the time
when the wheels are rolling, and when the brake pedal is pu~hed down
firmly . Expensive damage can result
if linings are not replaced when needed.
See also the brake checks listed in the Maintenance Schedule folder.
CLUTCH .PEDAL
On models equiPPed with a manual transaxle, a clutch pedal is used to engage
or disengage the clutch, thereby connecting
or disconnecting the engine from the
transaxle and drive1ine to the front wheels. -When the pedal is fully extended the
clutch
is engaged, driving the transaxle arid the front wheels.
INSTRUMENT PANEL P.ND CONTROLS
INSTRUMENTS
The instruments, gages and indicator lights conveniently grouped in the
instrument cluster are des igned to
tell you at a glance many important things about
_the perfonnance of your vehicle _, _ The following information will enable you to
more quickly -understand and properly it';:rerpretthese instruments.
Speedometer
The speedometer chand ·indicatt:5 vehicle speed in miles per hour and kilometers
per hour.
Odometer
The group of six figures . in the speedometer lower center section indicates the
accumulated mileage.
Fuel Gage
The fuel gagewiH register the_APPROXIMATE fuel level in the tank, when the
ignition
is in the RUN position.
When the gage registers
EMPTY, some fuel is still available as a reserve. When
the gage registers
FULL. some additional" fuel can"still be added to the tank. The
following conditiqns may be considered normal:
• Gas station _pump may shut off before fuel gage indicates FULL. •
•
Amount of gasoline required for fill-up may not exactly correspond to gage.
• Needle may not move away from FULL until some time after fill·up.
• Needle may !Dove during turns. stops and-accelerations.
When the ignition switch
is turned to the OFF position, the needle will not
necessarily
retiJrn · all the way to the EMPTY mark.
2-15
Page 33 of 95
Downloaded from www.Manualslib.com manuals search engine '" 0;
o STANDARD
o OPTIONAL
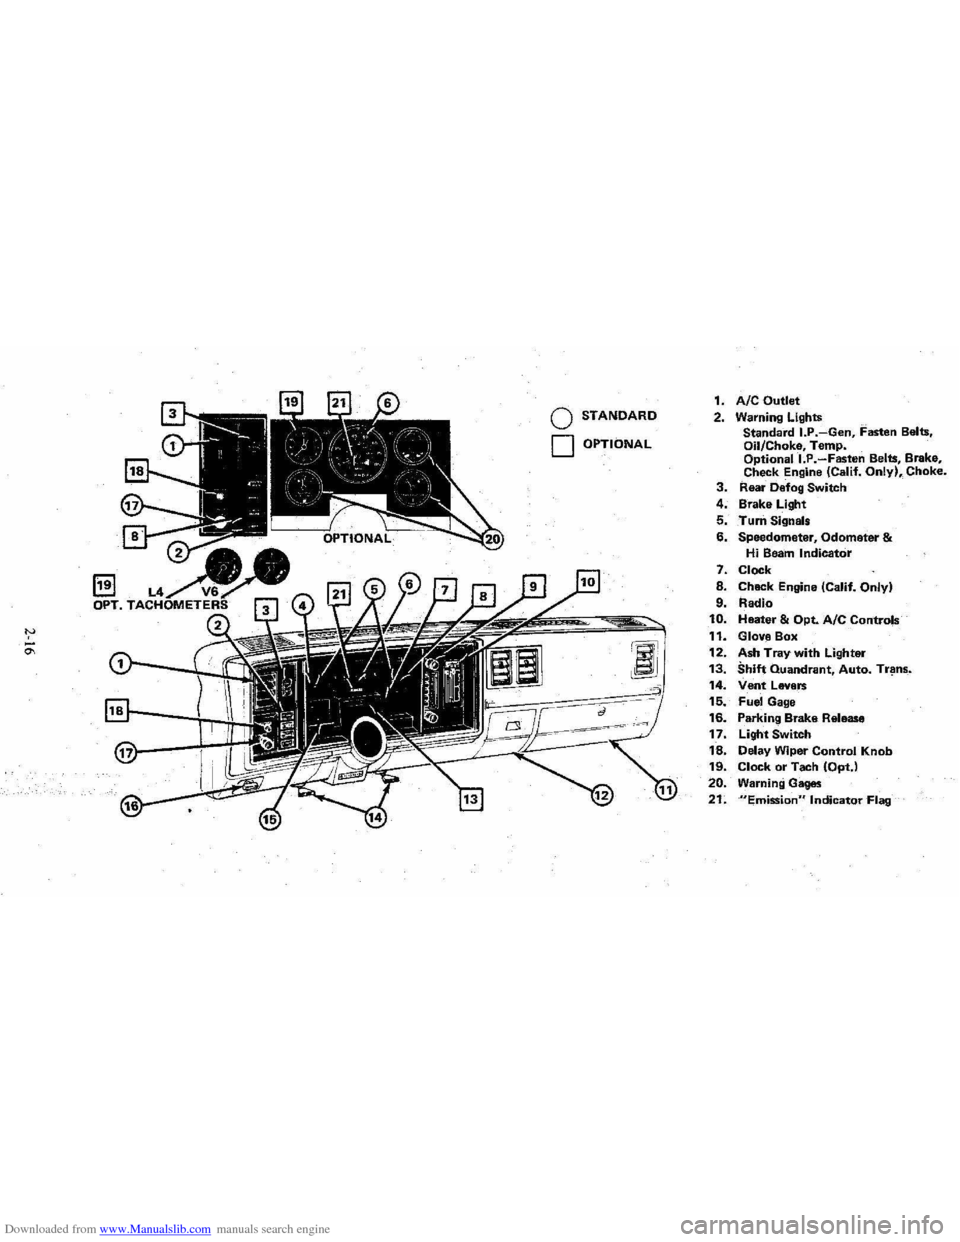
1. AIC Outlet 2. Warning Lights
Standard I.P.-Gen, Fasten Belts.
Oil/Choke, Temp.
Optionall.P.-Fasten Belts, Brake,
Check Engine (Calif. Only), Choke. 3. Rear Defog Switch
4. Brake Light
5. Turn Signals
6. Speedometer, Odometer & Hi Beam Indicator
7. Clock
8. Chack Engine (Calif. Only)
9. Radio 10. Heater & Opt. Ale Controls
11. Glove Box
12. Ash Tray with Lighter 13. Shift Quandrant, Auto. Tr~ns_.
14. Vent Levers 15. Fuel Gage
16. Parking Brake Release
17. Light Switch
18. Delay Wiper Control Knob 19. Clock or Tach (OptJ
20. Warning Gages
21. "Emission" Indicator Flag
Page 34 of 95
Downloaded from www.Manualslib.com manuals search engine Oil/Choke Indicator Light
This light will c0!TIe on to provide a "bulb check", w hen the igni tion is turned on, but sh Qu19 go out after the _ engine is started. If tight fails to
come on wit h ignitio~ turned on, it could indicate a burned out bulb , a
defective electric choke hea ter circuit (on L4 and V6 engines), or a blown
instrument lamp fuse. Have system repaired if light does not come on d min g ch eck .
Occa sionally. this light may flicker momentarily while the engine is running. Should this occur, CHECK EN GINE OIL LEVEL as outlined in Section 5,
"Checking Oil Level." If the light comes on continuously, pull over toa safe place and STOP THE ENGINE until the source of trouble can be loca ted and corrected.
The source of tro uble could be any of the following:
• Loss of engine oil press ure (cbec k eng ine oil level).
• Blown choke heater fuse.
• Loss. of electric choke heate r voltage.
Continuing to run the engine with an illuminated oil pressure light can cause
serious engine damage or unusu ally high exhaust system temperature which can
r esult in serio us damage to the
vehicle. Pull over to a safe place and STOP THE
VEHICLE IMMEDIATELY AND SHUT OFF ENGINE. If the light flashe s
momentarily , ch
eck engine oil leve l as outlined in Sectio n 5 of thi s manu al
Choke Warning Indicator Light
On some vehicles equipped with the optiona l oil pressure gage, an amber choke
warning indicator light replaces the red oil pressure indicator light in the
instrument cluste
r. If this light comes on, indicating loss of electric choke heater
volta
ge, have your authoriz ed Dea ler .locate and correct th e tro uble as soon as
p ossib l
e.
Generator Indicator Light The red ligh t GEN will go on when the ignition key is in the "run" _posit ion, but
before the engi ne
is started. After the engine s tarts, the light should 'go out and
r e m ain out .
If th e light remains on when en gine is running , have your Authorized
D eale r loca te and correct the troubl e as soo n as possibl
e.
Engine Temperature .Indicator Light This indicator light is provided in th e instrument cluster to quickly warn of an
overh eated en gi ne. With the igniti on switch in the START position, the red
TEMP indicator (hot light) will light to let you know that it is operati ng prope rly.
When the engi ne is started ;-th e re d light will go out imm ediate ly. It wilUight up
a t n o other time unleSS for some reason the engine reaches a dangerously high ope ra tin g temperature . 1f the light comes on during extreme driving condition s,
such as an exte nded idle, see "E ngine Cooling
System" on page 3-3. Glance at
th e instrument cluster frequently as you drive to see if this
ligh t is on.
Brake System Warning Light
The regular braking system is a dual system designed so that one part will provide
some braking action if there is a loss of hydraulic pressure in the other part of
the system. The system has a "Brake" warning light loca ted in the instrum ent
pane\.
• To serve as a reminder , the "Bra ke" lig ht is designed to come on while the
park ing brake is se t and the ignition key
is on.
• The light is also designed to come on briefly during engine starting so you
can chec k that the bulb is okay.
• Have the system repaired if the light does not come on during engine starting
o r when the parking brake
is set. 2-17
Page 35 of 95
Downloaded from www.Manualslib.com manuals search engine • This warning light docs no t do away with the need f or ~rake il),s.-pectio n and
maintenanc e. The brake fluid level must be checked regularly . See yo ur
Maint enance Schedule folder for
other brake checks.
If th e light comes on and stays o n when the ig nition key is on, after the brak e
pedal ha s been firmly pushed do wn, it may mean that there is somethin g wrong
wit'h one part of the brake system.
Wh at 10 do:
I. C heck to see that the pa rkin g brake has been released. If it has been ...
2. Pull off the road and sto p ca refully. And rememb er that:
• Stopping di stan ces may be longer .
• You may ha ve to pu sh hard er on the ped al.
• The pedal may go down farther {han no rm al.
3. Tryout the brake s by sta rrin g and stopping on the ro ad shoulder--then :
• If you judge it to be safe, drive cautiously at a safe speed to the neat est
dealer for repair , or
• Have vehicl e to w ed to dealer for repair .
Co ntinu ed dri ving with o
ut getting necessary re p a ir s co uld be dangerou s.
"EMISSIONS" INDICATOR
On so me cars, the word "EMISSIONS" is des ig ned to appear in a window in the spe ed om eter faceat certain int~rvals. This is a reminder that maintenan ce se rv ice
mu st
be performed on your ca r. One of two type s' o f se rvice is required :
• On cars equipped with the C-4 System, the oxygen sensor must be replaced with · a new sensor, or
• On
ca rs without the C -4 System, the cataly st in the catalyti c converter must
b e c han ged.
In either case, see yo ur Chl!~rolet dealer fo r se rvice when the "EMISSIONS "
indicat or appears. .
F or more information , see
"C-4 (Computer Contr olled Catalytic Conv erte r)
Syste m " and "Catalyti c Co nverter," both in "Service and Maintenance," Section
5 of thi s manual.
"CHECK ENGINE" LIGHT
If yo ur car has the C-4 System, a "CHECK ENGINE" light on the instrum ent
panel is des ig ned t o come on
during engine starting to le t y ou know th e bulb is
w orkin g. (The light will sla y o n a short time after th e e ngine s tarts .) If th e light
c o m es on whil e
drivin g, se rv ic e to the emi ssion contr ol sy stem may be re quired . Sc:e your Chevrolet deal er as soo n as: possible fo r an in spec tion of the sy ste m .
COlltinu ed driving without having [he C-4System serviced could eventually cause
d am age to the emission control system. It could also affect fuel economy and
driv ability.
See also '; C-4 (Comput er Co ntrolled Catalytic Converter) System" in ;'Ser vic e a nd
Mainte n ance, " Section 5 o f this manual.
Tachometer
The opti onal Tachomet ers indi cat e the speed of th e e ngin e in revoluti ons pe r minute. The indicated number, tim es ](x>o .. gives the engine s peed. Operatil.lg th e
engine w ith the tachom ete r r eading in the color- coded high ~peed area could lead to s~rious engine damage. The re are two tachom .e ter s us ed in the car depending on the e ngine option install ed in your car.
2-18