1968 DATSUN 510 diagram
[x] Cancel search: diagramPage 162 of 252

DIFFERENTIAL
REAR
AXLE
AND
REAR
SUSPENSION
157
DIFFERENTIAL
WAGON
The
dIfferentIal
carner
is
made
of
alumInum
alloy
and
uses
a
hypoid
bevel
gear
Proper
lubri
catIon
IS
essentIal
Check
and
replemsh
the
lub
rIcant
every
3
000
mIles
Dram
and
refill
every
30
000
mlles
Figure
20
IS
an
exploded
dIagram
of
the
differential
used
in
the
wagon
Difterential
Removal
Wagon
1
Jack
up
the
rear
wheels
and
support
vehicle
with
stands
l
2
DIsconnect
drIve
pmlon
companion
flange
to
yoke
connectIon
3
Remove
rear
wheel
axles
as
descnbed
later
m
thIS
chapter
4
Remove
dtfferentIal
from
vehIcle
Difterential
Inspection
Wagon
The
followmg
Inspection
can
be
done
Without
dISassembly
of
the
differentIal
Perform
the
fol
lOWIng
mspectIon
and
If
abnormalitIes
or
dam
age
eXISts
refer
further
service
and
repair
to
YOI
f
dealer
1
Check
the
tooth
contact
pattern
with
lead
oXIde
at
two
or
three
pomts
after
remoVIng
rear
cover
Refer
to
FIgure
5
for
correct
contact
pat
tern
If
the
pattern
IS
not
correct
dIsassembly
and
adjustment
of
the
dtfferentIalIS
reqUIred
2
Measure
backlash
between
dnve
gear
and
pInIOn
WIth
a
dIal
mdlcator
Backlash
should
be
00059
to
00079
in
0
15
to
0
20mm
3
Rotate
the
gears
and
lIsten
for
SIgnS
of
bear
Ing
nOIse
DefectIve
beanngs
should
be
replaced
by
a
dealer
4
Inspect
gear
teeth
for
signs
of
damage
or
cracks
r
Difterential
Installation
Wagon
Install
the
dIfferentIal
by
reversing
the
pro
cedures
used
for
removal
2
Olfferenllal
case
16
Pmlon
10Ckmg
pm
28
42
AdjusllRg
washer
t
3
Beanng
stud
17
Dlflerenbal
Side
beanng
43
47
Adjusting
shim
4
Plem
washer
18
22
Adjusting
shim
53
Oil
seal
5
Locking
nut
23
Rear
plRlOn
gear
54
Range
assembly
6
Lockmg
nut
24
Front
plRlOn
beanng
55
Nut
7
PIRlOn
gear
set
25
27
Spacer
56
Wesher
Iff
8
Hex
bolt
9
Bolt
locking
strap
7
10
Case
@
11
Side
gear
12
PmlOn
mete
is
Thrust
washer
13
14
Thrust
washer
10
15
PIRlOn
shaft
23
43
47
2S
27
7
J
I
18
22
17
l
24
S3
S6
S4
55
Page 170 of 252
DIFFERENTIAL
REAR
AXLE
AND
REAR
SUSPENSION
165
2
Check
wheel
bearmgs
for
damage
or
noise
Replace
them
If
defective
3
Be
sure
to
use
new
011
seals
and
lockwashers
4
FIt
beanng
cup
and
grease
seal
to
cage
Tap
WIth
a
brass
hammer
while
fittIng
FIll
grease
seal
IIp
With
wheel
beanng
grease
after
fittmg
5
Install
brake
diSC
and
beanng
cage
on
axle
Fit
bearmg
cone
With
brass
bar
6
Tighten
lock
nut
Place
faced
Side
of
nut
to
washer
SIde
so
that
washer
IS
not
damaged
Torque
lock
nut
to
10S
to
145
ft
lb
15
to
20
kg
m
7
Match
washer
IIp
With
groove
m
nut
tIghten
nut
and
bend
washer
carefully
to
prevent
hp
damage
S
Use
a
brass
bar
to
fit
011
seal
to
tube
end
When
fitted
apply
grease
to
the
hp
Be
careful
not
to
deform
seal
or
damage
hp
9
Completely
fill
bearmg
With
grease
10
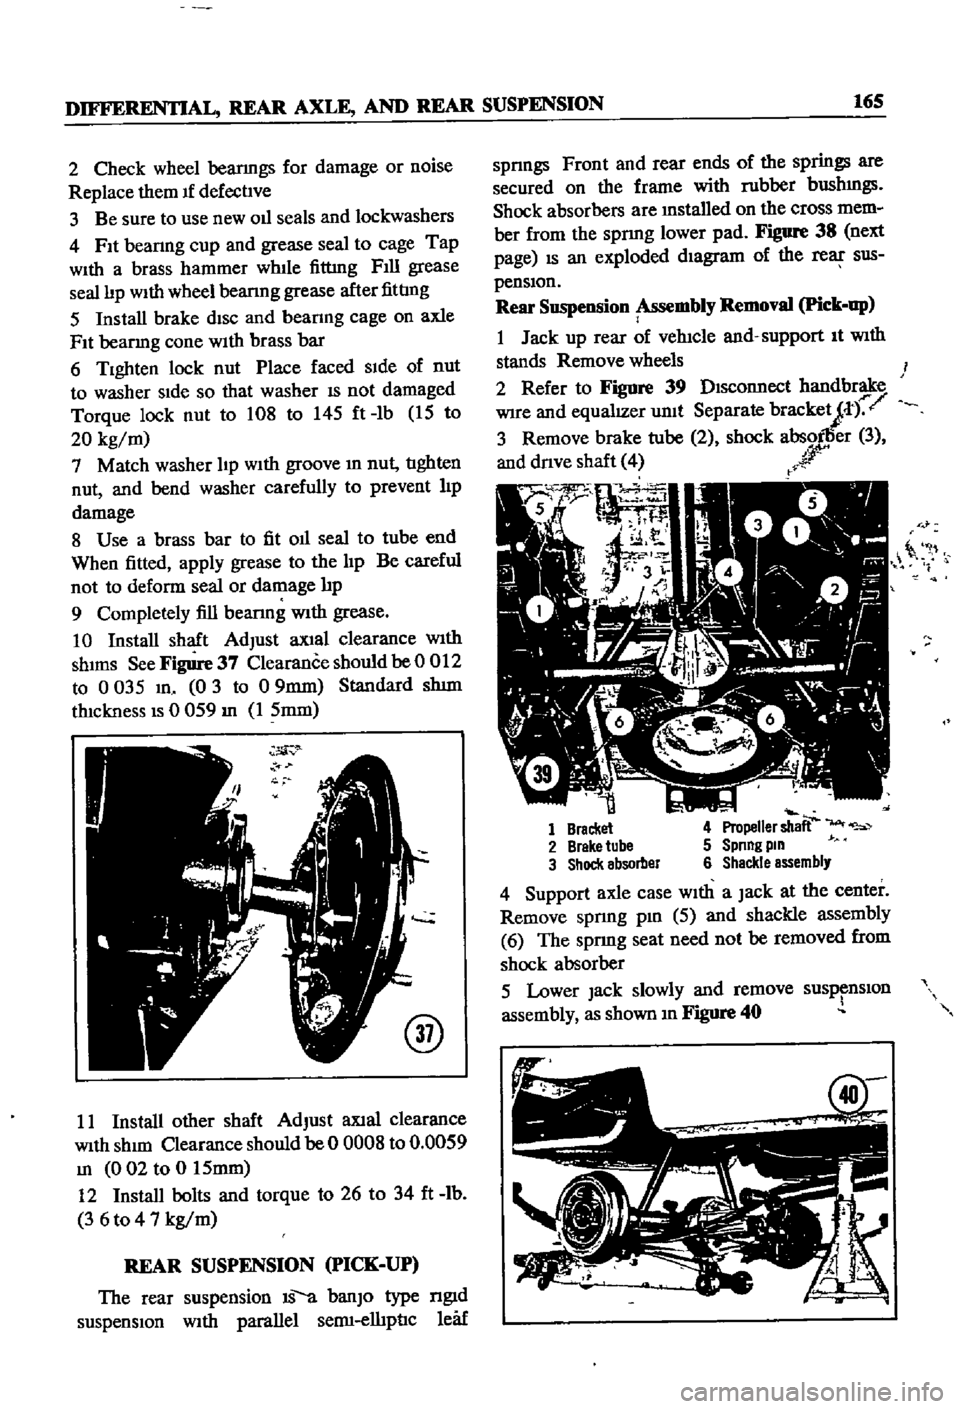
Install
shaft
AdJust
aXial
clearance
With
shIms
See
Figure
37
Clearance
should
be
0
012
to
0
035
m
0
3
to
09mm
Standard
shIm
thickness
IS
0
059
m
1
5mm
@
11
Install
other
shaft
AdJust
aXlal
clearance
With
shIm
Clearance
should
be
0
OOOS
to
0
0059
m
002
to
0
15mm
12
Install
bolts
and
torque
to
26
to
34
ft
lb
3
6
to
4
7
kg
m
REAR
SUSPENSION
PICK
UP
The
rear
suspension
IS
a
banJO
type
ngId
suspensIOn
With
parallel
semI
elhpnc
leaf
spnngs
Front
and
rear
ends
of
the
springs
are
secured
on
the
frame
with
rubber
bushmgs
Shock
absorbers
are
mstalled
on
the
cross
mem
ber
from
the
spnng
lower
pad
Figure
38
next
page
IS
an
exploded
dIagram
of
the
rear
sus
pensIOn
Rear
Suspension
Assembly
Removal
Pick
up
1
Jack
up
rear
of
vehicle
and
support
It
With
stands
Remove
wheels
2
Refer
to
Figure
39
DIsconnect
handbrake
Wire
and
equalIZer
unit
Separate
bracketJt
r
3
Remove
brake
tube
2
shock
absorller
3
and
dnve
shaft
4
r
r
0
it
1
Bracket
4
Propeller
shaft
2
Brake
tube
5
Spnng
pm
3
Shock
absorber
6
Shackle
assembly
4
Support
axle
case
With
a
Jack
at
the
center
Remove
spnng
pm
5
aJId
shackle
assembly
6
The
sprmg
seat
need
not
be
removed
from
shock
absorber
5
Lower
Jack
slowly
and
remove
susp
nslOn
assembly
as
shown
m
Figure
40
Page 173 of 252
CHAPTER
THIRTEEN
FRONT
AXLE
FRONT
SUSPENSION
AND
STEERING
A
strut
type
front
suspension
IS
used
on
sedans
and
wagons
The
shock
absorber
and
the
spmdle
are
a
smgle
urnt
which
is
supported
by
a
coIl
spnng
on
the
upper
end
and
by
the
trans
verse
lInk
on
the
lower
end
Figures
1
2
nnd
3
are
exploded
dIagrams
of
the
axle
and
suspen
SIon
system
used
FIgure
1
Illustrates
the
axle
Figure
2
shows
the
sedan
suspenSlOn
and
FIgure
3
covers
the
wagon
Front
suspensIOn
on
the
pIck
up
IS
a
double
wIShbone
mdependent
deSign
which
uses
torsIon
bars
Figure
4
IS
a
cross
sectional
view
WHEEL
HUB
AND
WHEEL
BEARING
SEDAN
AND
WAGON
Wheel
Hub
nnd
Wheel
Bearing
Removal
Sednn
aud
Wagon
1
Jack
up
the
front
of
the
vehicle
and
support
It
on
stands
2
Remove
the
wheels
3
Detach
brake
hose
connector
at
frame
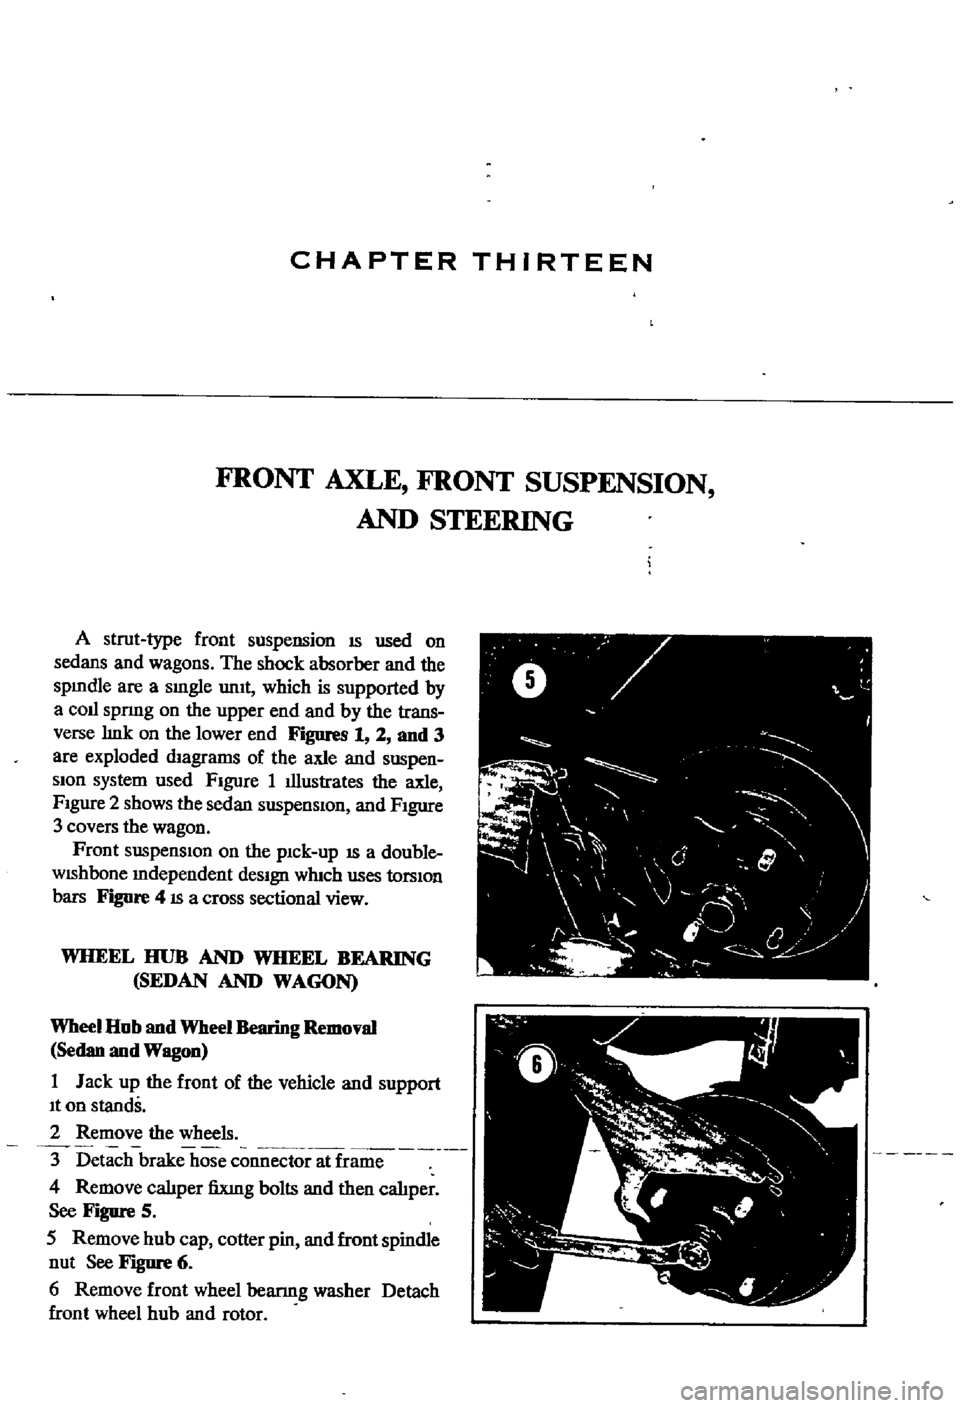
4
Remove
calIper
fiXlng
bolts
and
then
cahper
See
Figure
5
5
Remove
hub
cap
cotter
pin
and
front
spindle
nut
See
Figure
6
6
Remove
front
wheel
bearmg
washer
Detach
front
wheel
hub
and
rotor
ft
V
0
y
F
I
I
J
j
0
l
l
4
f
Page 196 of 252
BRAKES
191
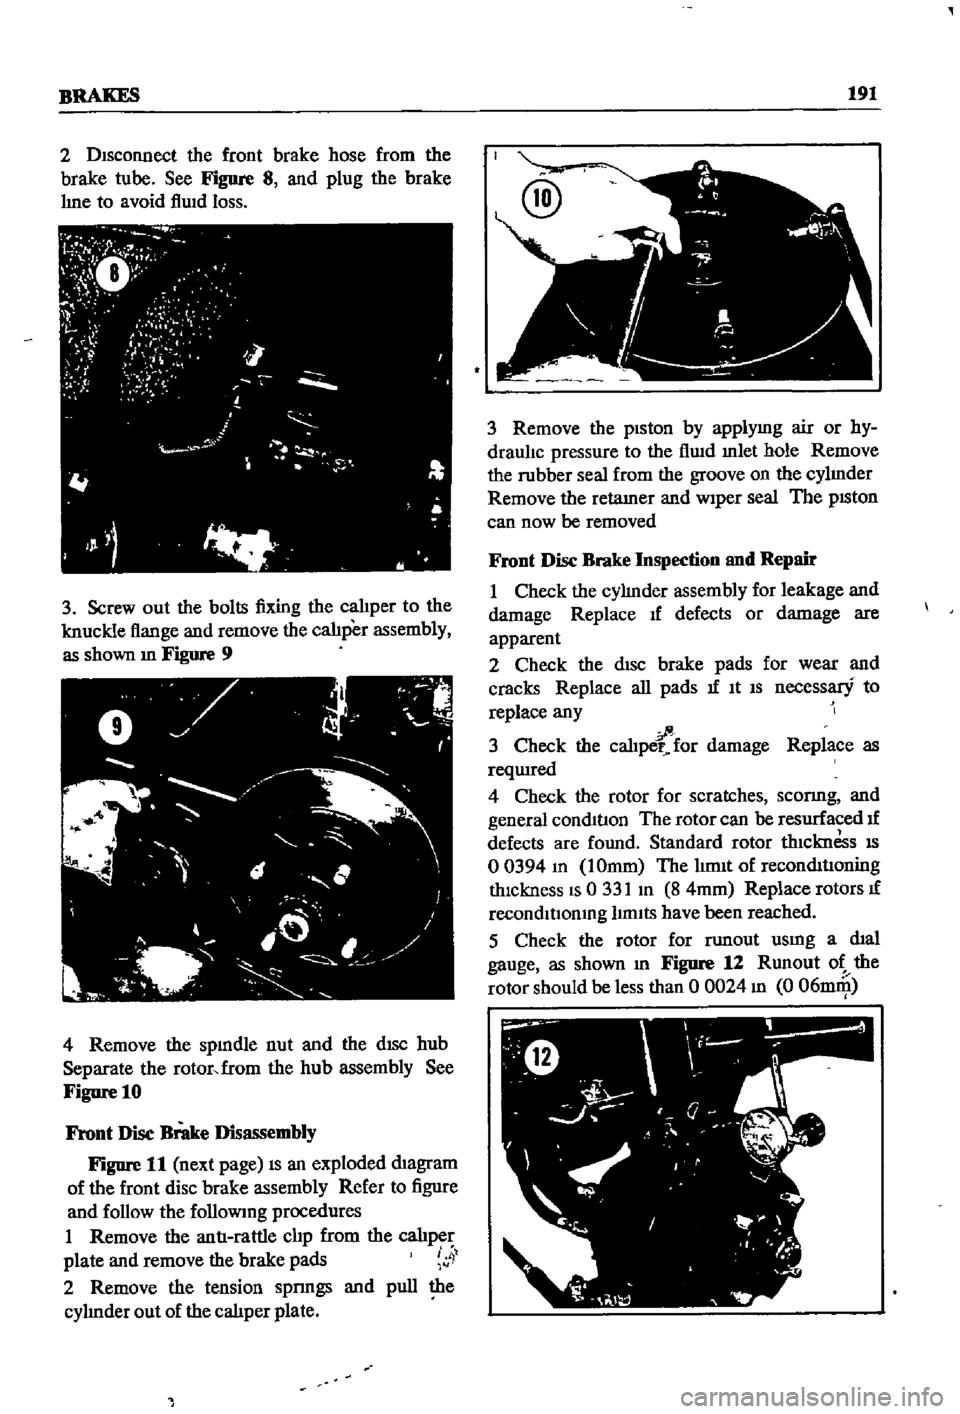
2
Disconnect
the
front
brake
hose
from
the
brake
tube
See
Figure
8
and
plug
the
brake
hne
to
avoid
flwd
loss
3
Screw
out
the
bolts
fixing
the
calJper
to
the
knuckle
flange
and
remove
the
calJper
assembly
as
shown
m
Figure
9
4
Remove
the
spmdle
nut
and
the
dISC
hub
Separate
the
rotor
from
the
hub
assembly
See
Figure
10
Front
Disc
Brake
Disassembly
Figure
11
next
page
IS
an
exploded
diagram
of
the
front
disc
brake
assembly
Refer
to
figure
and
follow
the
followmg
procedures
I
Remove
the
antI
rattle
clip
from
the
calJper
plate
and
remove
the
brake
pads
4
2
Remove
the
tension
spnngs
and
pull
the
cyhnder
out
of
the
caliper
plate
3
Remove
the
piston
by
applymg
air
or
hy
draulJc
pressure
to
the
flwd
mlet
hole
Remove
the
rubber
seal
from
the
groove
on
the
cyhnder
Remove
the
retamer
and
Wiper
seal
The
pISton
can
now
be
removed
Front
Disc
Brake
Inspection
and
Repair
I
Check
the
cyhnder
assembly
for
leakage
and
damage
Replace
If
defects
or
damage
are
apparent
2
Check
the
disc
brake
pads
for
wear
and
cracks
Replace
all
pads
If
It
IS
necessary
to
replace
any
fi
3
Check
the
caliper
for
damage
Replace
as
reqUIred
4
Check
the
rotor
for
scratches
sconng
and
general
conditIon
The
rotor
can
be
resurfaced
If
defects
are
found
Standard
rotor
thiCknesS
IS
o
0394
m
IOmm
The
hm1t
of
reconditIOning
thickness
IS
0
331
m
8
4mm
Replace
rotors
If
recondltIomng
limits
have
been
reached
5
Check
the
rotor
for
TWlout
usmg
a
dial
gauge
as
shown
m
Figure
12
Rnnout
ot
the
rotor
should
be
less
than
0
0024
m
0
06DlIll
Page 210 of 252
CHAPTER
FIFTEEN
BODY
ELECTRICAL
SYSTEM
Exploded
diagrams
of
the
various
systems
are
given
below
Inspection
of
the
constructIon
de
tails
as
given
m
the
exploded
diagrams
should
enable
the
mechanic
to
Identify
remove
repauj
replace
and
mstall
defectIve
parts
General
pro
cedures
are
given
at
the
end
of
the
chapter
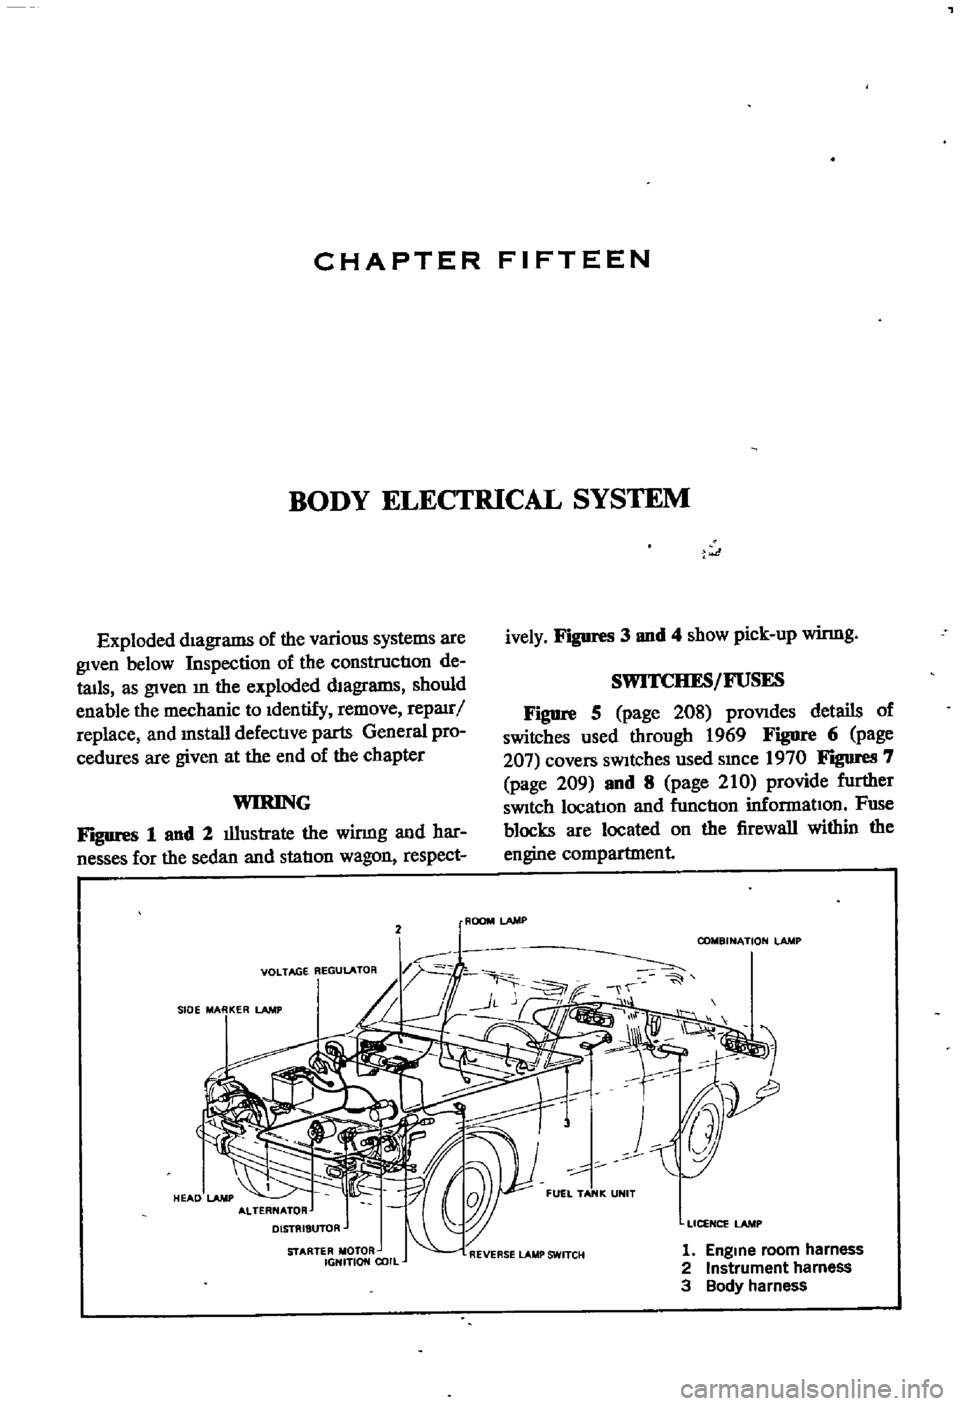
WIRING
FJgUres
1
and
2
illustrate
the
winng
and
har
nesses
for
the
sedan
and
statIon
wagon
respect
2
VOLTAGE
REGULATOR
JOE
MARKER
l
AMJ
STARTER
MOTOR
IGHITION
COIL
t
ively
Figures
3
and
4
show
pick
up
winng
SWITCHES
FUSES
Figure
5
page
208
prOVides
details
of
switches
used
through
1969
Figure
6
page
207
covers
SWitches
used
smce
1970
FIgDI
eS
7
page
209
and
8
page
210
provide
further
SWitch
locatlon
and
fnnctIon
informatIon
Fuse
blocks
are
located
on
the
firewall
within
the
engine
compartment
ROOM
LAMP
COMBINATION
lAMP
LICENCE
lAMP
1
Engme
room
harness
2
Instrument
harness
3
Body
harness
Page 222 of 252

BODY
ELECTRICAL
SYSTEM
217
bulb
socket
must
be
pulled
out
from
the
back
of
the
unit
and
then
the
bulb
can
be
replaced
Care
fully
mspect
the
unit
that
reqUIres
bulb
replace
ment
and
follow
the
appropriate
procedure
Make
certain
you
replace
the
bulb
with
one
rated
at
the
same
voltage
amperage
and
watt
age
Examples
of
units
that
might
require
bulb
replacement
are
the
front
park
and
directional
lamps
rear
combination
lamp
side
marker
lamps
interior
room
lamps
license
plate
lamps
and
engine
compartment
lamps
Fuse
Replacement
Whenever
a
fallure
occurs
m
any
part
of
the
electrical
system
always
check
the
fuse
box
to
see
1f
a
fuse
has
blown
The
fuse
box
is
located
on
the
firewall
within
the
engine
compartment
If
a
fuse
has
blown
It
will
be
eVident
by
bIacken
mg
of
the
fuse
or
by
a
break
of
the
metal
element
Within
the
fuse
The
wiring
diagrams
below
mdIcate
the
cir
cuits
that
are
connected
to
each
fuse
Before
replacing
a
fuse
always
detenIlIDe
what
caused
it
to
blow
and
correct
the
trouble
Never
replace
a
fuse
With
one
of
a
higher
amperage
ratIng
than
originally
used
Never
use
tmfOll
or
other
ma
tenal
to
Jump
across
fuse
tenIlIDals
Failure
to
follow
these
basic
rules
could
result
in
fire
or
damage
to
major
components
WIRING
DIAGRAMS
The
following
figures
provide
wiring
diagrams
for
the
sedan
wagon
and
pick
up
Figure
20
page
220
applies
to
the
sedan
and
station
wagon
with
manual
transmission
Figure
21
page
221
covers
the
sedan
and
station
wagon
With
automatic
transmission
Figure
22
page
222
is
for
the
pick
up
I
Page 230 of 252
CHAPTER
SIXTEEN
ThIS
chapter
provides
infOrnl8tion
and
pro
cedures
for
removal
adJustment
and
or
re
placement
of
various
body
components
in
cluded
are
the
hood
front
trinl
doors
seats
locks
bumpers
tail
gates
and
door
and
window
controls
The
illustrations
given
are
typical
of
the
sedan
the
station
wagon
IS
similar
Details
on
the
pick
up
are
given
in
separate
illustrations
Other
body
repairs
require
special
knowledge
CD
L
BODY
and
tools
and
should
be
referred
to
your
Datsun
dealer
or
local
body
shop
FRONT
BODY
TRIM
AND
BUMPERS
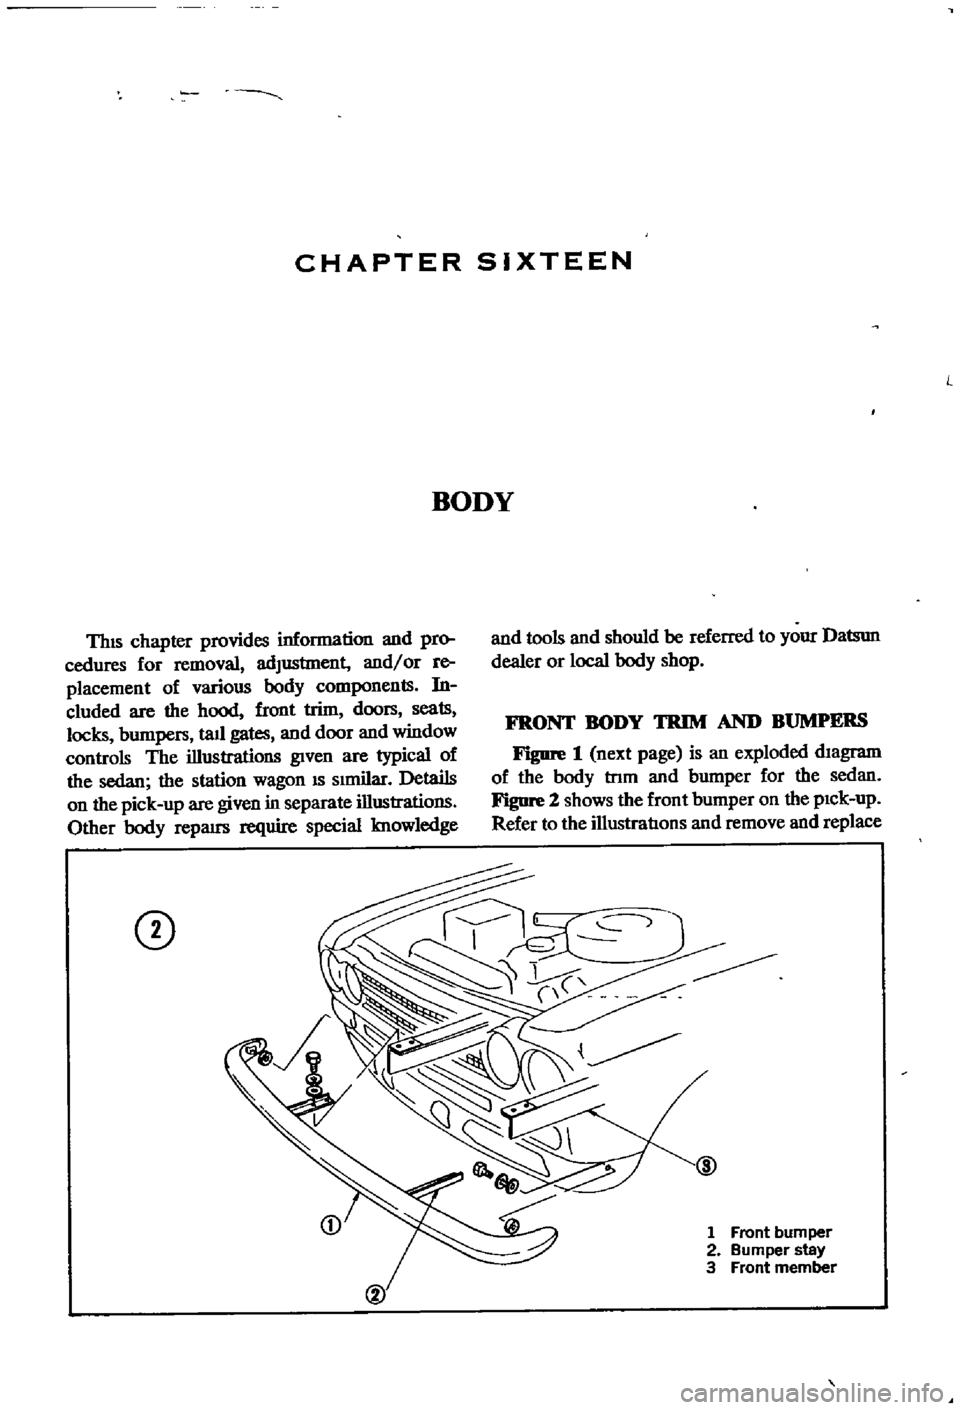
Figure
1
next
page
is
an
exploded
diagram
of
the
body
tnm
and
bumper
for
the
sedan
Figure
2
shows
the
front
bumper
on
the
pick
up
Refer
to
the
illustratIons
and
remove
and
replace
1
Front
bumper
2
Bumper
stay
3
Front
member
Page 243 of 252
INDEX
237
2
7
30
28
WIrIng
diagrams
WIrIng
harnesses
Electncal
system
engme
Alternator
Chargmg
ClfCUlt
Dlstnbutor
IgmtlOn
coIl
Spark
plugs
Starter
Voltage
regulator
Emission
control
crankcase
DescnptIon
General
mspectIon
SchematIc
vIew
VentIlatIOn
control
valve
EmIssIOn
control
exhaust
AIr
pump
AntI
backfire
valve
Check
valve
DescnptlOn
Engme
modificatIons
system
Exploded
and
schematIc
vIews
Mamtenance
and
testIng
Troubleshootmg
Emission
control
system
evaporatIve
Engme
Camshaft
and
beanngs
Camshaft
sprocket
Component
descnptIons
Componenl
reassembly
and
mstallatIon
CompressIOn
testmg
Connectmg
rod
beanngs
Connectmg
rods
Crankshaft
Crankshaft
and
tImmg
cham
Crankshafl
sprocket
Cylmder
block
CylInder
head
DescnptlOn
Disassembly
Exploded
view
Flywheel
InstallatIOn
LubncatIon
MaIO
bearmgs
PIston
nngs
Pistons
and
connectmg
rods
PiStOns
and
piston
pms
Reassembly
Removal
SectIonal
views
ServIce
data
SpeCificatIons
Troubleshootmg
Valve
rocker
PIvot
Valves
Engme
lubncatlon
DescnptIon
217
222
205
207
98
104
98
105
111
111
112
113
9197
104
122
122
121
38
114
123
115
120
114
15
123
48
54
53
31
38
5759
24
52
51
54
51
57
53
49
55
46
56
31
40
33
53
59
27
30
52
50
45
50
54
53
38
32
60
61
60
61
13
54
47
53
114
114
121
114
LubncatlOn
ClfCUlt
011
filter
011
pump
Engme
tune
up
Checks
miscellaneous
Compression
testIng
DIstributor
Dwell
angle
EqUIpment
usage
ReqUIred
eqUIpment
Spark
plugs
Tlmmg
Tlmmg
dual
pomt
dlstnbutor
Valve
clearances
Exhaust
systems
Exploded
views
InspectIon
InstallatIOn
Removal
pickup
Removal
sedan
and
wagon
F
Fan
clutch
DIsassembly
and
reassembly
OperatIon
and
mspectlon
Flywheel
Fuel
pump
Capacity
test
DescnptlOn
Exploded
views
InspectIOn
InstallatIOn
Reassembly
Removal
an
assembly
StatIc
pressure
test
Fuel
stramer
Fuel
system
Air
cleaner
Carburetor
Fuel
pump
Fuel
stramer
Fuel
tank
Troubleshootmg
Fuel
tank
DescnptIon
Exploded
Views
InspectIOn
and
repaIr
Installation
Removal
sedan
Removal
pick
up
Removal
wagon
Fuses
G
27
General
mformatIon
25
24
21
24
20
20
21
23
24
25
124
126
126
126
126
123
l
89
89
53
68
37
65
66
67
68
58
68
42
68
65
1
2v
62
69
65
68
l
6
7
1
l
76
78
81
82
82
76
82
7
6
2
1
F