2022 TOYOTA YARIS CROSS eco drive
[x] Cancel search: eco drivePage 351 of 618

349
6
CV Owner's Manual_Europe_M52N20_en
6-2. Maintenance
Maintenance and care
request that a record of maintenance
be kept.
■Does your vehicle need repairs?
Be on the alert for changes in perfor- mance and sounds, and visual tip-offs
that indicate service is needed. Some important clues are:
●Engine misses (misfire), stumbling or pinging
●Appreciable loss of power
●Strange engine noises
●A fluid leak under the vehicle (How-ever, water dripping from the air con-
ditioning system after use is normal.)
●Change in exhaust sound (This may
indicate a dangerous carbon monox- ide leak. Drive with the windows open and have the exhaust system checked
immediately.)
●Flat-looking tires, excessive tire
squeal when cornering, uneven tire wear
●Vehicle pulls to one side when driven straight on a level road
●Strange noises related to suspension movement
●Loss of brake effectiveness, spongy feeling brake pedal or clutch pedal (vehicles with a manual transmission),
pedal almost touches the floor, vehicle pulls to one side when braking
●Engine coolant temperature continu-ally higher than normal ( P.85, 89)
If you notice any of these clues, take
your vehicle to any authorized Toyota
retailer or Toyota authorized repairer, or
any reliable repairer as soon as possi-
ble. Your vehicle may need adjustment
or repair.
Page 352 of 618

350
CV Owner's Manual_Europe_M52N20_en
6-3. Do-it-yourself maintenance
6-3.Do-it-y ours elf main ten ance
Do-it-yourself ser vice
precautions
If you perform maintenance by
yourself, be sure to follow the
correct procedure as given in
these sections.
Maintenance
ItemsParts and tools
Battery con-
dition
( P.358)
•Warm water
• Baking soda
• Grease
• Conventional wrench
(for terminal clamp
bolts)
Engine cool-
ant level
( P.356)
• “Toyota Super Long
Life Coolant” or a simi-
lar high quality eth-
ylene glycol-based
non-silicate, non-
amine, non-nitrite and
non-borate coolant
with long-life hybrid
organic acid technol-
ogy.
“Toyota Super Long
Life Coolant” is pre-
mixed with 50% cool-
ant and 50% deionized
water.
• Funnel (used only for
adding coolant)
Engine oil
level
( P.354)
• “Toyota Genuine Motor
Oil” or equivalent
• Rag or paper towel
• Funnel (used only for
adding engine oil)
Fuses
( P.381)
• Fuse with same
amperage rating as
original
Light bulbs
( P.386)
• Bulb with same num-
ber and wattage rating
as original
• Flathead screwdriver
•Wrench
Radiator,
condenser
( P.357)
Tire inflation
pressure
( P.373)
• Tire pressure gauge
• Compressed air
source
Washer fluid
( P.362)
• Water or washer fluid
containing antifreeze
(for winter use)
• Funnel (used only for
adding water or
washer fluid)
WARNING
The engine compartment contains many mechanisms and fluids that
may move suddenly, become hot, or become electrically energized. To avoid death or serious injury, observe
the following precautions.
■When working on the engine
compartment
●Keep hands, clothing and tools away from the moving fan and
engine drive belt.
●Be careful not to touch the engine,
radiator, exhaust manifold, etc. right after driving as they may be hot. Oil and other fluids may also be hot.
●Do not leave anything that may burn easily, such as paper and
rags, in the engine compartment.
ItemsParts and tools
Page 371 of 618

369
6
CV Owner's Manual_Europe_M52N20_en
6-3. Do-it-yourself maintenance
Maintenance and care
determined and the inflation pres-
sures are not being displayed on the multi-information display, if the infla-tion pressure of a tire drops, the tire
pressure warning light will come on.
■If the tire pressure warning system is not initialized properly
●In the following situations, initialization may take longer than usual to be com-pleted or may not be possible. (Usu-
ally, the vehicle will need to be driven for approximately 10 to 30 minutes to complete initialization.) If initialization
is not complete after driving approxi- mately 30 minutes, continue driving for a while.
• If the vehicle is driven on an unpaved road, it may take longer to complete initialization.
• If the vehicle is backed up while per- forming initialization, data collected during initialization will be cleared and
it will take longer than normal to com- plete.• If the vehicle is driven in heavy traffic
or another situation where other vehi- cles are driven close by, it may take time for the system to recognize the
tire pressure warning valve and trans- mitters of your vehicle over those of other vehicles.
If initialization is not complete after driv-
ing for approximately 1 hour, park the
vehicle in a safe place for more than 15
minutes and then drive the vehicle
again.
●In the following situations, initialization will not be started or was not com-
pleted properly and the system will not operate properly. Perform the initial-ization procedure again.
• If, when attempting to start initializa- tion, the tire pressure warning light does not blink 3 times.
• If, when the vehicle has been driven for about 20 minutes after performing initialization, the tire pressure warning
light blinks for approximately 1 minute and then illuminates.
●If initialization cannot be completed
after performing the above procedure,
contact any authorized Toyota retailer or Toyota authorized repairer, or any reliable repairer.
The tire pressure warning valve
and transmitter is equipped with a
unique ID code. When replacing a
tire pressure warning valve and
transmitter, it is necessary to regis-
ter the ID code.
The ID codes can be registered on
of the multi-information display.
1 Park the vehicle in a safe place,
wait for approximately 15 min-
utes or more and perform the
procedure.
2 Turn the engine switch to ON.
Operate the registering ID codes func-
tion cannot be performed while the vehicle is moving.
3 Press / (7-inch display)
or / (4.2-inch display) of
the meter control switch to
select .
WARNING
■When initializing the tire pres- sure warning system
Do not initialize the tire pressure
warning system without first adjusting the tire inflation pressure to the speci-fied level. Otherwise, the tire pressure
warning light may not come on even if the tire inflation pressure is low, or it may come on when the tire inflation
pressure is actually normal.
Registering ID codes
Page 373 of 618

371
6
CV Owner's Manual_Europe_M52N20_en
6-3. Do-it-yourself maintenance
Maintenance and care
■If ID codes are not registered prop-
erly
●In the following situations, ID code
registration may take longer than usual to be completed or may not be possible. (Usually, the vehicle will
need to be driven for approximately 10 to 30 minutes to complete ID code registration.)
If ID code registration is not complete after driving for approximately 30 min-utes, continue driving for a while.
• If the vehicle is driven on an unpaved road, it may take longer than normal to complete registration.
• If the vehicle is backed up while per- forming registration, data collected during registration will be cleared, and
it will take longer than normal to com- plete.• If the vehicle is driven in heavy traffic
or another situation where other vehi- cles are driven close by, it may take time for the system to recognize the
tire pressure warning valve and trans- mitters of your vehicle over those of other vehicles.
• If a wheel with a tire pressure warning valve and transmitter installed is inside or near the vehicle, registration
of the ID codes for the installed wheels may not be possible.
If ID registration is not complete after
driving for approximately 1 hour, park
the vehicle in a safe place for approxi-
mately 20 minutes and then perform the
ID code registration procedure again.
●In the following situations, ID code registration will not be started or was not completed properly and the sys-
tem will not operate properly. Perform the ID code registration procedure again.
• If, when attempting to start ID code registration, the tire pressure warning light does not blink slowly 3 times.
• If, when the vehicle has been driven for about 10 minutes after performing ID code registration, the tire pressure
warning light blinks for approximately 1 minute and then illuminates.
●If ID code registration cannot be com-
pleted after performing the above pro- cedure, contact any authorized Toyota retailer or Toyota authorized repairer,
or any reliable repairer.
Your vehicle is equipped with tire
pressure warning system with the
function to have ID codes regis-
tered for a second wheel set, for
example a winter set, by any autho-
rized Toyota retailer or Toyota
authorized repairer, or any reliable
repairer.
After registration of a second wheel
set, either of these two wheel sets
can be selected for usage with the
tire pressure warning system.
■Operating conditions for the
function
This function will perform the
change of wheel set only if a sec-
ond wheel set has been regis-
tered. If no second wheel set has
been registered, the ID cannot
be changed even if “Identifying
Each Wheel & Position” is
selected in the multi-information
display and waiting for 2 min-
utes.
Only a change between both
registered wheel set is possible,
mixing between these wheel sets
is not supported.
Selecting wheel set
Page 374 of 618

372
CV Owner's Manual_Europe_M52N20_en
6-3. Do-it-yourself maintenance
■How to change between wheel
sets
1 Have the vehicle fitted with the
preferred wheel set.
2 Press / (7-inch display)
or / (4.2-inch display) of
the meter control switch to
select .
3 Press / (7-inch display)
or / (4.2-inch display) to
select “Vehicle Settings” and
then press .
4 Press / to select “TPWS
setting” and then press .
5 Press / to select “Identi-
fying Each Wheel & Position”.
Then press and hold until
the tire pressure warning light
blinks slowly 3 times. Afterward,
turns on after flashing for 1 min-
ute.
After 2 minutes, registration of a second
wheel set is being performed and the
tire pressure warning light will turn off.
6 Initialize the tire pressure warn-
ing system. ( P.367)
If the tire inflation pressure settings for
the installed tire changes, initialization operations are required, but if the same tire inflation pressure, initialization is
not required.
7 Drive straight (with occasional
left and right turns) at approxi-
mately 40 km/h (25 mph) or
more for approximately 10 to 30
minutes.
Registration of a second wheel set is complete when the tire pressure warn-ing light turns off and the inflation pres-
sure of each tire is displayed on the multi-information display.
■Certifications for the tire pressure warning system
P. 6 0 8
Page 375 of 618

373
6
CV Owner's Manual_Europe_M52N20_en
6-3. Do-it-yourself maintenance
Maintenance and care
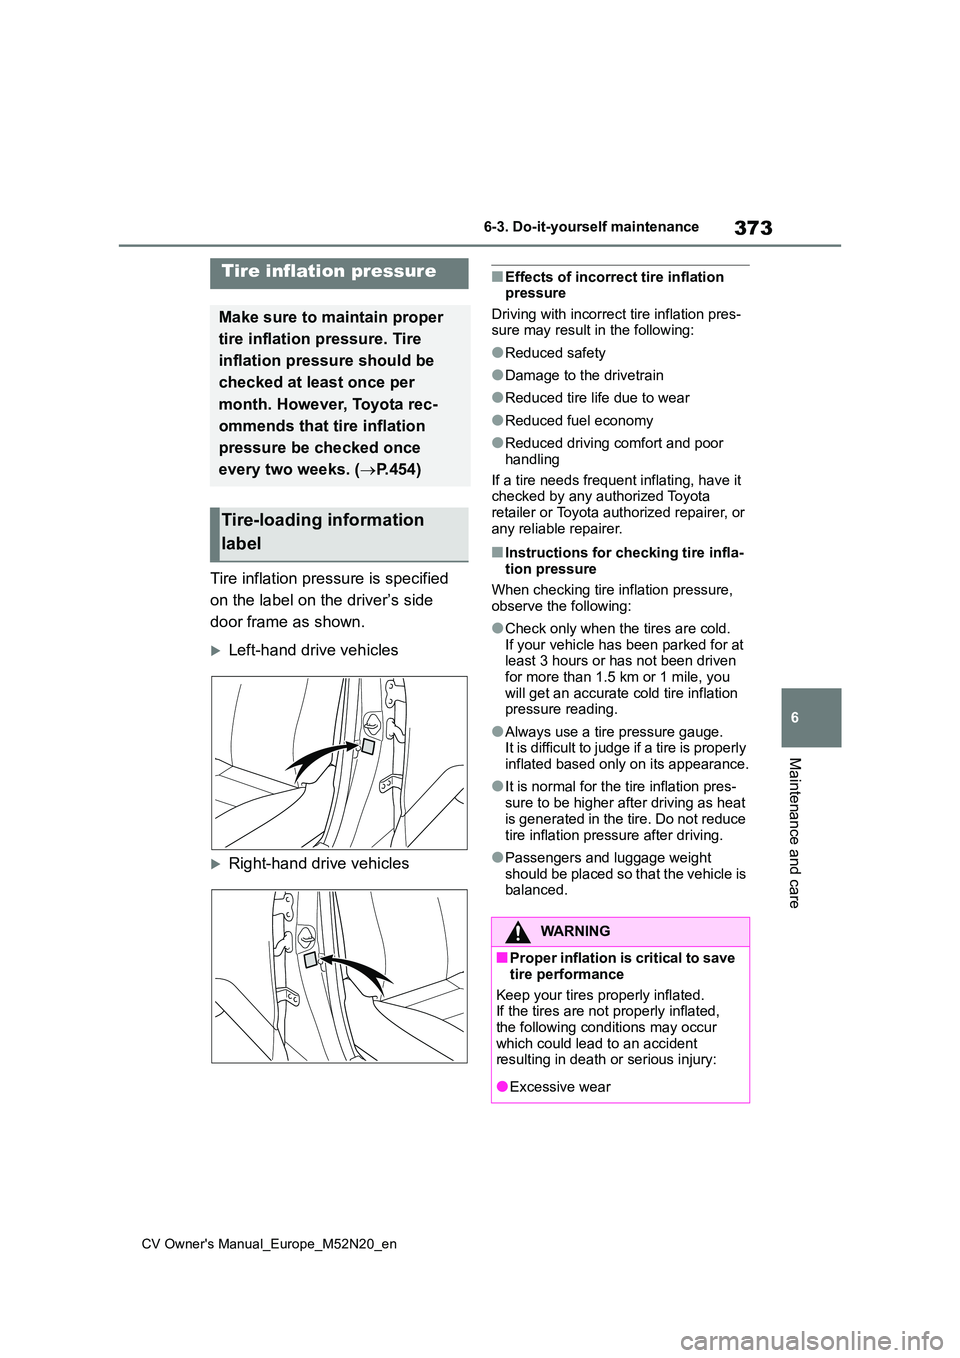
Tire inflation pressure is specified
on the label on the driver’s side
door frame as shown.
Left-hand drive vehicles
Right-hand drive vehicles
■Effects of incorrect tire inflation pressure
Driving with incorrect tire inflation pres- sure may result in the following:
●Reduced safety
●Damage to the drivetrain
●Reduced tire life due to wear
●Reduced fuel economy
●Reduced driving comfort and poor
handling
If a tire needs frequent inflating, have it checked by any authorized Toyota
retailer or Toyota authorized repairer, or any reliable repairer.
■Instructions for checking tire infla-tion pressure
When checking tire inflation pressure, observe the following:
●Check only when the tires are cold.If your vehicle has been parked for at least 3 hours or has not been driven
for more than 1.5 km or 1 mile, you will get an accurate cold tire inflation pressure reading.
●Always use a tire pressure gauge.It is difficult to judge if a tire is properly
inflated based only on its appearance.
●It is normal for the tire inflation pres-
sure to be higher after driving as heat is generated in the tire. Do not reduce
tire inflation pressure after driving.
●Passengers and luggage weight
should be placed so that the vehicle is balanced.
Tire inflation pressure
Make sure to maintain proper
tire inflation pressure. Tire
inflation pressure should be
checked at least once per
month. However, Toyota rec-
ommends that tire inflation
pressure be checked once
every two weeks. ( P.454)
Tire-loading information
label
WARNING
■Proper inflation is critical to save
tire performance
Keep your tires properly inflated. If the tires are not properly inflated,
the following conditions may occur which could lead to an accident resulting in death or serious injury:
●Excessive wear
Page 381 of 618

379
6
CV Owner's Manual_Europe_M52N20_en
6-3. Do-it-yourself maintenance
Maintenance and care
shops or camera stores.
●Replace only with the same or equiva- lent type recommended by the manu-
facturer.
●Dispose of used batteries according to
local laws.
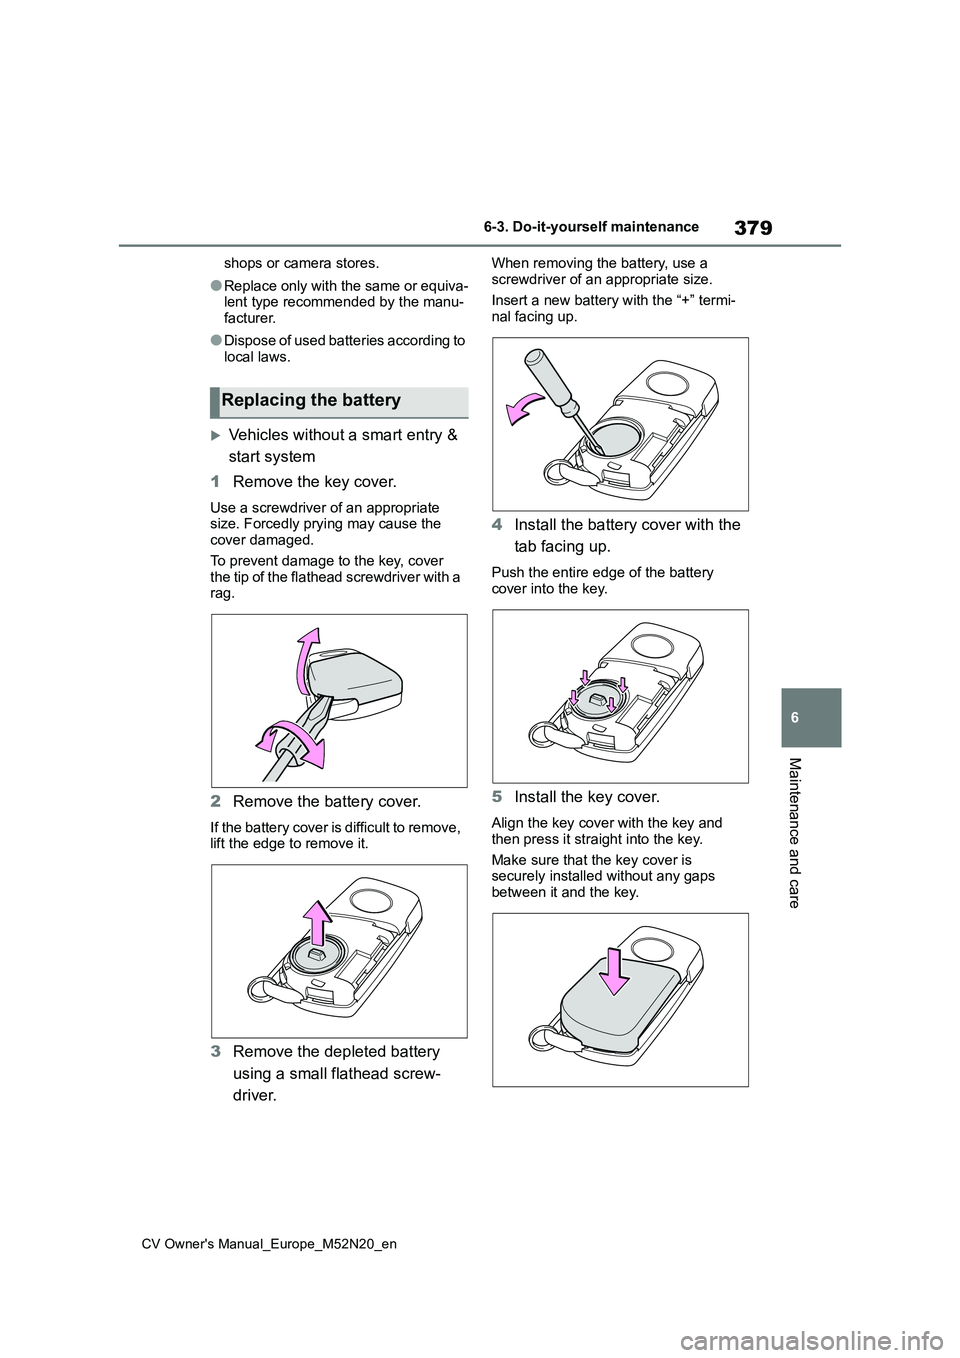
Vehicles without a smart entry &
start system
1 Remove the key cover.
Use a screwdriver of an appropriate size. Forcedly prying may cause the cover damaged.
To prevent damage to the key, cover the tip of the flathead screwdriver with a rag.
2 Remove the battery cover.
If the battery cover is difficult to remove, lift the edge to remove it.
3 Remove the depleted battery
using a small flathead screw-
driver.
When removing the battery, use a
screwdriver of an appropriate size.
Insert a new battery with the “+” termi- nal facing up.
4 Install the battery cover with the
tab facing up.
Push the entire edge of the battery cover into the key.
5 Install the key cover.
Align the key cover with the key and
then press it straight into the key.
Make sure that the key cover is securely installed without any gaps
between it and the key.
Replacing the battery
Page 388 of 618

386
CV Owner's Manual_Europe_M52N20_en
6-3. Do-it-yourself maintenance
Check the wattage of the light bulb
to be replaced. ( P.455)
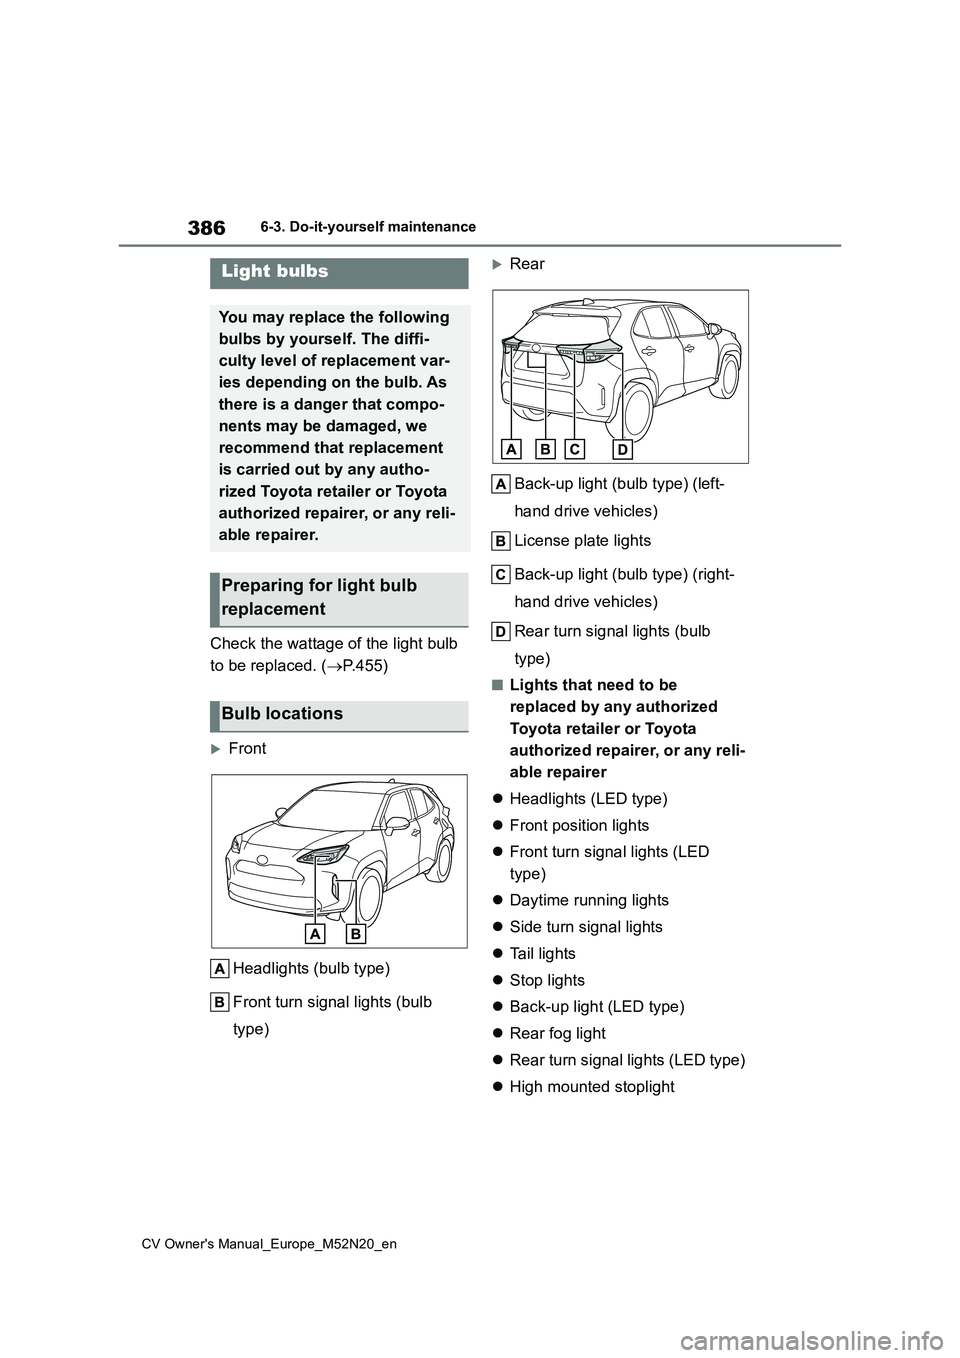
Front
Headlights (bulb type)
Front turn signal lights (bulb
type)
Rear
Back-up light (bulb type) (left-
hand drive vehicles)
License plate lights
Back-up light (bulb type) (right-
hand drive vehicles)
Rear turn signal lights (bulb
type)
■Lights that need to be
replaced by any authorized
Toyota retailer or Toyota
authorized repairer, or any reli-
able repairer
Headlights (LED type)
Front position lights
Front turn signal lights (LED
type)
Daytime running lights
Side turn signal lights
Ta i l l i g h t s
Stop lights
Back-up light (LED type)
Rear fog light
Rear turn signal lights (LED type)
High mounted stoplight
Light bulbs
You may replace the following
bulbs by yourself. The diffi-
culty level of replacement var-
ies depending on the bulb. As
there is a danger that compo-
nents may be damaged, we
recommend that replacement
is carried out by any autho-
rized Toyota retailer or Toyota
authorized repairer, or any reli-
able repairer.
Preparing for light bulb
replacement
Bulb locations