Page 33 of 268

GETTING TO KNOW YOUR VEHICLE31
Outside Mirrors Folding Feature
All outside mirrors are hinged and may be folded
forward or rearward to avoid damage. The hinges
have three detent positions:
Full forward position
Full rearward position
Normal position
POWER MIRRORS — IF EQUIPPED
The power mirror controls are located on the
driver’s side door trim panel.
Power Mirror Controls
To adjust a mirror, turn the control knob toward the left
upper, left lower, right upper or right lower mirror
positions indicated by one of the four arrows on the
switch. Tilt the control knob in the direction you want
the mirror to move. When you are finished adjusting the
mirror, turn the control to the center O (off) position to
prevent accidentally moving a mirror.
NOTE:
If your vehicle is equipped with a power blind
spot mirror, you can adjust them when the
control knob is positioned to the lower arrows.
The vehicle must be in ON/RUN to adjust the
mirrors.
POWER FOLDING OUTSIDE MIRRORS —
I
F EQUIPPED
The power folding mirrors can be folded rearward
and unfolded into the normal driving position.
The switch for the power folding mirrors is located on
the driver’s door panel below the power mirror controls.
Push the switch to the right and the mirrors will fold in,
push the switch to the left and the mirrors will return to
the normal driving position.
Power Folding Mirror Switch
The power folding mirrors are designed to be
folded and unfolded using the power folding
switch. If the mirrors are manually folded, the
mirror head may appear loose.
If the mirror head or pivot exhibits a slight amount
of play, the mirror should be power folded closed,
then power folded open (this may require multiple
button pushes).
NOTE:The intended use of the power folding mirrors is by
pushing the buttons to fold and unfold the mirrors.
Only manually fold the mirrors when necessary.
1 — Power Folding Mirror (Normal Driving Position)
2 — Power Folding Mirror (Fold In Position)
2
22_VF_OM_EN_USC_t.book Page 31
Page 34 of 268

32GETTING TO KNOW YOUR VEHICLE
Forward Folding
Mirrors can be folded forward manually or by
accidental impact. In this case it is possible to
restore to position both ways, manually and
electrically (as previously described).
Power/Manual Folding Mirror Positions
HEATED MIRRORS — IF EQUIPPED
These mirrors are heated to melt frost
or ice. This feature will be activated
whenever you turn on the rear window
defroster (if equipped) Ú page 39.
EXTERIOR LIGHTS
MULTIFUNCTION LEVER
The multifunction lever controls the operation
of the headlights, parking lights, turn signals,
headlight beam selection and the passing lights.
The multifunction lever is located on the left side of
the steering column.
Multifunction Lever
HEADLIGHTS
To turn on the headlights, turn the end of the
multifunction lever to the headlight position. When
the headlight switch is on, the parking lights,
taillights, license plate light, clearance lights and
instrument panel lights are also turned on. To turn off the headlights, turn the end of the multifunction
lever back to the O (off) position.
NOTE:On vehicles sold in Canada, the rear parking lights,
clearance lights, and Daytime Running Lights
(DRLs) will turn on when the headlight switch is
rotated to the O (off) position.
DAYTIME RUNNING LIGHTS (DRLS) —
I
F EQUIPPED
The Daytime Running Lights (DRLs) will come on
when the ignition is in the ON position and the
vehicle is in DRIVE or NEUTRAL.
To activate the DRLs, rotate the end of the
multifunction lever to the O (off) position or the
AUTO position.
NOTE:
For vehicles sold in Canada, the Daytime
Running Lights will automatically deactivate
when the front fog lights are turned on.
The low beams and side/taillights will not be on
with DRLs.
On some vehicles, the Daytime Running Lights
may deactivate, or reduce intensity, on one side
of the vehicle (when a turn signal is activated on
that side), or on both sides of the vehicle (when
the hazard warning lights are activated).
1 — Normal Driving Position
2 — Fold In Position
3 — Fold Forward Position
CAUTION!
Leaving the mirror in a non-powered position,
accidental impact or manual fold, may cause
permanent damage to the mirror. Electrically
restore the mirror to its normal position, as soon
as practical.
22_VF_OM_EN_USC_t.book Page 32
Page 35 of 268

GETTING TO KNOW YOUR VEHICLE33
HIGH/LOW BEAM SWITCH
With the low beams activated, push the multifunction
lever toward the instrument panel to turn on the high
beams. The High Beam Indicator Light will illuminate in
the instrument cluster to indicated that the high beams
are on. Push the multifunction lever a second time to
switch the headlights back to low beam. When the
ignition is placed in the OFF position, both the high and
low beams will turn off.
AUTOMATIC HIGH BEAM HEADLAMP
C
ONTROL — IF EQUIPPED
The Automatic High Beam Headlamp Control
system provides increased forward lighting at night
by automating high beam control through the use
of a digital camera mounted on the windshield.
This camera detects vehicle specific light and
automatically switches from high beams to low
beams until the approaching vehicle is out of view.
NOTE:
The multifunction lever must be in the high
beam position in order for the Automatic High
Beam Headlamp Control to activate.
The Automatic High Beam Headlamp Control
can be turned on or off through Uconnect
Settings Ú page 120.
Broken, muddy, or obstructed headlights and
taillights of vehicles in the field of view will
cause headlights to remain on longer (closer to
the vehicle). Also, dirt, film, and other obstruc -
tions on the windshield or camera lens will
cause the system to function improperly.
When set to AUTO, the system automatically
turns the headlights on or off based on ambient
light levels.
FLASH-TO-PASS
You can signal another vehicle with your headlights
by lightly pulling the multifunction lever toward you.
This will cause the high beam headlights to turn on,
and remain on, until the lever is released.
AUTOMATIC HEADLIGHTS — IF EQUIPPED
To turn on the automatic headlights, turn the end
of the multifunction lever to the AUTO position. To
turn off the automatic headlights, turn the end of
the multifunction lever back to the O (off) position.
PARKING LIGHTS
These lights can be turned on, with the ignition in the
OFF position, by moving the end of the multifunction
lever to O (off) position and then to the headlight
position.
The indicator light in the instrument panel comes
on. The lights stay on until the next ignition cycle is
performed.
HEADLIGHT DELAY
When this feature is selected, the driver can
choose to have the headlights remain on for a
preset period of time after the engine is turned off.
Activation
To activate the delay feature, place the ignition in
the OFF position while the headlights are still on.
Then, rotate the multifunction lever to the O (off)
position within two minutes. The delay interval
begins when the headlight switch is turned from
O (off) to the low beam position. If the headlight
switch is in AUTO position and headlights were on
before the ignition is OFF, the delay interval begins
automatically.
Deactivation
The feature is disabled by turning on the
headlights, the parking lights or by placing the
ignition in the RUN position. If you shut off the
lights before the ignition is turned on, they will turn
off in the normal manner.
Headlights with ignition in the OFF position.
With the ignition in the OFF position, the headlights
can be switched on for a maximum time of
8 minutes. To turn on the headlights with the
ignition in the OFF position, turn the end of the
multifunction lever to the headlight position.
2
22_VF_OM_EN_USC_t.book Page 33
Page 36 of 268

34GETTING TO KNOW YOUR VEHICLE
NOTE:If the headlight delay function is disabled in the
Uconnect Setting, when you put the ignition in the
OFF position with the multifunction lever already
set in the headlight position, the headlights remain
on for 8 minutes.
FOG LIGHTS — IF EQUIPPED
The fog light switch is located on the instrument
panel to the left of the steering column.
To activate the front fog lights, turn on the
parking lights or the low beam headlights
and push the fog light button. To turn off
the front fog lights, push the fog light
button a second time or turn off the headlight
switch. An indicator light in the instrument cluster
illuminates when the fog lights are turned on.
NOTE:The fog lights will operate with the low beam head -
lights or parking lights on. Selecting the high beam
headlights will turn off the fog lights.
If the vehicle’s ignition is turned off, the fog lights
will also turn off. Cornering Lights
The cornering lights are a feature to improve visibility at
night while turning the vehicle. When activated, a light
incorporated in the front fog light will illuminate on the
side of the vehicle the steering wheel is rotated or the
turn signal indicator is on. It can be activated through
the Uconnect system
Ú
page 120.
TURN SIGNALS
Move the multifunction lever up or down and the
arrows on each side of the instrument cluster will
flash to show proper operation of the front and rear
turn signals.
NOTE:When the Daytime Running Lights are on and a
turn signal is activated, the Daytime Running Lamp
will turn off on the side of the vehicle in which the
turn signal is flashing. The Daytime Running Lamp
will turn back on when the turn signal is turned off.
If either light remains on and does not flash, or
there is a very fast flash rate, check for a defective
outside light bulb.
LANE CHANGE ASSIST
Lightly push the multifunction lever up or down,
without moving beyond the detent, and the turn
signal will flash five times then automatically
turn off.
BATTERY SAVER
To protect the life of your vehicle’s battery, when
the ignition is OFF and any door is left ajar for
15 minutes, the interior lights will automatically
turn off.
NOTE:Battery saver mode is canceled if the ignition is
placed in the ON/RUN position.
22_VF_OM_EN_USC_t.book Page 34
Page 37 of 268

GETTING TO KNOW YOUR VEHICLE35
INTERIOR LIGHTS
COURTESY LIGHTS
These lights are mounted between the sun visors
on the overhead console. Each light is turned on by
pushing the corresponding switch.
Courtesy Lights
Dome Lights
The interior lights can be set to three different
positions (off/left position, center position,
on/right position). Using the switch on the
bottom of the overhead console:
Push the switch to the on/right position from its
center position and the lights are always on.
Push the switch to the off/left position from its
center position and the lights are always off.
Leave the switch in the center position, and the
lights are turned on and off when the doors are
opened or closed.
Map Lights
The switches on the left and right sides of the
overhead console control the map or reading
function of the lights. Push the switch on the right
to turn the right light on; push again to turn off.
Push the switch on the left to turn the left light on;
push again to turn off.
Rear Lights
Your vehicle may be equipped with a Rear Cargo
Lamp located at the upper rear cargo area above
the rear doors.
Rear Cargo Lamp Location
Your vehicle may also be equipped with a Side
Cargo Lamp located at the upper rear area of the
passenger side sliding door opening.
1 — Ambient Light
2 — Left Map Light
3 — Off/Left Position
4 — Center Position
5 — Right Map Light
6 — On/Right Position
CAUTION!
Before getting out of the vehicle be sure that the
switch is in the center position or that the lights
are off to avoid draining the battery.
2
22_VF_OM_EN_USC_t.book Page 35
Page 38 of 268

36GETTING TO KNOW YOUR VEHICLE
Side Cargo Lamp Location
The Rear and Side Cargo Lamps can be set to three
different positions by pushing the lens to the right,
left, or center positions.
Push the lens to the right from its center posi -
tion and the lamp is always off.
Leave the lens in the center position, and the
lamp is turned on and off when the sliding doors
or rear doors are opened or closed.
Push the lens to the left from its center position
and the lamp is always on.
Your vehicle may also be equipped with a cargo
lamp on the center of the ceiling of the cargo area.
Ceiling Cargo Lamp
The Ceiling Cargo Lamp can be set to three different
positions (off/left position, center position, on/right
position).
Push the switch to the left from its center posi -
tion and the lamp is always off.
Leave the switch in the center position, and the
lamp is turned on and off when the sliding doors
or rear doors are opened or closed. The Ceiling
Cargo Lamp is also equipped with a movement
sensor that will switch the light on when move -
ment is detected.
Push the switch to the right from its center posi -
tion and the lamp is always on.
NOTE:If the ignition is placed in the OFF position, the
lamp will stay on for about 15 minutes and then
time out.
Dimmer Controls
The dimmer controls are located on the left side of
the instrument panel below the instrument cluster
display.
Dimmer Controls
Pushing the “+” or “–” button will increase or
decrease the brightness of the instrument panel
lights, cupholder lights, and footwell lights, as long
as the headlights or parking lights are on.
If the “-” button is pushed until the instrument
panel lights turn off, the interior lights will remain
off when the vehicle’s doors are opened.
If the “+” button is pushed until the interior lights
turn on, the interior lights will remain on when the
vehicle’s doors are closed.
22_VF_OM_EN_USC_t.book Page 36
Page 39 of 268

GETTING TO KNOW YOUR VEHICLE37
Dimming Of The Uconnect Touchscreen
The brightness of the Uconnect touchscreen can be
dimmed using the instrument panel dimmer control
when the parking lights or headlights are on.
When Display Mode is set to Auto within the
Uconnect system, the brightness will automatically
adjust from daytime intensity to nighttime intensity
(and vice versa) based on ambient light levels
outside of the vehicle.
NOTE:The brightness of the Uconnect touchscreen
cannot be adjusted when the dimmer control is
at the maximum setting (interior lights on), even
when Display Mode is set to Auto within the
Uconnect Settings.
When Display Mode is set to Manual, the
brightness of the Uconnect touchscreen will adjust
to the set brightness (1 - 6) when the headlights
are either on or off. For more information on these
Uconnect Settings, see Ú page 120.
Ambient Light
The vehicle is equipped with ambient light on the
dome lamp. The ambient light will be on all the
time, with the option of dimming it with the dimmer
controls as long as the headlights are turned on.
Ambient LED Lighting — If Equipped
Your vehicle may be equipped with LED lighting in
the front footwells and center cup holders. The
brightness of the lights can be adjusted using the
dimmer controls, located on the left side of the
instrument panel, as long as the headlights are
turned on.
ILLUMINATED ENTRY
The courtesy lights will turn on when you use
the key fob to unlock the doors or open any door.
They also turn on when unlocking or opening
manually from the driver door cylinder.
The lights will fade to off after approximately
30 seconds, or they will immediately fade to off
once the ignition switch is changed to the ON/RUN
position from the OFF position.
The dome lights illuminate in the following ways:
When the doors are unlocked, the dome light
will illuminate for approximately 27 seconds.
When one of the front doors is opened, the front
dome light will illuminate for approximately
three minutes.
When one of the rear doors is opened, the rear
dome light will illuminate for approximately
three minutes.
When the front doors are closed, the front dome
light will automatically shut off after approxi -
mately 27 seconds.
When the rear doors are closed, the rear dome
light will automatically shut off after approxi -
mately 27 seconds. The timing stops once the
ignition is placed in the RUN or ON position.
The dome light will turn off under any of the
following conditions:
The dome light is disabled when the ignition is
placed in the RUN or ON position.
The dome lights will turn off automatically when
the doors are locked.
NOTE:
The front courtesy overhead console and door
courtesy lights will not turn off if the dimmer
control is in the “Dome ON” position.
The illuminated entry system will not operate if the
dimmer control is in the “Dome OFF” position.
2
22_VF_OM_EN_USC_t.book Page 37
Page 40 of 268

38GETTING TO KNOW YOUR VEHICLE
WIPERS AND WASHERS
The windshield wiper/washer lever is located on
the right side of the steering column. There are
five different modes of operation for the front
windshield wipers. The windshield wiper lever can
be raised or lowered to access the modes.
NOTE:The windshield wipers/washers will only operate
with the ignition in the ON/RUN position.
Windshield Wiper/Washer Lever
WINDSHIELD WIPER OPERATION
Rotate the windshield wiper knob to one of the first
two detent positions for intermittent settings, the
third detent for low wiper operation and the fourth
for high wiper operation.
Windshield Washers
To use the washer, pull the windshield wiper/
washer lever toward the steering wheel to activate.
The wipers will activate automatically for three
cycles after the lever is released, and then resume
the intermittent interval previously selected.
If the lever is pulled while in the off position, the wipers
will operate for three cycles and then turn off.
Mist
Use the Mist feature when weather conditions
make occasional usage of the wipers necessary.
Push the lever upward to the MIST position and
release for a single wiping cycle.
NOTE:The mist feature does not activate the washer
pump; therefore, no washer fluid will be sprayed on
the windshield. The wash function must be used in
order to spray the windshield with washer fluid.
For information on wiper care and replacement,
see Úpage 207.
RAIN SENSING WIPERS — IF EQUIPPED
This feature senses moisture on the windshield
and automatically activates the wipers. Rotate the
end of the multifunction lever to one of two detent
positions for intermittent settings to activate this
feature.
NOTE:If the windshield wiper lever is rotated from the
O (off) position to the first intermittent setting or
from the first intermittent setting to the second
intermittent setting, the wipers will perform an
immediate wipe cycle to clean the windshield.
The sensitivity of the system can be adjusted with
the windshield wiper lever. Wiper delay position
one is the least sensitive, and wiper delay position
two is the most sensitive. Place the wiper switch in
the O (off) position when not using the system.
1 — Pull Back For Front Washer
2 — Rotate For Intermittent Settings
3 — Push Upward For MistWARNING!
Sudden loss of visibility through the windshield
could lead to a collision. You might not see other
vehicles or other obstacles. To avoid sudden
icing of the windshield during freezing weather,
warm the windshield with the defroster before
and during windshield washer use.
22_VF_OM_EN_USC_t.book Page 38
 1
1 2
2 3
3 4
4 5
5 6
6 7
7 8
8 9
9 10
10 11
11 12
12 13
13 14
14 15
15 16
16 17
17 18
18 19
19 20
20 21
21 22
22 23
23 24
24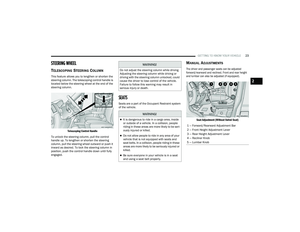 25
25 26
26 27
27 28
28 29
29 30
30 31
31 32
32 33
33 34
34 35
35 36
36 37
37 38
38 39
39 40
40 41
41 42
42 43
43 44
44 45
45 46
46 47
47 48
48 49
49 50
50 51
51 52
52 53
53 54
54 55
55 56
56 57
57 58
58 59
59 60
60 61
61 62
62 63
63 64
64 65
65 66
66 67
67 68
68 69
69 70
70 71
71 72
72 73
73 74
74 75
75 76
76 77
77 78
78 79
79 80
80 81
81 82
82 83
83 84
84 85
85 86
86 87
87 88
88 89
89 90
90 91
91 92
92 93
93 94
94 95
95 96
96 97
97 98
98 99
99 100
100 101
101 102
102 103
103 104
104 105
105 106
106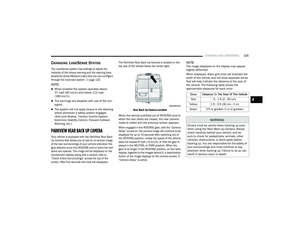 107
107 108
108 109
109 110
110 111
111 112
112 113
113 114
114 115
115 116
116 117
117 118
118 119
119 120
120 121
121 122
122 123
123 124
124 125
125 126
126 127
127 128
128 129
129 130
130 131
131 132
132 133
133 134
134 135
135 136
136 137
137 138
138 139
139 140
140 141
141 142
142 143
143 144
144 145
145 146
146 147
147 148
148 149
149 150
150 151
151 152
152 153
153 154
154 155
155 156
156 157
157 158
158 159
159 160
160 161
161 162
162 163
163 164
164 165
165 166
166 167
167 168
168 169
169 170
170 171
171 172
172 173
173 174
174 175
175 176
176 177
177 178
178 179
179 180
180 181
181 182
182 183
183 184
184 185
185 186
186 187
187 188
188 189
189 190
190 191
191 192
192 193
193 194
194 195
195 196
196 197
197 198
198 199
199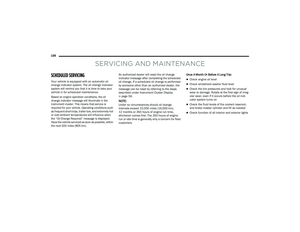 200
200 201
201 202
202 203
203 204
204 205
205 206
206 207
207 208
208 209
209 210
210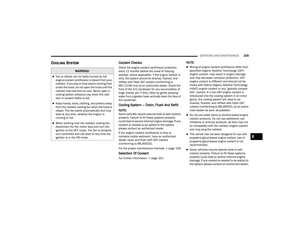 211
211 212
212 213
213 214
214 215
215 216
216 217
217 218
218 219
219 220
220 221
221 222
222 223
223 224
224 225
225 226
226 227
227 228
228 229
229 230
230 231
231 232
232 233
233 234
234 235
235 236
236 237
237 238
238 239
239 240
240 241
241 242
242 243
243 244
244 245
245 246
246 247
247 248
248 249
249 250
250 251
251 252
252 253
253 254
254 255
255 256
256 257
257 258
258 259
259 260
260 261
261 262
262 263
263 264
264 265
265 266
266 267
267