Page 305 of 502

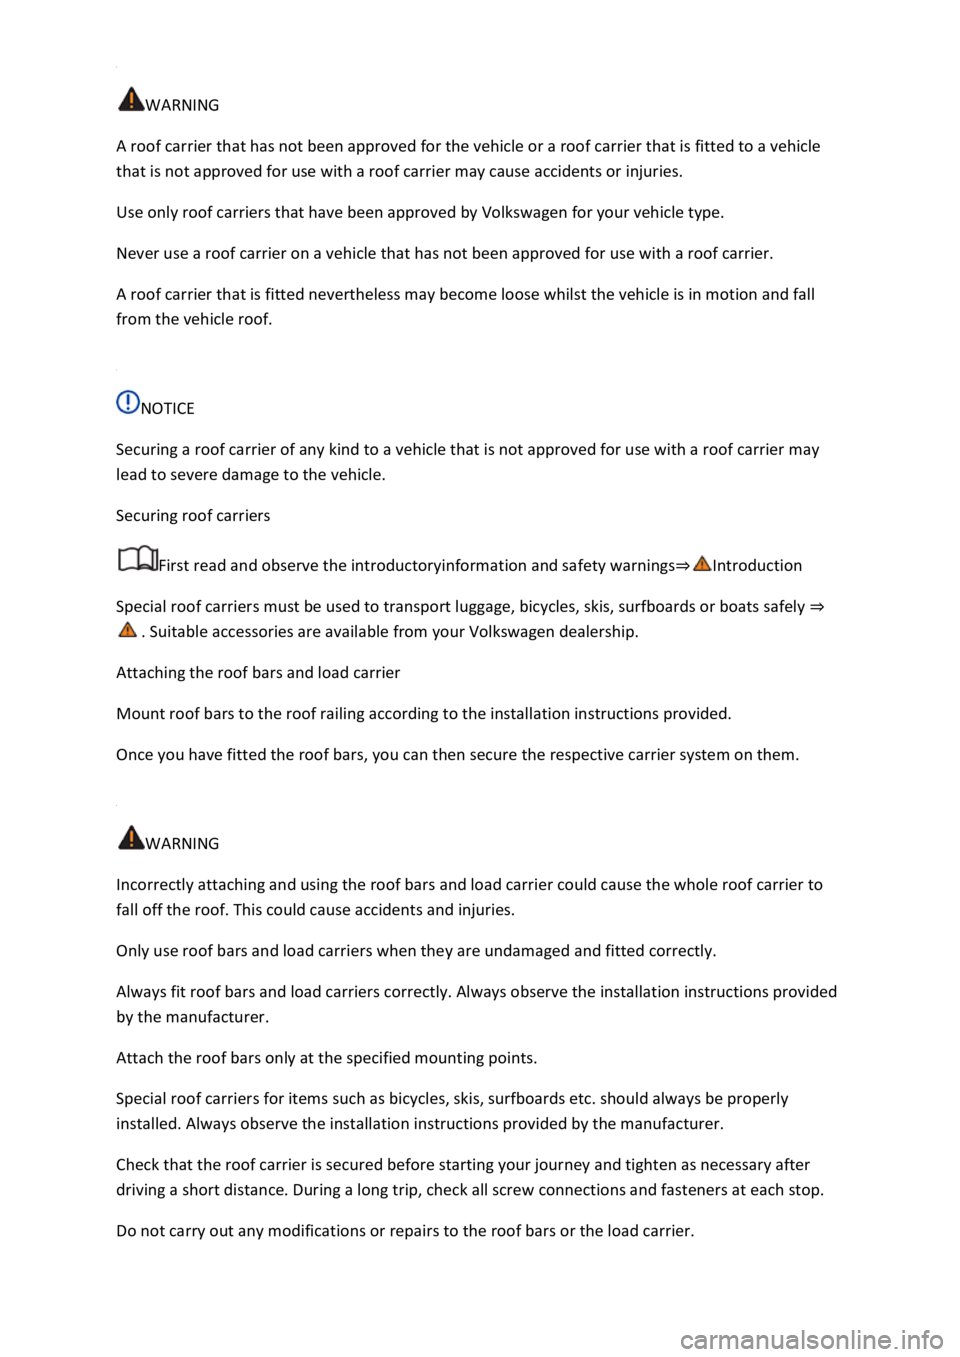
WARNING
A roof carrier that has not been approved for the vehicle or a roof carrier that is fitted to a vehicle
that is not approved for use with a roof carrier may cause accidents or injuries.
Use only roof carriers that have been approved by Volkswagen for your vehicle type.
Never use a roof carrier on a vehicle that has not been approved for use with a roof carrier.
A roof carrier that is fitted nevertheless may become loose whilst the vehicle is in motion and fall
from the vehicle roof.
NOTICE
Securing a roof carrier of any kind to a vehicle that is not approved for use with a roof carrier may
lead to severe damage to the vehicle.
Securing roof carriers
First read and observe the introductoryinformation and safety warnings⇒Introduction
Special roof carriers must be used to transport luggage, bicycles, skis, surfboards or boats safely ⇒
. Suitable accessories are available from your Volkswagen dealership.
Attaching the roof bars and load carrier
Mount roof bars to the roof railing according to the installation instructions provided.
Once you have fitted the roof bars, you can then secure the respective carrier system on them.
WARNING
Incorrectly attaching and using the roof bars and load carrier could cause the whole roof carrier to
fall off the roof. This could cause accidents and injuries.
Only use roof bars and load carriers when they are undamaged and fitted correctly.
Always fit roof bars and load carriers correctly. Always observe the installation instructions provided
by the manufacturer.
Attach the roof bars only at the specified mounting points.
Special roof carriers for items such as bicycles, skis, surfboards etc. should always be properly
installed. Always observe the installation instructions provided by the manufacturer.
Check that the roof carrier is secured before starting your journey and tighten as necessary after
driving a short distance. During a long trip, check all screw connections and fasteners at each stop.
Do not carry out any modifications or repairs to the roof bars or the load carrier.
Page 306 of 502

Loading roof carriers
First read and observe the introductoryinformation and safety warnings⇒Introduction
Maximum permitted roof load
The maximum permitted roof load is 75 kg.
The roof load limit refers to the combined weight of the roof carrier and the load carried on the roof
⇒ .
Make sure you are aware of the weight of the roof carrier system and the load to be transported.
Weigh the load if necessary.
However, you will not be able to carry the maximum permitted roof load if you are using a roof
carrier with a lower load rating. In this case, do not exceed the maximum weight limit for the load
carrier system which is specified in the manufacturer's installation instructions.
Distributing the load
Distribute the load evenly and secure it correctly ⇒ .
WARNING
Accidents and significant vehicle damage can occur if the maximum permitted roof load is exceeded.
Never exceed the stated roof load, the maximum permissible axle loads, and the permissible gross
vehicle weight for the vehicle.
Do not exceed the load rating of the roof carrier, even if the maximum roof load has not been
reached.
WARNING
Loose and incorrectly secured loads can fall off the roof carrier and cause accidents and injuries.
Always use suitable and undamaged lashing, retaining or securing straps.
NOTICE
When opening the boot lid, take care not to let it hit the roof load.
Notes on use
First read and observe the introductoryinformation and safety warnings⇒Introduction
Remove the roof carrier in the following situations
The roof carrier is no longer needed.
Page 307 of 502

Before driving through an automatic car wash.
The vehicle height exceeds the required clearance height, e.g. in a garage.
NOTICE
Always remove the roof carrier before driving through an automatic car wash.
The height of the vehicle is changed by the installation of a roof carrier and the load secured to it.
Check and compare the height of the vehicle with clearance heights, e.g. for underpasses and garage
doors.
The roof carrier and its load must not obstruct you from opening and closing the glass roof and the
boot lid. The roof aerial must also remain unaffected.
Driving with a fitted roof carrier will increase air resistance and thus increase fuel consumption.
Trailer towing
Introduction
This chapter contains information on the followingsubjects:
⇒ Technical requirements
⇒ Fitting the removable ball head
⇒ Removing the ball head
⇒ Notes on towing a trailer
⇒ Loading the trailer
⇒ Driving with a trailer
⇒ Trailer stabilisation
⇒ Retrofitting a towing bracket
The vehicle can be used to tow a trailer if it has the required technical equipment for this. The
additional trailer load will affect the amount of wear, fuel consumption and performance of the
vehicle and, in certain circumstances, could shorten the service intervals.
Driving with a trailer not only places an extra load on the vehicle, but also requires increased
concentration on the part of the driver.
Vehicles with start/stop system
When using towing brackets that were not retrofitted by Volkswagen, the start/stop system must be
deactivated manually using the button in the centre console before towing a trailer, and it must
remain deactivated for as long as a trailer is being towed ⇒ .
Page 308 of 502

DANGER
It is dangerous to transport people in a trailer and it may also be illegal.
WARNING
Improper use of the towing bracket can lead to a loss of vehicle control, accidents and serious
injuries.
Only use the towing bracket if it is fitted properly and is not damaged.
Do not carry out any alterations or repairs to the towing bracket.
Wherever possible, swivel in or remove the ball head when a trailer is not being used in order to
reduce the risk of injury in rear-end collisions, and the risk of injury to pedestrians and cyclists when
the vehicle is parked.
Never install a weight-distributing or load-balancing towing bracket to the vehicle. The vehicle is not
designed for these kinds of towing brackets. The towing bracket can fail, causing the trailer to tear
loose from the vehicle.
WARNING
Towing a trailer and transporting heavy or bulky items can change the vehicle handling and increase
the braking distance. This can lead to accidents.
Always secure loads properly using suitable and undamaged lashing, retaining or securing straps.
Always adapt your speed and driving style to suit visibility, weather, road and traffic conditions.
Reduce your speed, particularly when going downhill.
Trailers with a high centre of gravity are more likely to tip over than trailers with a low centre of
gravity.
Always drive carefully and think ahead. Accelerate very carefully and gently. Avoid abrupt and
sudden driving and braking manoeuvres.
Take special care when overtaking. Reduce your speed immediately if the trailer shows even the
slightest sign of snaking.
Never drive faster than 80 km/h (50 mph) when towing a trailer, also 100 km/h (60 mph) in
exceptional cases. This also applies to countries where higher speeds are permitted. Keep to
country-specific speed limits, which may be lower for vehicles with trailers than for vehicles without
trailers.
Never try to stop a trailer from snaking by increasing your speed.
Never install a weight-distributing or load-balancing towing bracket on the vehicle.
Page 309 of 502

WARNING
The start/stop system must always be switched off manually when towing a trailer using towing
brackets that have not been retrofitted by Volkswagen. Otherwise faults can occur in the brake
system, possibly resulting in accidents and serious injuries.
NOTICE
Observe the instructions and information for vehicles with an N1 approval ⇒ Information about
vehicles with N1 approval (light commercial vehicle) .
Always switch off the anti-theft alarm before a trailer is hitched or unhitched or a bicycle carrier is
loaded or unloaded ⇒ Anti-theft alarm . The tilt sensor could otherwise trigger an alarm
unintentionally.
With a new engine, do not tow a trailer during the first 1,000 km ⇒ Running in the engine .
Some retrofitted towing brackets may cover the aperture for fitting the towing eye. If so, the towing
eye cannot be used for towing or tow-starting other vehicles. For this reason, the removed ball head
of a retrofitted towing bracket should be kept in the vehicle at all times.
Technical requirements
First read and observe the introductoryinformation and safety warnings⇒Introduction
Cooling system
There is an increased load on the engine and the cooling system when towing a trailer. The cooling
system must contain sufficient coolant and be able to cope with the extra load due to trailer towing.
Trailer brake
If the trailer is equipped with its own brake system, comply with the relevant regulations.
Trailer tail light clusters
The trailer tail light clusters must work correctly and meet legal requirements. Do not exceed the
maximum power consumption for the trailer.
Exterior mirrors
If you are unable to see the traffic behind the trailer using the vehicle's standard exterior mirrors,
additional exterior mirrors should be fitted in accordance with any country-specific regulations.
Before setting off, adjust the exterior mirrors so that you have a sufficient view towards the rear.
Page 310 of 502

Retrofitting a towing bracket
Only use a towing bracket which has been approved by Volkswagen for your vehicle type. Always
check and observe the data provided by the towing bracket manufacturer.
Maximum power consumption of the trailer's electrical consumers
Never exceed the specified values.
Europe, Asia, Africa, South and Central America
All brake lights 84 watts
Turn signal per side 42 watts
All side lights 100 watts
All tail lights 42 watts
Rear fog light 42 watts
Australia
All brake lights 108 watts
Turn signal per side 54 watts
All side lights 100 watts
All tail lights 54 watts
Rear fog light 54 watts
WARNING
If the towing bracket is unsuitable or incorrectly fitted, the trailer could become detached from the
towing vehicle. This can cause serious accidents and fatal injuries.
Never fit a towing bracket to the rear bumper or its mountings. The towing bracket must not prevent
the rear bumper from functioning correctly.
Do not carry out any alterations to the exhaust or brake systems.
NOTICE
Page 311 of 502
The vehicle electronics system may be damaged if the trailer's power consumption is too high.
Never connect the trailer's electrical system directly to the electrical connections of the tail light
clusters or to other power sources. Use only suitable connectors to supply power to the trailer.
Towing a trailer places additional demands on the vehicle. Volkswagen recommends additional
services between the normal inspection intervals if the vehicle is used frequently for towing a trailer.
Fitting the removable ball head
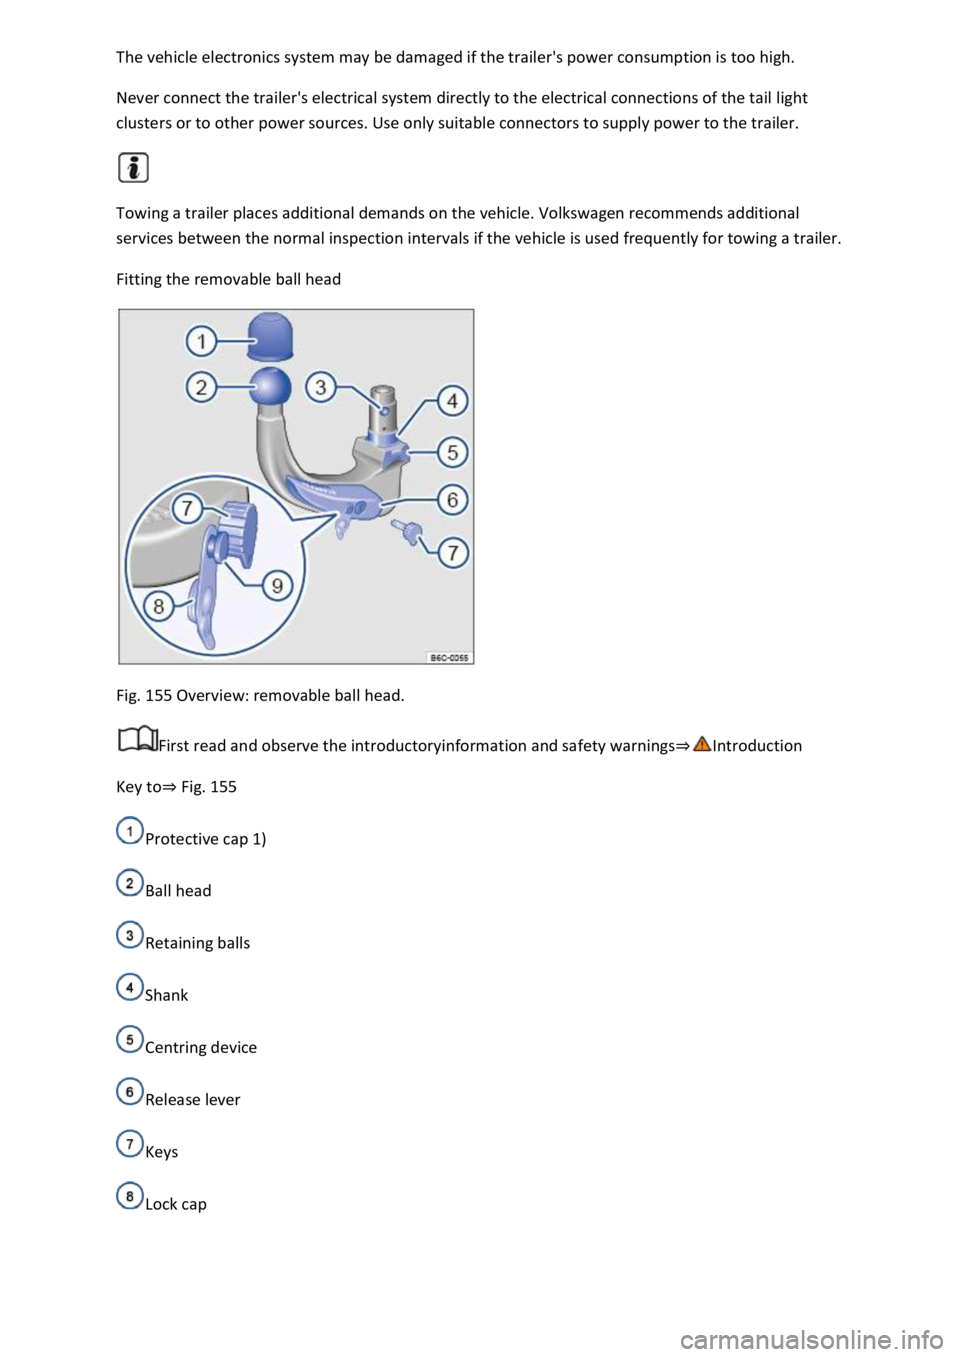
Fig. 155 Overview: removable ball head.
First read and observe the introductoryinformation and safety warnings⇒Introduction
Key to⇒ Fig. 155
Protective cap 1)
Ball head
Retaining balls
Shank
Centring device
Release lever
Keys
Lock cap
Page 312 of 502

Release pin with coloured marking
The removable ball head is located with the vehicle toolkit in the luggage compartment.
Step 1: preparations
Remove the cap from the ball head mounting under the rear bumper ⇒ Rear view and stow in the
vehicle.
Starting from the bottom right side, swivel the trailer socket as far as possible to the top left. This
gives you access to the ball head mounting.
Check to ensure that the mounting, locking lever ⇒ Fig. 155 ⑥, shank ④ and the retaining balls
③ of the ball head are all clean and not damaged ⇒ . Clean if necessary.
Step 2: check whether the ball head is pre-tensioned
The ball head cannot be fitted properly unless it is pre-tensioned.
The following conditions must be fulfilled:
The lock cover ⇒ Fig. 155 ⑧ is open and the key ⑦ is inserted
The release pin ⑨ can be moved.
The locking lever ⑥ is in the bottom position.
All retaining balls ③ can be pressed fully into the shank ④.
If all these conditions are met, continue with Step 4.
If conditions are not met, continue with Step 3.
Step 3: pre-tensioning the ball head
If the ball head is not pre-tensioned, pre-tension the ball head as follows:
Remove the lock cover ⑧ from the lock and insert the key ⑦ into the lock.
Turn the key ⑦ anti-clockwise until the part of the key with the hole is at the top.
Press the release pin ⑨ and at the same time press the locking lever ⑥ down as far as it will go ⇒
. The locking lever remains locked in this position.
Step 4: attaching the pre-tensioned ball head to the vehicle
Do not touch the locking lever once the ball head has been pre-tensioned. When the ball head is
engaged, the locking lever will spring back to its original position and could cause injury ⇒ .
Guide the pre-tensioned removable ball head into the mounting tube from below.
Push the ball head firmly upwards until it engages. The centring devices ⇒ Fig. 155 ⑤ must engage
in the mounting points on the vehicle.
The locking lever ⑥ automatically turns up to its original position and the green section of the
release pin ⑨ is visible.