Page 265 of 502

Park Distance Control is switched on automatically when reverse gear is engaged or if the vehicle
rolls backwards.
With some equipment levels, Park Distance Control can also be activated automatically when driving
forwards ⇒ Automatic activation when driving forwards (with some equipment levels) .
Switching off Park Distance Control
Press the button.
Park Distance Control is switched off automatically when the vehicle is driven forwards at a speed of
more than 10–15 km/h (6–9 mph.
OR: the selector lever is moved to P position.
Automatic activation when driving forwards (with some equipment levels)
Park Distance Control also switches itself on automatically if the vehicle approaches an obstacle in
the front area of the vehicle when driving forwards at a speed of less than 15 km/h (9 mph).
Automatic activation can be switched on in the Infotainment system.
Automatic activation takes place only once. Renewed automatic activation is possible under the
following conditions:
Press the button.
Switch the ignition off and then back on again.
Manoeuvre braking
If the vehicle is equipped with manoeuvre braking, the manoeuvre braking function triggers
emergency braking as soon as an obstacle is detected while reversing.
Depending on the vehicle equipment, the manoeuvre braking function can also trigger emergency
braking when driving forwards.
The manoeuvre braking function helps to prevent collisions. The vehicle speed must not be higher
than 10 km/h (6 mph). The manoeuvre braking function is activated or deactivated when Park
Distance Control is switched on or off. The manoeuvre braking function is inactive for five metres
after a braking operation in the same direction of travel. The manoeuvre braking function is ready
for braking again after changing gear or position. The same restrictions apply as to Park Distance
Control.
Manoeuvre braking is not active if Park Distance Control was activated automatically.
Touch the function button in the Infotainment system to switch manoeuvre braking on and off.
Display representation
Page 266 of 502

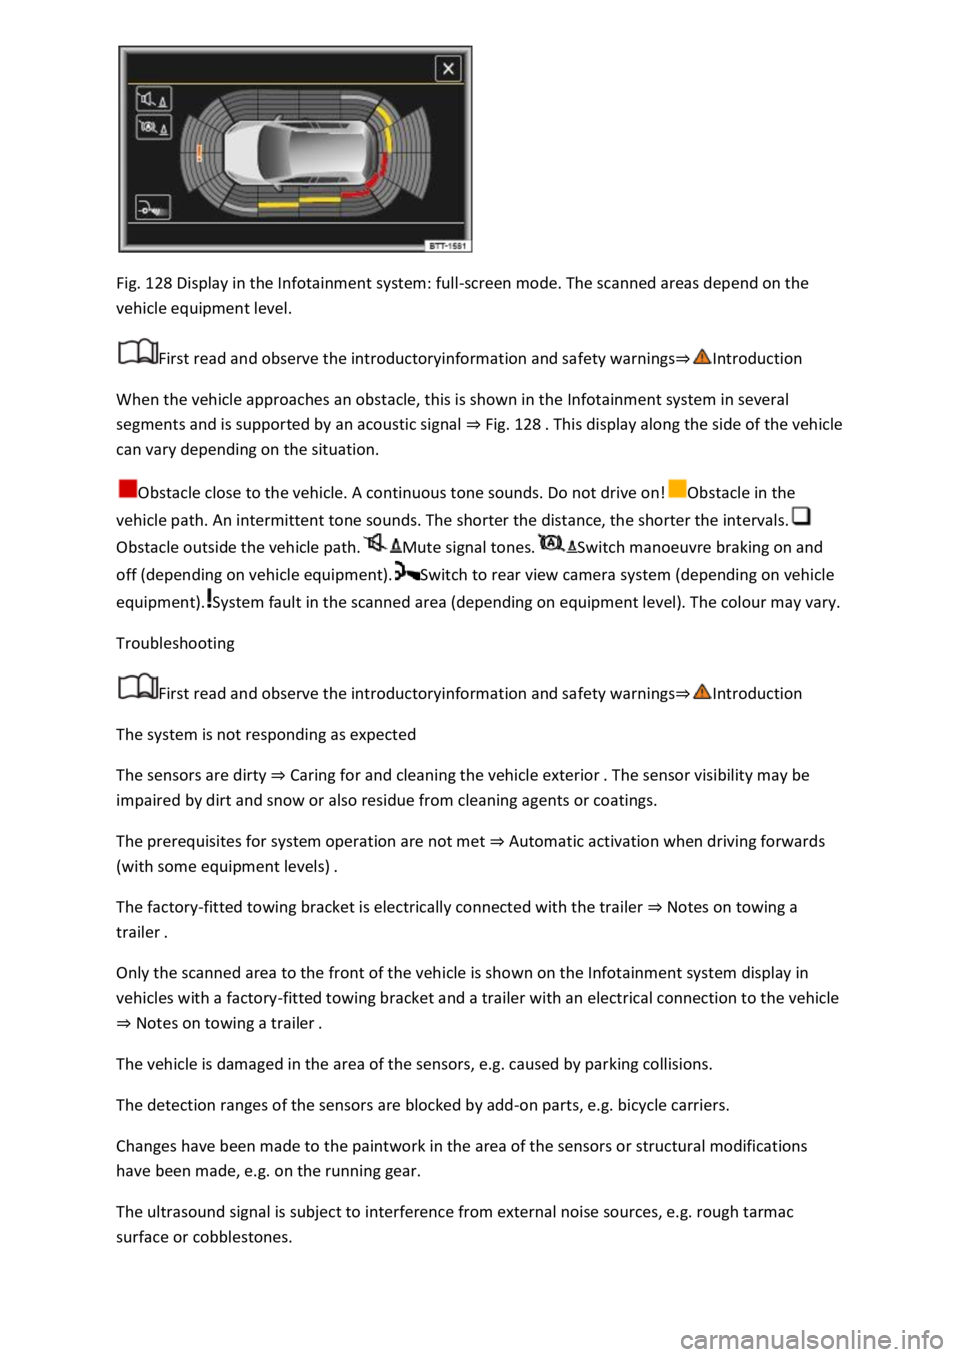
Fig. 128 Display in the Infotainment system: full-screen mode. The scanned areas depend on the
vehicle equipment level.
First read and observe the introductoryinformation and safety warnings⇒Introduction
When the vehicle approaches an obstacle, this is shown in the Infotainment system in several
segments and is supported by an acoustic signal ⇒ Fig. 128 . This display along the side of the vehicle
can vary depending on the situation.
Obstacle close to the vehicle. A continuous tone sounds. Do not drive on!Obstacle in the
vehicle path. An intermittent tone sounds. The shorter the distance, the shorter the intervals.
Obstacle outside the vehicle path.Mute signal tones.Switch manoeuvre braking on and
off (depending on vehicle equipment).Switch to rear view camera system (depending on vehicle
equipment).System fault in the scanned area (depending on equipment level). The colour may vary.
Troubleshooting
First read and observe the introductoryinformation and safety warnings⇒Introduction
The system is not responding as expected
The sensors are dirty ⇒ Caring for and cleaning the vehicle exterior . The sensor visibility may be
impaired by dirt and snow or also residue from cleaning agents or coatings.
The prerequisites for system operation are not met ⇒ Automatic activation when driving forwards
(with some equipment levels) .
The factory-fitted towing bracket is electrically connected with the trailer ⇒ Notes on towing a
trailer .
Only the scanned area to the front of the vehicle is shown on the Infotainment system display in
vehicles with a factory-fitted towing bracket and a trailer with an electrical connection to the vehicle
⇒ Notes on towing a trailer .
The vehicle is damaged in the area of the sensors, e.g. caused by parking collisions.
The detection ranges of the sensors are blocked by add-on parts, e.g. bicycle carriers.
Changes have been made to the paintwork in the area of the sensors or structural modifications
have been made, e.g. on the running gear.
The ultrasound signal is subject to interference from external noise sources, e.g. rough tarmac
surface or cobblestones.
Page 267 of 502

No sensor visibility, error message, system switches itself off
The sensor area is switched off permanently if a sensor fails.
Park Distance Control malfunctions will be indicated by a text message with an acoustic warning and
the indicator lamp in the button flashing when the system is switched on for the first time. If the
sensors are dirty or covered, the affected sensor cluster will be displayed on the Park Distance
Control screen. A cleaning message also appears (depending on the vehicle equipment level).
Possible solution
Switch off the system temporarily.
Check whether any of the causes described apply.
Clean the sensors or remove stickers or accessories from the sensors and cameras ⇒ Caring for and
cleaning the vehicle exterior .
Check whether any damage is visible.
You can switch the system back on again once you have rectified the cause of the problem.
If the system still fails to respond as expected, have the system checked by a qualified workshop or
your Volkswagen dealership.
Rear view camera system (Rear View)
Introduction
This chapter contains information on the followingsubjects:
⇒ Switching on and off
⇒ Display representation
⇒ Prerequisites
⇒ Parking
⇒ Troubleshooting
The rear view camera system in the rear of the vehicle makes it easier for the driver to see behind
the vehicle and provides support for parking manoeuvres.
The rear view camera system shows the area behind the vehicle on the Infotainment system screen.
Depending on the operating mode, orientation lines support the view to the rear.
WARNING
Using images from the camera to estimate the distance from obstacles (people, vehicles etc.) is
inaccurate and could cause accidents and severe injuries.
Camera lenses enlarge and distort the field of vision and show objects differently and inaccurately
on the screen.
Page 268 of 502

Switching on and off
First read and observe the introductoryinformation and safety warnings⇒Introduction
Switching on the rear view camera system
Select reverse gear.
OR: press the button.
Switching off the rear view camera system
Drive forwards at a speed of at least 10 km/h (6 mph).
Display representation
First read and observe the introductoryinformation and safety warnings⇒Introduction
The functions and displays of the rear view camera system image vary according to the equipment
level and may differ from each other.
The display of the reversing camera picture varies if the factory-fitted towing bracket is electrically
connected to the trailer ⇒ Notes on towing a trailer .
Functions and symbols of the rear view camera system
You can make settings by means of the function buttons when the rear view camera system is
switched on. Some setting options depend on the vehicle equipment.
xClose current display.Adjust display: brightness, contrast, colour.Switch to Park
Distance Control ⇒ Park Distance Control .Show Park Distance Control display.Hide Park
Distance Control display.
Orientation lines
Red line: safety distance to the rear.
Green lateral lines: extension of the vehicle.
Prerequisites
First read and observe the introductoryinformation and safety warnings⇒Introduction
The prerequisites for parking using the rear view camera system must be met.
Do not exceed a speed of approximately 15 km/h (9 mph).
Width of the parking space: vehicle width + 0.2 m.
The following conditions must be met in order to display a correct image:
The boot lid is closed.
The surrounding area has a flat surface.
Vehicle does not have a heavy load at the rear.
Page 269 of 502

Parking
Fig. 129 Infotainment system display: parking using the rear view camera system.
First read and observe the introductoryinformation and safety warnings⇒Introduction
Key to ⇒ Fig. 129 :
Choose parking space.Drive towards the selected parking space.Align the vehicle in the
parking space.1Road.2Selected parking space.3Side limits of the selected parking space.4Rear limit
of the parking space.
Parking using the rear view camera system
Position the vehicle in front of the parking space ⇒ Fig. 129② .
Select reverse gear.
Reverse slowly and steer the vehicle so that the lateral lines lead into the selected parking space.
The lines must correspond to the lateral boundary lines of the parking space ③ .
Stop when the horizontal line reaches the rear boundary ④ .
Troubleshooting
First read and observe the introductoryinformation and safety warnings⇒Introduction
The system is not responding as expected
The camera is dirty ⇒ Caring for and cleaning the vehicle exterior . The camera visibility may be
impaired by dirt and snow or even residue from cleaning agents or coatings.
The system requirements must be met ⇒ Prerequisites .
The factory-fitted towing bracket is electrically connected with the trailer ⇒ Notes on towing a
trailer .
The vehicle is damaged in the area around the camera, e.g. caused by parking collisions.
Page 270 of 502

The detection range of the camera is blocked by add-on parts, e.g. bicycle carriers.
Changes have been made to the paintwork in the area of the camera or structural modifications
have been made, e.g. on the running gear.
No camera visibility, error message, system switches itself off
Clean the camera or remove stickers or accessories from the camera ⇒ Caring for and cleaning the
vehicle exterior .
Check whether any damage is visible.
Possible solution
Switch off the system temporarily.
Check whether any of the causes described apply.
You can switch the system back on again once you have rectified the cause of the problem.
If the system still fails to respond as expected, have the system checked by a qualified workshop.
Park Assist
Introduction
This chapter contains information on the followingsubjects:
⇒ Prerequisites
⇒ Looking for a parking space
⇒ Driving into a parking space
⇒ Driving out of a parking space
⇒ Troubleshooting
Park Assist shows parking spaces which are suitable for parking and assists the driver when driving
into and out of parking spaces.
Park Assist is an extension of Park Distance Control ⇒ Park Distance Control .
Park Assist automatically steers the vehicle. The driver must control the accelerator, gear changes
and brake ⇒ Safety notes on the parking systems .
WARNING
Fast steering wheel movements can cause serious injury.
During the manoeuvring operation, do not reach for the steering wheel until prompted to do so by
the system.
Exception: if a dangerous situation occurs, intervene and take over the steering.
Page 271 of 502

NOTICE
Park Assist uses parked vehicles, the kerbs and other objects as guidance. Make sure that the tyres
and wheel rims are not damaged when parking the vehicle. If necessary, stop the parking procedure
in good time to prevent damage to the vehicle.
Prerequisites
First read and observe the introductoryinformation and safety warnings⇒Introduction
The following prerequisites must be met for driving into and out of parking spaces:
The traction control system (TCS) must be switched on ⇒ Brake support systems .
Distance: maintain a distance of 0.5 – 2.0 metres when driving past the parking space.
The parking space must have at least the dimensions required by Park Assist.
Speed when driving past the parking space (for parking spaces parallel to the road): not above
40 km/h (25 mph).
Speed when driving past the parking space (for parking spaces perpendicular to the road): not above
20 km/h (12 mph).
Maximum speed: 7 km/h (4 mph). An automatic braking intervention can take place when driving
into a parking space.
No trailer is connected electrically with the factory-fitted towing bracket ⇒ Notes on towing a
trailer .
The parking manoeuvre can be continued after the automatic brake intervention.
The automatic braking intervention takes place a maximum of once per parking manoeuvre. The
parking manoeuvre will be cancelled if a speed of approximately 7 km/h (4 mph) is exceeded again.
WARNING
Do not let the automatic braking intervention triggered by Park Assist tempt you to take any risks
while driving. The system is not a substitute for the full concentration of the driver.
Park Assist has system-related limitations. In some situations, automatic braking intervention may
function only in a limited way or not at all.
You should always be prepared to brake the vehicle yourself.
The automatic braking intervention is ended after approximately 1.5 seconds. Depress the brake
pedal of the vehicle yourself following the automatic braking intervention.
Looking for a parking space
Page 272 of 502

Fig. 130 On the instrument cluster display: display of parking modes.
First read and observe the introductoryinformation and safety warnings⇒Introduction
Park Assist has three parking modes ⇒ Fig. 130 (illustration).
Reverse parallel parking.Reverse perpendicular parking.Forward perpendicular parking.
Drive slowly past a row of parked vehicles, paying attention to the traffic.
Press the button. Park Assist automatically searches for a suitable parking space on the front
passenger side.
Stop when Park Assist displays a recommended parking mode on the instrument cluster display.
Drive into the parking space when a corresponding prompt ⇒ Fig. 131⑤ is shown on the
instrument cluster display ⇒ Driving into a parking space .
If you want Park Assist to search for a parking space on the opposite side of the road, operate the
turn signal for the corresponding side.
Changing parking mode
If Park Assist has found other alternative parking modes, these will be displayed in a miniature view.
They can be selected in turn by repeatedly pressing the button. Park Assist will switch itself off
after selection of all found parking modes. The originally recommended parking mode is offered
when the button is pressed again.
If you wish to park in a perpendicular parking space in forward direction, select Forward
perpendicular parking ⇒ Fig. 130 . Otherwise the vehicle will reverse into the perpendicular
parking space.
Park Assist can be activated retrospectively. If the vehicle has previously driven past a suitable
parking space, it will be displayed.
Driving into a parking space