Page 217 of 280

IN CASE OF EMERGENCY215
Front/Rear Side Marker Lamps
See below steps to replace:
The front/rear side marker lamps are LED and
not serviced separately. See an authorized
dealer for replacement of these lights.
Rear Tail, Stop, Backup And Turn Signal
Lamps
The rear light clusters contain taillight, brake
light, direction indicator and reverse/rear fog
light bulbs. To access the light clusters, see
below steps to replace:
1. Open the rear doors.
2. Remove the screws and remove the tail
lamp assembly.
3. Remove the screws and separate the backplate from the lamp housing.
4. Remove the tail, stop, or turn signal bulbs by pushing them slightly and turning counter -
clockwise.
5. Remove the backup lamp bulb by pulling straight out.
6. Replace lamps as required and reinstall lamp. The bulbs are arranged inside the light cluster
as follows:
Third Brake Light (Center Mount)
See below steps to replace:
1. For versions with tailgate, loosen the two
fastening screws and extract the cluster.
2. For versions with swing doors, remove rubber plugs, remove retaining tabs and
extract the cluster.
3. For versions with high roof and swing doors, remove the pressure-fit plastic guard and
rubber cap using a screwdriver, release the
retaining tags as shown in the figure and
remove the unit.
4. Remove the appropriate tabs and remove the bulb holder.
5. Remove the snap-fitted bulb and replace it.
License Plate Lights
See below steps to replace:
1. Disengage the holding tabs and remove the lens by lifting to the left.
2. Remove the bulbs by releasing them from the side contacts; insert the new bulbs and
make sure they are correctly clamped
between these contacts.
Replacing Interior Bulbs
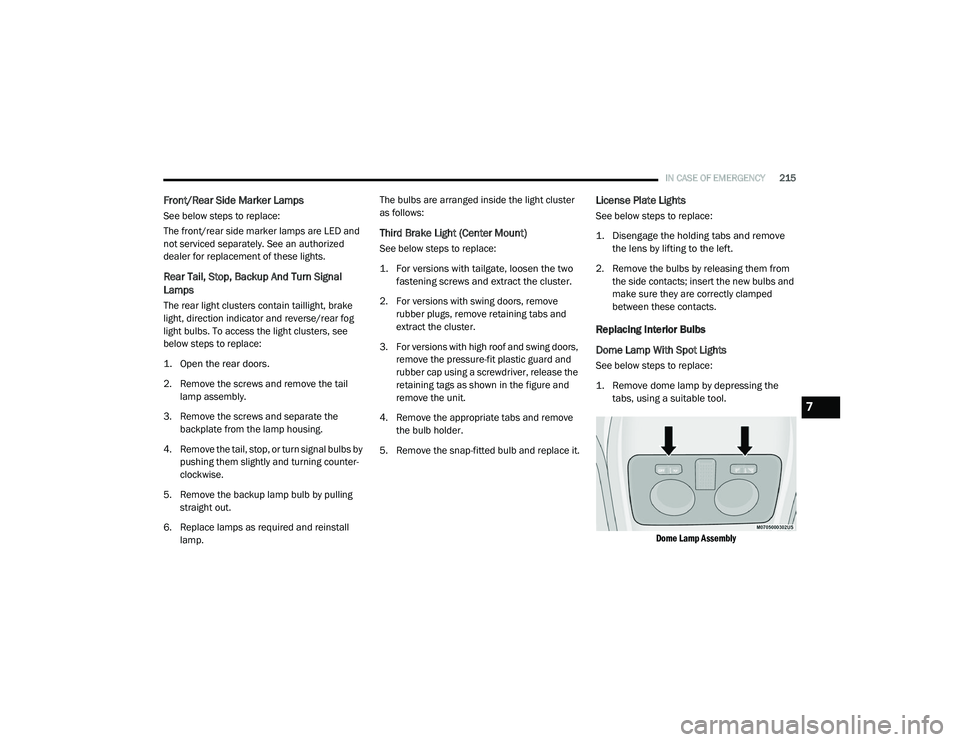
Dome Lamp With Spot Lights
See below steps to replace:
1. Remove dome lamp by depressing the tabs, using a suitable tool.
Dome Lamp Assembly
7
21_VM_OM_EN_USC_t.book Page 215
Page 218 of 280
216IN CASE OF EMERGENCY
2. Open protective cover.
Dome Lamp
3. Replace the bulbs releasing them from the side contacts making sure that the new
bulbs are correctly secured between the
contacts.
4. Close the protective cover and reposition it back into its housing, making sure that it
locks into place.
Rear Roof Lamp
See below steps to replace:
1. Remove roof lamp by depressing the tabs, using a suitable tool.
Roof Lamp
2. Open the cover.
Roof Lamp (Reverse Side)
3. Replace the bulb releasing them from the
side contacts making sure that the new
bulbs are correctly secured between the
contacts.
Roof Lamp (Reverse Side)
4. Close the protective cover and reposition it back into its housing, making sure that it
locks into place.
1 — Protective Cover
2 — Bulbs
1 — Cover
1 — Bulb
21_VM_OM_EN_USC_t.book Page 216
Page 219 of 280

217
SERVICING AND MAINTENANCE
SCHEDULED SERVICING
Your vehicle is equipped with an automatic oil
change indicator system. The oil change
indicator system will remind you that it is time to
take your vehicle in for scheduled maintenance.
Based on engine operation conditions, the oil
change indicator message will illuminate. This
means that service is required for your vehicle.
Operating conditions such as frequent
short-trips, trailer tow, extended engine idle
time, extremely hot or cold ambient
temperatures will influence when the “Oil
Change Required” message is displayed.
Severe Operating Conditions can cause the
change oil message to illuminate as early as
3,500 miles (5,600 km) since last reset. Have
your vehicle serviced as soon as possible,
within the next 500 miles (805 km).
An authorized dealer will reset the oil change
indicator message after completing the
scheduled oil change. If a scheduled oil change
is performed by someone other than an
authorized dealer, to reset the message
Úpage 46. NOTE:
Under no circumstances should oil change
intervals exceed 10,000 miles (16,000 km),
350 hours of engine run time or 12 months,
whichever comes first. The 350 hours of engine
run or idle time is generally only a concern for
fleet customers.
Severe Duty All Models
Vehicles that are operated in a dusty and
off-road environment, or predominately at idle
or very low engine RPM are known as Severe
Duty vehicles. It is recommended that you
change Engine Oil at 4,000 miles (6,500 km) or
350 hours of engine run time.
Once A Month Or Before A Long Trip:
Check engine oil level.
Check windshield washer fluid level.
Check tire pressure and look for unusual
wear or damage. Rotate tires at the first sign
of irregular wear, even if it occurs before the
oil indicator system turns on.
Check the fluid levels of the coolant reservoir
and brake master cylinder, fill as needed.
Check function of all interior and exterior
lights.
Maintenance Plan
Refer to the maintenance schedule for the
required maintenance intervals. More frequent
maintenance may be needed in severe
conditions, such as dusty areas and very short
trip driving. In some extreme conditions,
additional maintenance not specified in the
maintenance schedule may be required.
8
21_VM_OM_EN_USC_t.book Page 217
Page 220 of 280
218SERVICING AND MAINTENANCE
At Every Oil Change Interval As Indicated By Oil Change Indicator System:
Change oil and filter
Rotate the tires
Rotate at the first sign of irregular wear, even if it occurs before the oil indicator system turns on
Inspect battery and clean and tighten terminals as required
Inspect the CV/Universal joints
Inspect brake pads, shoes, rotors, drums, hoses, lines and park brake
Inspect engine cooling system protection and hoses
Inspect exhaust system
Inspect engine air cleaner if using in dusty or off-road conditions
Inspect and replace the Evaporative System Fresh Air Filter as necessary; replacement may be more frequent if vehicle is operated in extreme dusty
conditions
21_VM_OM_EN_USC_t.book Page 218
Page 221 of 280
SERVICING AND MAINTENANCE219
Mileage or time passed (whichever comes first)
20,000
30,000
40,000
50,000
60,000
70,000
80,000
90,000
100,000
110,000
120,000
130,000
140,000
150,000
Or Years: 2 3 4 5 6 7 8 9 10 11 12 13 14 15
Or Kilometers:
32,000
48,000
64,000
80,000
96,000
112,000
128,000
144,000
160,000
176,000
192,000
208,000
224,000
240,000
Additional Inspections
Inspect the CV/Universal joints. X X X X X X X X X X X X X X
Inspect front suspension, boot seals, tie rod ends, and
replace if necessary. X X X X X
X X
Inspect the brake linings, parking brake function. X X X X XX X
Inspect front accessory drive belt, tensioner, idler pulley, and
replace if necessary. X
Additional Maintenance
Replace engine air cleaner filter.
1X XX XX
Replace air conditioning/cabin air filter. X X X X XX X
Change brake fluid every two years.
2X X X X X X X
Replace spark plugs.
3X
8
21_VM_OM_EN_USC_t.book Page 219
Page 222 of 280

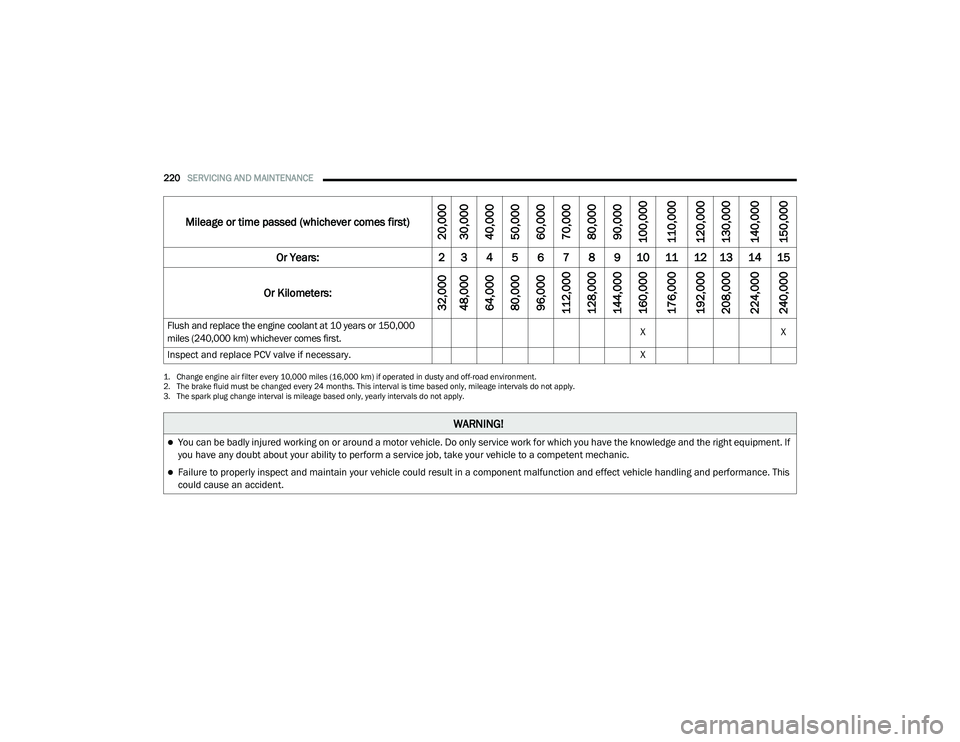
220SERVICING AND MAINTENANCE
Flush and replace the engine coolant at 10 years or 150,000
miles (240,000 km) whichever comes first. X
X
Inspect and replace PCV valve if necessary. X
1. Change engine air filter every 10,000 miles (16,000 km) if operated in dusty and off-road environment.
2. The brake fluid must be changed every 24 months. This interval is time based only, mileage intervals do not apply.
3. The spark plug change interval is mileage based only, yearly intervals do not apply.
Mileage or time passed (whichever comes first)
20,000
30,000
40,000
50,000
60,000
70,000
80,000
90,000
100,000
110,000
120,000
130,000
140,000
150,000
Or Years: 2 3 4 5 6 7 8 9 10 11 12 13 14 15
Or Kilometers:
32,000
48,000
64,000
80,000
96,000
112,000
128,000
144,000
160,000
176,000
192,000
208,000
224,000
240,000
WARNING!
You can be badly injured working on or around a motor vehicle. Do only service work for which you have the knowledge and the right equipment. If
you have any doubt about your ability to perform a service job, take your vehicle to a competent mechanic.
Failure to properly inspect and maintain your vehicle could result in a component malfunction and effect vehicle handling and performance. This
could cause an accident.
21_VM_OM_EN_USC_t.book Page 220
Page 223 of 280
SERVICING AND MAINTENANCE221
ENGINE COMPARTMENT
Engine Compartment — 2.4L
1 — Air Cleaner Filter Cover 5 — Power Distribution Center (Fuses)
2 — Power Steering Fluid Reservoir Cap 6 — Washer Fluid Reservoir Cap
3 — Oil Fill Cap 7 — Engine Coolant Pressure Cap
4 — Brake Fluid Reservoir Cap 8 — Engine Oil Dipstick
8
21_VM_OM_EN_USC_t.book Page 221
Page 224 of 280

222SERVICING AND MAINTENANCE
(Continued)
Checking Oil Level
To ensure proper engine lubrication, the engine
oil must be maintained at the correct level.
Check the oil level at regular intervals, such as
every fuel stop. The best time to check the
engine oil level is about five minutes after a fully
warmed up engine is shut off.
Checking the oil while the vehicle is on level
ground will improve the accuracy of the oil level
readings.
There are four possible dipstick types:
Crosshatched zone.
Crosshatched zone marked SAFE.
Crosshatched zone marked with MIN at the
low end of the range and MAX at the high end
of the range.
Crosshatched zone marked with dimples at
the MIN and the MAX ends of the range.
NOTE:
Always maintain the oil level within the cross -
hatch markings on the dipstick.
Adding 1 quart (1 liter) of oil when the reading is
at the low end of the dipstick range will raise the
oil level to the high end of the range marking.
Adding Washer Fluid
The windshield and rear window washers share
the same fluid reservoir. The fluid reservoir is
located in the front of the engine compartment.
Be sure to check the fluid level in the reservoir
at regular intervals. Fill the reservoir with
windshield washer solvent (not radiator
antifreeze) and operate the system for a few
seconds to flush out the residual water.
When refilling the washer fluid reservoir, take
some washer fluid and apply it to a cloth or
towel and wipe clean the wiper blades, this will
help blade performance.
To prevent freeze-up of your windshield washer
system in cold weather, select a solution or
mixture that meets or exceeds the temperature
range of your climate. This rating information
can be found on most washer fluid containers.Maintenance-Free Battery
Your vehicle is equipped with a
maintenance-free battery. You will never have
to add water, and periodic maintenance is not
required.
CAUTION!
Overfilling or underfilling the crankcase will
cause aeration or loss of oil pressure. This
could damage your engine.
WARNING!
Commercially available windshield washer
solvents are flammable. They could ignite and
burn you. Care must be exercised when filling
or working around the washer solution.
WARNING!
Battery fluid is a corrosive acid solution and
can burn or even blind you. Do not allow
battery fluid to contact your eyes, skin, or
clothing. Do not lean over a battery when
attaching clamps. If acid splashes in eyes
or on skin, flush the area immediately with
large amounts of water Ú page 204.
21_VM_OM_EN_USC_t.book Page 222