Page 31 of 280

GETTING TO KNOW YOUR VEHICLE29
INTERIOR LIGHTS
Courtesy/Interior Lights
These lights are mounted between the sun
visors on the overhead console. Each light is
turned on by pushing the corresponding switch.
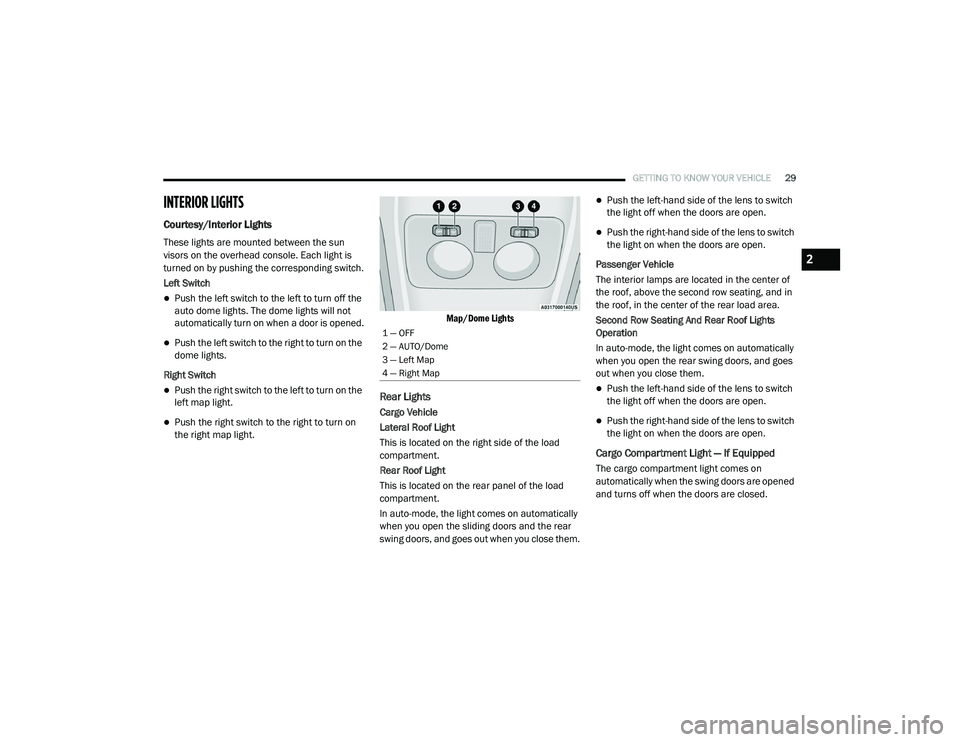
Left Switch
Push the left switch to the left to turn off the
auto dome lights. The dome lights will not
automatically turn on when a door is opened.
Push the left switch to the right to turn on the
dome lights.
Right Switch
Push the right switch to the left to turn on the
left map light.
Push the right switch to the right to turn on
the right map light.
Map/Dome Lights
Rear Lights
Cargo Vehicle
Lateral Roof Light
This is located on the right side of the load
compartment.
Rear Roof Light
This is located on the rear panel of the load
compartment.
In auto-mode, the light comes on automatically
when you open the sliding doors and the rear
swing doors, and goes out when you close them.
Push the left-hand side of the lens to switch
the light off when the doors are open.
Push the right-hand side of the lens to switch
the light on when the doors are open.
Passenger Vehicle
The interior lamps are located in the center of
the roof, above the second row seating, and in
the roof, in the center of the rear load area.
Second Row Seating And Rear Roof Lights
Operation
In auto-mode, the light comes on automatically
when you open the rear swing doors, and goes
out when you close them.
Push the left-hand side of the lens to switch
the light off when the doors are open.
Push the right-hand side of the lens to switch
the light on when the doors are open.
Cargo Compartment Light — If Equipped
The cargo compartment light comes on
automatically when the swing doors are opened
and turns off when the doors are closed.
1 — OFF
2 — AUTO/Dome
3 — Left Map
4 — Right Map
2
21_VM_OM_EN_USC_t.book Page 29
Page 62 of 280

60STARTING AND OPERATING
1. Locate the engine block heater cord
(behind the driver’s side headlamp).
2. Undo the hook-and-loop strap that secures the heater cord in place.
3. Pull the cord to the front of the vehicle and plug it into a grounded, three-wire extension
cord.
4. After the vehicle is running, reattach the cord to the hook-and-loop strap and
properly stow away behind the driver’s side
headlamp.
NOTE:
The engine block heater cord is a factory
installed option. If your vehicle is not
equipped, heater cords are available from an
authorized Mopar dealer.
The engine block heater will require 110 Volts
AC and 6.5 Amps to activate the heater
element.
The engine block heater must be plugged in
at least one hour to have an adequate
warming effect on the engine.
ENGINE BREAK-IN RECOMMENDATIONS
A long break-in period is not required for the
engine and drivetrain (transmission and axle) in
your vehicle.
Drive moderately during the first 300 miles
(500 km). After the initial 60 miles (100 km),
speeds up to 50 or 55 mph (80 or 90 km/h) are
desirable.
While cruising, brief full-throttle acceleration
within the limits of local traffic laws contributes
to a good break-in. Wide-open throttle
acceleration in low gear can be detrimental and
should be avoided.
The engine oil installed in the engine at the
factory is a high-quality energy conserving type
lubricant. Oil changes should be consistent with
anticipated climate conditions under which
vehicle operations will occur. For the
recommended viscosity and quality grades
Ú page 259. NOTE:
A new engine may consume some oil during its
first few thousand miles (kilometers) of opera
-
tion. This should be considered a normal part of
the break-in and not interpreted as a concern.
Please check your oil level with the engine oil
indicator often during the break in period. Add
oil as required.
PARKING BRAKE
Before leaving the vehicle, make sure that the
parking brake is fully applied. Also, be certain to
leave an automatic transmission in PARK.
The parking brake lever is located in the center
console. To apply the parking brake, pull the
lever up as firmly as possible. To release the
parking brake, pull the lever up slightly, push
the center button, then lower the lever
completely.
WARNING!
Remember to disconnect the engine block
heater cord before driving. Damage to the
110-115 Volt electrical cord could cause
electrocution.
CAUTION!
Never use Non-Detergent Oil or Straight
Mineral Oil in the engine or damage may
result.
21_VM_OM_EN_USC_t.book Page 60
Page 211 of 280

IN CASE OF EMERGENCY209
GEAR SELECTOR OVERRIDE
If a malfunction occurs and the gear selector
cannot be moved out of the PARK (P) position,
you can use the following procedure to
temporarily move the gear selector:
1. Turn the engine OFF.
2. Firmly apply the parking brake.
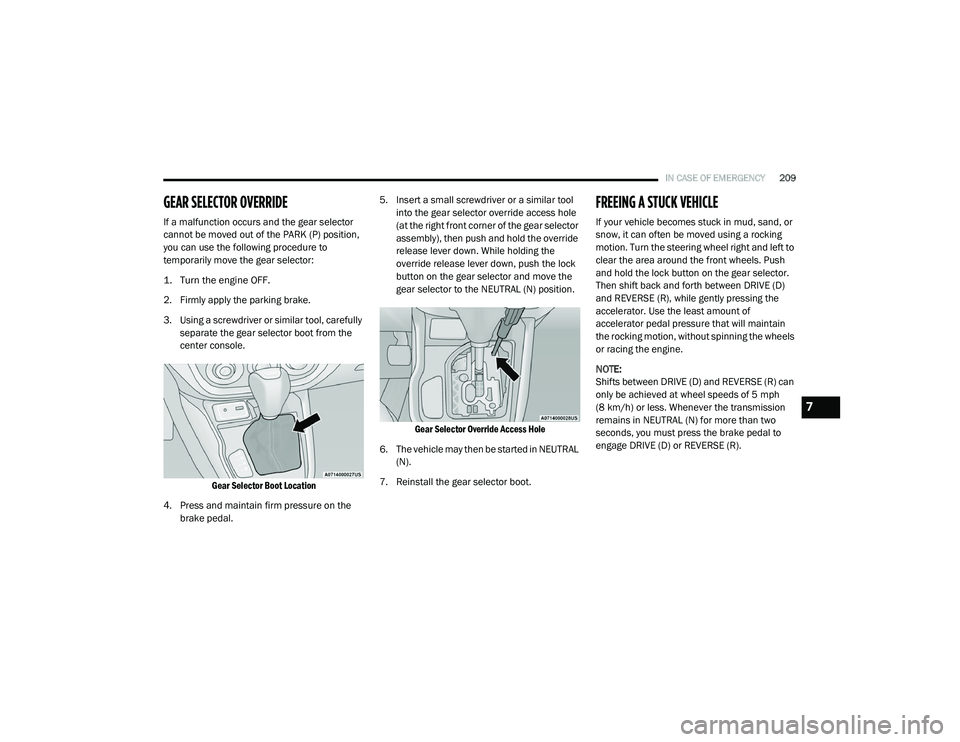
3. Using a screwdriver or similar tool, carefully
separate the gear selector boot from the
center console.
Gear Selector Boot Location
4. Press and maintain firm pressure on the brake pedal. 5. Insert a small screwdriver or a similar tool
into the gear selector override access hole
(at the right front corner of the gear selector
assembly), then push and hold the override
release lever down. While holding the
override release lever down, push the lock
button on the gear selector and move the
gear selector to the NEUTRAL (N) position.
Gear Selector Override Access Hole
6. The vehicle may then be started in NEUTRAL (N).
7. Reinstall the gear selector boot.
FREEING A STUCK VEHICLE
If your vehicle becomes stuck in mud, sand, or
snow, it can often be moved using a rocking
motion. Turn the steering wheel right and left to
clear the area around the front wheels. Push
and hold the lock button on the gear selector.
Then shift back and forth between DRIVE (D)
and REVERSE (R), while gently pressing the
accelerator. Use the least amount of
accelerator pedal pressure that will maintain
the rocking motion, without spinning the wheels
or racing the engine.
NOTE:
Shifts between DRIVE (D) and REVERSE (R) can
only be achieved at wheel speeds of 5 mph
(8 km/h) or less. Whenever the transmission
remains in NEUTRAL (N) for more than two
seconds, you must press the brake pedal to
engage DRIVE (D) or REVERSE (R).
7
21_VM_OM_EN_USC_t.book Page 209