2021 RAM PROMASTER CITY flat tire
[x] Cancel search: flat tirePage 153 of 280

SAFETY151
NOTE:
The TPMS is not intended to replace normal
tire care and maintenance or to provide
warning of a tire failure or condition.
The TPMS should not be used as a tire pres -
sure gauge while adjusting your tire pressure.
Driving on a significantly under-inflated tire
causes the tire to overheat and can lead to
tire failure. Under-inflation also reduces fuel
efficiency and tire tread life, and may affect
the vehicle’s handling and stopping ability.
The TPMS is not a substitute for proper tire
maintenance, and it is the driver’s responsi -
bility to maintain correct tire pressure using
an accurate tire pressure gauge, even if
under-inflation has not reached the level to
trigger illumination of the TPMS Warning
Light.
Seasonal temperature changes will affect
tire pressure, and the TPMS will monitor the
actual tire pressure in the tire Ú page 265.
Base System
This is the TPMS warning indicator
located in the instrument cluster.
The TPMS uses wireless technology with wheel
rim mounted electronic sensors to monitor tire
pressure levels. Sensors, mounted to each
wheel as part of the valve stem, transmit tire
pressure readings to the Receiver Module.
NOTE:
It is particularly important for you to check the
tire pressure in all of the tires on your vehicle
regularly and to maintain the proper pressure.
The TPMS consists of the following
components:
Receiver Module
Four Tire Pressure Monitoring sensors
Tire Pressure Monitoring System Warning
Light
Tire Pressure Monitoring Low Pressure
Warnings
The Tire Pressure Monitoring System Warning
Light will illuminate in the instrument cluster, an
audible chime will be activated, and the “Check
tire pressure” text message will display when
one or more of the four active road tire
pressures are low. Should this occur, you
should stop as soon as possible, check the
inflation pressure of each tire on your vehicle,
and inflate each tire to the vehicle’s
recommended cold placard pressure value. The
system will automatically update and the Tire
Pressure Monitoring Light will extinguish once
the updated tire pressures have been received.
The vehicle may need to be driven for up to
20 minutes above 15 mph (24 km/h) to receive
this information.
6
21_VM_OM_EN_USC_t.book Page 151
Page 154 of 280

152SAFETY
Check TPMS Warnings
The Tire Pressure Monitoring Warning Light will
flash on and off for 75 seconds and remain on
solid when a system fault is detected, an
audible chime will be activated and a proper
text message will be displayed. If the ignition
key is cycled, this sequence will repeat
providing the system fault still exists. The Tire
Pressure Monitoring Warning Light will turn off
when the fault condition no longer exists. A
system fault can occur with any of the following
scenarios:
1. Jamming due to electronic devices or
driving next to facilities emitting the same
radio frequencies as the TPM sensors.
2. Installing some form of aftermarket window tinting that affects radio wave signals.
3. Snow or ice around the wheels or wheel housings. 4. Using tire chains on the vehicle.
5. Using wheels/tires not equipped with TPM
sensors.
NOTE:
Your vehicle can be equipped with either a Tire
Service Kit, a compact spare tire or a regular
size spare tire (with or without original TPMS
sensor).
1. Tire Service Kit (original tire sealant – if equipped): After fixing the punctured tire
with original tire sealant, the original
situation will be restored, so system will
turn off the telltale during the normal drive.
2. Compact Spare Tire – if equipped: The compact spare wheel is not equipped with a
TPMS sensor. So when mounted, during the
normal drive the system will turn on the
telltale (flashing for approximately
75 seconds then remains solid). This
condition persists until a wheel equipped
with original TPMS sensor has been
mounted on the vehicle. 3. Regular size spare tire (not equipped with
TPMS sensor): When mounted, during the
normal drive the system will turn on the
telltale (flashing for approximately
75 seconds then remains solid). This
condition persists until a wheel equipped
with original TPMS sensor has been
mounted on the vehicle. Then the system
will be restored and the telltale will turn off
during the normal drive.
4. Regular size spare tire (equipped with TPMS sensor): When mounted, the telltale will
turn off during the normal drive.
5. In all the above cases, please check the replacement tire inflation pressure before
driving your vehicle.
6. In case of tire replacement, if the vehicle is driven for short periods of time, then the
system can take a while to be restored.
NOTE:
For a correct Tire Pressure Monitoring behavior,
please wait for about 20 minutes in key-off
during each tire substitution.
21_VM_OM_EN_USC_t.book Page 152
Page 189 of 280

SAFETY187
Periodic Safety Checks You Should Make
Outside The Vehicle
Tires
Examine tires for excessive tread wear and
uneven wear patterns. Check for stones, nails,
glass, or other objects lodged in the tread or
sidewall. Inspect the tread for cuts and cracks.
Inspect sidewalls for cuts, cracks, and bulges.
Check the lug nut/bold torque for tightness.
Check the tires (including spare) for proper cold
inflation pressure.
Lights
Have someone observe the operation of brake
lights and exterior lights while you work the
controls. Check turn signal and high beam
indicator lights on the instrument panel.
Door Latches
Check for proper closing, latching, and locking.
Fluid Leaks
Check area under the vehicle after overnight
parking for fuel, coolant, oil, or other fluid leaks.
Also, if gasoline fumes are detected or if fuel or
brake fluid leaks are suspected, the cause
should be located and corrected immediately.
NEVER place any objects under the floor
mat (e.g., towels, keys, etc.). These objects
could change the position of the floor mat
and may cause interference with the accel -
erator, brake, or clutch pedals.
If the vehicle carpet has been removed and
re-installed, always properly attach carpet
to the floor and check the floor mat
fasteners are secure to the vehicle carpet.
Fully depress each pedal to check for inter -
ference with the accelerator, brake, or
clutch pedals then re-install the floor mats.
It is recommended to only use mild soap
and water to clean your floor mats. After
cleaning, always check your floor mat has
been properly installed and is secured to
your vehicle using the floor mat fasteners
by lightly pulling mat.
WARNING! (Continued)
6
21_VM_OM_EN_USC_t.book Page 187
Page 199 of 280

IN CASE OF EMERGENCY197
(Continued)
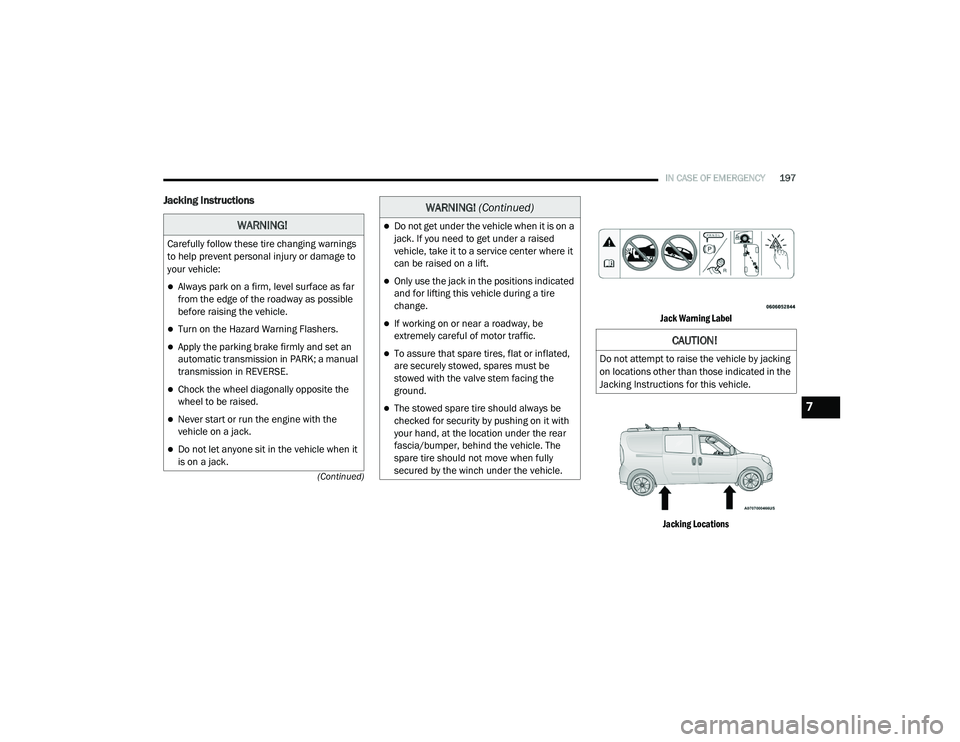
Jacking Instructions
Jack Warning Label Jacking Locations
WARNING!
Carefully follow these tire changing warnings
to help prevent personal injury or damage to
your vehicle:
Always park on a firm, level surface as far
from the edge of the roadway as possible
before raising the vehicle.
Turn on the Hazard Warning Flashers.
Apply the parking brake firmly and set an
automatic transmission in PARK; a manual
transmission in REVERSE.
Chock the wheel diagonally opposite the
wheel to be raised.
Never start or run the engine with the
vehicle on a jack.
Do not let anyone sit in the vehicle when it
is on a jack.
Do not get under the vehicle when it is on a
jack. If you need to get under a raised
vehicle, take it to a service center where it
can be raised on a lift.
Only use the jack in the positions indicated
and for lifting this vehicle during a tire
change.
If working on or near a roadway, be
extremely careful of motor traffic.
To assure that spare tires, flat or inflated,
are securely stowed, spares must be
stowed with the valve stem facing the
ground.
The stowed spare tire should always be
checked for security by pushing on it with
your hand, at the location under the rear
fascia/bumper, behind the vehicle. The
spare tire should not move when fully
secured by the winch under the vehicle.
WARNING! (Continued)
CAUTION!
Do not attempt to raise the vehicle by jacking
on locations other than those indicated in the
Jacking Instructions for this vehicle.
7
21_VM_OM_EN_USC_t.book Page 197
Page 200 of 280

198IN CASE OF EMERGENCY
1. Loosen (but do not remove) the wheel lug
bolts with the wrench handle by turning
them to the left one turn while the wheel is
still on the ground.
2. There are two jack engagement locations on each side of the vehicle body.
NOTE:
Place the jack underneath the jack engagement
location that is closest to the flat tire.
Front Lifting Point Front Jacking Location
Rear Lifting Point Rear Jacking Location
WARNING!
Being under a jacked-up vehicle is
dangerous. The vehicle could slip off the jack
and fall on you. You could be crushed. Never
get any part of your body under a vehicle that
is on a jack. If you need to get under a raised
vehicle, take it to a service center where it
can be raised on a lift.
CAUTION!
Do not attempt to raise the vehicle by jacking
on locations other than those indicated in the
Jacking Instructions for this vehicle.
21_VM_OM_EN_USC_t.book Page 198
Page 202 of 280

200IN CASE OF EMERGENCY
9. Stow the cable and wheel spacer before
driving the vehicle Ú page 200.
10. Stow the jack and tools under the driver’s seat.
11. Check the spare tire pressure as soon as possible. Correct the tire pressure, as
required.
12. When you place the spare tire back on the winch or if you carry the tire in need of repair
on the winch, always check that the tire is
properly secured under the vehicle by
pushing on the stowed tire under the rear
fascia/bumper at the back of the vehicle. If
the tire has motion when pushed, use the
tools to re-tighten the winch until a loud
click is heard.
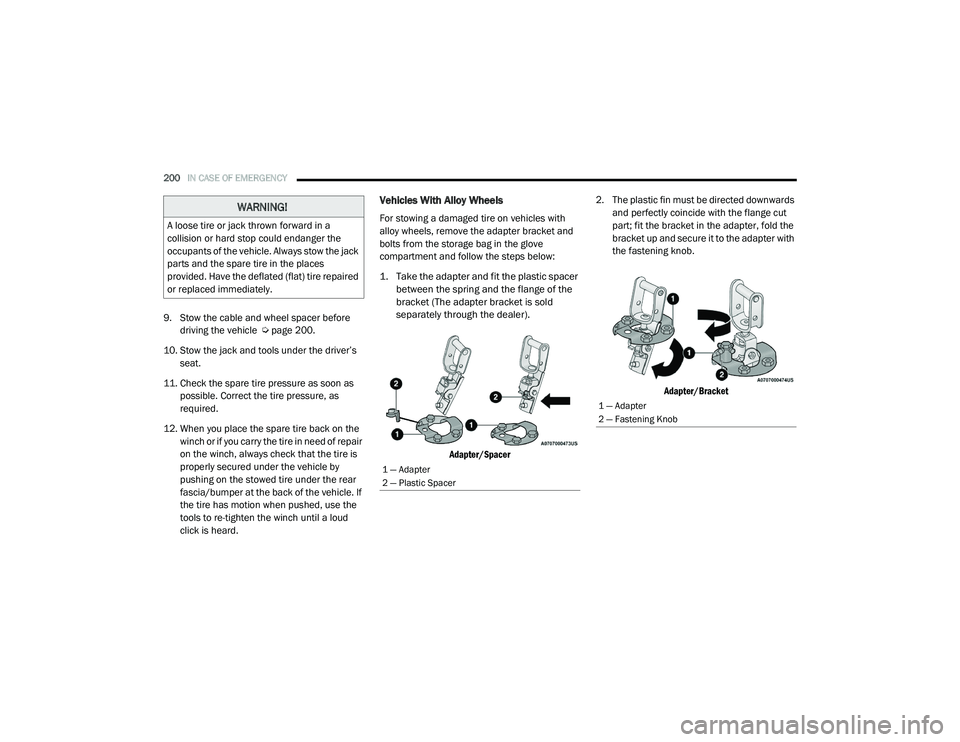
Vehicles With Alloy Wheels
For stowing a damaged tire on vehicles with
alloy wheels, remove the adapter bracket and
bolts from the storage bag in the glove
compartment and follow the steps below:
1. Take the adapter and fit the plastic spacer between the spring and the flange of the
bracket (The adapter bracket is sold
separately through the dealer).
Adapter/Spacer
2. The plastic fin must be directed downwards
and perfectly coincide with the flange cut
part; fit the bracket in the adapter, fold the
bracket up and secure it to the adapter with
the fastening knob.
Adapter/Bracket
WARNING!
A loose tire or jack thrown forward in a
collision or hard stop could endanger the
occupants of the vehicle. Always stow the jack
parts and the spare tire in the places
provided. Have the deflated (flat) tire repaired
or replaced immediately.
1 — Adapter
2 — Plastic Spacer
1 — Adapter
2 — Fastening Knob
21_VM_OM_EN_USC_t.book Page 200
Page 205 of 280

IN CASE OF EMERGENCY203
(Continued)
Insert the power plug into the vehicle power
outlet socket. Start the vehicle engine.
Push the Tire Service Kit power button on. The
electric compressor will be turned on, sealant
and air will inflate the tire.
Minimum 26 psi (1.8 bar) of pressure should be
reached within 20 minutes. If the pressure has
not been reached, turn off and remove the Tire
Service Kit, drive the vehicle 30 feet
(10 meters) back and forth, to better distribute
the sealant inside the tire.
Attach the clear flexible filling tube of the
compressor directly to the tire valve and repeat
the inflation process.
When the correct pressure has been reached,
start driving the vehicle to uniformly distribute
the sealant inside the tire. After 10 minutes,
stop and check the tire pressure. If the pressure
is below 19 psi (1.3 bar), do not drive the
vehicle, as the tire is too damaged, contact the
nearest authorized dealer.WARNING!
Do not attempt to seal a tire on the side of
the vehicle closest to traffic. Pull far enough
off the road to avoid the danger of being hit
when using the Tire Service Kit.
Do not use Tire Service Kit or drive the
vehicle under the following circumstances:
If the puncture in the tire tread is
approximately 1/4 inch (6 mm) or
larger.
If the tire has any sidewall damage.
If the tire has any damage from driving
with extremely low tire pressure.
If the tire has any damage from driving
on a flat tire.
If the wheel has any damage.
If you are unsure of the condition of the
tire or the wheel.
Keep Tire Service Kit away from open
flames or heat source.
A loose Tire Service Kit thrown forward in a
collision or hard stop could endanger the
occupants of the vehicle. Always stow the
Tire Service Kit in the place provided.
Failure to follow these warnings can result
in injuries that are serious or fatal to you,
your passengers, and others around you.
Take care not to allow the contents of Tire
Service Kit to come in contact with hair,
eyes, or clothing. Tire Service Kit sealant is
harmful if inhaled, swallowed, or absorbed
through the skin. It causes skin, eye, and
respiratory irritation. Flush immediately
with plenty of water if there is any contact
with eyes or skin. Change clothing as soon
as possible, if there is any contact with
clothing.
Tire Service Kit Sealant solution contains
latex. In case of an allergic reaction or rash,
consult a physician immediately. Keep Tire
Service Kit out of reach of children. If swal -
lowed, rinse mouth immediately with plenty
of water and drink plenty of water. Do not
induce vomiting! Consult a physician imme -
diately.
WARNING! (Continued)
7
21_VM_OM_EN_USC_t.book Page 203
Page 206 of 280

204IN CASE OF EMERGENCY
If the pressure is at 19 psi (1.3 bar) or above
repeat the inflation process to reach the correct
tire pressure and continue driving.
Peel off the warning label from the bottle and
place it on the dashboard as a reminder to the
driver that a tire has been treated with Tire
Service Kit. NOTE:
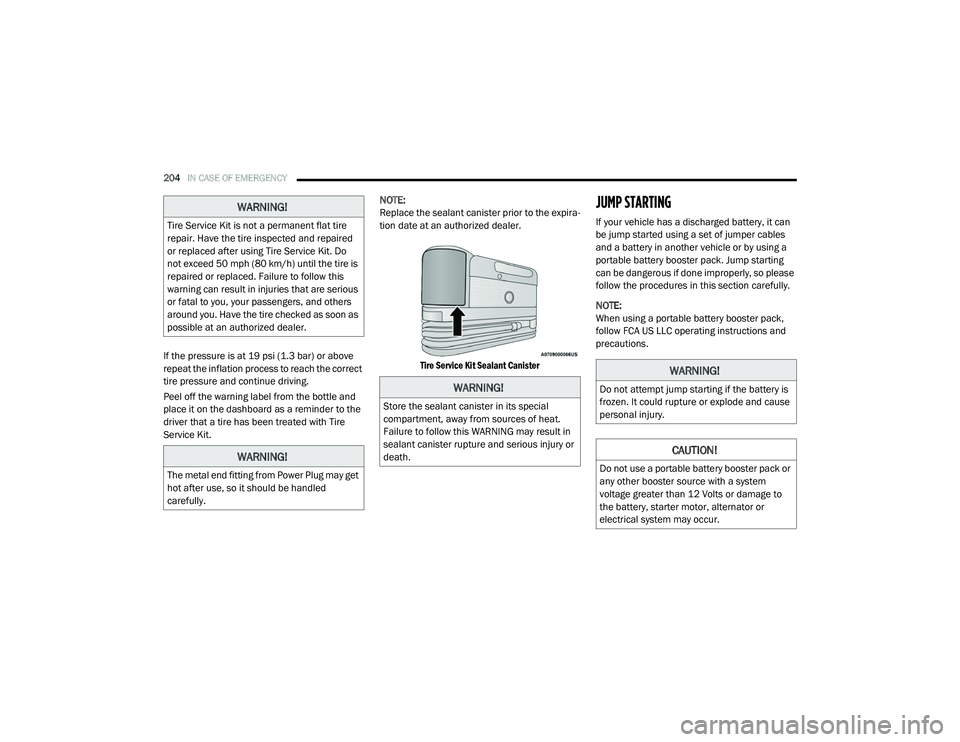
Replace the sealant canister prior to the expira-
tion date at an authorized dealer.
Tire Service Kit Sealant Canister
JUMP STARTING
If your vehicle has a discharged battery, it can
be jump started using a set of jumper cables
and a battery in another vehicle or by using a
portable battery booster pack. Jump starting
can be dangerous if done improperly, so please
follow the procedures in this section carefully.
NOTE:
When using a portable battery booster pack,
follow FCA US LLC operating instructions and
precautions.
WARNING!
Tire Service Kit is not a permanent flat tire
repair. Have the tire inspected and repaired
or replaced after using Tire Service Kit. Do
not exceed 50 mph (80 km/h) until the tire is
repaired or replaced. Failure to follow this
warning can result in injuries that are serious
or fatal to you, your passengers, and others
around you. Have the tire checked as soon as
possible at an authorized dealer.
WARNING!
The metal end fitting from Power Plug may get
hot after use, so it should be handled
carefully.
WARNING!
Store the sealant canister in its special
compartment, away from sources of heat.
Failure to follow this WARNING may result in
sealant canister rupture and serious injury or
death.
WARNING!
Do not attempt jump starting if the battery is
frozen. It could rupture or explode and cause
personal injury.
CAUTION!
Do not use a portable battery booster pack or
any other booster source with a system
voltage greater than 12 Volts or damage to
the battery, starter motor, alternator or
electrical system may occur.
21_VM_OM_EN_USC_t.book Page 204