2021 RAM PROMASTER CITY turn signal
[x] Cancel search: turn signalPage 4 of 280

2
INTRODUCTION
Symbols Key ............................................................ 7
WARNINGS AND CAUTIONS ................................. 7
VAN CONVERSIONS/CAMPERS ............................ 7
VEHICLE MODIFICATIONS/ALTERATIONS .......... 8
Symbol Glossary ..................................................... 8
GETTING TO KNOW YOUR VEHICLE
KEYS ......................................................................10
Key Fob......................................................... 10
SENTRY KEY ..........................................................12
IGNITION SWITCH ................................................12
VEHICLE SECURITY SYSTEM — IF EQUIPPED ...13
To Arm The System ...................................... 13
To Disarm The System................................. 13
Rearming Of The System............................. 13
Security System Manual Override .............. 13
DOORS ..................................................................14
Power Door Locks ....................................... 14
Auto Unlock Doors ....................................... 14
Sliding Side Door ......................................... 14
Double Rear Swing Doors ........................... 16
Child-Protection Door Lock System ............ 17
SEATS ....................................................................17
Manual Adjustment (Front Seats)............... 18
Folding Rear Seat — If Equipped ................ 20
Heated Seats — If Equipped........................ 20 HEAD RESTRAINTS ............................................. 21
Front Adjustment ......................................... 21
Rear Adjustment — If Equipped .................. 22
Front Removal.............................................. 22
Rear Removal — If Equipped....................... 23
STEERING WHEEL ................................................ 23
Tilt/Telescoping Steering Column .............. 23
UCONNECT VOICE RECOGNITION QUICK
TIPS ........................................................................ 24
Introducing Voice Recognition .................... 24
Get Started ................................................... 24
Basic Voice Commands............................... 24
Additional Information ................................. 24
MIRRORS ............................................................. 25
Inside Rearview Mirror ................................ 25
Outside Mirrors ........................................... 25
Vanity Mirror................................................. 26
EXTERIOR LIGHTS ................................................ 27
Multifunction Lever...................................... 27
Headlights ................................................... 27
Daytime Running Lights (DRLs) —
If Equipped .................................................. 27 High/Low Beam Switch ............................... 28
Flash-To-Pass .............................................. 28
Parking Lights ............................................. 28
Follow Me Home/Headlight Delay .............. 28
Fog Lights — If Equipped ............................ 28
Turn Signals ................................................. 28
Lane Change Assist ..................................... 28
INTERIOR LIGHTS ................................................ 29
Courtesy/Interior Lights .............................. 29 WIPERS AND WASHERS .....................................30
Front Wiper Operation ................................. 30
Rear Wiper Operation — If Equipped .......... 31
CLIMATE CONTROLS ...........................................31
Manual Climate Control Descriptions And
Functions ..................................................... 31 Operating Tips.............................................. 33
WINDOWS ............................................................35
Power Window Controls — If Equipped ...... 35
Automatic Window Features ....................... 35
Power Windows System Initialization......... 36
Window Bar Grates — If Equipped .............. 36
Wind Buffeting ............................................ 36
HOOD .....................................................................37
Opening ........................................................ 37
Closing.......................................................... 37
CARGO AREA FEATURES .....................................38
Rear Cargo Tie-Downs ................................. 38
INTERIOR STORAGE AND EQUIPMENT ..............38
Storage ......................................................... 38
USB Control — If Equipped .......................... 40
Power Outlets .............................................. 40
ROOF RACK — IF EQUIPPED................................41
GETTING TO KNOW YOUR INSTRUMENT PANEL
INSTRUMENT CLUSTER........................................43
Instrument Cluster Descriptions................. 44
21_VM_OM_EN_USC_t.book Page 2
Page 11 of 280

9
Yellow Warning Lights
Anti-Lock Brake System (ABS) Warning Light Úpage 52
Low Fuel Warning Light Úpage 52
Generic Warning Light Úpage 52
Tire Pressure Monitoring System (TPMS) Warning Light Ú page 53
Vehicle Security Warning Light Úpage 54
Engine Check/Malfunction Indicator Warning Light (MIL)
Ú page 54
Electronic Stability Control (ESC) Warning Light — If Equipped Ú page 55
Electronic Stability Control (ESC) OFF Warning Light — If Equipped Úpage 55
Green Indicator Lights
Turn Signal Indicator Lights
Úpage 55
Park/Headlight On Indicator Light Úpage 55
Front Fog Indicator Light — If Equipped Úpage 55
Cruise Control Indicator Light — If Equipped Úpage 55
Blue Indicator Lights
High Beam Indicator Light
Úpage 56
1
21_VM_OM_EN_USC_t.book Page 9
Page 12 of 280
10
GETTING TO KNOW YOUR VEHICLE
KEYS
Key Fob
Your vehicle uses a key start ignition system
which supports Remote Keyless Entry (RKE).
The key fob allows you to lock or unlock the
doors from distances up to approximately 66 ft
(20 m). The key fob does not need to be pointed
at the vehicle to activate the system. The key
fob also contains an integrated mechanical key,
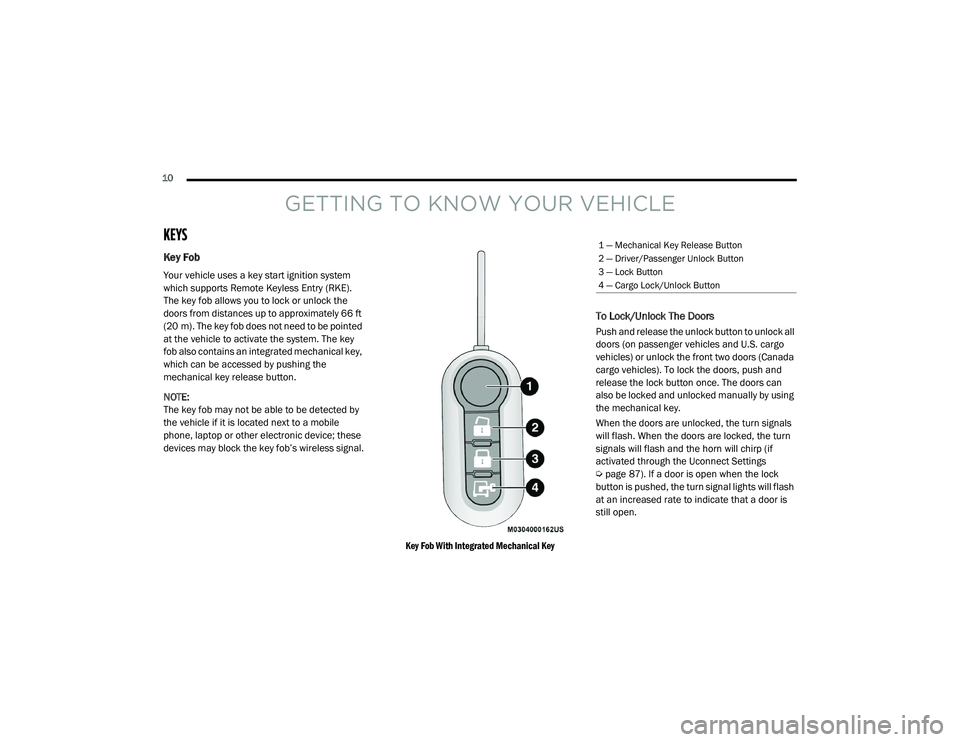
which can be accessed by pushing the
mechanical key release button.
NOTE:
The key fob may not be able to be detected by
the vehicle if it is located next to a mobile
phone, laptop or other electronic device; these
devices may block the key fob’s wireless signal.
Key Fob With Integrated Mechanical Key
To Lock/Unlock The Doors
Push and release the unlock button to unlock all
doors (on passenger vehicles and U.S. cargo
vehicles) or unlock the front two doors (Canada
cargo vehicles). To lock the doors, push and
release the lock button once. The doors can
also be locked and unlocked manually by using
the mechanical key.
When the doors are unlocked, the turn signals
will flash. When the doors are locked, the turn
signals will flash and the horn will chirp (if
activated through the Uconnect Settings
Úpage 87). If a door is open when the lock
button is pushed, the turn signal lights will flash
at an increased rate to indicate that a door is
still open.
1 — Mechanical Key Release Button
2 — Driver/Passenger Unlock Button
3 — Lock Button
4 — Cargo Lock/Unlock Button
21_VM_OM_EN_USC_t.book Page 10
Page 15 of 280
GETTING TO KNOW YOUR VEHICLE13
NOTE:
When opening the driver’s door with the key in
the ignition and the ignition placed in the STOP
(OFF/LOCK) position, a chime will sound to
remind you to remove the key.
VEHICLE SECURITY SYSTEM — IF EQUIPPED
The Vehicle Security system monitors the
vehicle doors and ignition for unauthorized
operation. When the Vehicle Security system is
activated, interior switches for door locks are
disabled. The system provides both audible and
visible signals. Every intrusion attempt causes
six continuous alarm cycles. Every alarm cycle
lasts for 30 seconds. For 26 seconds, the horn
will sound, and the turn signal lights will flash.
For four seconds, it will pause. After a maximum
of 10 alarm cycles, only the turn signal lights will
flash until the next alarm activation.
To Arm The System
The Vehicle Security system will arm when you
use the key fob to lock the doors. If a door or the
hood is not properly shut, the alarm system will
not be armed.
To Disarm The System
Use the key fob to unlock the door and disarm
the system. The Vehicle Security system will also disarm if a
programmed Sentry Key is inserted into the
ignition switch. To exit the alarm mode, push
the key fob unlock button, or insert a
programmed Sentry Key into the ignition switch.
The Vehicle Security system is designed to
protect your vehicle. However, you can create
conditions where the system will give you a false
alarm. If one of the previously described arming
sequences has occurred, the Vehicle Security
system will arm regardless of whether you are in
the vehicle or not. If you remain in the vehicle
and open a door, the alarm will sound. If this
occurs, disarm the Vehicle Security system.
Rearming Of The System
If the system has not been disabled, the Vehicle
Security system will rearm itself after the
15 additional minutes of turn lamps flashing. If
the condition which initiated the alarm is still
present, the system will ignore that condition
and monitor the remaining doors and ignition.
Security System Manual Override
The Vehicle Security system will not arm if you
lock the doors using the manual door lock.
Do not leave the key fob in or near the
vehicle, or in a location accessible to chil-
dren. A child could operate power windows,
other controls, or move the vehicle.
Do not leave children or animals inside
parked vehicles in hot weather. Interior
heat build-up may cause serious injury or
death.
CAUTION!
An unlocked vehicle is an invitation. Always
remove the key from the ignition and lock all
the doors when leaving the vehicle
unattended.
WARNING!
(Continued)
2
21_VM_OM_EN_USC_t.book Page 13
Page 16 of 280
14GETTING TO KNOW YOUR VEHICLE
DOORS
Power Door Locks
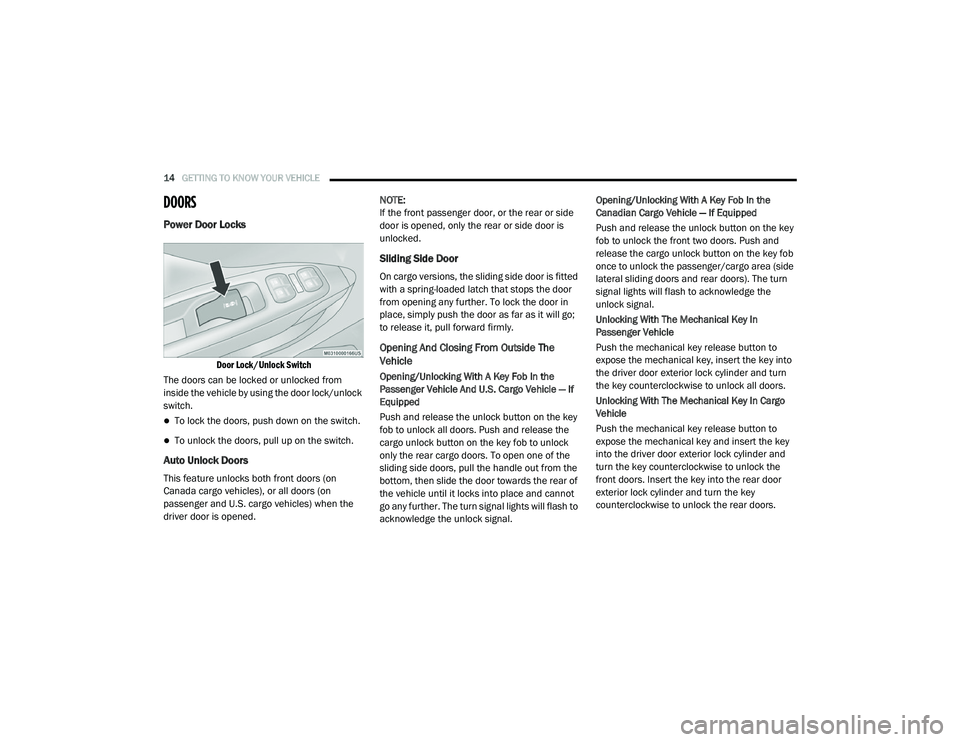
Door Lock/Unlock Switch
The doors can be locked or unlocked from
inside the vehicle by using the door lock/unlock
switch.
To lock the doors, push down on the switch.
To unlock the doors, pull up on the switch.
Auto Unlock Doors
This feature unlocks both front doors (on
Canada cargo vehicles), or all doors (on
passenger and U.S. cargo vehicles) when the
driver door is opened. NOTE:
If the front passenger door, or the rear or side
door is opened, only the rear or side door is
unlocked.
Sliding Side Door
On cargo versions, the sliding side door is fitted
with a spring-loaded latch that stops the door
from opening any further. To lock the door in
place, simply push the door as far as it will go;
to release it, pull forward firmly.
Opening And Closing From Outside The
Vehicle
Opening/Unlocking With A Key Fob In the
Passenger Vehicle And U.S. Cargo Vehicle — If
Equipped
Push and release the unlock button on the key
fob to unlock all doors. Push and release the
cargo unlock button on the key fob to unlock
only the rear cargo doors. To open one of the
sliding side doors, pull the handle out from the
bottom, then slide the door towards the rear of
the vehicle until it locks into place and cannot
go any further. The turn signal lights will flash to
acknowledge the unlock signal.Opening/Unlocking With A Key Fob In the
Canadian Cargo Vehicle — If Equipped
Push and release the unlock button on the key
fob to unlock the front two doors. Push and
release the cargo unlock button on the key fob
once to unlock the passenger/cargo area (side
lateral sliding doors and rear doors). The turn
signal lights will flash to acknowledge the
unlock signal.
Unlocking With The Mechanical Key In
Passenger Vehicle
Push the mechanical key release button to
expose the mechanical key, insert the key into
the driver door exterior lock cylinder and turn
the key counterclockwise to unlock all doors.
Unlocking With The Mechanical Key In Cargo
Vehicle
Push the mechanical key release button to
expose the mechanical key and insert the key
into the driver door exterior lock cylinder and
turn the key counterclockwise to unlock the
front doors. Insert the key into the rear door
exterior lock cylinder and turn the key
counterclockwise to unlock the rear doors.
21_VM_OM_EN_USC_t.book Page 14
Page 17 of 280
GETTING TO KNOW YOUR VEHICLE15
Closing/Locking With A Key Fob
Push and release the lock button on the key fob
to lock all doors, including the cargo area (side
lateral sliding doors and rear doors). The turn
signal lights will flash to acknowledge the lock
signal.
Horn activation settings after a key fob lock
command can be adjusted manually through
the Uconnect system Úpage 87.
Locking With The Mechanical Key In Passenger
Vehicle
Push the mechanical key release button to
expose the mechanical key, insert the key into
the driver door exterior lock cylinder and turn
the key clockwise to lock all doors.
Locking With The Mechanical Key In Cargo
Vehicle
Push the mechanical key release button to
expose the mechanical key, insert the key into
the driver door exterior lock cylinder and turn
the key clockwise to lock the front doors. Insert
the key into the rear door exterior lock cylinder
and turn the key clockwise to lock the rear
doors. Closing And Locking From Outside
Grab the side door handle and push towards
the front of the vehicle. Once the side door is
secured in the full closed position, use one of
the prior locking methods to lock the sliding
side doors.
Opening And Closing From The Inside
Opening:
Pull the interior door handle to unlock the door,
then pull the handle and slide the door towards
the rear of the vehicle until it can go no further.
Closing:
Pull the interior door handle to release the door
and then push it towards the front of the
vehicle.
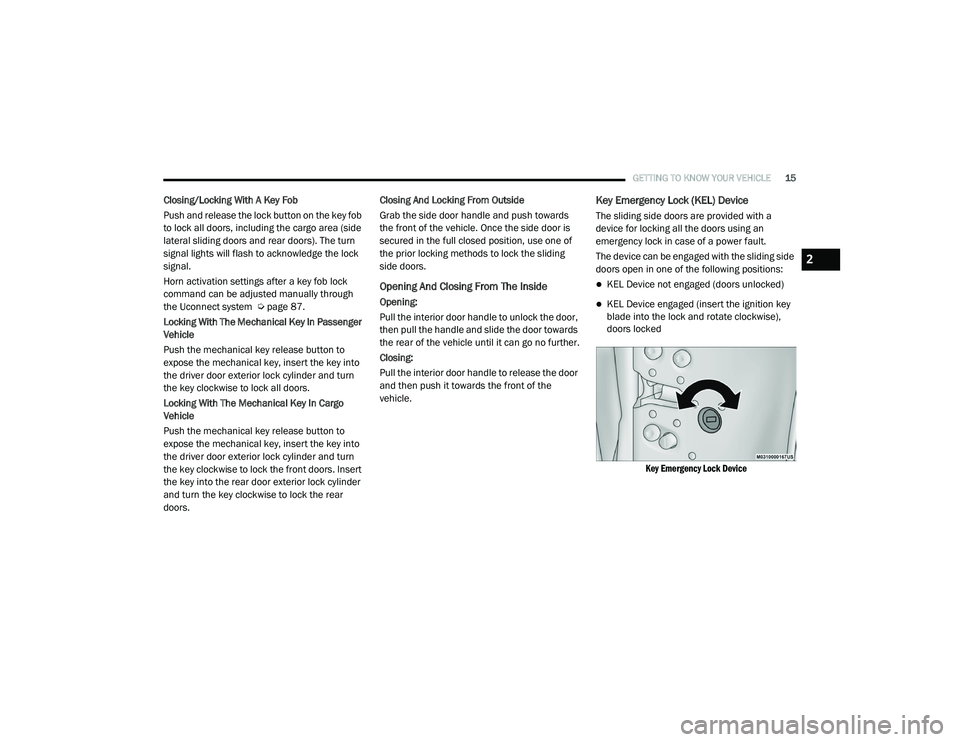
Key Emergency Lock (KEL) Device
The sliding side doors are provided with a
device for locking all the doors using an
emergency lock in case of a power fault.
The device can be engaged with the sliding side
doors open in one of the following positions:
KEL Device not engaged (doors unlocked)
KEL Device engaged (insert the ignition key
blade into the lock and rotate clockwise),
doors locked
Key Emergency Lock Device
2
21_VM_OM_EN_USC_t.book Page 15
Page 25 of 280
GETTING TO KNOW YOUR VEHICLE23
Rear Removal — If Equipped
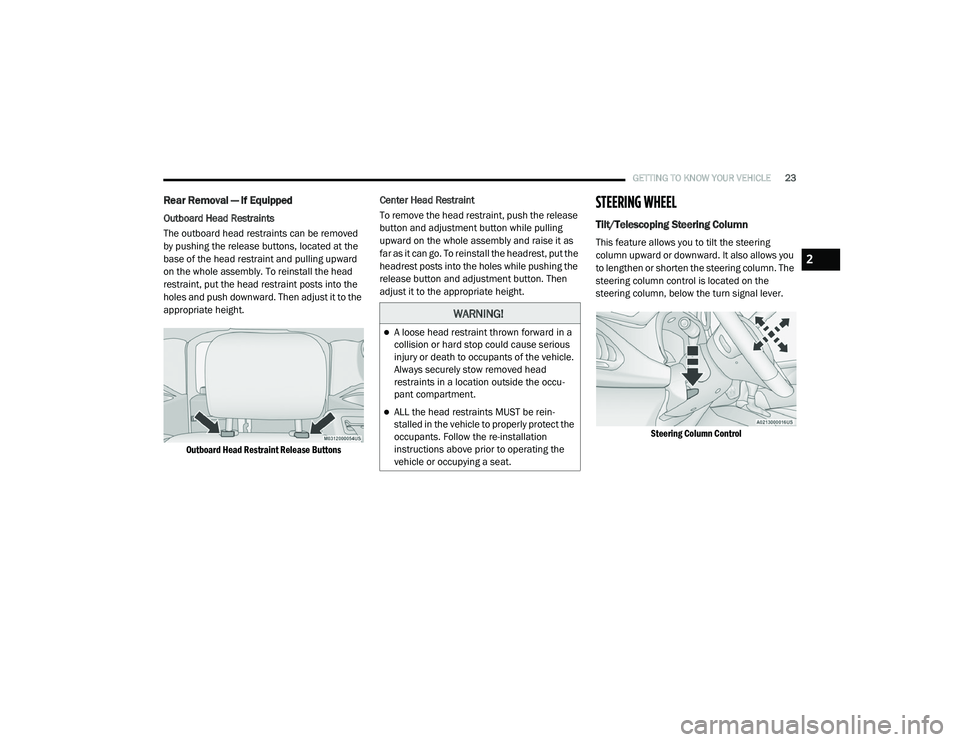
Outboard Head Restraints
The outboard head restraints can be removed
by pushing the release buttons, located at the
base of the head restraint and pulling upward
on the whole assembly. To reinstall the head
restraint, put the head restraint posts into the
holes and push downward. Then adjust it to the
appropriate height.
Outboard Head Restraint Release Buttons
Center Head Restraint
To remove the head restraint, push the release
button and adjustment button while pulling
upward on the whole assembly and raise it as
far as it can go. To reinstall the headrest, put the
headrest posts into the holes while pushing the
release button and adjustment button. Then
adjust it to the appropriate height.
STEERING WHEEL
Tilt/Telescoping Steering Column
This feature allows you to tilt the steering
column upward or downward. It also allows you
to lengthen or shorten the steering column. The
steering column control is located on the
steering column, below the turn signal lever.
Steering Column Control
WARNING!
A loose head restraint thrown forward in a
collision or hard stop could cause serious
injury or death to occupants of the vehicle.
Always securely stow removed head
restraints in a location outside the occu -
pant compartment.
ALL the head restraints MUST be rein -
stalled in the vehicle to properly protect the
occupants. Follow the re-installation
instructions above prior to operating the
vehicle or occupying a seat.
2
21_VM_OM_EN_USC_t.book Page 23
Page 29 of 280
GETTING TO KNOW YOUR VEHICLE27
Sun Visor “Slide-On-Rod” Feature
The sun visor “Slide-On-Rod” feature allows for
additional flexibility in positioning the sun visor
to block out the sun.
1. Fold down the sun visor.
2. Unclip the visor from the corner clip.
3. Pull the sun visor toward the inside rearview
mirror to extend it.
EXTERIOR LIGHTS
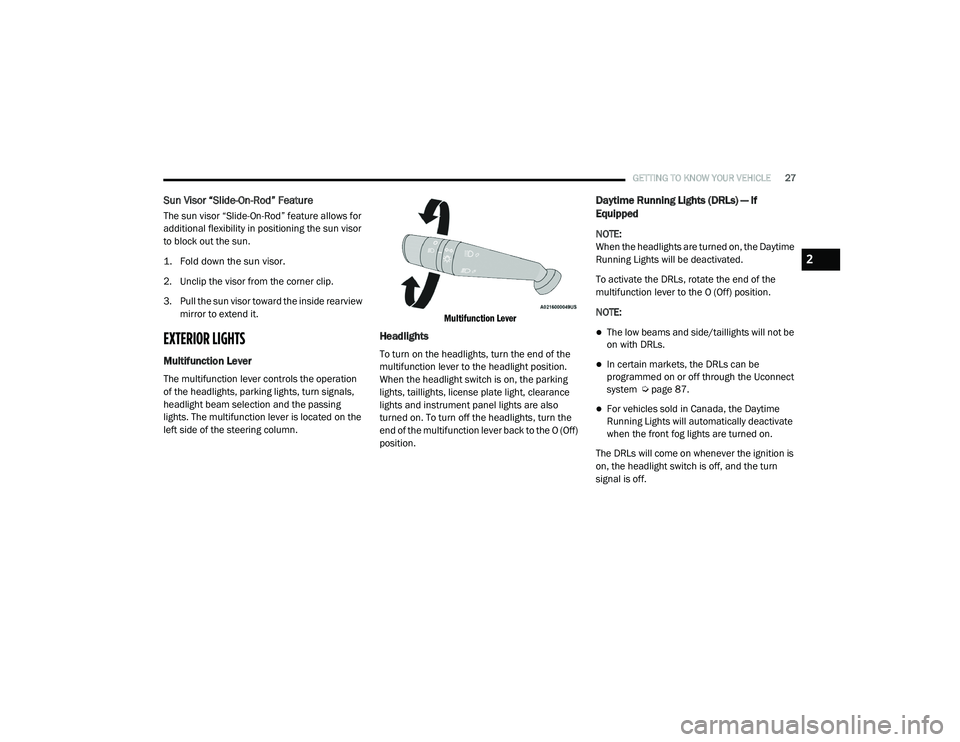
Multifunction Lever
The multifunction lever controls the operation
of the headlights, parking lights, turn signals,
headlight beam selection and the passing
lights. The multifunction lever is located on the
left side of the steering column.
Multifunction Lever
Headlights
To turn on the headlights, turn the end of the
multifunction lever to the headlight position.
When the headlight switch is on, the parking
lights, taillights, license plate light, clearance
lights and instrument panel lights are also
turned on. To turn off the headlights, turn the
end of the multifunction lever back to the O (Off)
position.
Daytime Running Lights (DRLs) — If
Equipped
NOTE:
When the headlights are turned on, the Daytime
Running Lights will be deactivated.
To activate the DRLs, rotate the end of the
multifunction lever to the O (Off) position.
NOTE:
The low beams and side/taillights will not be
on with DRLs.
In certain markets, the DRLs can be
programmed on or off through the Uconnect
system Ú
page 87.
For vehicles sold in Canada, the Daytime
Running Lights will automatically deactivate
when the front fog lights are turned on.
The DRLs will come on whenever the ignition is
on, the headlight switch is off, and the turn
signal is off.
2
21_VM_OM_EN_USC_t.book Page 27