2021 ALFA ROMEO STELVIO ECU
[x] Cancel search: ECUPage 190 of 280
SAFETY
188
(Continued)
1. Look behind the seating position where youplan to install the child restraint to find the
tether anchorage. You may need to move the
seat forward to provide better access to the
tether anchorage. If there is no top tether
anchorage for that seating position, move the
child restraint to another position in the
vehicle if one is available.
2. Route the tether strap to provide the most direct path for the strap between the anchor
and the child seat. If your vehicle is equipped
with adjustable rear head restraints, raise the
head restraint, and where possible, route the
tether strap under the head restraint and
between the two posts. If not possible, lower
the head restraint and pass the tether strap
around the outboard side of the head
restraint.
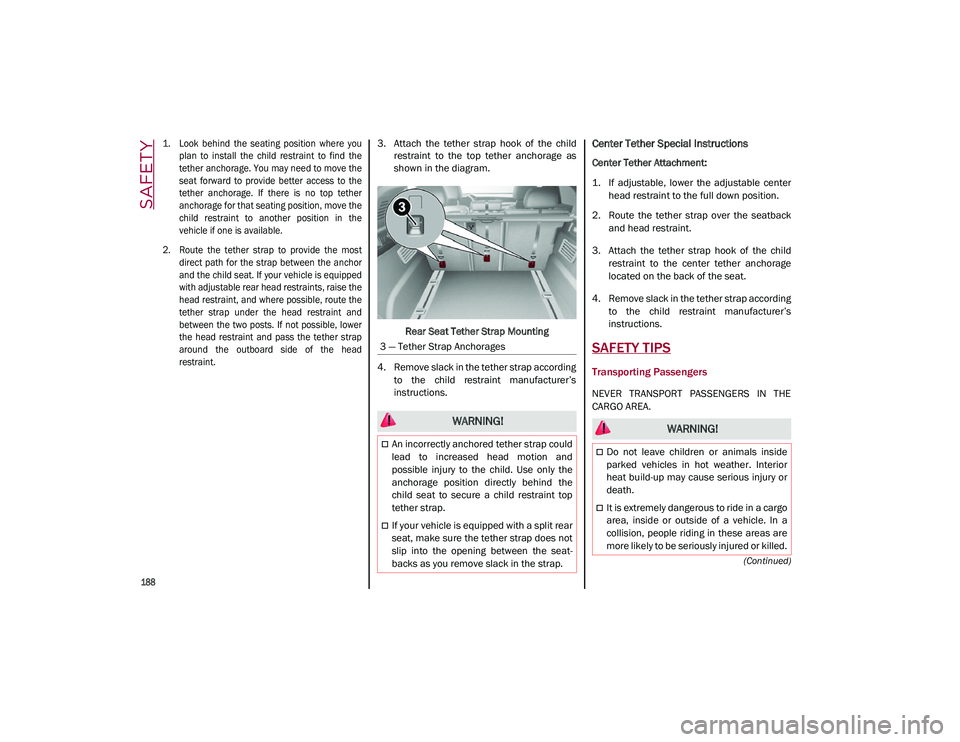
3. Attach the tether strap hook of the child
restraint to the top tether anchorage as
shown in the diagram.
Rear Seat Tether Strap Mounting
4. Remove slack in the tether strap according to the child restraint manufacturer’s
instructions.Center Tether Special Instructions
Center Tether Attachment:
1. If adjustable, lower the adjustable centerhead restraint to the full down position.
2. Route the tether strap over the seatback and head restraint.
3. Attach the tether strap hook of the child restraint to the center tether anchorage
located on the back of the seat.
4. Remove slack in the tether strap according to the child restraint manufacturer’s
instructions.
SAFETY TIPS
Transporting Passengers
NEVER TRANSPORT PASSENGERS IN THE
CARGO AREA.
3 — Tether Strap Anchorages
WARNING!
An incorrectly anchored tether strap could
lead to increased head motion and
possible injury to the child. Use only the
anchorage position directly behind the
child seat to secure a child restraint top
tether strap.
If your vehicle is equipped with a split rear
seat, make sure the tether strap does not
slip into the opening between the seat
-
backs as you remove slack in the strap.
WARNING!
Do not leave children or animals inside
parked vehicles in hot weather. Interior
heat build-up may cause serious injury or
death.
It is extremely dangerous to ride in a cargo
area, inside or outside of a vehicle. In a
collision, people riding in these areas are
more likely to be seriously injured or killed.
21_GU_OM_EN_USC_t.book Page 188
Page 191 of 280
189
(Continued)
Transporting Pets
Air Bags deploying in the front seat could harm
your pet. An unrestrained pet will be thrown
about and possibly injured, or injure a
passenger during panic braking or in a colli-
sion.
Pets should be restrained in the rear seat (if
equipped) in pet harnesses or pet carriers that
are secured by seat belts.
Safety Checks You Should Make Inside The
Vehicle
Seat Belts
Inspect the seat belt system periodically,
checking for cuts, frays, and loose parts.
Damaged parts must be replaced immedi -
ately. Do not disassemble or modify the
system.
Front seat belt assemblies must be replaced
after a collision. Rear seat belt assemblies
must be replaced after a collision if they have
been damaged (i.e., bent retractor, torn
webbing, etc.). If there is any question regarding seat belt or retractor condition,
replace the seat belt.
Air Bag Warning Light
The Air Bag warning light will turn on for
four to eight seconds as a bulb check when the
ignition switch is first turned to ON/RUN. If the
light is either not on during starting, stays on,
or turns on while driving, have the system
inspected at an authorized dealer as soon as
possible. After the bulb check, this light will
illuminate with a single chime when a fault
with the Air Bag System has been detected. It
will stay on until the fault is removed. If the
light comes on intermittently or remains on
while driving, have an authorized dealer
service the vehicle immediately
Ú
page 163.
Defroster
Check operation by selecting the defrost mode
and place the blower control on high speed.
You should be able to feel the air directed
against the windshield. See an authorized
dealer for service if your defroster is inoper -
able.
Floor Mat Safety Information
Always use floor mats designed to fit your
vehicle. Only use a floor mat that does not
interfere with the operation of the accelerator,
brake or clutch pedals. Only use a floor mat
that is securely attached using the floor mat
fasteners so it cannot slip out of position and
interfere with the accelerator, brake or clutch pedals or impair safe operation of your vehicle
in other ways.
Do not allow people to ride in any area of
your vehicle that is not equipped with
seats and seat belts.
Be sure everyone in your vehicle is in a
seat and using a seat belt properly.
WARNING!
(Continued)
WARNING!
An improperly attached, damaged, folded,
or stacked floor mat, or damaged floor mat
fasteners may cause your floor mat to
interfere with the accelerator, brake, or
clutch pedals and cause a loss of vehicle
control. To prevent SERIOUS INJURY or
DEATH:
ALWAYS securely attach your floor mat
using the floor mat fasteners. DO NOT
install your floor mat upside down or turn
your floor mat over. Lightly pull to confirm
mat is secured using the floor mat
fasteners on a regular basis.
ALWAYS REMOVE THE EXISTING FLOOR
MAT FROM THE VEHICLE before
installing any other floor mat. NEVER
install or stack an additional floor mat on
top of an existing floor mat.
ONLY install floor mats designed to fit your
vehicle. NEVER install a floor mat that
cannot be properly attached and secured
to your vehicle. If a floor mat needs to be
replaced, only use a FCA approved floor
mat for the specific make, model, and
year of your vehicle.
21_GU_OM_EN_USC_t.book Page 189
Page 192 of 280
SAFETY
190
(Continued)
(Continued)
Periodic Safety Checks You Should Make
Outside The Vehicle
Tires
Examine tires for excessive tread wear and
uneven wear patterns. Check for stones, nails,
glass, or other objects lodged in the tread or
sidewall. Inspect the tread for cuts and cracks.
Inspect sidewalls for cuts, cracks, and bulges.
Check the wheel nuts for tightness. Check the
tires (including spare) for proper cold inflation
pressure.
Lights
Have someone observe the operation of brake
lights and exterior lights while you work the controls. Check turn signal and high beam
indicator lights on the instrument panel.
Door Latches
Check for proper closing, latching, and locking.
Fluid Leaks
Check area under the vehicle after overnight
parking for fuel, coolant, oil, or other fluid
leaks. Also, if gasoline fumes are detected or if
fuel, or brake fluid leaks are suspected, the
cause should be located and corrected imme
-
diately.
Exhaust Gas
ONLY use the driver’s side floor mat on the
driver’s side floor area. To check for inter -
ference, with the vehicle properly parked
with the engine off, fully depress the
accelerator, the brake, and the clutch
pedal (if present) to check for interfer -
ence. If your floor mat interferes with the
operation of any pedal, or is not secure to
the floor, remove the floor mat from the
vehicle and place the floor mat in your
trunk.
ONLY use the passenger’s side floor mat
on the passenger’s side floor area.
ALWAYS make sure objects cannot fall or
slide into the driver’s side floor area when
the vehicle is moving. Objects can become
trapped under accelerator, brake, or
clutch pedals and could cause a loss of
vehicle control.
NEVER place any objects under the floor
mat (e.g., towels, keys, etc.). These
objects could change the position of the
floor mat and may cause interference with
the accelerator, brake, or clutch pedals.
WARNING! (Continued)
If the vehicle carpet has been removed
and re-installed, always properly attach
carpet to the floor and check the floor mat
fasteners are secure to the vehicle carpet.
Fully depress each pedal to check for
interference with the accelerator, brake,
or clutch pedals then re-install the floor
mats.
It is recommended to only use mild soap
and water to clean your floor mats. After
cleaning, always check your floor mat has
been properly installed and is secured to
your vehicle using the floor mat fasteners
by lightly pulling mat.
WARNING! (Continued)
WARNING!
Exhaust gases can injure or kill. They
contain carbon monoxide (CO), which is
colorless and odorless. Breathing it can
make you unconscious and can eventually
poison you. To avoid breathing (CO), follow
these safety tips:
Do not run the engine in a closed garage
or in confined areas any longer than
needed to move your vehicle in or out of
the area.
If you are required to drive with the trunk/lift -
gate/rear doors open, make sure that all
windows are closed and the climate control
BLOWER switch is set at high speed. DO NOT
use the recirculation mode.
21_GU_OM_EN_USC_t.book Page 190
Page 207 of 280
205
(Continued)
MANUAL PARK RELEASE
See an authorized dealer to disengage the
manual park release lever.
TOWING A DISABLED VEHICLE
This section describes procedures for towing a
disabled vehicle using a commercial towing
service.
NOTE:
If your vehicle is equipped with a Anti-Lift
Protection system, you will need to disable the
system prior to towing by pushing the button
located on the overhead console
Ú
page 23.
The operators of the assistance vehicle must
be informed with regard to the vehicle's
minimum height from ground in order to avoid
contact between the ends of the bumpers with
the equipment of the breakdown truck.
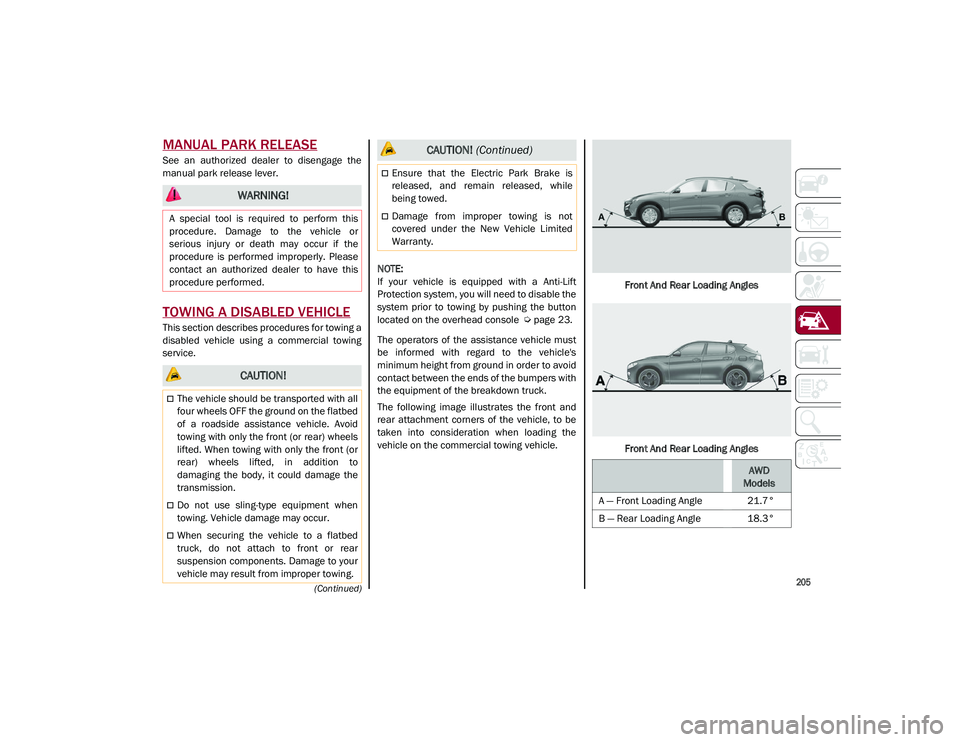
The following image illustrates the front and
rear attachment corners of the vehicle, to be
taken into consideration when loading the
vehicle on the commercial towing vehicle. Front And Rear Loading Angles
Front And Rear Loading Angles
WARNING!
A special tool is required to perform this
procedure. Damage to the vehicle or
serious injury or death may occur if the
procedure is performed improperly. Please
contact an authorized dealer to have this
procedure performed.
CAUTION!
The vehicle should be transported with all
four wheels OFF the ground on the flatbed
of a roadside assistance vehicle. Avoid
towing with only the front (or rear) wheels
lifted. When towing with only the front (or
rear) wheels lifted, in addition to
damaging the body, it could damage the
transmission.
Do not use sling-type equipment when
towing. Vehicle damage may occur.
When securing the vehicle to a flatbed
truck, do not attach to front or rear
suspension components. Damage to your
vehicle may result from improper towing.
Ensure that the Electric Park Brake is
released, and remain released, while
being towed.
Damage from improper towing is not
covered under the New Vehicle Limited
Warranty.
CAUTION! (Continued)
AWD
Models
A — Front Loading Angle 21.7°
B — Rear Loading Angle 18.3°
21_GU_OM_EN_USC_t.book Page 205
Page 227 of 280
225
Automatic Transmission
Use only a transmission oil with the character-
istics indicated
Ú
page 263.
Special Additives
Do not use any type of additive with the auto -
matic transmission oil. The automatic trans -
mission oil is a product designed specially for this vehicle and its performance may be
compromised through the use of further addi
-
tives.
Frequency of Oil Changes
In normal vehicle operating conditions, it is not
necessary to change the transmission oil.
Replacing The Battery
If necessary, replace the battery with another
battery with the same specifications. It is
advised to contact an authorized dealer for
replacement.
Follow the battery manufacturer's instructions
for maintenance.
Fuses
General Information
The fuses protect electrical systems against
excessive current.
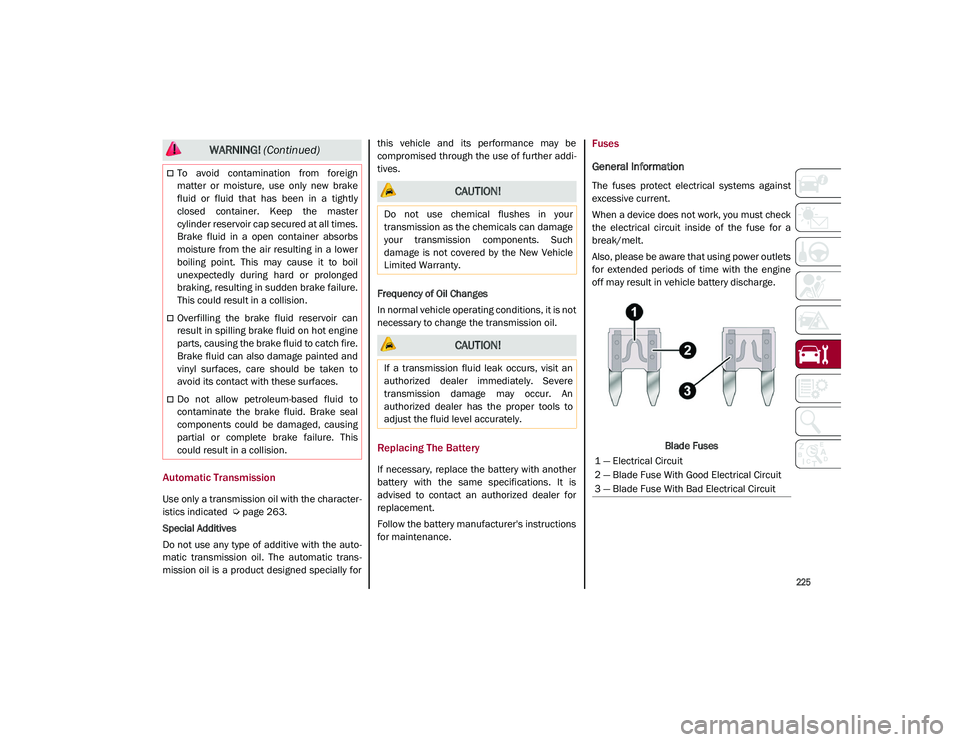
When a device does not work, you must check
the electrical circuit inside of the fuse for a
break/melt.
Also, please be aware that using power outlets
for extended periods of time with the engine
off may result in vehicle battery discharge.
Blade Fuses
To avoid contamination from foreign
matter or moisture, use only new brake
fluid or fluid that has been in a tightly
closed container. Keep the master
cylinder reservoir cap secured at all times.
Brake fluid in a open container absorbs
moisture from the air resulting in a lower
boiling point. This may cause it to boil
unexpectedly during hard or prolonged
braking, resulting in sudden brake failure.
This could result in a collision.
Overfilling the brake fluid reservoir can
result in spilling brake fluid on hot engine
parts, causing the brake fluid to catch fire.
Brake fluid can also damage painted and
vinyl surfaces, care should be taken to
avoid its contact with these surfaces.
Do not allow petroleum-based fluid to
contaminate the brake fluid. Brake seal
components could be damaged, causing
partial or complete brake failure. This
could result in a collision.
WARNING! (Continued)
CAUTION!
Do not use chemical flushes in your
transmission as the chemicals can damage
your transmission components. Such
damage is not covered by the New Vehicle
Limited Warranty.
CAUTION!
If a transmission fluid leak occurs, visit an
authorized dealer immediately. Severe
transmission damage may occur. An
authorized dealer has the proper tools to
adjust the fluid level accurately.
1 — Electrical Circuit
2 — Blade Fuse With Good Electrical Circuit
3 — Blade Fuse With Bad Electrical Circuit
21_GU_OM_EN_USC_t.book Page 225
Page 274 of 280
272
INDEX
Rear Camera ..............................................132
Rear Cross Path .........................................150
Reformulated Gasoline .............................. 260
Refueling Procedure ..................................133
Refueling The Vehicle ................................ 133
Reminder, Seat Belt ...................................164
Remote ControlStarting System........................................ 22
Remote Keyless Entry .................................. 18
Remote Starting Exit Remote Start Mode .......................... 22
Remote Starting System ....................... 22, 86
Replacement Tires ..................................... 244
Reporting Safety Defects ...........................267
Restraints, Child .........................................178
Restraints, Head .......................................... 35
Rims And Tires ...........................................233
Roll Over Warning........................................... 3
S
Safety Checks Inside Vehicle ....................189
Safety Checks Outside Vehicle.................. 190
Safety Defects, Reporting ..........................267
Safety Information, Tire .............................233
Safety Tips ..................................................188
Safety, Exhaust Gas ...................................190
Saving Fuel .................................................142
Scheduled Servicing ..................................208
Scheduled Servicing Program
(2.0L T4 MAir Engine Versions) ................. 209
Scheduled Servicing Program
(2.9L V6 Gasoline Engine Versions) .........212
Seat Belt Reminder ...................................... 75
Seat Belts ..........................................164, 189 Adjustable Shoulder Belt ....................... 166 Adjustable Upper Shoulder
Anchorage .......................................... 166
Adjustable Upper Shoulder Belt Anchorage .......................................... 166
Child Restraints ..................................... 178
Energy Management Feature ............... 168
Front Seat .............................................. 164
Inspection .............................................. 189
Lap/Shoulder Belt Untwisting............... 166
Lap/Shoulder Belts ............................... 164
Pregnant Women ................................... 167
Pretensioners......................................... 167
Rear Seat ............................................... 164
Reminder................................................ 164
Seat Belt Pretensioner .......................... 167 Untwisting Procedure ............................ 166
Seats.......................................................30, 33 Adjustment .................................. 30, 31, 33
Head Restraints ....................................... 35
Heated...................................................... 34
Height Adjustment ................................... 33
Power........................................................ 33
Tilting ........................................................ 33
Security Alarm .............................................. 23
Service Assistance ..................................... 266
Service Contract......................................... 267
Service Manuals ........................................ 268
Servicing Procedures ................................. 219
Shoulder Belts............................................ 164
Signals, Turn .................................44, 78, 190
Snow Chains .............................................. 247
Snow Tires .................................................. 246
Spare Tires ........................................ 244, 245 Speed Control
Accel/Decel .................................. 105, 106
Accel/Decel (ACC Only) ......................... 109
Cancel .................................................... 106Distance Setting (ACC Only).................. 110
Resume.................................................. 106
Set .......................................................... 105
Speed Control (Cruise Control) ................. 104
Starting....................................................... 204 Button .......................................................20Cold Weather ............................................87
Remote .....................................................22
Starting And Operating .............................. 204
Starting Procedures .................................. 204
Starting The Engine ......................................86
Steering ...................................................... 256 Wheel, Heated .......................................... 29
Wheel, Tilt ................................................. 28
Stop/Start System ..................................... 101
Storage Console .....................................................56
Suggestions For Driving ............................ 142
Sun Roof ................................................ 59, 61
Supplemental Restraint System –
Air Bag ........................................................ 170
Suspension ................................................ 256
System, Remote Starting ............................. 22
T
Telescoping Steering Column ...................... 28
Tilt Steering Column .....................................28
Tire And Loading Information Placard ..... 237
Tire Markings ............................................. 234
Tire Safety Information ............................. 233
Tire Service Kit........................................... 198
21_GU_OM_EN_USC_t.book Page 272