2021 ALFA ROMEO STELVIO fold seats
[x] Cancel search: fold seatsPage 10 of 280

8
DEAR CUSTOMER
READ THIS CAREFULLY
Refueling..................................................... 2
Starting The Engine .................................... 2
Parking On Flammable Material ............... 2
Respecting The Environment .................... 2
Electrical Accessories ................................ 2
Scheduled Servicing .................................. 2
Rollover Warning ........................................ 3
VEHICLE CHANGES / ALTERATIONS
Accessories Purchased By The Owner ...... 4
Installing Electrical/Electronic Devices .... 4
Radio Transmitters And Mobile Phones ... 5
GETTING TO KNOW YOUR VEHICLE
KEYS..........................................................18
Key Fob................................................... 18
ENGINE IMMOBILIZER SYSTEM ..............20
IGNITION SWITCH ...................................20
Keyless Push Button Ignition ................ 20
REMOTE START — IF EQUIPPED .............22
How To Use Remote Start ..................... 22
To Exit Remote Start Mode ................... 22
Remote Start Comfort Systems —
If Equipped ............................................. 23
VEHICLE SECURITY SYSTEM —
IF EQUIPPED............................................. 23
To Arm The System................................ 23
To Disarm The System .......................... 23
Volumetric/Anti-Lift Protection —
If Equipped ............................................. 24
DOORS ...................................................... 24
Power Door Locks.................................. 24
Locking The Doors With A Depleted
Battery .................................................... 25 Passive Entry System ........................... 25
Power Lock Safety Device..................... 27
Automatic Door Locks — If Equipped .. 27
Child-Protection Door Lock System — Rear
Doors ...................................................... 27
STEERING WHEEL.................................... 28
Manual Tilt/Telescoping Steering
Column ................................................. 28 Heated Steering Wheel —
If Equipped ............................................ 29
DRIVER MEMORY SETTINGS —
IF EQUIPPED............................................. 30
Programming The Memory Feature ..... 30
Memory Position Recall ........................ 30
SEATS ...................................................... 30
Sparco Racing Seats (Quadrifoglio
Vehicles) — If Equipped ......................... 30 Split Folding Rear Seat ......................... 31
Power Adjustment (Front Seats)........... 33
Heated Seats — If Equipped ................ 34
Head Restraints .................................. 35
MIRRORS ..................................................37
Automatic Dimming Mirror ....................37
Vanity Mirror ...........................................37
Outside Power Mirrors .........................38
Power Folding Outside Mirrors ..............38
Outside Automatic Dimming Mirrors —
If Equipped .............................................39 Heated Mirrors .....................................39
UNIVERSAL GARAGE DOOR OPENER
(HOMELINK®) ..........................................39
Before You Begin Programming
HomeLink® ............................................39 Erasing All The HomeLink®
Channels ................................................. 39 Identifying Whether You Have A Rolling
Code Or Non-Rolling Code Device .........40 Programming HomeLink® To A
Garage Door Opener ..............................40 Programming HomeLink® To A
Miscellaneous Device ............................ 41 Reprogramming A Single HomeLink®
Button .....................................................41 Canadian/Gate Operator
Programming .......................................... 41
EXTERIOR LIGHTS ....................................42
Headlight Switch ..................................42
Daytime Running Lights (DRLs) .........42
High Beam Headlights ..........................43
Automatic Headlights ...........................43
Flash-To-Pass .........................................43
21_GU_OM_EN_USC_t.book Page 8
Page 33 of 280
31
(Continued)
Adjusting The Seat Forward Or Rearward
The adjustment lever is at the front of the seat,
near the floor. Pull the bar upward to move the
seat forward or rearward. Release the bar
once the seat is in the desired position. Using
body pressure, move forward and rearward on
the seat to be sure that the seat adjusters
have latched.
Adjusting The Seat Up Or Down
Push the height adjustment button upward or
downward to obtain your desired height.
Reclining The Seatback
To adjust the seatback, lift the recline lever
located on the outboard side of the seat, lean
back to the desired position and release the
lever. To return the seatback, lift the lever,
lean forward and release the lever.
Split Folding Rear Seat
The rear seat is a 40/20/40 seat that allows
the luggage compartment to be partially or
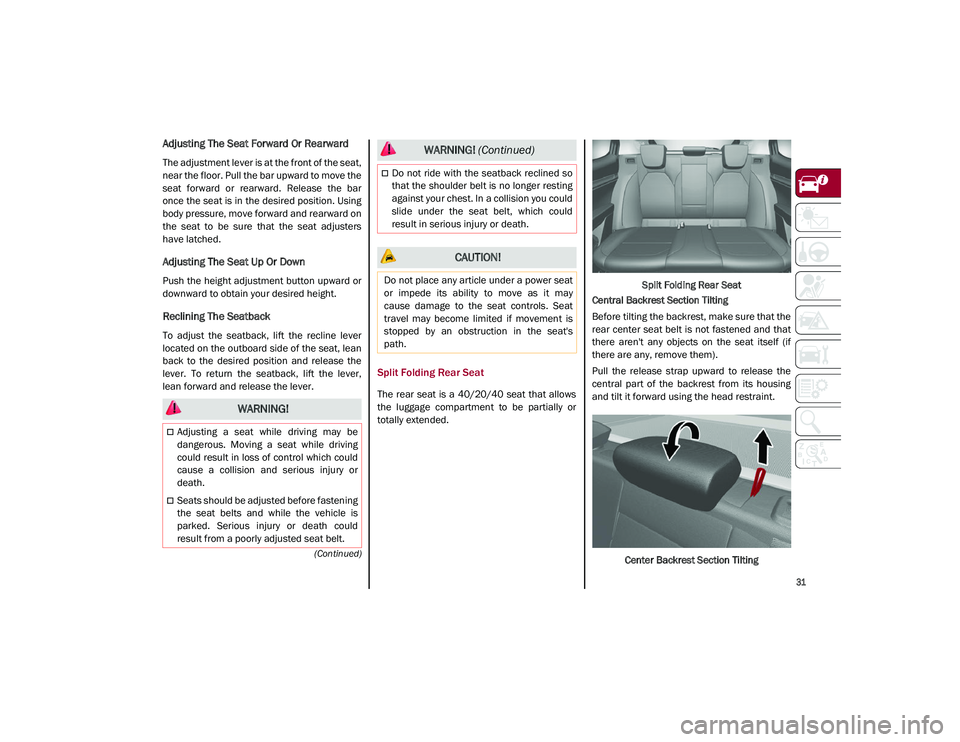
totally extended.Split Folding Rear Seat
Central Backrest Section Tilting
Before tilting the backrest, make sure that the
rear center seat belt is not fastened and that
there aren't any objects on the seat itself (if
there are any, remove them).
Pull the release strap upward to release the
central part of the backrest from its housing
and tilt it forward using the head restraint.
Center Backrest Section Tilting
WARNING!
Adjusting a seat while driving may be
dangerous. Moving a seat while driving
could result in loss of control which could
cause a collision and serious injury or
death.
Seats should be adjusted before fastening
the seat belts and while the vehicle is
parked. Serious injury or death could
result from a poorly adjusted seat belt.
Do not ride with the seatback reclined so
that the shoulder belt is no longer resting
against your chest. In a collision you could
slide under the seat belt, which could
result in serious injury or death.
CAUTION!
Do not place any article under a power seat
or impede its ability to move as it may
cause damage to the seat controls. Seat
travel may become limited if movement is
stopped by an obstruction in the seat's
path.
WARNING! (Continued)
21_GU_OM_EN_USC_t.book Page 31
Page 34 of 280
GETTING TO KNOW YOUR VEHICLE
32
Central Backrest Section Repositioning
Using the head restraint, lift the central portion
upwards, manually guiding it back into place.
Lightly push to make sure that it is properly
latched. Make sure that the armrest is prop-
erly latched by gently trying to move it. If it is
not latched, repeat the operation.
Repositioning The Backrests
Move the seat belts to the side, making sure
that they are correctly extended and not
twisted. Also make sure that they are not
caught on anything behind the backrests of
the seats. Then, lift the backrests by pushing
them rearward until you hear the lock click into
place on both attachment mechanisms.
Extending The Luggage Compartment
The rear seatbacks can be folded forward to
provide an additional storage area.
Extending the right side of the luggage
compartment allows you to carry two passen -
gers on the left part of the rear seat, while
extending the left side allows you to carry one
passenger. Proceed as follows:
1. Completely lower the rear seat head
restraints
Ú
page 35.
2. Place the seat belt so that it doesn't impede the movement of the backrest
while tilting it.
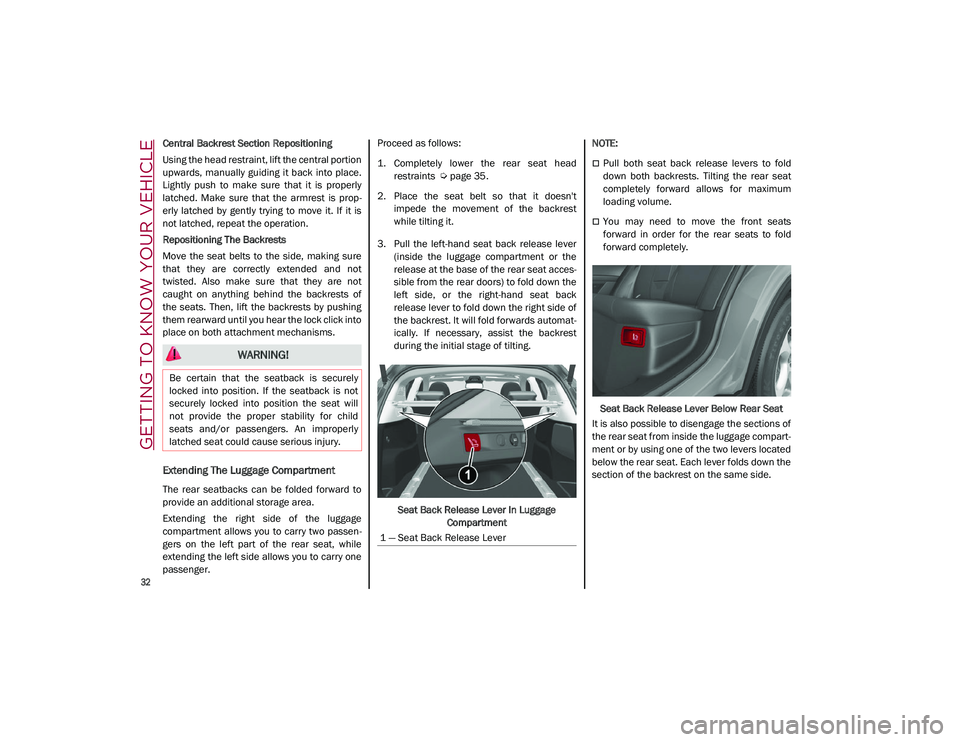
3. Pull the left-hand seat back release lever (inside the luggage compartment or the
release at the base of the rear seat acces -
sible from the rear doors) to fold down the
left side, or the right-hand seat back
release lever to fold down the right side of
the backrest. It will fold forwards automat-
ically. If necessary, assist the backrest
during the initial stage of tilting.
Seat Back Release Lever In Luggage Compartment
NOTE:
Pull both seat back release levers to fold
down both backrests. Tilting the rear seat
completely forward allows for maximum
loading volume.
You may need to move the front seats
forward in order for the rear seats to fold
forward completely.
Seat Back Release Lever Below Rear Seat
It is also possible to disengage the sections of
the rear seat from inside the luggage compart -
ment or by using one of the two levers located
below the rear seat. Each lever folds down the
section of the backrest on the same side.
WARNING!
Be certain that the seatback is securely
locked into position. If the seatback is not
securely locked into position the seat will
not provide the proper stability for child
seats and/or passengers. An improperly
latched seat could cause serious injury.
1 — Seat Back Release Lever
21_GU_OM_EN_USC_t.book Page 32
Page 58 of 280
GETTING TO KNOW YOUR VEHICLE
56
Center Console
The center console storage compartment is
located between the front seats.
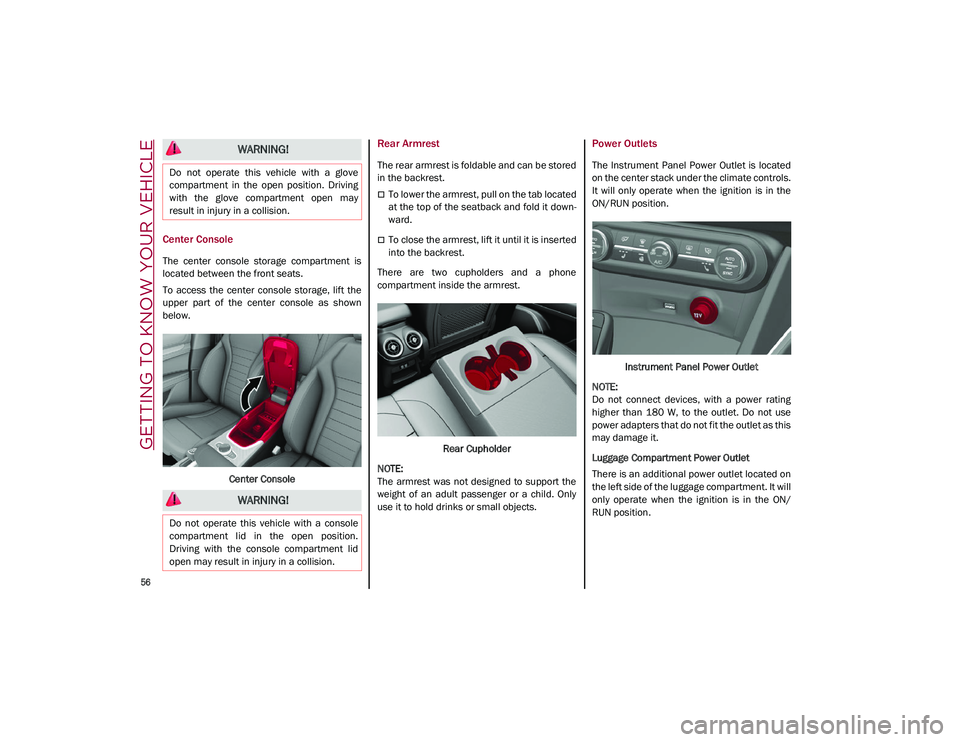
To access the center console storage, lift the
upper part of the center console as shown
below.Center Console
Rear Armrest
The rear armrest is foldable and can be stored
in the backrest.
To lower the armrest, pull on the tab located
at the top of the seatback and fold it down -
ward.
To close the armrest, lift it until it is inserted
into the backrest.
There are two cupholders and a phone
compartment inside the armrest.
Rear Cupholder
NOTE:
The armrest was not designed to support the
weight of an adult passenger or a child. Only
use it to hold drinks or small objects.
Power Outlets
The Instrument Panel Power Outlet is located
on the center stack under the climate controls.
It will only operate when the ignition is in the
ON/RUN position.
Instrument Panel Power Outlet
NOTE:
Do not connect devices, with a power rating
higher than 180 W, to the outlet. Do not use
power adapters that do not fit the outlet as this
may damage it.
Luggage Compartment Power Outlet
There is an additional power outlet located on
the left side of the luggage compartment. It will
only operate when the ignition is in the ON/
RUN position.
WARNING!
Do not operate this vehicle with a glove
compartment in the open position. Driving
with the glove compartment open may
result in injury in a collision.
WARNING!
Do not operate this vehicle with a console
compartment lid in the open position.
Driving with the console compartment lid
open may result in injury in a collision.
21_GU_OM_EN_USC_t.book Page 56
Page 168 of 280
SAFETY
166
Lap/Shoulder Belt Operating Instructions
1. Enter the vehicle and close the door. Sitback and adjust the seat.
2. The seat belt latch plate is above the back of the front seat, and next to your arm in
the rear seat (for vehicles equipped with a
rear seat). Grab the latch plate and pull out
the seat belt. Slide the latch plate up the
webbing as far as necessary to allow the
seat belt to go around your lap.
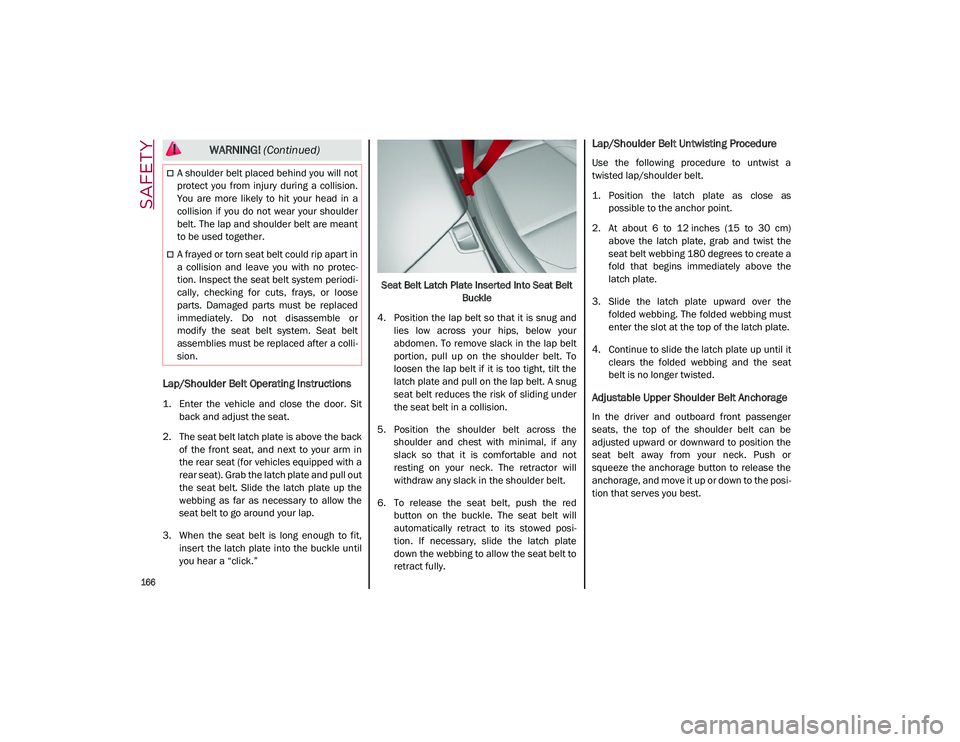
3. When the seat belt is long enough to fit, insert the latch plate into the buckle until
you hear a “click.” Seat Belt Latch Plate Inserted Into Seat Belt
Buckle
4. Position the lap belt so that it is snug and lies low across your hips, below your
abdomen. To remove slack in the lap belt
portion, pull up on the shoulder belt. To
loosen the lap belt if it is too tight, tilt the
latch plate and pull on the lap belt. A snug
seat belt reduces the risk of sliding under
the seat belt in a collision.
5. Position the shoulder belt across the shoulder and chest with minimal, if any
slack so that it is comfortable and not
resting on your neck. The retractor will
withdraw any slack in the shoulder belt.
6. To release the seat belt, push the red button on the buckle. The seat belt will
automatically retract to its stowed posi -
tion. If necessary, slide the latch plate
down the webbing to allow the seat belt to
retract fully.
Lap/Shoulder Belt Untwisting Procedure
Use the following procedure to untwist a
twisted lap/shoulder belt.
1. Position the latch plate as close as possible to the anchor point.
2. At about 6 to 12 inches (15 to 30 cm) above the latch plate, grab and twist the
seat belt webbing 180 degrees to create a
fold that begins immediately above the
latch plate.
3. Slide the latch plate upward over the folded webbing. The folded webbing must
enter the slot at the top of the latch plate.
4. Continue to slide the latch plate up until it clears the folded webbing and the seat
belt is no longer twisted.
Adjustable Upper Shoulder Belt Anchorage
In the driver and outboard front passenger
seats, the top of the shoulder belt can be
adjusted upward or downward to position the
seat belt away from your neck. Push or
squeeze the anchorage button to release the
anchorage, and move it up or down to the posi -
tion that serves you best.
A shoulder belt placed behind you will not
protect you from injury during a collision.
You are more likely to hit your head in a
collision if you do not wear your shoulder
belt. The lap and shoulder belt are meant
to be used together.
A frayed or torn seat belt could rip apart in
a collision and leave you with no protec -
tion. Inspect the seat belt system periodi -
cally, checking for cuts, frays, or loose
parts. Damaged parts must be replaced
immediately. Do not disassemble or
modify the seat belt system. Seat belt
assemblies must be replaced after a colli -
sion.
WARNING! (Continued)
21_GU_OM_EN_USC_t.book Page 166
Page 174 of 280
SAFETY
172
damage by themselves are not good indicators
of whether or not an air bag should have
deployed.
Seat belts are necessary for your protection in
all collisions, and also are needed to help keep
you in position, away from an inflating air bag.
When the Occupant Restraint Controller (ORC)
detects a collision requiring the front air bags,
it signals the inflator units. A large quantity of
non-toxic gas is generated to inflate the front
air bags.
The steering wheel hub trim cover and the
upper passenger side of the instrument panel
separate and fold out of the way as the air
bags inflate to their full size. The front air bags
fully inflate in less time than it takes to blink
your eyes. The front air bags then quickly
deflate while helping to restrain the driver and
front passenger.
Knee Impact Bolsters
The Knee Impact Bolsters help protect the
knees of the driver and front passenger, and
position the front occupants for improved
interaction with the front air bags.
Supplemental Driver And Front Passenger
Knee Air Bags
This vehicle is equipped with a Supplemental
Driver Knee Air Bag mounted in the instrument
panel below the steering column and a
Supplemental Passenger Knee Air Bag
mounted in the instrument panel below the
glove compartment. The Supplemental Knee
Air Bags provide enhanced protection during a
frontal impact by working together with the
seat belts, pretensioners, and front air bags.
Supplemental Side Air Bags
Supplemental Seat-Mounted Side Air Bags
(SABs)
This vehicle is equipped with Supplemental
Seat-Mounted Side Air Bags (SABs).
Supplemental Seat-Mounted Side Air Bags
(SABs) are located in the outboard side of the
front seats. The SABs are marked with “SRS
AIRBAG” or “AIRBAG” on a label or on the seat
trim on the outboard side of the seats.
The SABs may help to reduce the risk of occu-
pant injury during certain side impacts, in addi-
tion to the injury reduction potential provided
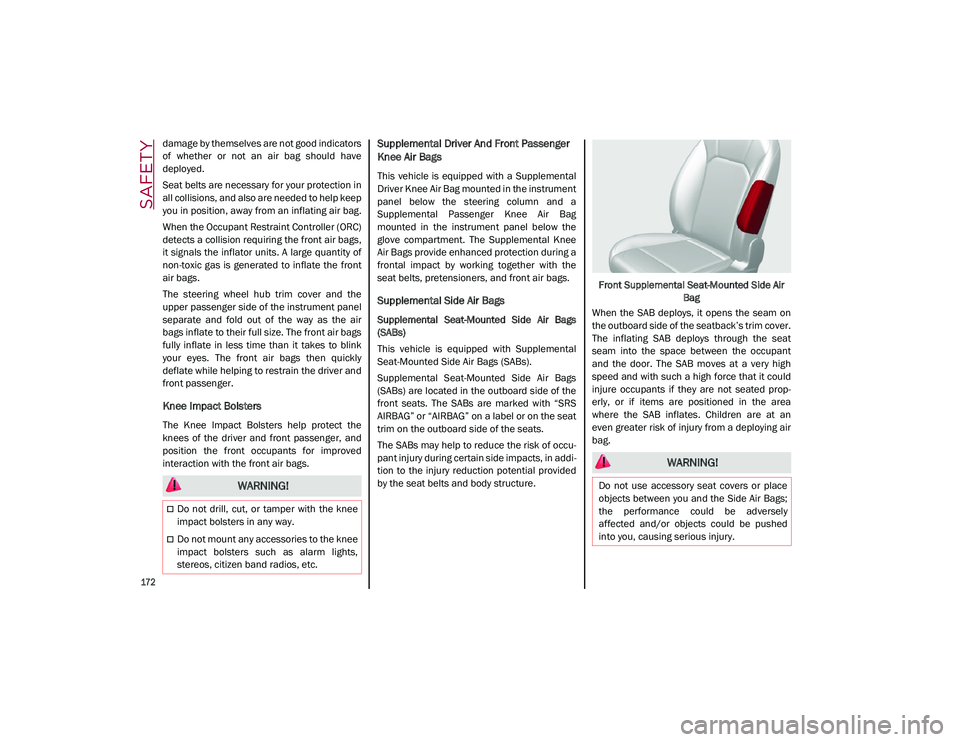
by the seat belts and body structure. Front Supplemental Seat-Mounted Side Air
Bag
When the SAB deploys, it opens the seam on
the outboard side of the seatback’s trim cover.
The inflating SAB deploys through the seat
seam into the space between the occupant
and the door. The SAB moves at a very high
speed and with such a high force that it could
injure occupants if they are not seated prop -
erly, or if items are positioned in the area
where the SAB inflates. Children are at an
even greater risk of injury from a deploying air
bag.
WARNING!
Do not drill, cut, or tamper with the knee
impact bolsters in any way.
Do not mount any accessories to the knee
impact bolsters such as alarm lights,
stereos, citizen band radios, etc.
WARNING!
Do not use accessory seat covers or place
objects between you and the Side Air Bags;
the performance could be adversely
affected and/or objects could be pushed
into you, causing serious injury.
21_GU_OM_EN_USC_t.book Page 172
Page 191 of 280
189
(Continued)
Transporting Pets
Air Bags deploying in the front seat could harm
your pet. An unrestrained pet will be thrown
about and possibly injured, or injure a
passenger during panic braking or in a colli-
sion.
Pets should be restrained in the rear seat (if
equipped) in pet harnesses or pet carriers that
are secured by seat belts.
Safety Checks You Should Make Inside The
Vehicle
Seat Belts
Inspect the seat belt system periodically,
checking for cuts, frays, and loose parts.
Damaged parts must be replaced immedi -
ately. Do not disassemble or modify the
system.
Front seat belt assemblies must be replaced
after a collision. Rear seat belt assemblies
must be replaced after a collision if they have
been damaged (i.e., bent retractor, torn
webbing, etc.). If there is any question regarding seat belt or retractor condition,
replace the seat belt.
Air Bag Warning Light
The Air Bag warning light will turn on for
four to eight seconds as a bulb check when the
ignition switch is first turned to ON/RUN. If the
light is either not on during starting, stays on,
or turns on while driving, have the system
inspected at an authorized dealer as soon as
possible. After the bulb check, this light will
illuminate with a single chime when a fault
with the Air Bag System has been detected. It
will stay on until the fault is removed. If the
light comes on intermittently or remains on
while driving, have an authorized dealer
service the vehicle immediately
Ú
page 163.
Defroster
Check operation by selecting the defrost mode
and place the blower control on high speed.
You should be able to feel the air directed
against the windshield. See an authorized
dealer for service if your defroster is inoper -
able.
Floor Mat Safety Information
Always use floor mats designed to fit your
vehicle. Only use a floor mat that does not
interfere with the operation of the accelerator,
brake or clutch pedals. Only use a floor mat
that is securely attached using the floor mat
fasteners so it cannot slip out of position and
interfere with the accelerator, brake or clutch pedals or impair safe operation of your vehicle
in other ways.
Do not allow people to ride in any area of
your vehicle that is not equipped with
seats and seat belts.
Be sure everyone in your vehicle is in a
seat and using a seat belt properly.
WARNING!
(Continued)
WARNING!
An improperly attached, damaged, folded,
or stacked floor mat, or damaged floor mat
fasteners may cause your floor mat to
interfere with the accelerator, brake, or
clutch pedals and cause a loss of vehicle
control. To prevent SERIOUS INJURY or
DEATH:
ALWAYS securely attach your floor mat
using the floor mat fasteners. DO NOT
install your floor mat upside down or turn
your floor mat over. Lightly pull to confirm
mat is secured using the floor mat
fasteners on a regular basis.
ALWAYS REMOVE THE EXISTING FLOOR
MAT FROM THE VEHICLE before
installing any other floor mat. NEVER
install or stack an additional floor mat on
top of an existing floor mat.
ONLY install floor mats designed to fit your
vehicle. NEVER install a floor mat that
cannot be properly attached and secured
to your vehicle. If a floor mat needs to be
replaced, only use a FCA approved floor
mat for the specific make, model, and
year of your vehicle.
21_GU_OM_EN_USC_t.book Page 189
Page 261 of 280
259
Luggage Compartment Volume
Capacity (VDA standards)
Rear seats not folded
Vehicle unladen: 18.54 cubic feet (525 liters)
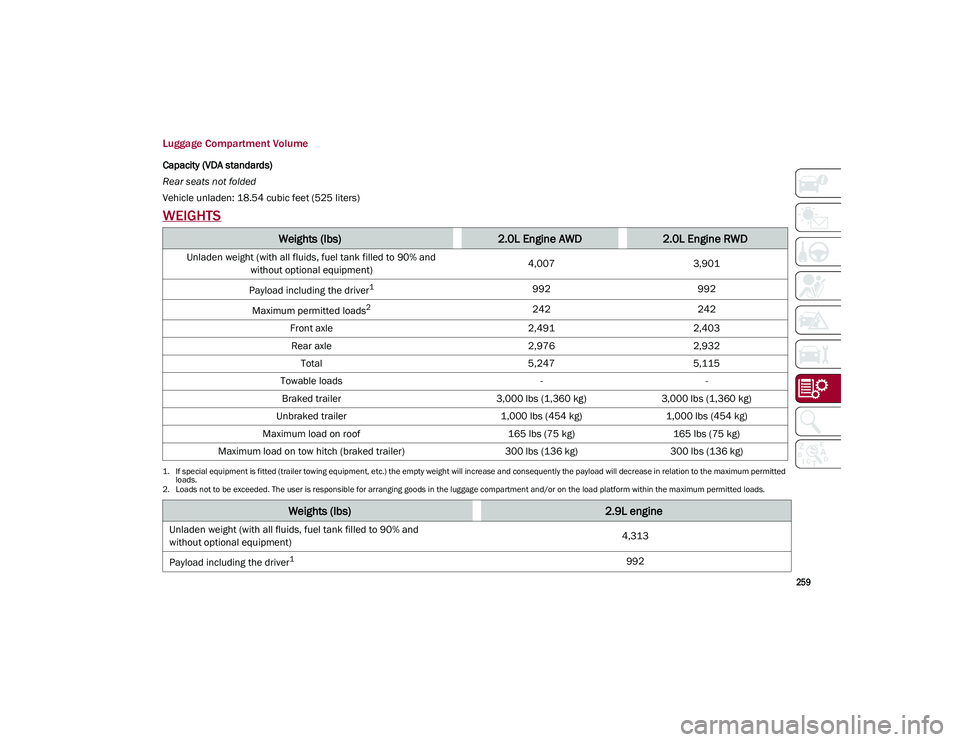
WEIGHTS
Weights (lbs)2.0L Engine AWD2.0L Engine RWD
Unladen weight (with all fluids, fuel tank filled to 90% and without optional equipment) 4,007
3,901
Payload including the driver
1
1. If special equipment is fitted (trailer towing equipment, etc.) the empty weight will increase and consequently the payload will decrease in relation to the maximum permitted loads.
992 992
Maximum permitted loads
2
2. Loads not to be exceeded. The user is responsible for arranging goods in the luggage compartment and/or on the load platform within the maximum permitted loads.
242 242
Front axle 2,4912,403
Rear axle 2,9762,932
Total 5,2475,115
Towable loads --
Braked trailer 3,000 lbs (1,360 kg)3,000 lbs (1,360 kg)
Unbraked trailer 1,000 lbs (454 kg)1,000 lbs (454 kg)
Maximum load on roof 165 lbs (75 kg)165 lbs (75 kg)
Maximum load on tow hitch (braked trailer) 300 lbs (136 kg)300 lbs (136 kg)
Weights (lbs)2.9L engine
Unladen weight (with all fluids, fuel tank filled to 90% and
without optional equipment) 4,313
Payload including the driver
1992
21_GU_OM_EN_USC_t.book Page 259