2021 ALFA ROMEO STELVIO ECU
[x] Cancel search: ECUPage 143 of 280
141
Towing Tips
Before setting out on a trip, practice turning,
stopping, and backing up the trailer in an area
located away from heavy traffic.
Automatic Transmission
Select the DRIVE range when towing. The
transmission controls include a drive strategy
to avoid frequent shifting when towing.
However, if frequent shifting does occur while
in DRIVE, you can use the AutoStick shift
control to manually select a lower gear.
NOTE:
Using a lower gear while operating the vehicle
under heavy loading conditions will improve
performance and extend transmission life by
reducing excessive shifting and heat build-up.
This action will also provide better engine
braking.
Cruise Control — If Equipped
Do not use on hilly terrain or with heavy
loads.
When using the Cruise Control, if you expe-
rience speed drops greater than 10 mph
(16 km/h), disengage until you can get back
to cruising speed.
Use Cruise Control in flat terrain and with
light loads to maximize fuel efficiency.
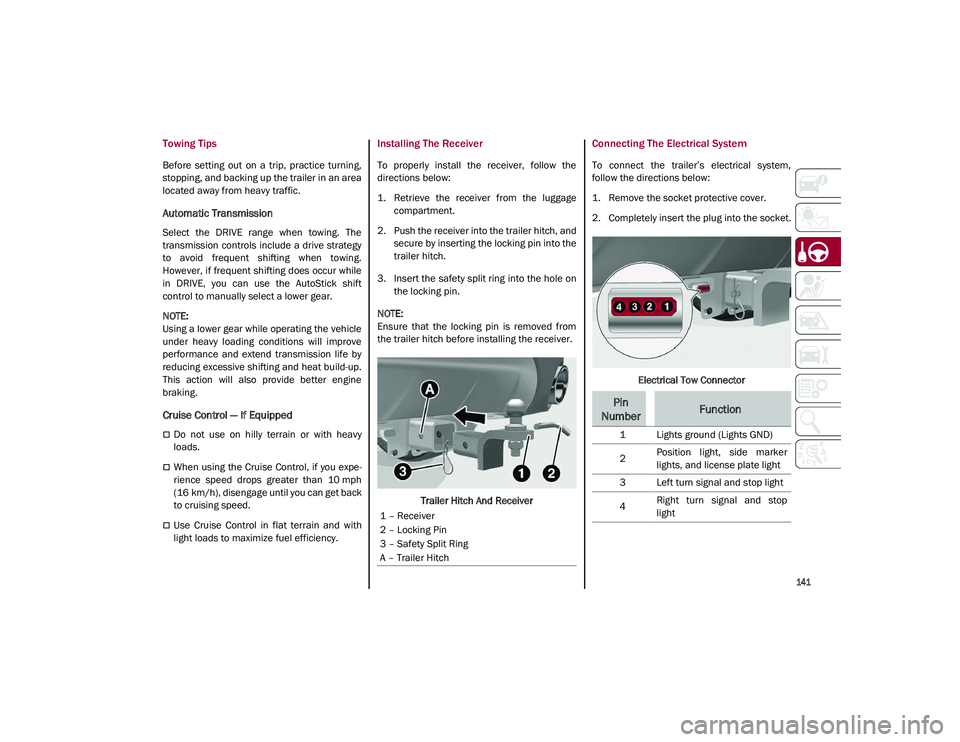
Installing The Receiver
To properly install the receiver, follow the
directions below:
1. Retrieve the receiver from the luggage compartment.
2. Push the receiver into the trailer hitch, and secure by inserting the locking pin into the
trailer hitch.
3. Insert the safety split ring into the hole on the locking pin.
NOTE:
Ensure that the locking pin is removed from
the trailer hitch before installing the receiver.
Trailer Hitch And Receiver
Connecting The Electrical System
To connect the trailer’s electrical system,
follow the directions below:
1. Remove the socket protective cover.
2. Completely insert the plug into the socket.
Electrical Tow Connector
1 – Receiver
2 – Locking Pin
3 – Safety Split Ring
A – Trailer Hitch
Pin
NumberFunction
1 Lights ground (Lights GND)
2 Position light, side marker
lights, and license plate light
3 Left turn signal and stop light
4 Right turn signal and stop
light
21_GU_OM_EN_USC_t.book Page 141
Page 165 of 280
163
To reactivate the TPMS, replace all four wheel
and tire assemblies (road tires) with tires
equipped with TPMS sensors. Then, drive the
vehicle for up to 20 minutes above 15 mph
(24 km/h). The TPMS will chime, the TPMS
Warning Light will flash on and off for 75
seconds and then turn off. The instrument
cluster will display the “SERVICE TPM
SYSTEM” message and then display pressure
values in place of the dashes. On the next igni-
tion switch cycle the “SERVICE TPM SYSTEM”
message will no longer be displayed, as long
as no system fault exists.
NOTE:
The TPMS is not intended to replace normal
tire care and maintenance, or to provide
warning of a tire failure or condition.
The TPMS should not be used as a tire pres -
sure gauge while adjusting your tire pres -
sure.
Driving on a significantly underinflated tire
will cause the tire to overheat, and can lead
to tire failure. Underinflation also reduces
fuel efficiency and tire tread life, and may
affect the vehicle’s handling and stopping
ability.
The TPMS is not a substitute for proper tire
maintenance, and it is the driver’s responsi -
bility to maintain correct tire pressure using
an accurate tire pressure gauge, even if underinflation has not reached the level to
trigger illumination of the TPMS Warning
Light.
Seasonal temperature changes will affect
tire pressure, and the TPMS will monitor the
actual tire pressure in the tire
Ú
page 268.
OCCUPANT RESTRAINT
SYSTEMS
Some of the most important safety features in
your vehicle are the restraint systems:
Occupant Restraint Systems Features
Seat Belt Systems
Supplemental Restraint Systems (SRS) Air
Bags
Child Restraints
Some of the safety features described in this
section may be standard equipment on some
models, or may be optional equipment on
others. If you are not sure, ask an authorized
dealer.
Important Safety Precautions
Please pay close attention to the information
in this section. It tells you how to use your
restraint system properly, to keep you and
your passengers as safe as possible. Here are some simple steps you can take to
minimize the risk of harm from a deploying air
bag:
1. Children 12 years old and under should
always ride buckled up in the rear seat of
a vehicle with a rear seat.
2. A child who is not big enough to wear the vehicle seat belt properly must be secured
in the appropriate child restraint or
belt-positioning booster seat in a rear
seating position
Ú
page 178.
3. If a child from 2 to 12 years old (not in a rear-facing child restraint) must ride in the
front passenger seat, move the seat as far
back as possible and use the proper child
restraint
Ú
page 178.
4. Never allow children to slide the shoulder belt behind them or under their arm.
5. You should read the instructions provided with your child restraint to make sure that
you are using it properly.
6. All occupants should always wear their lap and shoulder belts properly.
7. The driver and front passenger seats should be moved back as far as practical
to allow the front air bags room to inflate.
8. Do not lean against the door or window. If your vehicle has side air bags, and deploy -
ment occurs, the side air bags will inflate
21_GU_OM_EN_USC_t.book Page 163
Page 166 of 280
SAFETY
164
forcefully into the space between occu-
pants and the door and occupants could
be injured.
9. If the air bag system in this vehicle needs to be modified to accommodate a disabled
person, see
Ú
page 266 for customer
service contact information.
Seat Belt Systems
Buckle up even though you are an excellent
driver, even on short trips. Someone on the
road may be a poor driver and could cause a
collision that includes you. This can happen far
away from home or on your own street.
Research has shown that seat belts save lives,
and they can reduce the seriousness of inju -
ries in a collision. Some of the worst injuries
happen when people are thrown from the vehicle. Seat belts reduce the possibility of
ejection and the risk of injury caused by
striking the inside of the vehicle. Everyone in a
motor vehicle should be belted at all times.
Enhanced Seat Belt Use Reminder System
(BeltAlert)
Driver and Passenger BeltAlert (If Equipped)
BeltAlert is a feature intended to remind
the driver and outboard front seat passenger
(if equipped with outboard front passenger
seat BeltAlert) to buckle their seat belts. The
BeltAlert feature is active whenever the igni -
tion switch is in the ON/RUN position.
Initial Indication
If the driver is unbuckled when the ignition
switch is first in the ON/RUN position, a chime
will signal for a few seconds. If the driver or
outboard front seat passenger (if equipped
with outboard front passenger seat BeltAlert)
is unbuckled when the ignition switch is first in
the ON/RUN position the Seat Belt Reminder
Light will turn on and remain on until both
outboard front seat belts are buckled. The
outboard front passenger seat BeltAlert is not
active when an outboard front passenger seat
is unoccupied.
BeltAlert Warning Sequence
The BeltAlert warning sequence is activated
when the vehicle is moving above a specified
vehicle speed range and the driver or outboard
front seat passenger is unbuckled (if equipped
with outboard front passenger seat BeltAlert) (the outboard front passenger seat BeltAlert is
not active when the outboard front passenger
seat is unoccupied). The BeltAlert warning
sequence starts by blinking the Seat Belt
Reminder Light and sounding an intermittent
chime. Once the BeltAlert warning sequence
has completed, the Seat Belt Reminder Light
will remain on until the seat belts are buckled.
The BeltAlert warning sequence may repeat
based on vehicle speed until the driver and
occupied outboard front seat passenger seat
belts are buckled. The driver should instruct all
occupants to buckle their seat belts.
Change of Status
If the driver or outboard front seat passenger
(if equipped with outboard front passenger
seat BeltAlert) unbuckles their seat belt while
the vehicle is traveling, the BeltAlert warning
sequence will begin until the seat belts are
buckled again.
The outboard front passenger seat BeltAlert is
not active when the outboard front passenger
seat is unoccupied. BeltAlert may be triggered
when an animal or other items are placed on
the outboard front passenger seat or when the
seat is folded flat (if equipped). It is recom
-
mended that pets be restrained in the rear
seat (if equipped) in pet harnesses or pet
carriers that are secured by seat belts, and
cargo is properly stowed.
Lap/Shoulder Belts
All seating positions in your vehicle are
equipped with lap/shoulder belts.
WARNING!
Never place a rear-facing child restraint in
front of an air bag. A deploying passenger
front air bag can cause death or serious
injury to a child 12 years or younger,
including a child in a rear-facing child
restraint.
Never install a rear-facing child restraint in
the front seat of a vehicle. Only use a
rear-facing child restraint in the rear seat.
If the vehicle does not have a rear seat, do
not transport a rear-facing child restraint
in that vehicle.
21_GU_OM_EN_USC_t.book Page 164
Page 170 of 280
SAFETY
168
(Continued)
Energy Management Feature
The front outboard seat belt system is
equipped with an Energy Management feature
that may help further reduce the risk of injury
in the event of a collision. The seat belt system
has a retractor assembly that is designed to
release webbing in a controlled manner.
Switchable Automatic Locking Retractors
(ALR)
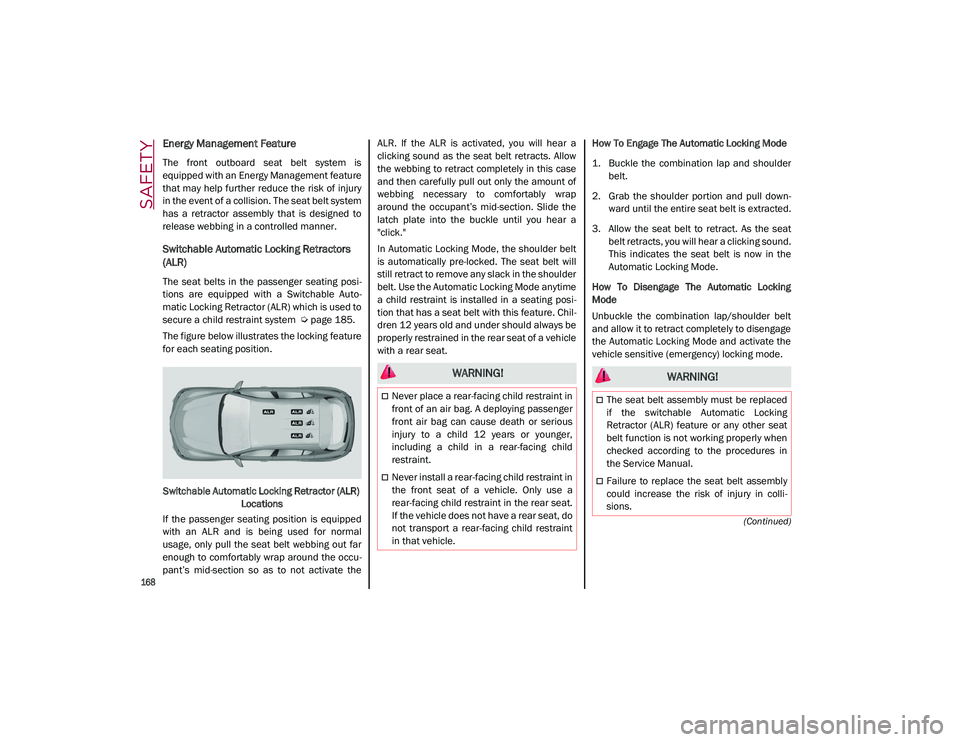
The seat belts in the passenger seating posi-
tions are equipped with a Switchable Auto -
matic Locking Retractor (ALR) which is used to
secure a child restraint system
Ú
page 185.
The figure below illustrates the locking feature
for each seating position.
Switchable Automatic Locking Retractor (ALR) Locations
If the passenger seating position is equipped
with an ALR and is being used for normal
usage, only pull the seat belt webbing out far
enough to comfortably wrap around the occu -
pant’s mid-section so as to not activate the ALR. If the ALR is activated, you will hear a
clicking sound as the seat belt retracts. Allow
the webbing to retract completely in this case
and then carefully pull out only the amount of
webbing necessary to comfortably wrap
around the occupant’s mid-section. Slide the
latch plate into the buckle until you hear a
"click."
In Automatic Locking Mode, the shoulder belt
is automatically pre-locked. The seat belt will
still retract to remove any slack in the shoulder
belt. Use the Automatic Locking Mode anytime
a child restraint is installed in a seating posi
-
tion that has a seat belt with this feature. Chil -
dren 12 years old and under should always be
properly restrained in the rear seat of a vehicle
with a rear seat. How To Engage The Automatic Locking Mode
1. Buckle the combination lap and shoulder
belt.
2. Grab the shoulder portion and pull down -
ward until the entire seat belt is extracted.
3. Allow the seat belt to retract. As the seat belt retracts, you will hear a clicking sound.
This indicates the seat belt is now in the
Automatic Locking Mode.
How To Disengage The Automatic Locking
Mode
Unbuckle the combination lap/shoulder belt
and allow it to retract completely to disengage
the Automatic Locking Mode and activate the
vehicle sensitive (emergency) locking mode.
WARNING!
Never place a rear-facing child restraint in
front of an air bag. A deploying passenger
front air bag can cause death or serious
injury to a child 12 years or younger,
including a child in a rear-facing child
restraint.
Never install a rear-facing child restraint in
the front seat of a vehicle. Only use a
rear-facing child restraint in the rear seat.
If the vehicle does not have a rear seat, do
not transport a rear-facing child restraint
in that vehicle.
WARNING!
The seat belt assembly must be replaced
if the switchable Automatic Locking
Retractor (ALR) feature or any other seat
belt function is not working properly when
checked according to the procedures in
the Service Manual.
Failure to replace the seat belt assembly
could increase the risk of injury in colli -
sions.
21_GU_OM_EN_USC_t.book Page 168
Page 180 of 280

SAFETY
178
Event Data Recorder (EDR)
This vehicle is equipped with an event data
recorder (EDR). The main purpose of an EDR is
to record, in certain crash or near crash-like
situations, such as an air bag deployment or
hitting a road obstacle, data that will assist in
understanding how a vehicle’s systems
performed. The EDR is designed to record data
related to vehicle dynamics and safety
systems for a short period of time, typically 30
seconds or less. The EDR in this vehicle is
designed to record such data as:
How various systems in your vehicle were
operating;
Whether or not the driver and passenger
safety belts were buckled/fastened;
How far (if at all) the driver was depressing
the accelerator and/or brake pedal; and,
How fast the vehicle was traveling.
These data can help provide a better under -
standing of the circumstances in which
crashes and injuries occur.
NOTE:
EDR data are recorded by your vehicle only if a
non-trivial crash situation occurs; no data are
recorded by the EDR under normal driving
conditions and no personal data (e.g., name,
gender, age, and crash location) are recorded.
However, other parties, such as law enforce -
ment, could combine the EDR data with the
type of personally identifying data routinely
acquired during a crash investigation. To read data recorded by an EDR, special
equipment is required, and access to the
vehicle or the EDR is needed. In addition to the
vehicle manufacturer, other parties, such as
law enforcement, that have the special equip
-
ment, can read the information if they have
access to the vehicle or the EDR.
Child Restraints
Everyone in your vehicle needs to be buckled
up at all times, including babies and children.
Every state in the United States, and every
Canadian province, requires that small chil -
dren ride in proper restraint systems. This is
the law, and you can be prosecuted for
ignoring it.
Children 12 years or younger should ride prop -
erly buckled up in a rear seat, if available.
According to crash statistics, children are
safer when properly restrained in the rear
seats rather than in the front. There are different sizes and types of
restraints for children from newborn size to
the child almost large enough for an adult
safety belt. Always check the child seat
Owner’s Manual to make sure you have the
correct seat for your child. Carefully read and
follow all the instructions and warnings in the
child restraint Owner’s Manual and on all the
labels attached to the child restraint.
Before buying any restraint system, make sure
that it has a label certifying that it meets all
applicable Safety Standards. You should also
make sure that you can install it in the vehicle
where you will use it.
NOTE:
For additional information, refer to
http://
www.nhtsa.gov/parents-and-caregivers
or
call: 1–888–327–4236
Canadian residents should refer to Trans -
port Canada’s website for additional infor -
mation:
https://www.tc.gc.ca/en/services/
road/child-car-seat-safety.html
WARNING!
In a collision, an unrestrained child can
become a projectile inside the vehicle. The
force required to hold even an infant on
your lap could become so great that you
could not hold the child, no matter how
strong you are. The child and others could
be badly injured or killed. Any child riding in
your vehicle should be in a proper restraint
for the child’s size.
21_GU_OM_EN_USC_t.book Page 178
Page 182 of 280
SAFETY
180
(Continued)
or height limit of their rear-facing convertible
child seat. Children should remain in a
forward-facing child seat with a harness for as
long as possible, up to the highest weight or
height allowed by the child seat.
All children whose weight or height is above
the forward-facing limit for the child seat
should use a belt-positioning booster seat
until the vehicle’s seat belts fit properly. If the
child cannot sit with knees bent over the
vehicle’s seat cushion while the child’s back is
against the seatback, they should use a
belt-positioning booster seat. The child and
belt-positioning booster seat are held in the
vehicle by the seat belt.
Children Too Large For Booster Seats
Children who are large enough to wear the
shoulder belt comfortably, and whose legs are
long enough to bend over the front of the seat
when their back is against the seatback,
should use the seat belt in a rear seat. Use thissimple 5-step test to decide whether the child
can use the vehicle’s seat belt alone:
1. Can the child sit all the way back against
the back of the vehicle seat?
2. Do the child’s knees bend comfortably over the front of the vehicle seat – while
the child is still sitting all the way back?
3. Does the shoulder belt cross the child’s shoulder between the neck and arm?
4. Is the lap part of the belt as low as possible, touching the child’s thighs and
not the stomach?
5. Can the child stay seated like this for the whole trip?
If the answer to any of these questions was
“no,” then the child still needs to use a booster
seat in this vehicle. If the child is using the lap/
shoulder belt, check seat belt fit periodically
and make sure the seat belt buckle is latched.
A child’s squirming or slouching can move the
belt out of position. If the shoulder belt
contacts the face or neck, move the child
closer to the center of the vehicle, or use a
booster seat to position the seat belt on the
child correctly.
WARNING!
Improper installation can lead to failure of
an infant or child restraint. It could come
loose in a collision. The child could be
badly injured or killed. Follow the child
restraint manufacturer’s directions
exactly when installing an infant or child
restraint.
After a child restraint is installed in the
vehicle, do not move the vehicle seat
forward or rearward because it can loosen
the child restraint attachments. Remove
the child restraint before adjusting the
vehicle seat position. When the vehicle
seat has been adjusted, reinstall the child
restraint.
When your child restraint is not in use,
secure it in the vehicle with the seat belt or
LATCH anchorages, or remove it from the
vehicle. Do not leave it loose in the
vehicle. In a sudden stop or accident, it
could strike the occupants or seatbacks
and cause serious personal injury.
WARNING! (Continued)
21_GU_OM_EN_USC_t.book Page 180
Page 187 of 280
185
(Continued)
1. Loosen the adjusters on the lower strapsand on the tether strap of the child seat so
that you can more easily attach the hooks
or connectors to the vehicle anchorages.
2. Place the child seat between the lower anchorages for that seating position. If the
second row seat can be reclined, you may
recline the seat and/or raise the head
restraint (if adjustable) to get a better fit. If
the rear seat can be moved forward and
rearward in the vehicle, you may wish to
move it to its rear-most position to make
room for the child seat. You may also move
the front seat forward to allow more room
for the child seat.
3. Attach the lower hooks or connectors of the child restraint to the lower anchorages
in the selected seating position.
4. If the child restraint has a tether strap, connect it to the top tether anchorage. See
Ú
page 187 for directions to attach a
tether anchor.
5. Tighten all of the straps as you push the child restraint rearward and downward
into the seat. Remove slack in the straps
according to the child restraint manufac -
turer’s instructions.
6. Test that the child restraint is installed tightly by pulling back and forth on the
child seat at the belt path. It should not
move more than 1 inch (25.4 mm) in any
direction.How To Stow An Unused Switchable-ALR
(ALR) Seat Belt:
When using the LATCH attaching system to
install a child restraint, stow all ALR seat belts
that are not being used by other occupants or
being used to secure child restraints. An
unused belt could injure a child if they play
with it and accidentally lock the seat belt
retractor. Before installing a child restraint
using the LATCH system, buckle the seat belt
behind the child restraint and out of the child’s
reach. If the buckled seat belt interferes with
the child restraint installation, instead of buck -
ling it behind the child restraint, route the seat
belt through the child restraint belt path and
then buckle it. Do not lock the seat belt.
Remind all children in the vehicle that the seat
belts are not toys and that they should not play
with them.
Installing Child Restraints Using The Vehicle
Seat Belt
Child restraint systems are designed to be
secured in vehicle seats by lap belts or the lap
belt portion of a lap/shoulder belt.
The seat belts in the passenger seating posi -
tions are equipped with a Switchable Auto -
matic Locking Retractor (ALR) that is designed
to keep the lap portion of the seat belt tight
around the child restraint so that it is not
necessary to use a locking clip. The ALR
retractor can be “switched” into a locked
mode by pulling all of the webbing out of the
WARNING!
Improper installation of a child restraint to
the LATCH anchorages can lead to failure
of the restraint. The child could be badly
injured or killed. Follow the child restraint
manufacturer’s directions exactly when
installing an infant or child restraint.
Child restraint anchorages are designed
to withstand only those loads imposed by
correctly-fitted child restraints. Under no
circumstances are they to be used for
adult seat belts, harnesses, or for
attaching other items or equipment to the
vehicle.
WARNING!
Improper installation or failure to properly
secure a child restraint can lead to failure
of the restraint. The child could be badly
injured or killed.
Follow the child restraint manufacturer’s
directions exactly when installing an
infant or child restraint.
WARNING! (Continued)
21_GU_OM_EN_USC_t.book Page 185
Page 189 of 280
187
Installing A Child Restraint With A
Switchable Automatic Locking Retractor
(ALR):
Child restraint systems are designed to be
secured in vehicle seats by lap belts or the lap
belt portion of a lap/shoulder belt.
1. Place the child seat in the center of theseating position. If the second row seat
can be reclined, you may recline the seat
and/or raise the head restraint (if adjust-
able) to get a better fit. If the rear seat can
be moved forward and rearward in the
vehicle, you may wish to move it to its
rear-most position to make room for the
child seat. You may also move the front
seat forward to allow more room for the
child seat.
2. Pull enough of the seat belt webbing from the retractor to pass it through the belt
path of the child restraint. Do not twist the
belt webbing in the belt path. 3. Slide the latch plate into the buckle until
you hear a “click.”
4. Pull on the webbing to make the lap portion tight against the child seat.
5. To lock the seat belt, pull down on the shoulder part of the belt until you have
pulled all the seat belt webbing out of the
retractor. Then, allow the webbing to
retract back into the retractor. As the
webbing retracts, you will hear a clicking
sound. This means the seat belt is now in
the Automatic Locking mode.
6. Try to pull the webbing out of the retractor. If it is locked, you should not be able to pull
out any webbing. If the retractor is not
locked, repeat step 5.
7. Finally, pull up on any excess webbing to tighten the lap portion around the child
restraint while you push the child restraint
rearward and downward into the vehicle
seat.
8. If the child restraint has a top tether strap and the seating position has a top tether
anchorage, connect the tether strap to the
anchorage and tighten the tether strap.
See
Ú
page 187 for directions to attach a
tether anchor.
9. Test that the child restraint is installed tightly by pulling back and forth on the
child seat at the belt path. It should not move more than 1 inch (25.4 mm) in any
direction.
Any seat belt system will loosen with time, so
check the belt occasionally, and pull it tight if
necessary.
Installing Child Restraints Using The Top
Tether Anchorage: WARNING!
Improper installation or failure to properly
secure a child restraint can lead to failure
of the restraint. The child could be badly
injured or killed.
Follow the child restraint manufacturer’s
directions exactly when installing an
infant or child restraint.
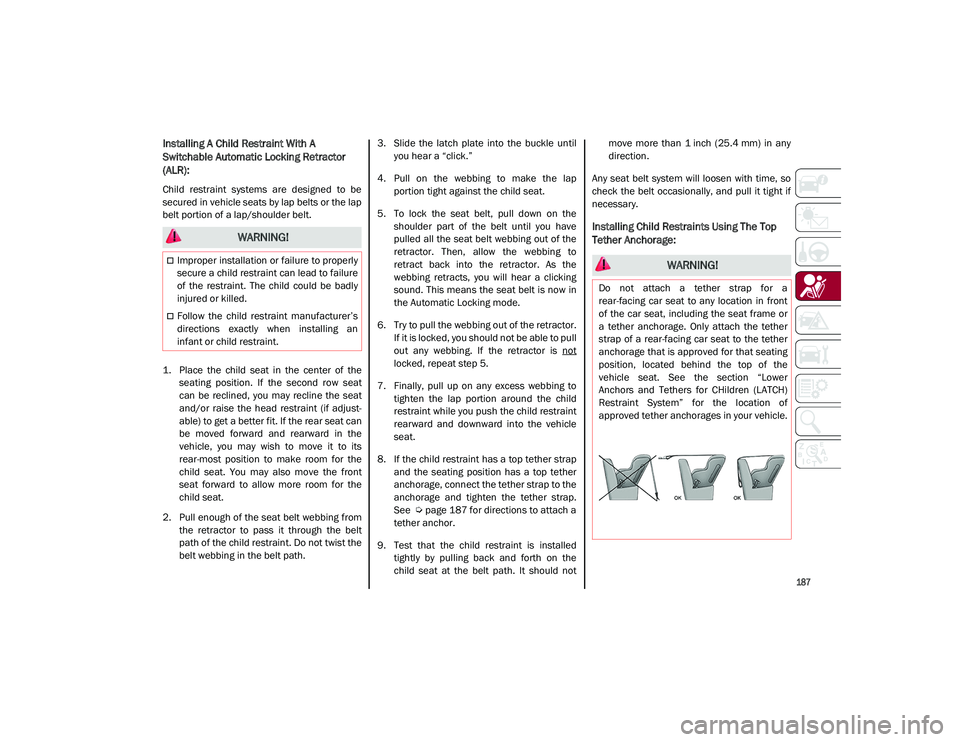
WARNING!
Do not attach a tether strap for a
rear-facing car seat to any location in front
of the car seat, including the seat frame or
a tether anchorage. Only attach the tether
strap of a rear-facing car seat to the tether
anchorage that is approved for that seating
position, located behind the top of the
vehicle seat. See the section “Lower
Anchors and Tethers for CHildren (LATCH)
Restraint System” for the location of
approved tether anchorages in your vehicle.
21_GU_OM_EN_USC_t.book Page 187