2021 ALFA ROMEO STELVIO ECO mode
[x] Cancel search: ECO modePage 12 of 280

10
STARTING AND OPERATING
STARTING THE ENGINE ............................86
Starting Procedure................................. 86
Remote Starting System ....................... 86
Cold Weather Operation ........................ 87
Extended Park Starting.......................... 87
If Engine Fails To Start .......................... 87
After Starting — Warming Up The
Engine ..................................................... 88 Stopping The Engine.............................. 88
Turbocharger Cool Down ....................... 88
ENGINE BLOCK HEATER —
IF EQUIPPED .............................................89
ENGINE BREAK-IN
RECOMMENDATIONS ...............................89
Engine Break-In...................................... 89
ELECTRIC PARK BRAKE (EPB) .................90
Electric Park Brake (EPB) Operating
Modes ..................................................... 91 Safe Hold ................................................ 91
AUTOMATIC TRANSMISSION....................92
Display .................................................... 93
Gear Selector ......................................... 93
Transmission Operating Modes ............ 94
Automatic Transmission Limp Home
Mode....................................................... 96 Brake Transmission Shift Interlock
(BTSI) System ......................................... 96 Important Notes ..................................... 97
ALFA DNA SELECTOR ...............................98
Alfa DNA System .................................... 98
Driving Modes ........................................ 98
ALFA ACTIVE SUSPENSION (AAS) —
IF EQUIPPED .......................................... 101 STOP/START SYSTEM............................ 101
Operating Mode ................................... 101
System Manual Activation/
Deactivation ......................................... 102 Possible Reasons The Engine Does
Not Autostop ........................................ 102 Engine Restarting Conditions ............. 102
Safety Functions .................................. 102
Energy Saving Function....................... 102
Irregular Operation .............................. 103
Vehicle Inactivity .................................. 103
SPEED LIMITER ...................................... 103
Description ........................................... 103
Activation ............................................. 103
Speed Limit Programming .................. 103
Exceeding The Programmed Speed ... 104
Programmed Speed Icon Flashing ..... 104
Deactivation ......................................... 104
CRUISE CONTROL SYSTEMS —
IF EQUIPPED........................................... 104
Cruise Control — If Equipped .............. 104
Adaptive Cruise Control (ACC) —
If Equipped .......................................... 106
HIGHWAY ASSIST SYSTEM (HAS) —
IF EQUIPPED........................................... 114
To Activate/Deactivate........................ 114
Operation ............................................. 114
Indications On The Display ................. 115
System Status...................................... 115
Limited System Availability/
Operation ............................................. 116
TRAFFIC JAM ASSIST (TJA) SYSTEM —
IF EQUIPPED........................................... 117
To Activate/Deactivate........................ 117
Operation ............................................. 118 Indications On The Display ................. 118
System Status ..................................... 119
Limited System Availability/
Operation ............................................. 119
TRAFFIC SIGN RECOGNITION (TSR)
SYSTEM — IF EQUIPPED........................ 120
To Activate/Deactivate ....................... 120
Indications On The Display ................. 121
INTELLIGENT SPEED CONTROL (ISC)
SYSTEM — IF EQUIPPED........................ 121
To Activate/Deactivate ....................... 122
Indications On The Display ................. 122
Acceptance/Rejection Of The
Suggested Speed ................................ 122
PARKSENSE FRONT/REAR PARK ASSIST
SYSTEM — IF EQUIPPED........................ 123
ParkSense Sensors............................. 123
ParkSense Display .............................. 124
Enabling And Disabling ParkSense .... 124
ParkSense Warning Display ............... 125
Operation With A Trailer...................... 125
ParkSense System Usage
Precautions ......................................... 126
LANE DEPARTURE WARNING (LDW)
SYSTEM.................................................. 126
Lane Departure Warning Operation... 126
Turning Lane Departure Warning On
Or Off .................................................... 127 Lane Departure Warning Message .... 127
Changing Lane Departure Warning
Status................................................... 128
21_GU_OM_EN_USC_t.book Page 10
Page 14 of 280

12
JUMP STARTING .................................... 201
Remote Battery Connection Posts......202
Jump Starting Procedure.....................203
Bump Starting ..................................204
ENGINE OVERHEATING ......................... 204 MANUAL PARK RELEASE ...................... 205TOWING A DISABLED VEHICLE ............. 205
Four-Wheel Drive (AWD) Models .........206
TOW EYES .............................................. 206
ENHANCED ACCIDENT RESPONSE
SYSTEM (EARS) ..................................... 207EVENT DATA RECORDER (EDR) ............ 207
SERVICING AND MAINTENANCE
SCHEDULED SERVICING ....................... 208
Periodic Checks ...................................208
Heavy Usage Of The Vehicle ...............208
Maintenance Plan (2.0L Engine) ........209
Maintenance Plan (2.9L Engine) ........212
ENGINE COMPARTMENT....................... 214
Checking Levels — 2.0L Engine .......... 214
Checking Levels — 2.9L Engine .......... 215
Engine Oil ............................................. 215
Engine Coolant Fluid............................216
Washer Fluid For Windshield/
Headlights ............................................ 217 Brake Fluid ...........................................217
Automatic Transmission Activation
System Oil ............................................ 217 Useful Advice For Extending The Life Of
Your Battery..........................................217 Battery ..................................................217
Pressure Washing ................................ 218
BATTERY RECHARGING ......................... 218
Important Notes .................................. 218
VEHICLE MAINTENANCE ........................ 219
Engine Oil ............................................. 219
Engine Oil Filter ................................... 220
Engine Air Cleaner Filter ..................... 220
Air Conditioning System
Maintenance........................................ 220 Lubricating Moving Parts Of The
Bodywork ............................................. 220 Windshield Wiper................................. 221
Exhaust System ................................... 222
Cooling System .................................... 223
Braking System.................................... 224
Automatic Transmission ..................... 225
Replacing The Battery ......................... 225
Fuses .................................................... 225
Bulb Replacement ............................... 229
TIRES ...................................................... 233
Tire Safety Information .................... 233
Tires — General Information .............. 239
Spare Tires — If Equipped .................. 244
Wheel And Wheel Trim Care ............ 245
Tire Types ............................................. 246
Tire Chains and Traction Devices ....... 247
Tire Rotation Recommendations........ 247
DEPARTMENT OF TRANSPORTATION
UNIFORM TIRE QUALITY GRADES ......... 248
Treadwear ............................................ 248
Traction Grades ................................... 248
Temperature Grades ........................... 248
STORING THE VEHICLE ......................... 249 BODYWORK ........................................... 249
Protection Against Atmospheric
Agents .................................................. 249 Corrosion Warranty ............................. 250
Preserving The Bodywork .................. 250
INTERIORS ............................................. 251
Seats And Fabric Parts ....................... 251
Leather Seats ...................................... 251
Plastic And Coated Parts .................... 251
Alcantara Parts — If Equipped ............ 251
Genuine Leather Parts........................ 251
Carbon Fiber Parts .............................. 252
TECHNICAL SPECIFICATIONS
VEHICLE IDENTIFICATION
NUMBER (VIN) ....................................... 253
Vehicle Identification Number............ 253
Vehicle Identification Number
(VIN) Plate ............................................ 253
ENGINE .................................................. 254
POWER SUPPLY ..................................... 255 TRANSMISSION ..................................... 255BRAKES.................................................. 255
SUSPENSION ......................................... 256
STEERING .............................................. 256
DIMENSIONS ......................................... 257
Luggage Compartment Volume ......... 259
WEIGHTS ................................................ 259
21_GU_OM_EN_USC_t.book Page 12
Page 22 of 280

GETTING TO KNOW YOUR VEHICLE
20
Programming And Requesting Additional
Key Fobs
Programming the key fob may be performed by
an authorized dealer.
NOTE:
Once a key fob is programmed to a vehicle,
it cannot be re-purposed and repro-
grammed to another vehicle.
Only key fobs that are programmed to the
vehicle electronics can be used to start and
operate the vehicle. Once a key fob is
programmed to a vehicle, it cannot be
programmed to any other vehicle.
Duplication of key fobs may be performed at
an authorized dealer. This procedure consists
of programming a blank key fob to the vehicle
electronics. A blank key fob is one that has
never been programmed
Ú
page 268.
NOTE:
When having the Engine Immobilizer
system serviced, bring all vehicle keys with
you to an authorized dealer.
For Quadrifoglio models, if you need a
replacement key fob, contact an authorized
dealer.
ENGINE IMMOBILIZER SYSTEM
The Engine Immobilizer system prevents unau-
thorized use of the vehicle by disabling engine
starting. The system does not need to be
enabled or activated. Operation is automatic,
regardless of whether the vehicle is locked or
unlocked.
The system uses a key fob, keyless push
button ignition and a Radio Frequency (RF)
receiver to prevent unauthorized vehicle oper
-
ation. Therefore, only key fobs that are
programmed to the vehicle can be used to
start and operate the vehicle. The system will
shut the engine off in two seconds if an invalid
key fob is used to start the engine.
After placing the ignition switch in the ON/RUN
position, the vehicle security light will turn on
for three seconds for a bulb check. If the light
remains on after the bulb check, it indicates
that there is a problem with the electronics. In
addition, if the light begins to flash after the
bulb check, it indicates that someone used an
invalid key fob to start the engine. Either of
these conditions will result in the engine being
shut off after two seconds. If the vehicle security light turns on during
normal vehicle operation (vehicle running for
longer than 10 seconds), it indicates that
there is a fault in the electronics. Should this
occur, have the vehicle serviced as soon as
possible by an authorized dealer.
All of the key fobs provided with your new
vehicle have been programmed to the vehicle
electronics.
NOTE:
A key fob that has not been programmed is
also considered an invalid key
Ú
page 268.
IGNITION SWITCH
Keyless Push Button Ignition
This feature allows the driver to operate the
ignition switch with the push of a button as
long as the key fob is in the passenger
compartment.
The START/STOP ignition button has several
operating modes. These modes are OFF, ACC,
and ON/RUN.
WARNING!
Always remove the key fobs from the
vehicle and lock all doors when leaving
the vehicle unattended.
Always remember to place the ignition in
the OFF mode.
CAUTION!
The Engine Immobilizer system is not
compatible with some aftermarket remote
starting systems. Use of these systems may
result in vehicle starting problems and loss
of security protection.
21_GU_OM_EN_USC_t.book Page 20
Page 24 of 280

GETTING TO KNOW YOUR VEHICLE
22
REMOTE START — IF EQUIPPED
This system uses the key fob to start
the engine conveniently from
outside the vehicle while still main-
taining security.
NOTE:
Obstructions between the vehicle and key fob
may reduce this range
Ú
page 268.
How To Use Remote Start
Push the Remote Start button on the key fob
twice within five seconds. The vehicle doors will lock, the turn signals will flash twice, and
the horn will chirp twice. Pushing the Remote
Start button a third time shuts the engine off.
NOTE:
With Remote Start, the engine will only run
for 15 minutes.
Remote Start can only be used twice.
If an engine fault is present or fuel level is
low, the vehicle will start and then shut
down in 10 seconds.
The park lamps will turn on and remain on
during Remote Start mode.
For security, power window operation is
disabled when the vehicle is in the Remote
Start mode.
The ignition must be placed in the ACC posi
-
tion before the Remote Start sequence can
be repeated for a third cycle.
All of the following conditions must be met
before the engine will Remote Start:
Gear selector in PARK
Doors closed
Hood closed
Liftgate closed
Hazard switch off
Brake switch inactive (brake pedal not
pushed)
Battery at an acceptable charge level
PANIC button not pushed
System not disabled from previous remote
start event
Vehicle Security system indicator flashing
Ignition in OFF position
Fuel level meets minimum requirement
Vehicle Security system is not signaling an
intrusion
Malfunction Indicator Light is not illumi -
nated
To Exit Remote Start Mode
To drive the vehicle after starting the Remote
Start system, either push and release the
unlock button on the key fob to unlock the
doors, or unlock the vehicle using Passive
Entry via the door handles, and disarm the
vehicle security system (if equipped). Then,
prior to the end of the 15 minute cycle, push
and release the START/STOP ignition button
while pressing the brake pedal.
The Remote Start system will turn the engine
off with another push and release of the
Remote Start button on the key fob, or if the
engine is allowed to run for the entire
15 minute cycle.
CAUTION!
An unlocked vehicle is an invitation for
thieves. Always remove key fob from the
vehicle and lock all doors when leaving the
vehicle unattended.
WARNING!
Do not start or run an engine in a closed
garage or confined area. Exhaust gas
contains Carbon Monoxide (CO) which is
odorless and colorless. Carbon Monoxide
is poisonous and can cause serious injury
or death when inhaled.
Keep key fobs away from children. Opera -
tion of the Remote Start system, windows,
door locks or other controls could cause
serious injury or death.
21_GU_OM_EN_USC_t.book Page 22
Page 47 of 280

45
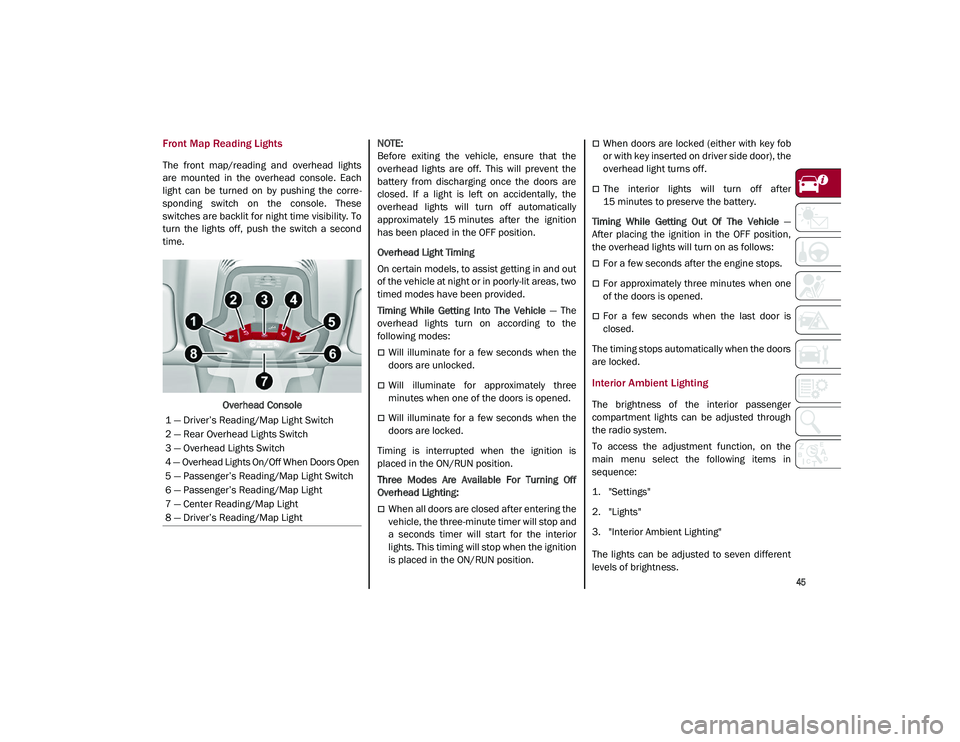
Front Map Reading Lights
The front map/reading and overhead lights
are mounted in the overhead console. Each
light can be turned on by pushing the corre-
sponding switch on the console. These
switches are backlit for night time visibility. To
turn the lights off, push the switch a second
time.
Overhead Console
NOTE:
Before exiting the vehicle, ensure that the
overhead lights are off. This will prevent the
battery from discharging once the doors are
closed. If a light is left on accidentally, the
overhead lights will turn off automatically
approximately 15 minutes after the ignition
has been placed in the OFF position.
Overhead Light Timing
On certain models, to assist getting in and out
of the vehicle at night or in poorly-lit areas, two
timed modes have been provided.
Timing While Getting Into The Vehicle
— The
overhead lights turn on according to the
following modes:
Will illuminate for a few seconds when the
doors are unlocked.
Will illuminate for approximately three
minutes when one of the doors is opened.
Will illuminate for a few seconds when the
doors are locked.
Timing is interrupted when the ignition is
placed in the ON/RUN position.
Three Modes Are Available For Turning Off
Overhead Lighting:
When all doors are closed after entering the
vehicle, the three-minute timer will stop and
a seconds timer will start for the interior
lights. This timing will stop when the ignition
is placed in the ON/RUN position.
When doors are locked (either with key fob
or with key inserted on driver side door), the
overhead light turns off.
The interior lights will turn off after
15 minutes to preserve the battery.
Timing While Getting Out Of The Vehicle —
After placing the ignition in the OFF position,
the overhead lights will turn on as follows:
For a few seconds after the engine stops.
For approximately three minutes when one
of the doors is opened.
For a few seconds when the last door is
closed.
The timing stops automatically when the doors
are locked.
Interior Ambient Lighting
The brightness of the interior passenger
compartment lights can be adjusted through
the radio system.
To access the adjustment function, on the
main menu select the following items in
sequence:
1. "Settings"
2. "Lights"
3. "Interior Ambient Lighting"
The lights can be adjusted to seven different
levels of brightness.
1 — Driver’s Reading/Map Light Switch
2 — Rear Overhead Lights Switch
3 — Overhead Lights Switch
4 — Overhead Lights On/Off When Doors Open
5 — Passenger’s Reading/Map Light Switch
6 — Passenger’s Reading/Map Light
7 — Center Reading/Map Light
8 — Driver’s Reading/Map Light
21_GU_OM_EN_USC_t.book Page 45
Page 48 of 280

GETTING TO KNOW YOUR VEHICLE
46
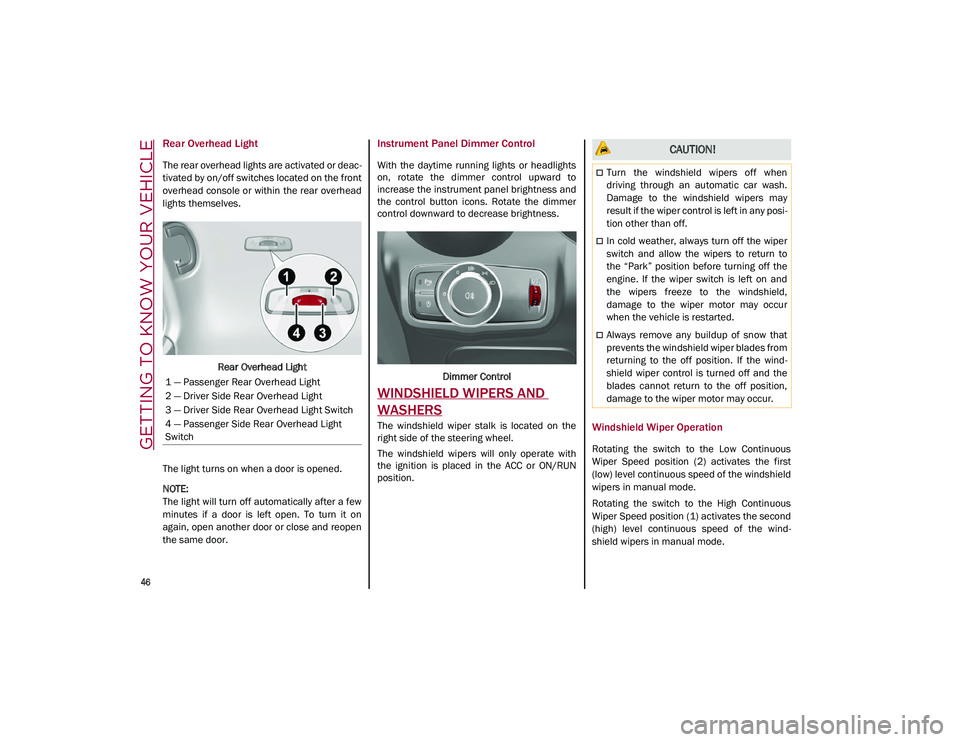
Rear Overhead Light
The rear overhead lights are activated or deac-
tivated by on/off switches located on the front
overhead console or within the rear overhead
lights themselves.
Rear Overhead Light
The light turns on when a door is opened.
NOTE:
The light will turn off automatically after a few
minutes if a door is left open. To turn it on
again, open another door or close and reopen
the same door.
Instrument Panel Dimmer Control
With the daytime running lights or headlights
on, rotate the dimmer control upward to
increase the instrument panel brightness and
the control button icons. Rotate the dimmer
control downward to decrease brightness.
Dimmer Control
WINDSHIELD WIPERS AND
WASHERS
The windshield wiper stalk is located on the
right side of the steering wheel.
The windshield wipers will only operate with
the ignition is placed in the ACC or ON/RUN
position.Windshield Wiper Operation
Rotating the switch to the Low Continuous
Wiper Speed position (2) activates the first
(low) level continuous speed of the windshield
wipers in manual mode.
Rotating the switch to the High Continuous
Wiper Speed position (1) activates the second
(high) level continuous speed of the wind -
shield wipers in manual mode.
1 — Passenger Rear Overhead Light
2 — Driver Side Rear Overhead Light
3 — Driver Side Rear Overhead Light Switch
4 — Passenger Side Rear Overhead Light
Switch
CAUTION!
Turn the windshield wipers off when
driving through an automatic car wash.
Damage to the windshield wipers may
result if the wiper control is left in any posi
-
tion other than off.
In cold weather, always turn off the wiper
switch and allow the wipers to return to
the “Park” position before turning off the
engine. If the wiper switch is left on and
the wipers freeze to the windshield,
damage to the wiper motor may occur
when the vehicle is restarted.
Always remove any buildup of snow that
prevents the windshield wiper blades from
returning to the off position. If the wind -
shield wiper control is turned off and the
blades cannot return to the off position,
damage to the wiper motor may occur.
21_GU_OM_EN_USC_t.book Page 46
Page 50 of 280

GETTING TO KNOW YOUR VEHICLE
48
If the windshield washer is used with the rain
sensor activated, the normal washing cycle is
performed, and then the rain sensor resumes
its normal automatic operation.
NOTE:
Keep the glass in the sensor area clean.
Deactivation
To turn off the Rain Sensing Wipers, use the
wiper switch or place the ignition in the OFF
position.
In the event of malfunction of the rain sensor
while it is active, the windshield wiper oper-
ates intermittently at a speed consistent with
the sensitivity setting of the rain sensor,
whether or not there is rain on the glass for as
long as the sensor failure is indicated on the
display.
The sensor continues to operate and it is
possible to set the windshield wiper to contin -
uous mode (1 or 2). The failure indication
remains on for as long as the sensor is active. The rain sensor is able to recognize and auto
-
matically adjust itself in the presence of the
following conditions:
Presence of dirt on the controlled surface
(e.g. salt, dirt, etc.).
Presence of streaks of water caused by the
worn window wiper blades.
Difference between day and night.
Rear Window Wiper/Washer
Push the windshield wiper lever downward to
activate/deactivate continuous rear wiper
operation.
Push the windshield wiper lever towards the
instrument panel to activate the rear window
washer (a brief push activates one washing
cycle, keeping the stalk pushed washes
continuously until the stalk is released).
Shifting the vehicle into REVERSE with the
windshield wiper operating activates a single
cycle of the rear window wiper.
Headlamp Washers — If Equipped
The windshield wiper lever operates the head -
light washers when the ignition is in the ON
position and the headlights are turned on. To
use the headlight washers, pull the lever
toward you and release it. The headlight
washers will spray a timed high-pressure spray
of washer fluid onto each headlight lens. In
addition, the windshield washers will spray the
windshield and the windshield wipers will
cycle.
NOTE:
The headlight washers work on every tenth
wash cycle request.
CLIMATE CONTROLS
The Climate Control system allows you to regu -
late the temperature, air flow, and direction of
air circulating throughout the vehicle. The
controls are located on the touchscreen and
on the instrument panel below the radio.
21_GU_OM_EN_USC_t.book Page 48
Page 56 of 280

GETTING TO KNOW YOUR VEHICLE
54
the flow of air. The air vanes of the center
outlets and outboard outlets can be moved up
and down or side to side to regulate airflow
direction. There is a shut off wheel located
below the air vanes to shut off or adjust the
amount of airflow from these outlets.
Bi-Level Mode
Air comes from the instrument panel
outlets and floor outlets. A slight
amount of air is directed through the
defrost and side window demister
outlets.
NOTE:
Bi-Level mode is designed under comfort
conditions to provide cooler air out of the
panel outlets and warmer air from the floor
outlets.
Floor Mode
Air comes from the floor outlets. A
slight amount of air is directed
through the defrost and side window
demister outlets. This setting heats
the passenger compartment the quickest.
Mix Mode
Air is directed through the floor,
defrost, and side window demister
outlets. This setting works best in
cold or snowy conditions that require
extra heat to the windshield. This setting is
good for maintaining comfort while reducing
moisture on the windshield.
Front Defrost And Panel Mode
Air flow is distributed between the
windshield demisting/defrosting
vents and side/central dashboard
vents. This setting allows air to flow
to the windshield on sunny days.
Front Defrost And Bi-Level Mode
Air flow is distributed to all vents.
Switching The Climate Control System On/
Off
To Turn Off The Climate Control System
Rotate the Air Speed Adjustment Knob
completely counterclockwise to turn off the
Climate Control system.
With the air conditioner is off:
Air recirculation is on
The A/C compressor is off
The fan is off
The heated rear window can be activated/
deactivated
NOTE:
The Climate Control system stores the previ -
ously set temperatures and resumes opera -
tion when any button on the system is pushed. To Turn On The Climate Control System
To switch the Climate Control system on in
automatic mode, push the AUTO button.
Operating Mode
The Climate Control system can be activated
in different ways. It is recommended to use the
automatic function. Push the AUTO button and
set the desired temperatures.
The automatic system adjusts the tempera
-
ture, quantity, and distribution of air intro -
duced into the passenger compartment. It
also controls air recirculation and the activa -
tion of the air conditioner.
At any time during automatic operation, you
can change the temperature, activate or deac -
tivate the Rear Defrost, activate SYNC, acti -
vate or deactivate the air conditioner, and
activate or deactivate air recirculation. The
system will automatically adjust to the new
settings.
Climate Control Display Settings
The Climate Control settings are visible on the
radio screen.
The display on the radio system is a pop up
window, which is activated by pushing the
buttons or turning the knobs on the Climate
Control system. The indicator lights located on
the buttons and knobs indicate that the
selected feature is on/off. If no operation is
performed for a predetermined time, the
pop-up will close on the display.
21_GU_OM_EN_USC_t.book Page 54