2021 ALFA ROMEO STELVIO warning lights
[x] Cancel search: warning lightsPage 10 of 280

8
DEAR CUSTOMER
READ THIS CAREFULLY
Refueling..................................................... 2
Starting The Engine .................................... 2
Parking On Flammable Material ............... 2
Respecting The Environment .................... 2
Electrical Accessories ................................ 2
Scheduled Servicing .................................. 2
Rollover Warning ........................................ 3
VEHICLE CHANGES / ALTERATIONS
Accessories Purchased By The Owner ...... 4
Installing Electrical/Electronic Devices .... 4
Radio Transmitters And Mobile Phones ... 5
GETTING TO KNOW YOUR VEHICLE
KEYS..........................................................18
Key Fob................................................... 18
ENGINE IMMOBILIZER SYSTEM ..............20
IGNITION SWITCH ...................................20
Keyless Push Button Ignition ................ 20
REMOTE START — IF EQUIPPED .............22
How To Use Remote Start ..................... 22
To Exit Remote Start Mode ................... 22
Remote Start Comfort Systems —
If Equipped ............................................. 23
VEHICLE SECURITY SYSTEM —
IF EQUIPPED............................................. 23
To Arm The System................................ 23
To Disarm The System .......................... 23
Volumetric/Anti-Lift Protection —
If Equipped ............................................. 24
DOORS ...................................................... 24
Power Door Locks.................................. 24
Locking The Doors With A Depleted
Battery .................................................... 25 Passive Entry System ........................... 25
Power Lock Safety Device..................... 27
Automatic Door Locks — If Equipped .. 27
Child-Protection Door Lock System — Rear
Doors ...................................................... 27
STEERING WHEEL.................................... 28
Manual Tilt/Telescoping Steering
Column ................................................. 28 Heated Steering Wheel —
If Equipped ............................................ 29
DRIVER MEMORY SETTINGS —
IF EQUIPPED............................................. 30
Programming The Memory Feature ..... 30
Memory Position Recall ........................ 30
SEATS ...................................................... 30
Sparco Racing Seats (Quadrifoglio
Vehicles) — If Equipped ......................... 30 Split Folding Rear Seat ......................... 31
Power Adjustment (Front Seats)........... 33
Heated Seats — If Equipped ................ 34
Head Restraints .................................. 35
MIRRORS ..................................................37
Automatic Dimming Mirror ....................37
Vanity Mirror ...........................................37
Outside Power Mirrors .........................38
Power Folding Outside Mirrors ..............38
Outside Automatic Dimming Mirrors —
If Equipped .............................................39 Heated Mirrors .....................................39
UNIVERSAL GARAGE DOOR OPENER
(HOMELINK®) ..........................................39
Before You Begin Programming
HomeLink® ............................................39 Erasing All The HomeLink®
Channels ................................................. 39 Identifying Whether You Have A Rolling
Code Or Non-Rolling Code Device .........40 Programming HomeLink® To A
Garage Door Opener ..............................40 Programming HomeLink® To A
Miscellaneous Device ............................ 41 Reprogramming A Single HomeLink®
Button .....................................................41 Canadian/Gate Operator
Programming .......................................... 41
EXTERIOR LIGHTS ....................................42
Headlight Switch ..................................42
Daytime Running Lights (DRLs) .........42
High Beam Headlights ..........................43
Automatic Headlights ...........................43
Flash-To-Pass .........................................43
21_GU_OM_EN_USC_t.book Page 8
Page 11 of 280
9
Automatic High Beam Headlights —
If Equipped ............................................. 43 Parking Lights ....................................... 44
Headlight Off Delay ................................ 44
Rear Fog Lights ...................................... 44
Adaptive Headlight System (AFS) —
If Equipped ............................................. 44 Turn Signals ........................................ 44
Lane Change Assist ............................... 44
INTERIOR LIGHTS .....................................44
Front Map Reading Lights ..................... 45
Interior Ambient Lighting ...................... 45
Rear Overhead Light ............................. 46
Instrument Panel Dimmer Control ....... 46
WINDSHIELD WIPERS AND WASHERS....46
Windshield Wiper Operation ............... 46
Rain Sensing Wipers.............................. 47
Rear Window Wiper/Washer................. 48
Headlamp Washers — If Equipped ....... 48
CLIMATE CONTROLS ................................48
Automatic Dual-Zone Climate Control
System ................................................. 49
INTERIOR STORAGE AND EQUIPMENT....55
Glove Compartment............................... 55
Center Console ...................................... 56
Rear Armrest .......................................... 56
Power Outlets ...................................... 56
Cigar Lighter And Ash Tray —
If Equipped ............................................. 57 Wireless Charging Pad — If Equipped... 57
POWER WINDOWS ................................... 58
Power Window Controls ........................ 58
Auto-Up Feature With Anti-Pinch
Protection............................................... 59 Power Window System Initialization .... 59
Wind Buffeting ...................................... 59
POWER SUNROOF — IF EQUIPPED.......... 59
Power Sunroof ....................................... 59
Opening And Closing The Sunroof ........ 60
Venting Sunroof ..................................... 60
Sunshade Operation ............................. 60
Pinch Protect Feature ........................... 60
Re-Initialization Procedure.................... 60
Sunroof Maintenance ........................... 61
HOOD ........................................................ 61
Opening The Hood ................................. 61
Closing The Hood................................... 62
POWER LIFTGATE..................................... 62
Opening .................................................. 62
Closing.................................................... 63
Liftgate Initialization .............................. 64
Cargo Area Features ............................. 64
GETTING TO KNOW YOUR INSTRUMENT
PANEL
INSTRUMENT PANEL FEATURES............. 67
Instrument Cluster ............................... 67
Instrument Cluster Descriptions .......... 68
INSTRUMENT CLUSTER DISPLAY ............69
Instrument Cluster Display
Description .............................................69 Reconfigurable Instrument Cluster
Display ....................................................69 Reconfigurable Display Items ............... 69
Customer Programmable Settings........ 72
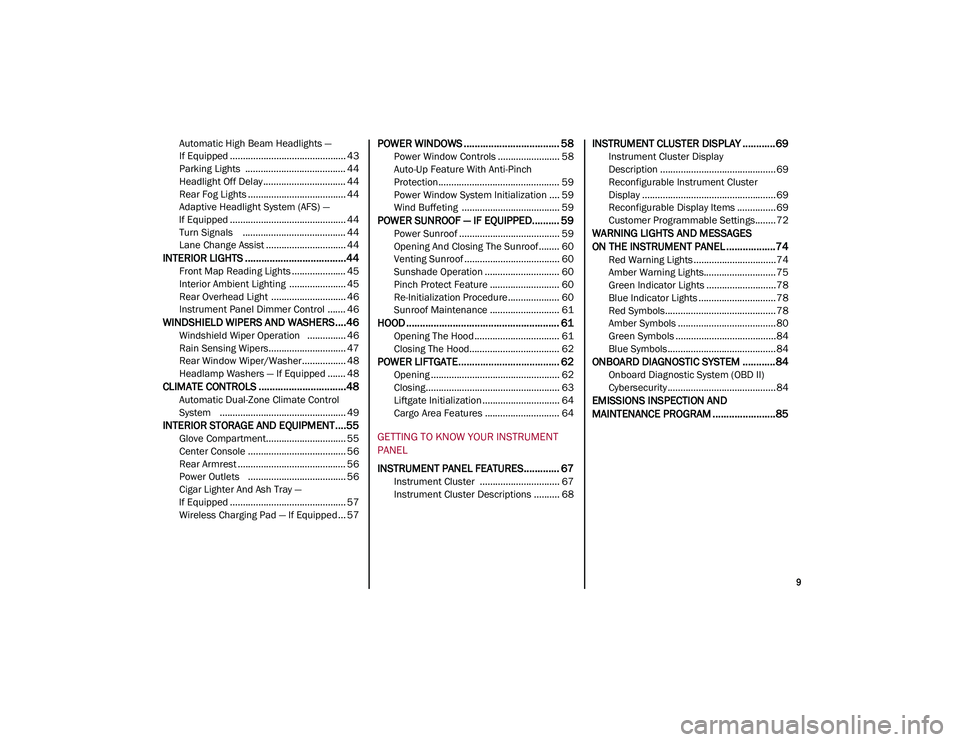
WARNING LIGHTS AND MESSAGES
ON THE INSTRUMENT PANEL ..................74
Red Warning Lights ................................74
Amber Warning Lights............................ 75
Green Indicator Lights ...........................78
Blue Indicator Lights ..............................78
Red Symbols...........................................78
Amber Symbols ......................................80
Green Symbols .......................................84
Blue Symbols .......................................... 84
ONBOARD DIAGNOSTIC SYSTEM ............84
Onboard Diagnostic System (OBD II)
Cybersecurity .......................................... 84
EMISSIONS INSPECTION AND
MAINTENANCE PROGRAM .......................85
21_GU_OM_EN_USC_t.book Page 9
Page 16 of 280
14
SYMBOL GLOSSARY
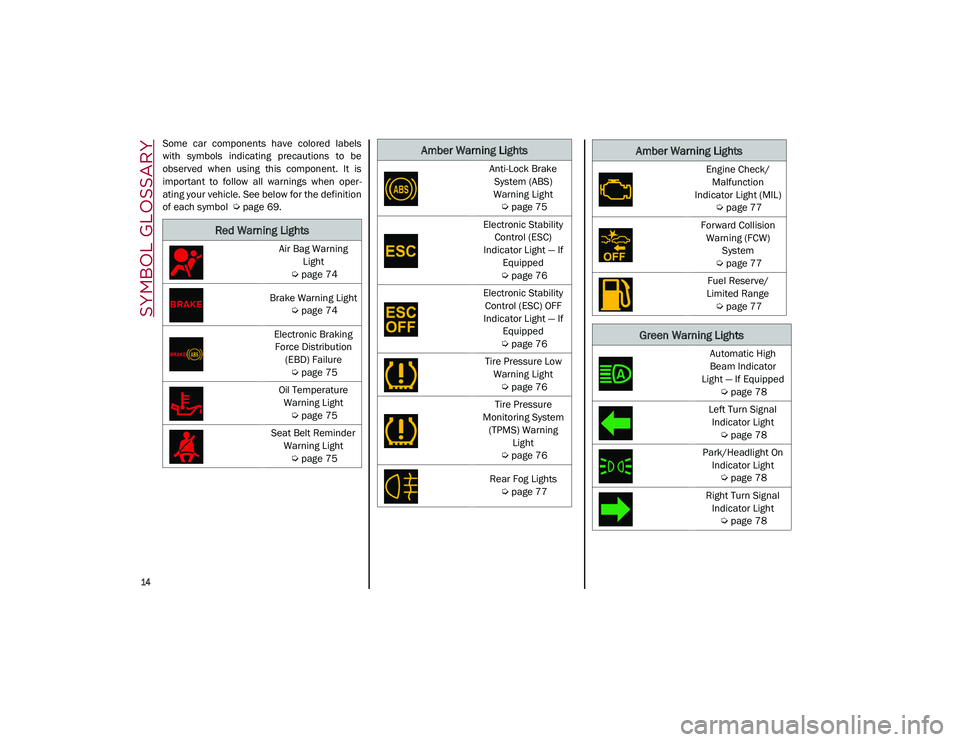
Some car components have colored labels
with symbols indicating precautions to be
observed when using this component. It is
important to follow all warnings when oper-
ating your vehicle. See below for the definition
of each symbol
Ú
page 69.
Red Warning Lights
Air Bag Warning
Light
Ú
page 74
Brake Warning Light
Ú
page 74
Electronic Braking Force Distribution (EBD) Failure
Ú
page 75
Oil Temperature Warning Light
Ú
page 75
Seat Belt Reminder Warning Light
Ú
page 75
Amber Warning Lights
Anti-Lock Brake
System (ABS)
Warning Light
Ú
page 75
Electronic Stability Control (ESC)
Indicator Light — If Equipped
Ú
page 76
Electronic Stability Control (ESC) OFF
Indicator Light — If Equipped
Ú
page 76
Tire Pressure Low Warning Light
Ú
page 76
Tire Pressure
Monitoring System (TPMS) Warning Light
Ú
page 76
Rear Fog Lights
Ú
page 77Engine Check/
Malfunction
Indicator Light (MIL)
Ú
page 77
Forward Collision Warning (FCW) System
Ú
page 77
Fuel Reserve/
Limited Range
Ú
page 77
Green Warning Lights
Automatic High
Beam Indicator
Light — If Equipped
Ú
page 78
Left Turn Signal Indicator Light
Ú
page 78
Park/Headlight On Indicator Light
Ú
page 78
Right Turn Signal Indicator Light
Ú
page 78
Amber Warning Lights
21_GU_OM_EN_USC_t.book Page 14
Page 17 of 280
15
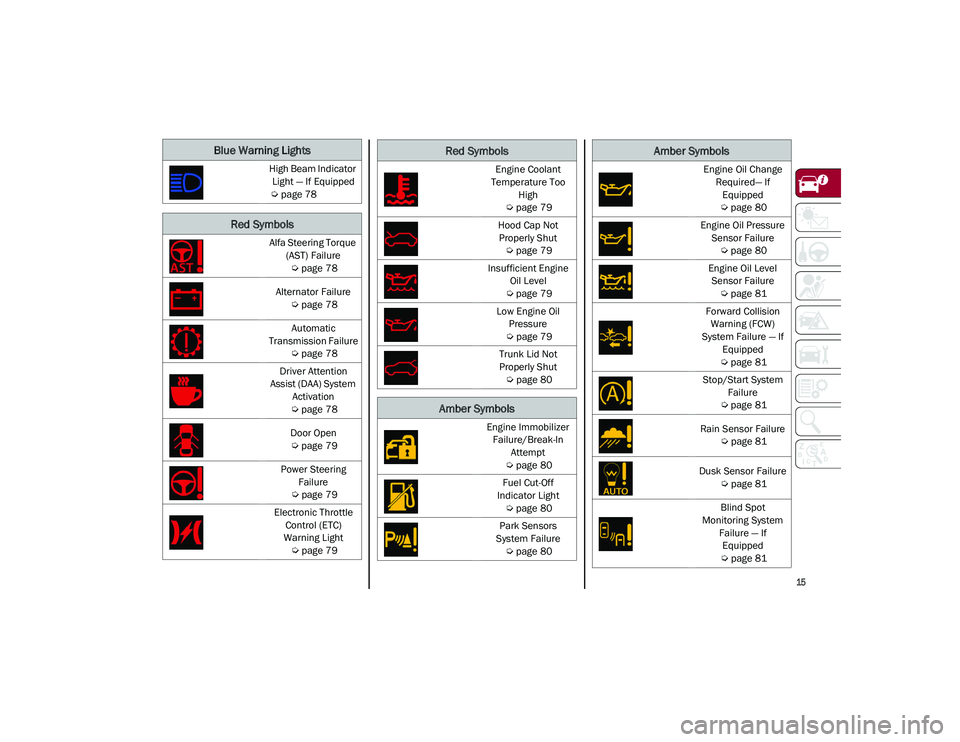
Blue Warning Lights
High Beam Indicator Light — If Equipped
Ú
page 78
Red Symbols
Alfa Steering Torque
(AST) Failure
Ú
page 78
Alternator Failure
Ú
page 78
Automatic
Transmission Failure
Ú
page 78
Driver Attention
Assist (DAA) System Activation
Ú
page 78
Door Open
Ú
page 79
Power Steering Failure
Ú
page 79
Electronic Throttle Control (ETC)
Warning Light
Ú
page 79
Engine Coolant
Temperature Too High
Ú
page 79
Hood Cap Not Properly Shut
Ú
page 79
Insufficient Engine Oil Level
Ú
page 79
Low Engine Oil Pressure
Ú
page 79
Trunk Lid Not
Properly Shut
Ú
page 80
Amber Symbols
Engine Immobilizer
Failure/Break-In Attempt
Ú
page 80
Fuel Cut-Off
Indicator Light
Ú
page 80
Park Sensors
System Failure
Ú
page 80
Red Symbols
Engine Oil Change
Required— If Equipped
Ú
page 80
Engine Oil Pressure Sensor Failure
Ú
page 80
Engine Oil Level Sensor Failure
Ú
page 81
Forward Collision Warning (FCW)
System Failure — If Equipped
Ú
page 81
Stop/Start System Failure
Ú
page 81
Rain Sensor Failure
Ú
page 81
Dusk Sensor Failure
Ú
page 81
Blind Spot
Monitoring System Failure — If Equipped
Ú
page 81
Amber Symbols
21_GU_OM_EN_USC_t.book Page 15
Page 18 of 280
SYMBOL GLOSSARY
16
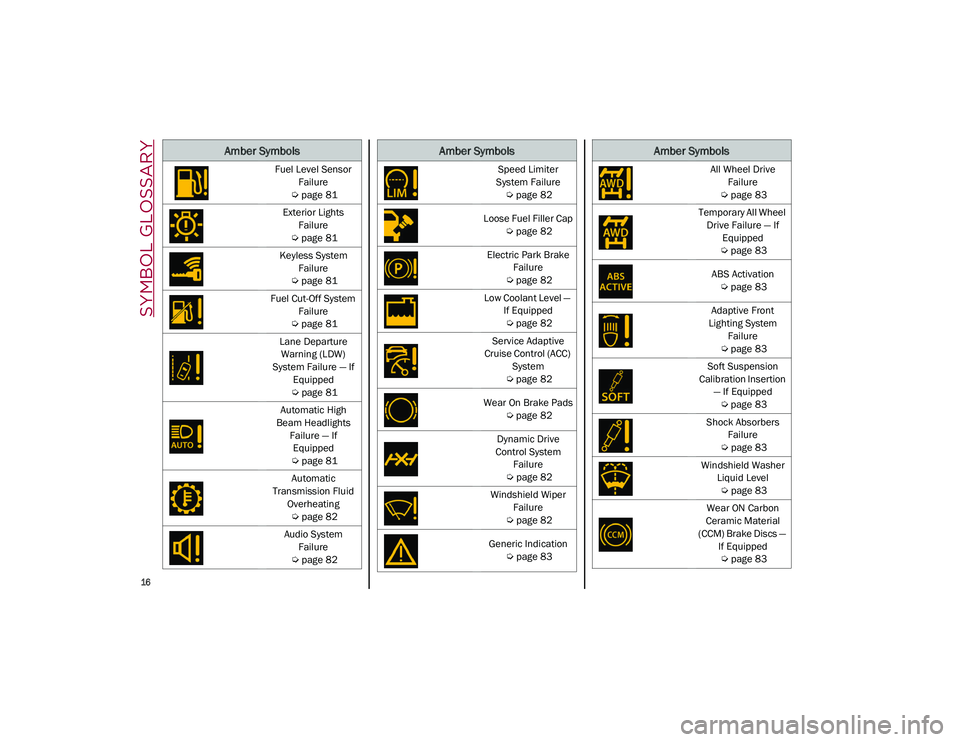
Fuel Level Sensor
Failure
Ú
page 81
Exterior Lights Failure
Ú
page 81
Keyless System Failure
Ú
page 81
Fuel Cut-Off System Failure
Ú
page 81
Lane Departure Warning (LDW)
System Failure — If Equipped
Ú
page 81
Automatic High
Beam Headlights Failure — If Equipped
Ú
page 81
Automatic
Transmission Fluid Overheating
Ú
page 82
Audio System Failure
Ú
page 82
Amber Symbols
Speed Limiter
System Failure
Ú
page 82
Loose Fuel Filler Cap
Ú
page 82
Electric Park Brake Failure
Ú
page 82
Low Coolant Level — If Equipped
Ú
page 82
Service Adaptive
Cruise Control (ACC) System
Ú
page 82
Wear On Brake Pads
Ú
page 82
Dynamic Drive
Control System Failure
Ú
page 82
Windshield Wiper Failure
Ú
page 82
Generic Indication
Ú
page 83
Amber Symbols
All Wheel Drive
Failure
Ú
page 83
Temporary All Wheel Drive Failure — If Equipped
Ú
page 83
ABS Activation
Ú
page 83
Adaptive Front
Lighting System Failure
Ú
page 83
Soft Suspension
Calibration Insertion — If Equipped
Ú
page 83
Shock Absorbers Failure
Ú
page 83
Windshield Washer Liquid Level
Ú
page 83
Wear ON Carbon
Ceramic Material
(CCM) Brake Discs — If Equipped
Ú
page 83
Amber Symbols
21_GU_OM_EN_USC_t.book Page 16
Page 26 of 280
GETTING TO KNOW YOUR VEHICLE
24
(Continued)
battery is reconnected; the exterior lights will
flash, and the horn will sound. If this occurs,
disarm the Vehicle Security system.
NOTE:
The alarm does not disarm when the doors are
unlocked by inserting the blade of the emer-
gency key (found inside the key fob) into the
door handle lock cylinder.
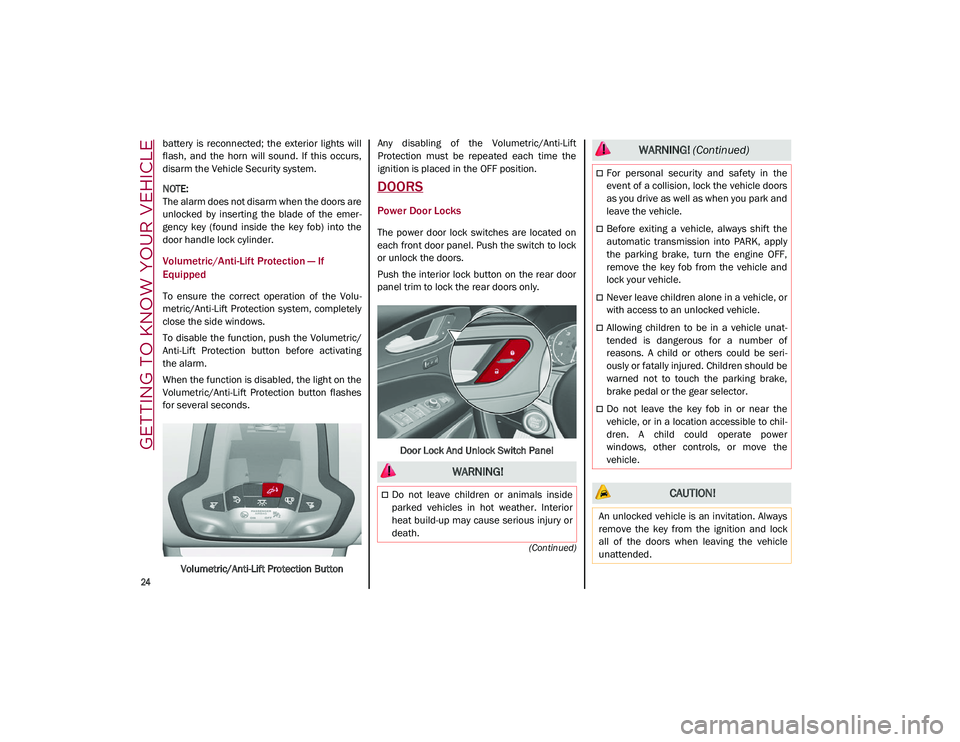
Volumetric/Anti-Lift Protection — If
Equipped
To ensure the correct operation of the Volu -
metric/Anti-Lift Protection system, completely
close the side windows.
To disable the function, push the Volumetric/
Anti-Lift Protection button before activating
the alarm.
When the function is disabled, the light on the
Volumetric/Anti-Lift Protection button flashes
for several seconds.
Volumetric/Anti-Lift Protection Button Any disabling of the Volumetric/Anti-Lift
Protection must be repeated each time the
ignition is placed in the OFF position.
DOORS
Power Door Locks
The power door lock switches are located on
each front door panel. Push the switch to lock
or unlock the doors.
Push the interior lock button on the rear door
panel trim to lock the rear doors only.
Door Lock And Unlock Switch Panel
WARNING!
Do not leave children or animals inside
parked vehicles in hot weather. Interior
heat build-up may cause serious injury or
death.
For personal security and safety in the
event of a collision, lock the vehicle doors
as you drive as well as when you park and
leave the vehicle.
Before exiting a vehicle, always shift the
automatic transmission into PARK, apply
the parking brake, turn the engine OFF,
remove the key fob from the vehicle and
lock your vehicle.
Never leave children alone in a vehicle, or
with access to an unlocked vehicle.
Allowing children to be in a vehicle unat -
tended is dangerous for a number of
reasons. A child or others could be seri -
ously or fatally injured. Children should be
warned not to touch the parking brake,
brake pedal or the gear selector.
Do not leave the key fob in or near the
vehicle, or in a location accessible to chil -
dren. A child could operate power
windows, other controls, or move the
vehicle.
CAUTION!
An unlocked vehicle is an invitation. Always
remove the key from the ignition and lock
all of the doors when leaving the vehicle
unattended.
WARNING! (Continued)
21_GU_OM_EN_USC_t.book Page 24
Page 40 of 280
GETTING TO KNOW YOUR VEHICLE
38
There are courtesy mirrors with lights on the
back of the sun visors.Rotate Sun Visor Toward Passenger Window
NOTE:
A rear facing child restraint system should
never be fitted in the front passenger seat.
Always comply with the instructions on the sun
visor
Ú
page 178.
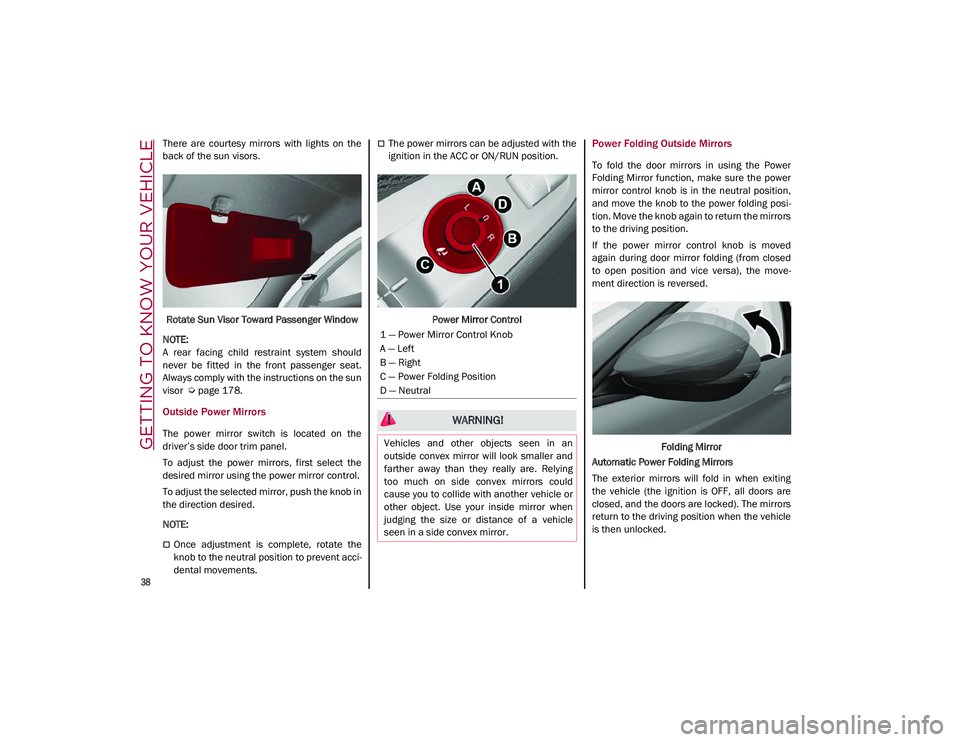
Outside Power Mirrors
The power mirror switch is located on the
driver’s side door trim panel.
To adjust the power mirrors, first select the
desired mirror using the power mirror control.
To adjust the selected mirror, push the knob in
the direction desired.
NOTE:
Once adjustment is complete, rotate the
knob to the neutral position to prevent acci -
dental movements.
The power mirrors can be adjusted with the
ignition in the ACC or ON/RUN position.
Power Mirror ControlPower Folding Outside Mirrors
To fold the door mirrors in using the Power
Folding Mirror function, make sure the power
mirror control knob is in the neutral position,
and move the knob to the power folding posi -
tion. Move the knob again to return the mirrors
to the driving position.
If the power mirror control knob is moved
again during door mirror folding (from closed
to open position and vice versa), the move -
ment direction is reversed.
Folding Mirror
Automatic Power Folding Mirrors
The exterior mirrors will fold in when exiting
the vehicle (the ignition is OFF, all doors are
closed, and the doors are locked). The mirrors
return to the driving position when the vehicle
is then unlocked.
1 — Power Mirror Control Knob
A — Left
B — Right
C — Power Folding Position
D — Neutral
WARNING!
Vehicles and other objects seen in an
outside convex mirror will look smaller and
farther away than they really are. Relying
too much on side convex mirrors could
cause you to collide with another vehicle or
other object. Use your inside mirror when
judging the size or distance of a vehicle
seen in a side convex mirror.
21_GU_OM_EN_USC_t.book Page 38
Page 44 of 280
GETTING TO KNOW YOUR VEHICLE
42
NOTE:
If the indicator light stays on constantly,
programming is complete and the garage
door/device should activate when the
HomeLink® button is pressed.
To program the two remaining HomeLink®
buttons, repeat each step for each
remaining button. DO NOT erase the chan-
nels.
If you unplugged the garage door opener/
device for programming, plug it back in at this
time.
Reprogramming A Single HomeLink® Button
(Canadian/Gate Operator)
To reprogram a channel that has been previ -
ously trained, follow these steps:
1. Place the ignition to the ON/RUN position.
2. Press and hold the desired HomeLink® button until the indicator light begins to
flash after 20 seconds. Do not release the
button.
3. Without releasing the button, proceed with “Canadian/Gate Operator Programming”
step 2 and follow all remaining steps.
EXTERIOR LIGHTS
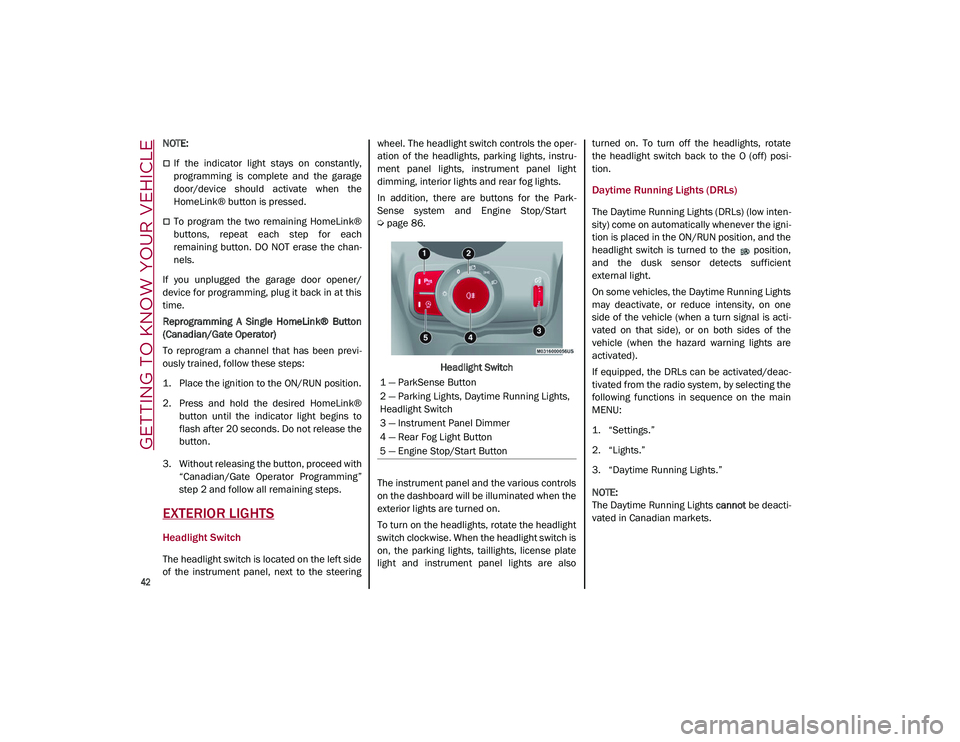
Headlight Switch
The headlight switch is located on the left side
of the instrument panel, next to the steering wheel. The headlight switch controls the oper
-
ation of the headlights, parking lights, instru -
ment panel lights, instrument panel light
dimming, interior lights and rear fog lights.
In addition, there are buttons for the Park -
Sense system and Engine Stop/Start
Ú
page 86.
Headlight Switch
The instrument panel and the various controls
on the dashboard will be illuminated when the
exterior lights are turned on.
To turn on the headlights, rotate the headlight
switch clockwise. When the headlight switch is
on, the parking lights, taillights, license plate
light and instrument panel lights are also turned on. To turn off the headlights, rotate
the headlight switch back to the O (off) posi
-
tion.
Daytime Running Lights (DRLs)
The Daytime Running Lights (DRLs) (low inten -
sity) come on automatically whenever the igni -
tion is placed in the ON/RUN position, and the
headlight switch is turned to the position,
and the dusk sensor detects sufficient
external light.
On some vehicles, the Daytime Running Lights
may deactivate, or reduce intensity, on one
side of the vehicle (when a turn signal is acti -
vated on that side), or on both sides of the
vehicle (when the hazard warning lights are
activated).
If equipped, the DRLs can be activated/deac -
tivated from the radio system, by selecting the
following functions in sequence on the main
MENU:
1. “Settings.”
2. “Lights.”
3. “Daytime Running Lights.”
NOTE:
The Daytime Running Lights cannot be deacti -
vated in Canadian markets.
1 — ParkSense Button
2 — Parking Lights, Daytime Running Lights,
Headlight Switch
3 — Instrument Panel Dimmer
4 — Rear Fog Light Button
5 — Engine Stop/Start Button
21_GU_OM_EN_USC_t.book Page 42