2021 ALFA ROMEO STELVIO battery replacement
[x] Cancel search: battery replacementPage 14 of 280

12
JUMP STARTING .................................... 201
Remote Battery Connection Posts......202
Jump Starting Procedure.....................203
Bump Starting ..................................204
ENGINE OVERHEATING ......................... 204 MANUAL PARK RELEASE ...................... 205TOWING A DISABLED VEHICLE ............. 205
Four-Wheel Drive (AWD) Models .........206
TOW EYES .............................................. 206
ENHANCED ACCIDENT RESPONSE
SYSTEM (EARS) ..................................... 207EVENT DATA RECORDER (EDR) ............ 207
SERVICING AND MAINTENANCE
SCHEDULED SERVICING ....................... 208
Periodic Checks ...................................208
Heavy Usage Of The Vehicle ...............208
Maintenance Plan (2.0L Engine) ........209
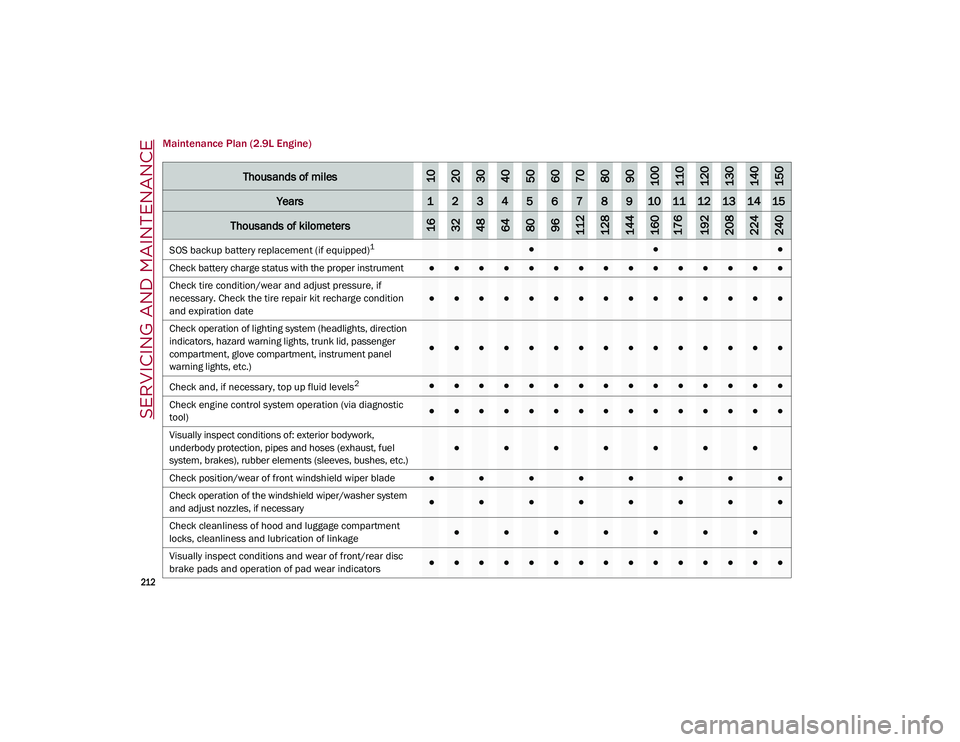
Maintenance Plan (2.9L Engine) ........212
ENGINE COMPARTMENT....................... 214
Checking Levels — 2.0L Engine .......... 214
Checking Levels — 2.9L Engine .......... 215
Engine Oil ............................................. 215
Engine Coolant Fluid............................216
Washer Fluid For Windshield/
Headlights ............................................ 217 Brake Fluid ...........................................217
Automatic Transmission Activation
System Oil ............................................ 217 Useful Advice For Extending The Life Of
Your Battery..........................................217 Battery ..................................................217
Pressure Washing ................................ 218
BATTERY RECHARGING ......................... 218
Important Notes .................................. 218
VEHICLE MAINTENANCE ........................ 219
Engine Oil ............................................. 219
Engine Oil Filter ................................... 220
Engine Air Cleaner Filter ..................... 220
Air Conditioning System
Maintenance........................................ 220 Lubricating Moving Parts Of The
Bodywork ............................................. 220 Windshield Wiper................................. 221
Exhaust System ................................... 222
Cooling System .................................... 223
Braking System.................................... 224
Automatic Transmission ..................... 225
Replacing The Battery ......................... 225
Fuses .................................................... 225
Bulb Replacement ............................... 229
TIRES ...................................................... 233
Tire Safety Information .................... 233
Tires — General Information .............. 239
Spare Tires — If Equipped .................. 244
Wheel And Wheel Trim Care ............ 245
Tire Types ............................................. 246
Tire Chains and Traction Devices ....... 247
Tire Rotation Recommendations........ 247
DEPARTMENT OF TRANSPORTATION
UNIFORM TIRE QUALITY GRADES ......... 248
Treadwear ............................................ 248
Traction Grades ................................... 248
Temperature Grades ........................... 248
STORING THE VEHICLE ......................... 249 BODYWORK ........................................... 249
Protection Against Atmospheric
Agents .................................................. 249 Corrosion Warranty ............................. 250
Preserving The Bodywork .................. 250
INTERIORS ............................................. 251
Seats And Fabric Parts ....................... 251
Leather Seats ...................................... 251
Plastic And Coated Parts .................... 251
Alcantara Parts — If Equipped ............ 251
Genuine Leather Parts........................ 251
Carbon Fiber Parts .............................. 252
TECHNICAL SPECIFICATIONS
VEHICLE IDENTIFICATION
NUMBER (VIN) ....................................... 253
Vehicle Identification Number............ 253
Vehicle Identification Number
(VIN) Plate ............................................ 253
ENGINE .................................................. 254
POWER SUPPLY ..................................... 255 TRANSMISSION ..................................... 255BRAKES.................................................. 255
SUSPENSION ......................................... 256
STEERING .............................................. 256
DIMENSIONS ......................................... 257
Luggage Compartment Volume ......... 259
WEIGHTS ................................................ 259
21_GU_OM_EN_USC_t.book Page 12
Page 20 of 280

18
GETTING TO KNOW YOUR VEHICLE
In this section, you will find important informa-
tion to help you become familiar with the
features needed to operate your vehicle, and
how they function.
KEYS
Key Fob
Your vehicle is equipped with a key fob which
supports Passive Entry, Remote Keyless Entry
(RKE), Remote Start (if equipped), and remote
liftgate operation. The key fob allows you to
lock or unlock the doors and liftgate. The key
fob does not need to be pointed at the vehicle
to activate the system. The key fob also
contains an emergency key, which is stored
inside the key fob.
NOTE:
The key fob’s wireless signal may be
blocked if the key fob is located next to a
mobile phone, laptop, or other electronic
device. This may result in poor perfor -
mance.
With ignition in the ON position and the
vehicle moving at 2 mph (4 km/h), all RKE commands are disabled. Key Fob
In case the ignition switch does not change
with the push of a button, the key fob may
have a low or fully depleted battery. A low key
fob battery can be verified by referring to the
instrument cluster, which will display direc -
tions to follow
Ú
page 268.
To Lock/Unlock The Doors And Liftgate
Push and release the unlock button on the key
fob once to unlock the driver’s door or twice
within one second to unlock all doors and the
liftgate. To lock all the doors and the liftgate,
push the lock button once.
The current unlock setting can be changed
through the radio system menu, so that the
system unlocks:
All doors on the first push of the key fob
unlock button.
The driver door on the first push of the key
fob unlock button.
The liftgate "independently" or "with doors". When the doors are locked/unlocked, the turn
signals will flash and the illuminated entry
system will be activated.
NOTE:
If one or more doors are open when the lock
button is pushed, or the liftgate is open, the
doors will lock. The doors will unlock again
automatically if the key is left inside the
passenger compartment, otherwise the doors
will stay locked.
Flashing of the turn signals upon locking/
unlocking the doors, and activation of the
courtesy light upon unlocking the doors, can
be activated or deactivated through the radio
system. For further information, refer to the
Information and Entertainment System
Owner’s Manual Supplement.
Opening The Liftgate
Rapidly push the button on the key fob twice to
open the liftgate. The turn signals will flash to
indicate that the liftgate has been opened.
Replacing The Battery In The Key Fob
The recommended replacement battery is one
CR2032 battery.
NOTE:
Customers are recommended to use a
battery obtained from Mopar. Aftermarket
coin battery dimensions may not meet the
original OEM coin battery dimensions.
21_GU_OM_EN_USC_t.book Page 18
Page 21 of 280
19
Perchlorate Material — special handling
may apply. See
www.dtsc.ca.gov/hazard -
ouswaste/perchlorate
for further informa -
tion.
Do not touch the battery terminals that are
on the back housing or the printed circuit
board.
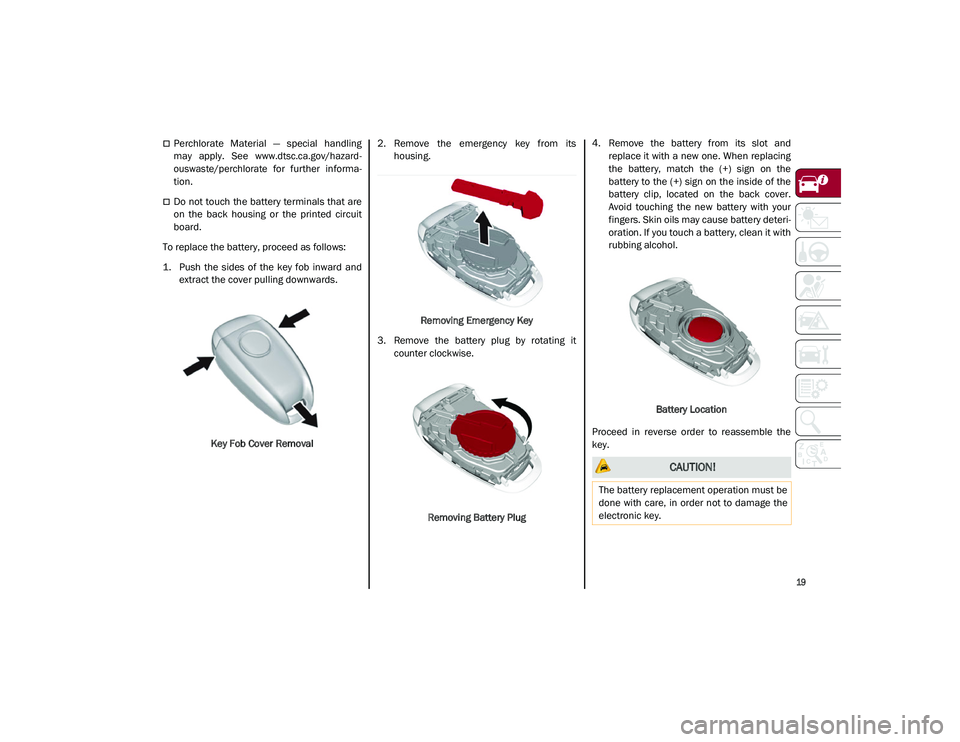
To replace the battery, proceed as follows:
1. Push the sides of the key fob inward and extract the cover pulling downwards.
Key Fob Cover Removal 2. Remove the emergency key from its
housing.
Removing Emergency Key
3. Remove the battery plug by rotating it counter clockwise.
Removing Battery Plug 4. Remove the battery from its slot and
replace it with a new one. When replacing
the battery, match the (+) sign on the
battery to the (+) sign on the inside of the
battery clip, located on the back cover.
Avoid touching the new battery with your
fingers. Skin oils may cause battery deteri -
oration. If you touch a battery, clean it with
rubbing alcohol.
Battery Location
Proceed in reverse order to reassemble the
key.
CAUTION!
The battery replacement operation must be
done with care, in order not to damage the
electronic key.
21_GU_OM_EN_USC_t.book Page 19
Page 87 of 280

85
EMISSIONS INSPECTION AND
MAINTENANCE PROGRAM
In some localities, it may be a legal require-
ment to pass an inspection of your vehicle's
emissions control system. Failure to pass
could prevent vehicle registration. For states that require an Inspection
and Maintenance (I/M), this check
verifies the Malfunction Indicator
Light (MIL) is functioning and is not
on when the engine is running, and that the
OBD II system is ready for testing.
Normally, the OBD II system will be ready. The
OBD II system may not be ready if your vehicle
was recently serviced, recently had a depleted
battery or a battery replacement. If the OBD II
system should be determined not ready for the
I/M test, your vehicle may fail the test.
Your vehicle has a simple ignition actuated
test, which you can use prior to going to the
test station. To check if your vehicle's OBD II
system is ready, you must do the following:
1. Cycle the ignition switch to the ACC posi -
tion, but do not crank or start the engine.
NOTE:
If you crank or start the engine, you will have to
start this test over.
2. As soon as you cycle the ignition switch to the ACC position, you will see the Malfunc -
tion Indicator Light (MIL) symbol come on
as part of a normal bulb check. 3. Approximately 15 seconds later, one of
two things will happen:
• The MIL will flash for about 10 seconds
and then return to being fully illumi-
nated until you turn OFF the ignition or
start the engine. This means that your
vehicle's OBD II system is not ready and
you should not proceed to the I/M
station.
• The MIL will not flash at all and will
remain fully illuminated until you place the ignition in the off position or start
the engine. This means that your
vehicle's OBD II system is ready and you
can proceed to the I/M station.
If y o
ur OBD II system is not ready, you should
see an authorized dealer or repair facility. If
your vehicle was recently serviced or had a
battery failure or replacement, you may need
to do nothing more than drive your vehicle as
you normally would in order for your OBD II
system to update. A recheck with the above
test routine may then indicate that the system
is now ready .
Regardless of whether your vehicle's OBD II
system is ready or not, if the MIL is illuminated
during normal vehicle operation you should
have your vehicle serviced before going to the
I/M station. The I/M station can fail your
vehicle because the MIL is on with the engine
running.
WARNING!
ONLY an authorized service technician
should connect equipment to the OBD II
connection port in order to read the VIN,
diagnose, or service your vehicle.
If unauthorized equipment is connected to
the OBD II connection port, such as a
driver-behavior tracking device, it may:
• Be possible that vehicle systems,
including safety related systems,
could be impaired or a loss of vehicle
control could occur that may result in an accident involving serious injury or
death.
• Access, or allow others to access,
information stored in your vehicle
systems, including personal informa-
tion.
21_GU_OM_EN_USC_t.book Page 85
Page 210 of 280
208
SERVICING AND MAINTENANCE
Correct servicing permits the performance of
the vehicle to be maintained over time, as well
as limited running costs and safeguarding the
efficiency of the safety systems.
SCHEDULED SERVICING
Correct servicing is crucial for guaranteeing a
long life for the vehicle under the best condi-
tions.
For this reason, Alfa Romeo has planned a
series of checks and services for your vehicle
at fixed intervals based on distance and time,
as described in the Scheduled Servicing Plan.
Before each service, it is always necessary to
carefully follow the instructions in the Sched -
uled Servicing Plan (e.g. periodically check
level of fluids, tire pressure, etc.).
Scheduled Servicing is offered by an autho -
rized dealer according to a set time schedule.
If, during each operation, in addition to the
ones scheduled, the need arises for further
replacements or repairs, these may be carried
out with the owner’s explicit consent only.
NOTE:
Scheduled Servicing intervals are required by
the manufacturer. Failure to have them
carried out may invalidate the New Vehicle
Limited Warranty.
You are advised to inform an authorized
dealer of any small operating irregularities
without waiting for the next service.
Periodic Checks
Every month or every 620 miles (1,000 km) or
before long trips check and, if necessary, top
off:
Engine coolant level.
Brake fluid level (if insufficient, see an
authorized dealer as soon as possible).
Windshield washer fluid level.
Tire inflation pressure and condition.
Operation of lighting system (headlights,
direction indicators, hazard warning lights,
etc.).
Operation of windshield washing/wiping
system and positioning/wear of wiper
blades.
Inspect the CV/Universal joints.
Oil consumption of the engine depends on
conditions and driving style. For this reason,
the engine oil level must be checked every
1,860 miles (3,000 km), and top off if neces -
sary; for further information
Ú
page 215.
Heavy Usage Of The Vehicle
If the vehicle is used under one of the following
conditions:
Dusty roads.
Short, repeated journeys less than 4 miles
(7 km) at sub-zero outside temperatures.
Engine often idling or driving long distances
at low speeds or long periods of inactivity.
In the event of a long period of inactivity.
The following checks must be carried out more
often than indicated in the Scheduled
Servicing Plan:
Check cleanliness of hood and liftgate
locks, cleanliness and lubrication of
linkage.
Visually inspect conditions of: engine, trans -
mission, pipes and hoses (exhaust/fuel
system/brakes) and rubber elements
(sleeves/bushes, etc.).
Check battery charge and battery fluid level
(electrolyte).
Visually inspect conditions of the accessory
drive belts.
Check and, if necessary, change engine oil
and replace oil filter.
Check and, if necessary, replace cabin air
filter.
Check and, if necessary, replace air cleaner.
Severe Duty All Models
Change engine oil at 4,000 miles (6,500 km)
if the vehicle is operated in a dusty and
off-road environment or is operated predomi -
nately at idle or only very low engine RPM. This
type of vehicle use is considered Severe Duty.
21_GU_OM_EN_USC_t.book Page 208
Page 211 of 280
209
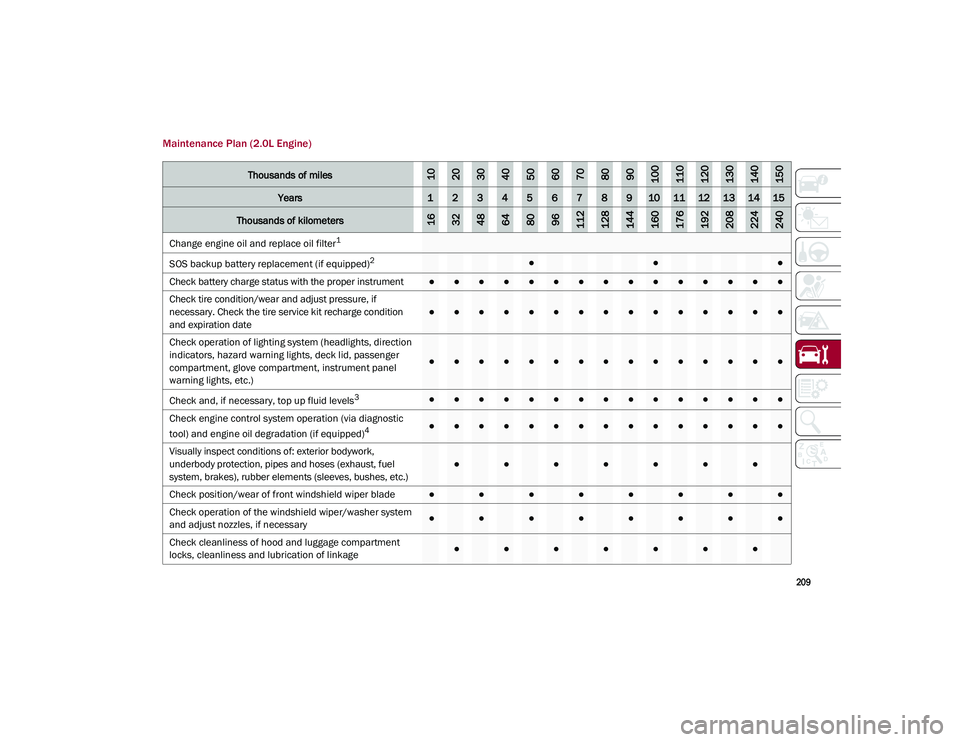
Maintenance Plan (2.0L Engine)
Thousands of miles102030405060708090100110120130140150
Years123456789101112131415
Thousands of kilometers163248648096112128144160176192208224240
Change engine oil and replace oil filter1
SOS backup battery replacement (if equipped)
2●●●
Check battery charge status with the proper instrument
●●●●●●●●●●●●●●●
Check tire condition/wear and adjust pressure, if
necessary. Check the tire service kit recharge condition
and expiration date
●●●●●●●●●●●●●●●
Check operation of lighting system (headlights, direction
indicators, hazard warning lights, deck lid, passenger
compartment, glove compartment, instrument panel
warning lights, etc.)
●●●●●●●●●●●●●●●
Check and, if necessary, top up fluid levels
3●●●●●●●●●●●●●●●
Check engine control system operation (via diagnostic
tool) and engine oil degradation (if equipped)
4●●●●●●●●●●●●●●●
Visually inspect conditions of: exterior bodywork,
underbody protection, pipes and hoses (exhaust, fuel
system, brakes), rubber elements (sleeves, bushes, etc.)
●●●●●●●
Check position/wear of front windshield wiper blade●●●●●●●●
Check operation of the windshield wiper/washer system
and adjust nozzles, if necessary
●●●●●●●●
Check cleanliness of hood and luggage compartment
locks, cleanliness and lubrication of linkage
●●●●●●●
21_GU_OM_EN_USC_t.book Page 209
Page 212 of 280
SERVICING AND MAINTENANCE
210
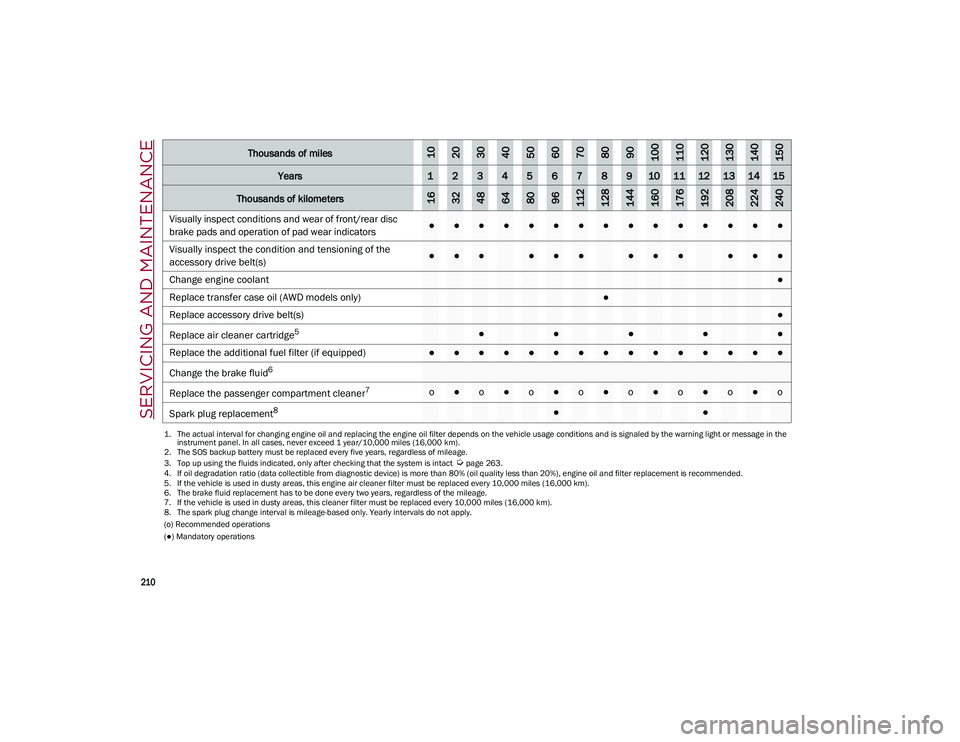
(o) Recommended operations
(●) Mandatory operations
Visually inspect conditions and wear of front/rear disc
brake pads and operation of pad wear indicators●●●●●●●●●●●●●●●
Visually inspect the condition and tensioning of the
accessory drive belt(s)
●●●●●●●●●●●●
Change engine coolant
●
Replace transfer case oil (AWD models only)
●
Replace accessory drive belt(s)●
Replace air cleaner cartridge
5●●●●●
Replace the additional fuel filter (if equipped)
●●●●●●●●●●●●●●●
Change the brake fluid
6
Replac
e the passenger compartment cleaner
7o●o●o●o●o●o●o●o
Spark plug replacement
8●●
1. The actual interval for changing engine oil and replacing the engine oil filter depends on the vehicle usage conditions and is signaled by the warning light or message in the instrument panel. In all cases, never exceed 1 year/10,000 miles (16,000 km).
2. The SOS backup battery must be replaced every five years, regardless of mileage.
3. Top up using the fluids indicated, only after checking that the system is intact
Ú
page 263.
4. If oil degradation ratio (data collectible from diagnostic device) is more than 80% (oil quality less than 20%), engine oil and filter replacement is recommended.
5. If the vehicle is used in dusty areas, this engine air cleaner filter must be replaced every 10,000 miles (16,000 km).
6. The brake fluid replacement has to be done every two years, regardless of the mileage.
7. If the vehicle is used in dusty areas, this cleaner filter must be replaced every 10,000 miles (16,000 km). 8. The spark plug change interval is mileage-based only. Yearly intervals do not apply.
Thousands of miles102030405060708090100110120130140150
Years123456789101112131415
Thousands of kilometers163248648096112128144160176192208224240
21_GU_OM_EN_USC_t.book Page 210
Page 214 of 280
SERVICING AND MAINTENANCE
212
Maintenance Plan (2.9L Engine)
Thousands of miles102030405060708090100110120130140150
Years123456789101112131415
Thousands of kilometers163248648096112128144160176192208224240
SOS backup battery replacement (if equipped)1●●●
Check battery charge status with the proper instrument
●●●●●●●●●●●●●●●
Check tire condition/wear and adjust pressure, if
necessary. Check the tire repair kit recharge condition
and expiration date
●●●●●●●●●●●●●●●
Check operation of lighting system (headlights, direction
indicators, hazard warning lights, trunk lid, passenger
compartment, glove compartment, instrument panel
warning lights, etc.)
●●●●●●●●●●●●●●●
Check and, if necessary, top up fluid levels
2●●●●●●●●●●●●●●●
Check engine control system operation (via diagnostic
tool)
●●●●●●●●●●●●●●●
Visually inspect conditions of: exterior bodywork,
underbody protection, pipes and hoses (exhaust, fuel
system, brakes), rubber elements (sleeves, bushes, etc.)
●●●●●●●
Check position/wear of front windshield wiper blade●●●●●●●●
Check operation of the windshield wiper/washer system
and adjust nozzles, if necessary
●●●●●●●●
Check cleanliness of hood and luggage compartment
locks, cleanliness and lubrication of linkage
●●●●●●●
Visually inspect conditions and wear of front/rear disc
brake pads and operation of pad wear indicators●●●●●●●●●●●●●●●
21_GU_OM_EN_USC_t.book Page 212