2021 ALFA ROMEO STELVIO sensor
[x] Cancel search: sensorPage 12 of 280

10
STARTING AND OPERATING
STARTING THE ENGINE ............................86
Starting Procedure................................. 86
Remote Starting System ....................... 86
Cold Weather Operation ........................ 87
Extended Park Starting.......................... 87
If Engine Fails To Start .......................... 87
After Starting — Warming Up The
Engine ..................................................... 88 Stopping The Engine.............................. 88
Turbocharger Cool Down ....................... 88
ENGINE BLOCK HEATER —
IF EQUIPPED .............................................89
ENGINE BREAK-IN
RECOMMENDATIONS ...............................89
Engine Break-In...................................... 89
ELECTRIC PARK BRAKE (EPB) .................90
Electric Park Brake (EPB) Operating
Modes ..................................................... 91 Safe Hold ................................................ 91
AUTOMATIC TRANSMISSION....................92
Display .................................................... 93
Gear Selector ......................................... 93
Transmission Operating Modes ............ 94
Automatic Transmission Limp Home
Mode....................................................... 96 Brake Transmission Shift Interlock
(BTSI) System ......................................... 96 Important Notes ..................................... 97
ALFA DNA SELECTOR ...............................98
Alfa DNA System .................................... 98
Driving Modes ........................................ 98
ALFA ACTIVE SUSPENSION (AAS) —
IF EQUIPPED .......................................... 101 STOP/START SYSTEM............................ 101
Operating Mode ................................... 101
System Manual Activation/
Deactivation ......................................... 102 Possible Reasons The Engine Does
Not Autostop ........................................ 102 Engine Restarting Conditions ............. 102
Safety Functions .................................. 102
Energy Saving Function....................... 102
Irregular Operation .............................. 103
Vehicle Inactivity .................................. 103
SPEED LIMITER ...................................... 103
Description ........................................... 103
Activation ............................................. 103
Speed Limit Programming .................. 103
Exceeding The Programmed Speed ... 104
Programmed Speed Icon Flashing ..... 104
Deactivation ......................................... 104
CRUISE CONTROL SYSTEMS —
IF EQUIPPED........................................... 104
Cruise Control — If Equipped .............. 104
Adaptive Cruise Control (ACC) —
If Equipped .......................................... 106
HIGHWAY ASSIST SYSTEM (HAS) —
IF EQUIPPED........................................... 114
To Activate/Deactivate........................ 114
Operation ............................................. 114
Indications On The Display ................. 115
System Status...................................... 115
Limited System Availability/
Operation ............................................. 116
TRAFFIC JAM ASSIST (TJA) SYSTEM —
IF EQUIPPED........................................... 117
To Activate/Deactivate........................ 117
Operation ............................................. 118 Indications On The Display ................. 118
System Status ..................................... 119
Limited System Availability/
Operation ............................................. 119
TRAFFIC SIGN RECOGNITION (TSR)
SYSTEM — IF EQUIPPED........................ 120
To Activate/Deactivate ....................... 120
Indications On The Display ................. 121
INTELLIGENT SPEED CONTROL (ISC)
SYSTEM — IF EQUIPPED........................ 121
To Activate/Deactivate ....................... 122
Indications On The Display ................. 122
Acceptance/Rejection Of The
Suggested Speed ................................ 122
PARKSENSE FRONT/REAR PARK ASSIST
SYSTEM — IF EQUIPPED........................ 123
ParkSense Sensors............................. 123
ParkSense Display .............................. 124
Enabling And Disabling ParkSense .... 124
ParkSense Warning Display ............... 125
Operation With A Trailer...................... 125
ParkSense System Usage
Precautions ......................................... 126
LANE DEPARTURE WARNING (LDW)
SYSTEM.................................................. 126
Lane Departure Warning Operation... 126
Turning Lane Departure Warning On
Or Off .................................................... 127 Lane Departure Warning Message .... 127
Changing Lane Departure Warning
Status................................................... 128
21_GU_OM_EN_USC_t.book Page 10
Page 17 of 280
15
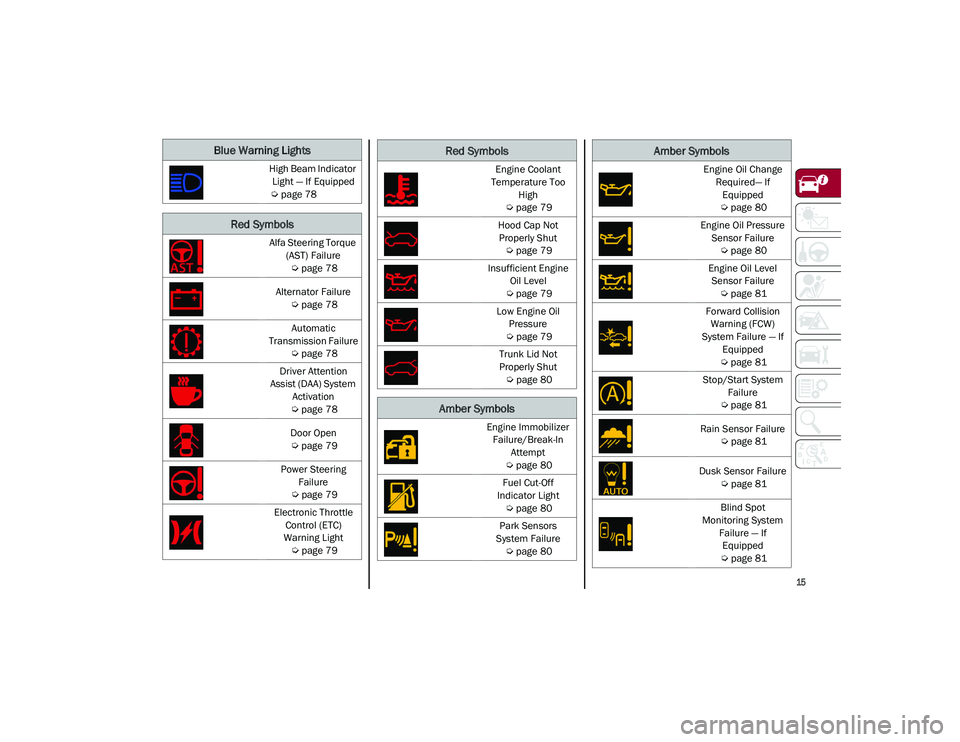
Blue Warning Lights
High Beam Indicator Light — If Equipped
Ú
page 78
Red Symbols
Alfa Steering Torque
(AST) Failure
Ú
page 78
Alternator Failure
Ú
page 78
Automatic
Transmission Failure
Ú
page 78
Driver Attention
Assist (DAA) System Activation
Ú
page 78
Door Open
Ú
page 79
Power Steering Failure
Ú
page 79
Electronic Throttle Control (ETC)
Warning Light
Ú
page 79
Engine Coolant
Temperature Too High
Ú
page 79
Hood Cap Not Properly Shut
Ú
page 79
Insufficient Engine Oil Level
Ú
page 79
Low Engine Oil Pressure
Ú
page 79
Trunk Lid Not
Properly Shut
Ú
page 80
Amber Symbols
Engine Immobilizer
Failure/Break-In Attempt
Ú
page 80
Fuel Cut-Off
Indicator Light
Ú
page 80
Park Sensors
System Failure
Ú
page 80
Red Symbols
Engine Oil Change
Required— If Equipped
Ú
page 80
Engine Oil Pressure Sensor Failure
Ú
page 80
Engine Oil Level Sensor Failure
Ú
page 81
Forward Collision Warning (FCW)
System Failure — If Equipped
Ú
page 81
Stop/Start System Failure
Ú
page 81
Rain Sensor Failure
Ú
page 81
Dusk Sensor Failure
Ú
page 81
Blind Spot
Monitoring System Failure — If Equipped
Ú
page 81
Amber Symbols
21_GU_OM_EN_USC_t.book Page 15
Page 18 of 280
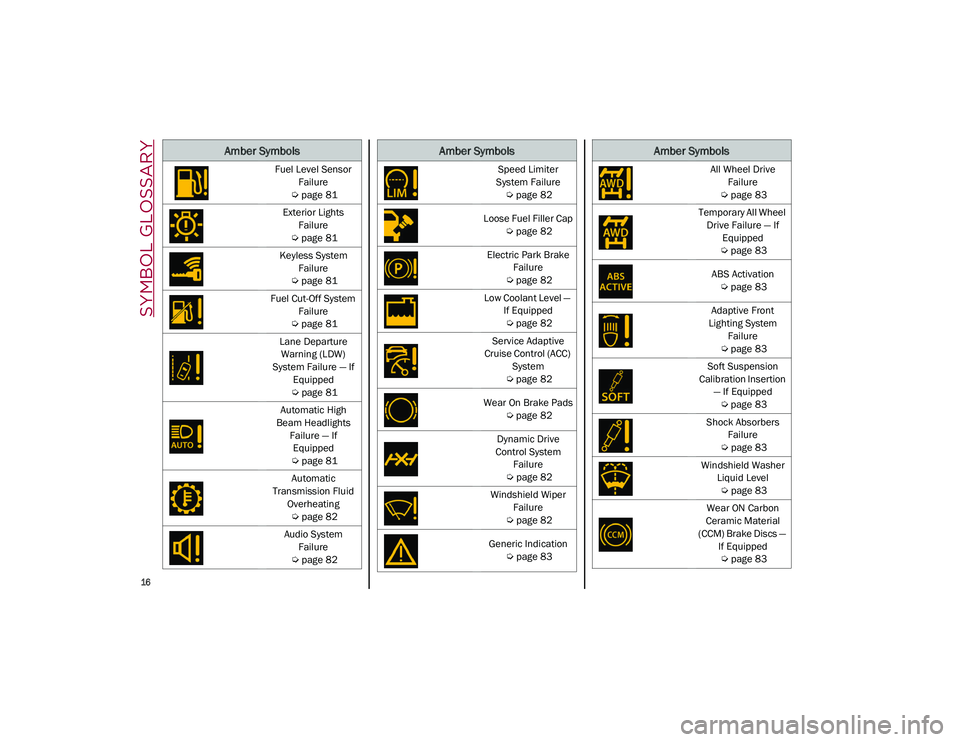
SYMBOL GLOSSARY
16
Fuel Level Sensor
Failure
Ú
page 81
Exterior Lights Failure
Ú
page 81
Keyless System Failure
Ú
page 81
Fuel Cut-Off System Failure
Ú
page 81
Lane Departure Warning (LDW)
System Failure — If Equipped
Ú
page 81
Automatic High
Beam Headlights Failure — If Equipped
Ú
page 81
Automatic
Transmission Fluid Overheating
Ú
page 82
Audio System Failure
Ú
page 82
Amber Symbols
Speed Limiter
System Failure
Ú
page 82
Loose Fuel Filler Cap
Ú
page 82
Electric Park Brake Failure
Ú
page 82
Low Coolant Level — If Equipped
Ú
page 82
Service Adaptive
Cruise Control (ACC) System
Ú
page 82
Wear On Brake Pads
Ú
page 82
Dynamic Drive
Control System Failure
Ú
page 82
Windshield Wiper Failure
Ú
page 82
Generic Indication
Ú
page 83
Amber Symbols
All Wheel Drive
Failure
Ú
page 83
Temporary All Wheel Drive Failure — If Equipped
Ú
page 83
ABS Activation
Ú
page 83
Adaptive Front
Lighting System Failure
Ú
page 83
Soft Suspension
Calibration Insertion — If Equipped
Ú
page 83
Shock Absorbers Failure
Ú
page 83
Windshield Washer Liquid Level
Ú
page 83
Wear ON Carbon
Ceramic Material
(CCM) Brake Discs — If Equipped
Ú
page 83
Amber Symbols
21_GU_OM_EN_USC_t.book Page 16
Page 31 of 280

29
To unlock the steering column, push the tilt/
telescoping control handle down to the open
position. To tilt the steering column, move the
steering wheel upward or downward as
desired. To lengthen or shorten the steering
column, pull the steering wheel outward or
push it inward as desired. To lock the steering
column in position, push the tilt/telescoping
control handle to the closed position.
Heated Steering Wheel — If Equipped
The steering wheel contains a heating element
that helps warm your hands in cold weather.
The heated steering wheel has only one
temperature setting. The heated steering
wheel may not turn on when it is already warm.
The heated steering wheel button is located
on the instrument panel.
Push the heated steering wheel button
once to turn the heating element on.
Push the heated steering wheel button a
second time to turn the heating element off.
When the function is enabled, the indicator on
the button will illuminate. Heated Steering Wheel Button
NOTE:
The engine must be running for the heated
steering wheel to operate.
For information on use with the Remote Start
system, see
Ú
page 23.
WARNING!
Do not adjust the steering column while
driving. Adjusting the steering column
while driving or driving with the steering
column unlocked, could cause the driver
to lose control of the vehicle. Failure to
follow this warning may result in serious
injury or death.
Do not place any objects on the steering
wheel (e.g. permanently fixed covers)
which could interfere with the hand detec -
tion sensor on the steering wheel of the
Active Blind Spot Assist (ABSA), Lane
Keeping Assist (LKA), Traffic Jam Assist
(TJA), or Highway Assist systems (HAS) (if
equipped).
WARNING!
It is absolutely forbidden to carry out any
after-market operation involving steering
system or steering column modifications
(e.g. installation of anti-theft device) that
could adversely affect performance. Doing
so could void the New Vehicle Limited
Warrant, cause SERIOUS SAFETY
PROBLEMS INCLUDING INJURY, and also
result in the vehicle not meeting
type-approval requirements.
WARNING!
Persons who are unable to feel pain to the
skin because of advanced age, chronic
illness, diabetes, spinal cord injury, medi -
cation, alcohol use, exhaustion, or other
physical conditions must exercise care
when using the steering wheel heater. It
may cause burns even at low tempera -
tures, especially if used for long periods.
Do not place anything on the steering
wheel that insulates against heat, such as
a blanket or steering wheel covers of any
type and material. This may cause the
steering wheel heater to overheat.
21_GU_OM_EN_USC_t.book Page 29
Page 44 of 280
GETTING TO KNOW YOUR VEHICLE
42
NOTE:
If the indicator light stays on constantly,
programming is complete and the garage
door/device should activate when the
HomeLink® button is pressed.
To program the two remaining HomeLink®
buttons, repeat each step for each
remaining button. DO NOT erase the chan-
nels.
If you unplugged the garage door opener/
device for programming, plug it back in at this
time.
Reprogramming A Single HomeLink® Button
(Canadian/Gate Operator)
To reprogram a channel that has been previ -
ously trained, follow these steps:
1. Place the ignition to the ON/RUN position.
2. Press and hold the desired HomeLink® button until the indicator light begins to
flash after 20 seconds. Do not release the
button.
3. Without releasing the button, proceed with “Canadian/Gate Operator Programming”
step 2 and follow all remaining steps.
EXTERIOR LIGHTS
Headlight Switch
The headlight switch is located on the left side
of the instrument panel, next to the steering wheel. The headlight switch controls the oper
-
ation of the headlights, parking lights, instru -
ment panel lights, instrument panel light
dimming, interior lights and rear fog lights.
In addition, there are buttons for the Park -
Sense system and Engine Stop/Start
Ú
page 86.
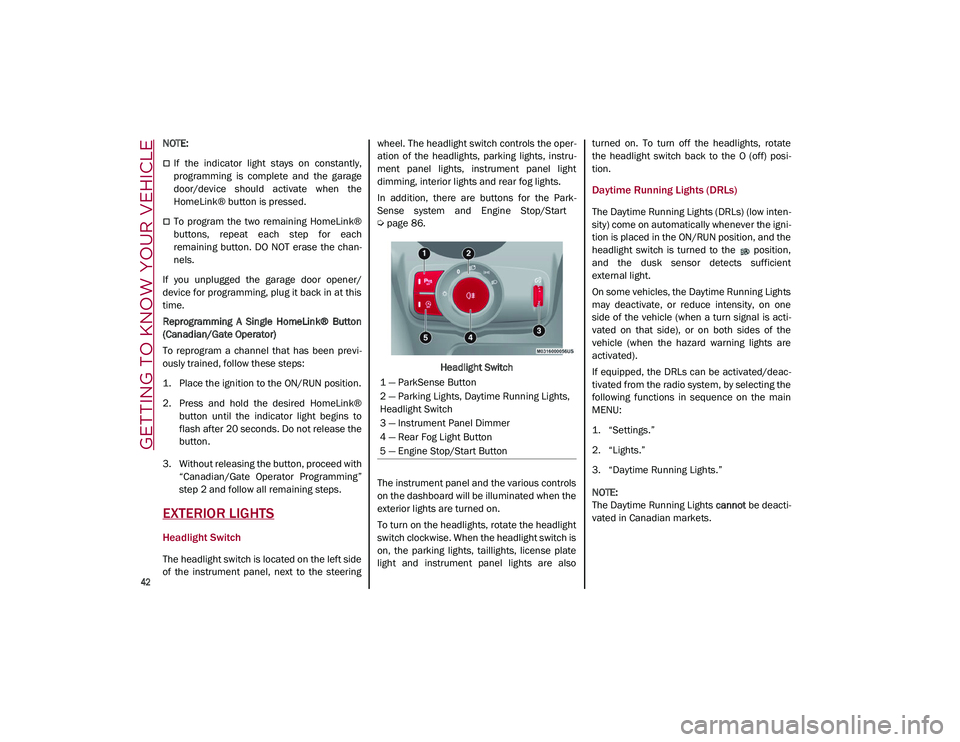
Headlight Switch
The instrument panel and the various controls
on the dashboard will be illuminated when the
exterior lights are turned on.
To turn on the headlights, rotate the headlight
switch clockwise. When the headlight switch is
on, the parking lights, taillights, license plate
light and instrument panel lights are also turned on. To turn off the headlights, rotate
the headlight switch back to the O (off) posi
-
tion.
Daytime Running Lights (DRLs)
The Daytime Running Lights (DRLs) (low inten -
sity) come on automatically whenever the igni -
tion is placed in the ON/RUN position, and the
headlight switch is turned to the position,
and the dusk sensor detects sufficient
external light.
On some vehicles, the Daytime Running Lights
may deactivate, or reduce intensity, on one
side of the vehicle (when a turn signal is acti -
vated on that side), or on both sides of the
vehicle (when the hazard warning lights are
activated).
If equipped, the DRLs can be activated/deac -
tivated from the radio system, by selecting the
following functions in sequence on the main
MENU:
1. “Settings.”
2. “Lights.”
3. “Daytime Running Lights.”
NOTE:
The Daytime Running Lights cannot be deacti -
vated in Canadian markets.
1 — ParkSense Button
2 — Parking Lights, Daytime Running Lights,
Headlight Switch
3 — Instrument Panel Dimmer
4 — Rear Fog Light Button
5 — Engine Stop/Start Button
21_GU_OM_EN_USC_t.book Page 42
Page 45 of 280
43
High Beam Headlights
Push the multifunction lever towards the
instrument panel to switch the headlights to
high beams. The headlight switch must first be
turned to the (auto) or (on) position.
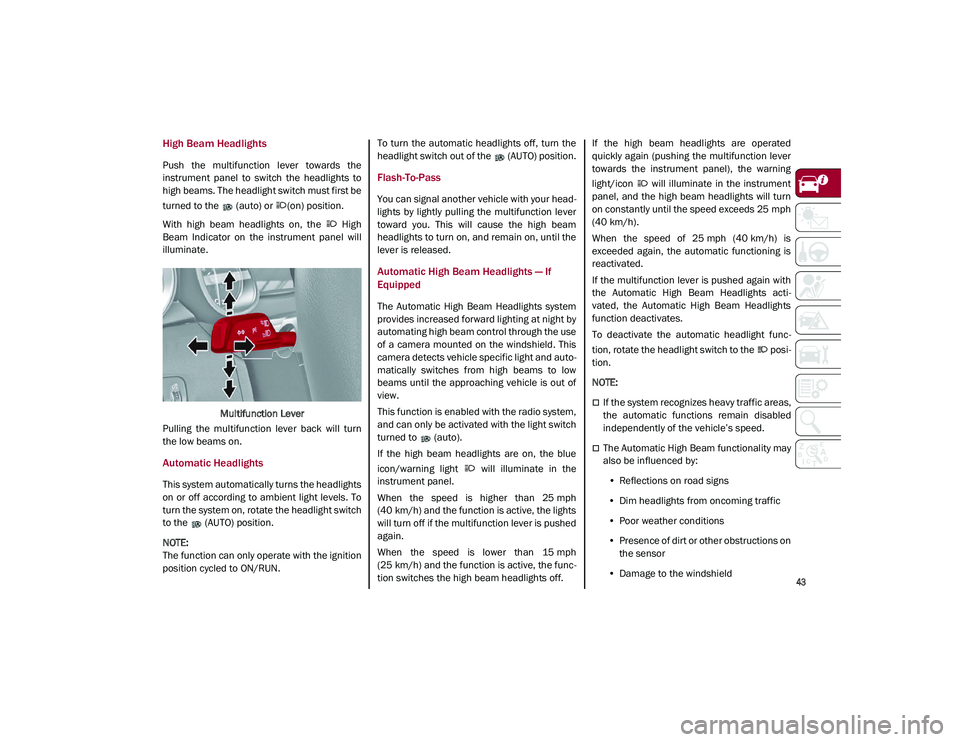
With high beam headlights on, the High
Beam Indicator on the instrument panel will
illuminate.Multifunction Lever
Pulling the multifunction lever back will turn
the low beams on.
Automatic Headlights
This system automatically turns the headlights
on or off according to ambient light levels. To
turn the system on, rotate the headlight switch
to the (AUTO) position.
NOTE:
The function can only operate with the ignition
position cycled to ON/RUN. To turn the automatic headlights off, turn the
headlight switch out of the (AUTO) position.
Flash-To-Pass
You can signal another vehicle with your head
-
lights by lightly pulling the multifunction lever
toward you. This will cause the high beam
headlights to turn on, and remain on, until the
lever is released.
Automatic High Beam Headlights — If
Equipped
The Automatic High Beam Headlights system
provides increased forward lighting at night by
automating high beam control through the use
of a camera mounted on the windshield. This
camera detects vehicle specific light and auto -
matically switches from high beams to low
beams until the approaching vehicle is out of
view.
This function is enabled with the radio system,
and can only be activated with the light switch
turned to (auto).
If the high beam headlights are on, the blue
icon/warning light will illuminate in the
instrument panel.
When the speed is higher than 25 mph
(40 km/h) and the function is active, the lights
will turn off if the multifunction lever is pushed
again.
When the speed is lower than 15 mph
(25 km/h) and the function is active, the func -
tion switches the high beam headlights off. If the high beam headlights are operated
quickly again (pushing the multifunction lever
towards the instrument panel), the warning
light/icon will illuminate in the instrument
panel, and the high beam headlights will turn
on constantly until the speed exceeds 25 mph
(40 km/h).
When the speed of 25 mph (40 km/h) is
exceeded again, the automatic functioning is
reactivated.
If the multifunction lever is pushed again with
the Automatic High Beam Headlights acti
-
vated, the Automatic High Beam Headlights
function deactivates.
To deactivate the automatic headlight func -
tion, rotate the headlight switch to the posi -
tion.
NOTE:
If the system recognizes heavy traffic areas,
the automatic functions remain disabled
independently of the vehicle’s speed.
The Automatic High Beam functionality may
also be influenced by:
• Reflections on road signs
• Dim headlights from oncoming traffic
• Poor weather conditions
• Presence of dirt or other obstructions on
the sensor
• Damage to the windshield
21_GU_OM_EN_USC_t.book Page 43
Page 49 of 280
47
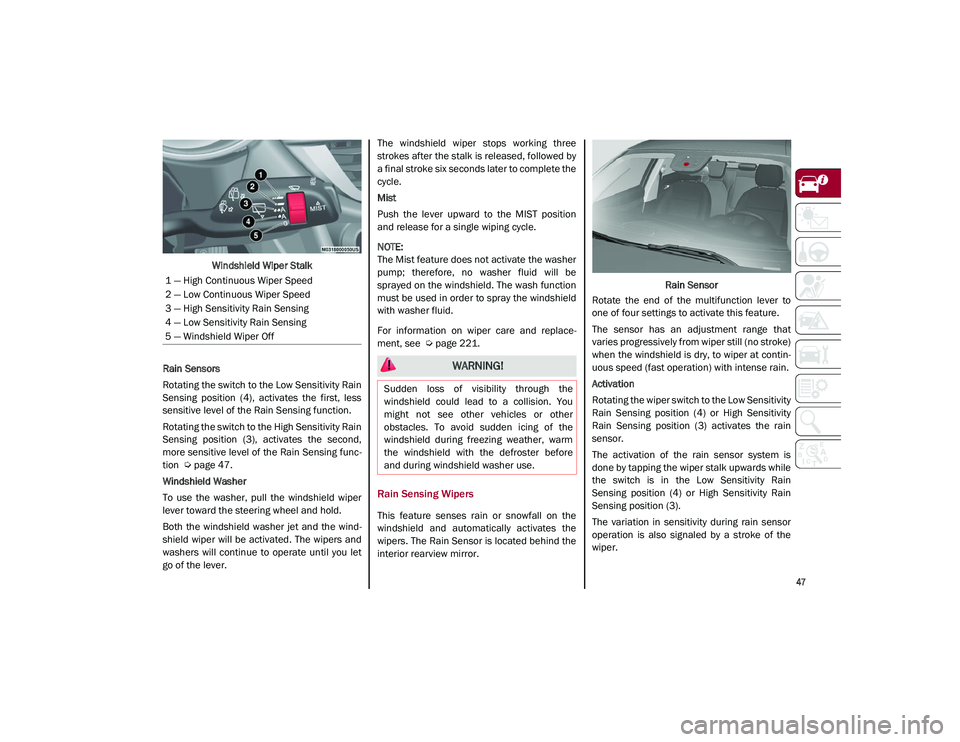
Windshield Wiper Stalk
Rain Sensors
Rotating the switch to the Low Sensitivity Rain
Sensing position (4), activates the first, less
sensitive level of the Rain Sensing function.
Rotating the switch to the High Sensitivity Rain
Sensing position (3), activates the second,
more sensitive level of the Rain Sensing func -
tion
Ú
page 47.
Windshield Washer
To use the washer, pull the windshield wiper
lever toward the steering wheel and hold.
Both the windshield washer jet and the wind -
shield wiper will be activated. The wipers and
washers will continue to operate until you let
go of the lever. The windshield wiper stops working three
strokes after the stalk is released, followed by
a final stroke six seconds later to complete the
cycle.
Mist
Push the lever upward to the MIST position
and release for a single wiping cycle.
NOTE:
The Mist feature does not activate the washer
pump; therefore, no washer fluid will be
sprayed on the windshield. The wash function
must be used in order to spray the windshield
with washer fluid.
For information on wiper care and replace
-
ment, see
Ú
page 221.
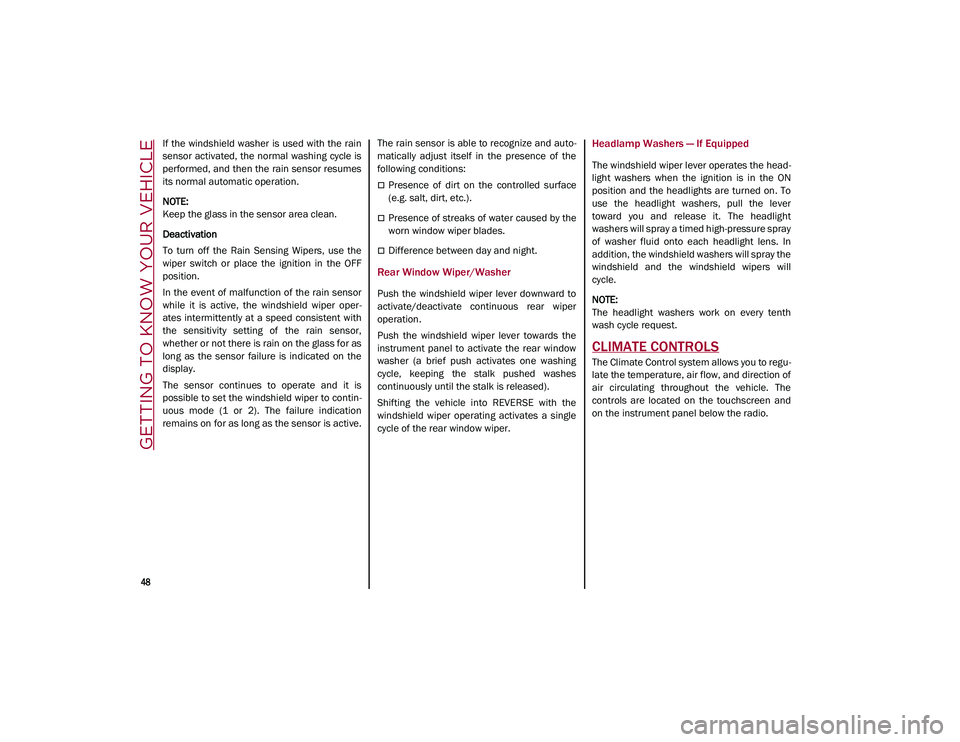
Rain Sensing Wipers
This feature senses rain or snowfall on the
windshield and automatically activates the
wipers. The Rain Sensor is located behind the
interior rearview mirror. Rain Sensor
Rotate the end of the multifunction lever to
one of four settings to activate this feature.
The sensor has an adjustment range that
varies progressively from wiper still (no stroke)
when the windshield is dry, to wiper at contin -
uous speed (fast operation) with intense rain.
Activation
Rotating the wiper switch to the Low Sensitivity
Rain Sensing position (4) or High Sensitivity
Rain Sensing position (3) activates the rain
sensor.
The activation of the rain sensor system is
done by tapping the wiper stalk upwards while
the switch is in the Low Sensitivity Rain
Sensing position (4) or High Sensitivity Rain
Sensing position (3).
The variation in sensitivity during rain sensor
operation is also signaled by a stroke of the
wiper.
1 — High Continuous Wiper Speed
2 — Low Continuous Wiper Speed
3 — High Sensitivity Rain Sensing
4 — Low Sensitivity Rain Sensing
5 — Windshield Wiper Off
WARNING!
Sudden loss of visibility through the
windshield could lead to a collision. You
might not see other vehicles or other
obstacles. To avoid sudden icing of the
windshield during freezing weather, warm
the windshield with the defroster before
and during windshield washer use.
21_GU_OM_EN_USC_t.book Page 47
Page 50 of 280
GETTING TO KNOW YOUR VEHICLE
48
If the windshield washer is used with the rain
sensor activated, the normal washing cycle is
performed, and then the rain sensor resumes
its normal automatic operation.
NOTE:
Keep the glass in the sensor area clean.
Deactivation
To turn off the Rain Sensing Wipers, use the
wiper switch or place the ignition in the OFF
position.
In the event of malfunction of the rain sensor
while it is active, the windshield wiper oper-
ates intermittently at a speed consistent with
the sensitivity setting of the rain sensor,
whether or not there is rain on the glass for as
long as the sensor failure is indicated on the
display.
The sensor continues to operate and it is
possible to set the windshield wiper to contin -
uous mode (1 or 2). The failure indication
remains on for as long as the sensor is active. The rain sensor is able to recognize and auto
-
matically adjust itself in the presence of the
following conditions:
Presence of dirt on the controlled surface
(e.g. salt, dirt, etc.).
Presence of streaks of water caused by the
worn window wiper blades.
Difference between day and night.
Rear Window Wiper/Washer
Push the windshield wiper lever downward to
activate/deactivate continuous rear wiper
operation.
Push the windshield wiper lever towards the
instrument panel to activate the rear window
washer (a brief push activates one washing
cycle, keeping the stalk pushed washes
continuously until the stalk is released).
Shifting the vehicle into REVERSE with the
windshield wiper operating activates a single
cycle of the rear window wiper.
Headlamp Washers — If Equipped
The windshield wiper lever operates the head -
light washers when the ignition is in the ON
position and the headlights are turned on. To
use the headlight washers, pull the lever
toward you and release it. The headlight
washers will spray a timed high-pressure spray
of washer fluid onto each headlight lens. In
addition, the windshield washers will spray the
windshield and the windshield wipers will
cycle.
NOTE:
The headlight washers work on every tenth
wash cycle request.
CLIMATE CONTROLS
The Climate Control system allows you to regu -
late the temperature, air flow, and direction of
air circulating throughout the vehicle. The
controls are located on the touchscreen and
on the instrument panel below the radio.
21_GU_OM_EN_USC_t.book Page 48