2021 ALFA ROMEO STELVIO mirror
[x] Cancel search: mirrorPage 10 of 280

8
DEAR CUSTOMER
READ THIS CAREFULLY
Refueling..................................................... 2
Starting The Engine .................................... 2
Parking On Flammable Material ............... 2
Respecting The Environment .................... 2
Electrical Accessories ................................ 2
Scheduled Servicing .................................. 2
Rollover Warning ........................................ 3
VEHICLE CHANGES / ALTERATIONS
Accessories Purchased By The Owner ...... 4
Installing Electrical/Electronic Devices .... 4
Radio Transmitters And Mobile Phones ... 5
GETTING TO KNOW YOUR VEHICLE
KEYS..........................................................18
Key Fob................................................... 18
ENGINE IMMOBILIZER SYSTEM ..............20
IGNITION SWITCH ...................................20
Keyless Push Button Ignition ................ 20
REMOTE START — IF EQUIPPED .............22
How To Use Remote Start ..................... 22
To Exit Remote Start Mode ................... 22
Remote Start Comfort Systems —
If Equipped ............................................. 23
VEHICLE SECURITY SYSTEM —
IF EQUIPPED............................................. 23
To Arm The System................................ 23
To Disarm The System .......................... 23
Volumetric/Anti-Lift Protection —
If Equipped ............................................. 24
DOORS ...................................................... 24
Power Door Locks.................................. 24
Locking The Doors With A Depleted
Battery .................................................... 25 Passive Entry System ........................... 25
Power Lock Safety Device..................... 27
Automatic Door Locks — If Equipped .. 27
Child-Protection Door Lock System — Rear
Doors ...................................................... 27
STEERING WHEEL.................................... 28
Manual Tilt/Telescoping Steering
Column ................................................. 28 Heated Steering Wheel —
If Equipped ............................................ 29
DRIVER MEMORY SETTINGS —
IF EQUIPPED............................................. 30
Programming The Memory Feature ..... 30
Memory Position Recall ........................ 30
SEATS ...................................................... 30
Sparco Racing Seats (Quadrifoglio
Vehicles) — If Equipped ......................... 30 Split Folding Rear Seat ......................... 31
Power Adjustment (Front Seats)........... 33
Heated Seats — If Equipped ................ 34
Head Restraints .................................. 35
MIRRORS ..................................................37
Automatic Dimming Mirror ....................37
Vanity Mirror ...........................................37
Outside Power Mirrors .........................38
Power Folding Outside Mirrors ..............38
Outside Automatic Dimming Mirrors —
If Equipped .............................................39 Heated Mirrors .....................................39
UNIVERSAL GARAGE DOOR OPENER
(HOMELINK®) ..........................................39
Before You Begin Programming
HomeLink® ............................................39 Erasing All The HomeLink®
Channels ................................................. 39 Identifying Whether You Have A Rolling
Code Or Non-Rolling Code Device .........40 Programming HomeLink® To A
Garage Door Opener ..............................40 Programming HomeLink® To A
Miscellaneous Device ............................ 41 Reprogramming A Single HomeLink®
Button .....................................................41 Canadian/Gate Operator
Programming .......................................... 41
EXTERIOR LIGHTS ....................................42
Headlight Switch ..................................42
Daytime Running Lights (DRLs) .........42
High Beam Headlights ..........................43
Automatic Headlights ...........................43
Flash-To-Pass .........................................43
21_GU_OM_EN_USC_t.book Page 8
Page 32 of 280
GETTING TO KNOW YOUR VEHICLE
30
DRIVER MEMORY SETTINGS — IF
EQUIPPED
This feature allows the driver to store up to
three different memory profiles for easy recall
through a memory switch. Each memory
profile saves desired position settings for the
following features:
Driver seat
Side mirrors
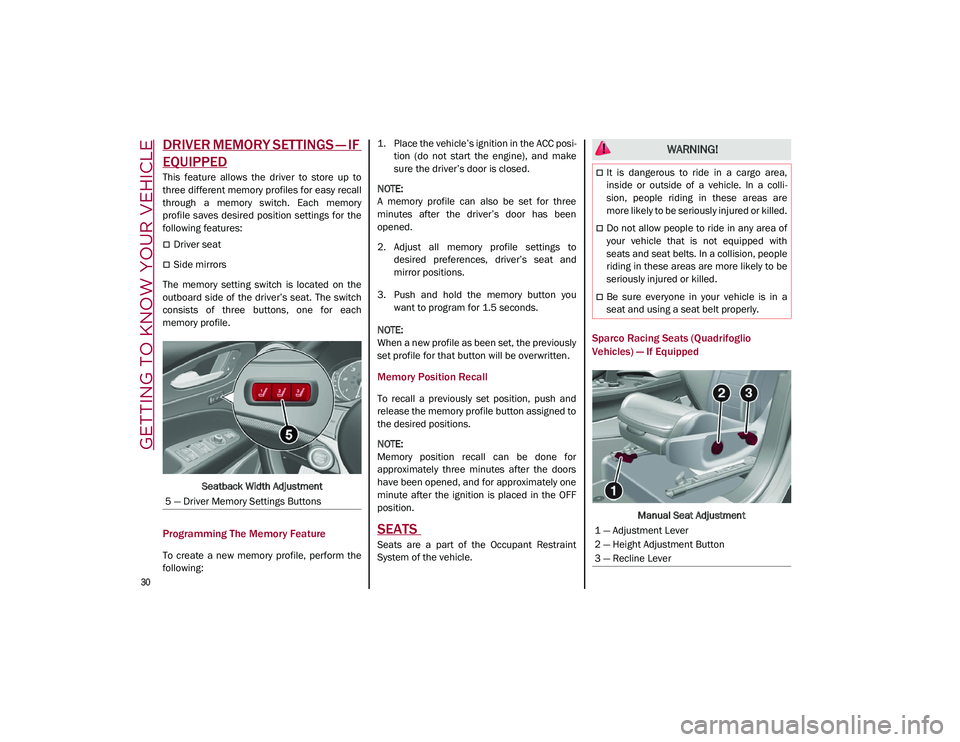
The memory setting switch is located on the
outboard side of the driver’s seat. The switch
consists of three buttons, one for each
memory profile.
Seatback Width Adjustment
Programming The Memory Feature
To create a new memory profile, perform the
following: 1. Place the vehicle’s ignition in the ACC posi
-
tion (do not start the engine), and make
sure the driver’s door is closed.
NOTE:
A memory profile can also be set for three
minutes after the driver’s door has been
opened.
2. Adjust all memory profile settings to desired preferences, driver’s seat and
mirror positions.
3. Push and hold the memory button you want to program for 1.5 seconds.
NOTE:
When a new profile as been set, the previously
set profile for that button will be overwritten.
Memory Position Recall
To recall a previously set position, push and
release the memory profile button assigned to
the desired positions.
NOTE:
Memory position recall can be done for
approximately three minutes after the doors
have been opened, and for approximately one
minute after the ignition is placed in the OFF
position.
SEATS
Seats are a part of the Occupant Restraint
System of the vehicle.
Sparco Racing Seats (Quadrifoglio
Vehicles) — If Equipped
Manual Seat Adjustment
5 — Driver Memory Settings Buttons
WARNING!
It is dangerous to ride in a cargo area,
inside or outside of a vehicle. In a colli
-
sion, people riding in these areas are
more likely to be seriously injured or killed.
Do not allow people to ride in any area of
your vehicle that is not equipped with
seats and seat belts. In a collision, people
riding in these areas are more likely to be
seriously injured or killed.
Be sure everyone in your vehicle is in a
seat and using a seat belt properly.
1 — Adjustment Lever
2 — Height Adjustment Button
3 — Recline Lever
21_GU_OM_EN_USC_t.book Page 30
Page 39 of 280
37
3. Push the adjustment button and therelease button at the side of the two
supports at the same time.
4. Pull upward on the head restraint to fully remove it.
To reinstall the head restraints, proceed as
follows:
1. Hold down both the adjustment button and release button while placing the head
restraint posts into the holes.
2. Then, reposition the head restraint to the appropriate height for the passengers.
3. Replace the seat back to the appropriate position for passengers.MIRRORS
Automatic Dimming Mirror
The rearview mirror can be adjusted up, down,
left, and right. The mirror should be adjusted
to center on the view through the rear window.
This mirror automatically adjusts for headlight
glare from vehicles behind you.
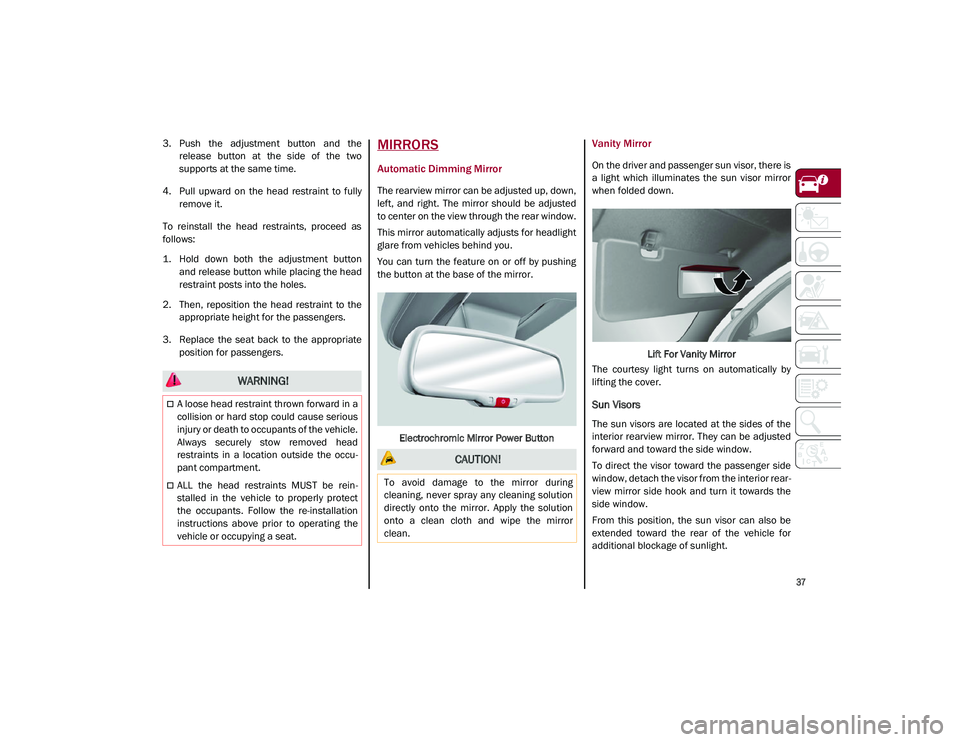
You can turn the feature on or off by pushing
the button at the base of the mirror.
Electrochromic Mirror Power Button
Vanity Mirror
On the driver and passenger sun visor, there is
a light which illuminates the sun visor mirror
when folded down. Lift For Vanity Mirror
The courtesy light turns on automatically by
lifting the cover.
Sun Visors
The sun visors are located at the sides of the
interior rearview mirror. They can be adjusted
forward and toward the side window.
To direct the visor toward the passenger side
window, detach the visor from the interior rear -
view mirror side hook and turn it towards the
side window.
From this position, the sun visor can also be
extended toward the rear of the vehicle for
additional blockage of sunlight.
WARNING!
A loose head restraint thrown forward in a
collision or hard stop could cause serious
injury or death to occupants of the vehicle.
Always securely stow removed head
restraints in a location outside the occu -
pant compartment.
ALL the head restraints MUST be rein -
stalled in the vehicle to properly protect
the occupants. Follow the re-installation
instructions above prior to operating the
vehicle or occupying a seat.
CAUTION!
To avoid damage to the mirror during
cleaning, never spray any cleaning solution
directly onto the mirror. Apply the solution
onto a clean cloth and wipe the mirror
clean.
21_GU_OM_EN_USC_t.book Page 37
Page 40 of 280
GETTING TO KNOW YOUR VEHICLE
38
There are courtesy mirrors with lights on the
back of the sun visors.Rotate Sun Visor Toward Passenger Window
NOTE:
A rear facing child restraint system should
never be fitted in the front passenger seat.
Always comply with the instructions on the sun
visor
Ú
page 178.
Outside Power Mirrors
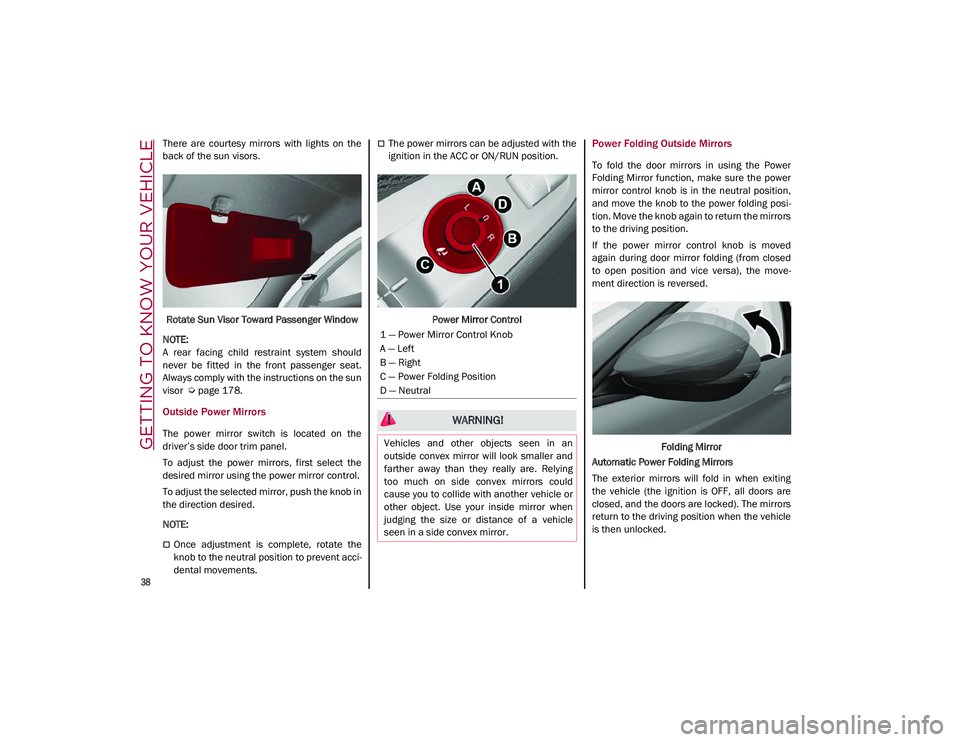
The power mirror switch is located on the
driver’s side door trim panel.
To adjust the power mirrors, first select the
desired mirror using the power mirror control.
To adjust the selected mirror, push the knob in
the direction desired.
NOTE:
Once adjustment is complete, rotate the
knob to the neutral position to prevent acci -
dental movements.
The power mirrors can be adjusted with the
ignition in the ACC or ON/RUN position.
Power Mirror ControlPower Folding Outside Mirrors
To fold the door mirrors in using the Power
Folding Mirror function, make sure the power
mirror control knob is in the neutral position,
and move the knob to the power folding posi -
tion. Move the knob again to return the mirrors
to the driving position.
If the power mirror control knob is moved
again during door mirror folding (from closed
to open position and vice versa), the move -
ment direction is reversed.
Folding Mirror
Automatic Power Folding Mirrors
The exterior mirrors will fold in when exiting
the vehicle (the ignition is OFF, all doors are
closed, and the doors are locked). The mirrors
return to the driving position when the vehicle
is then unlocked.
1 — Power Mirror Control Knob
A — Left
B — Right
C — Power Folding Position
D — Neutral
WARNING!
Vehicles and other objects seen in an
outside convex mirror will look smaller and
farther away than they really are. Relying
too much on side convex mirrors could
cause you to collide with another vehicle or
other object. Use your inside mirror when
judging the size or distance of a vehicle
seen in a side convex mirror.
21_GU_OM_EN_USC_t.book Page 38
Page 41 of 280
39
If the door mirrors were folded using the power
mirror control knob, they can only be returned
to the driving position by moving the knob to
the power folding position again.
NOTE:
The power folding operation can be enabled
only when the vehicle speed is lower than
31 mph (50 km/h).
Outside Automatic Dimming Mirrors — If
Equipped
The outside mirrors will automatically dim for
glare from vehicles behind you. This feature is
controlled by the inside automatic dimming
mirror. The mirrors will automatically adjust for
headlight glare when the inside mirror adjusts.
Heated Mirrors
Push the rear defrost button, located within
the climate controls, to activate the heated
mirrors.
UNIVERSAL GARAGE DOOR
OPENER (HOMELINK®)
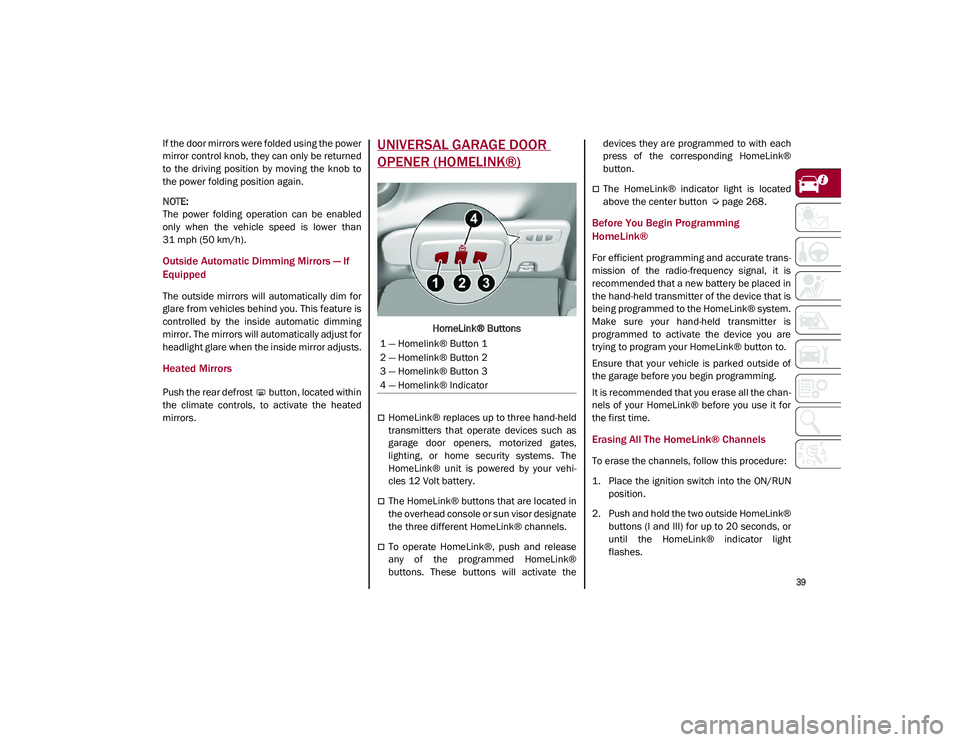
HomeLink® Buttons
HomeLink® replaces up to three hand-held
transmitters that operate devices such as
garage door openers, motorized gates,
lighting, or home security systems. The
HomeLink® unit is powered by your vehi-
cles 12 Volt battery.
The HomeLink® buttons that are located in
the overhead console or sun visor designate
the three different HomeLink® channels.
To operate HomeLink®, push and release
any of the programmed HomeLink®
buttons. These buttons will activate the devices they are programmed to with each
press of the corresponding HomeLink®
button.
The HomeLink® indicator light is located
above the center button
Ú
page 268.
Before You Begin Programming
HomeLink®
For efficient programming and accurate trans -
mission of the radio-frequency signal, it is
recommended that a new battery be placed in
the hand-held transmitter of the device that is
being programmed to the HomeLink® system.
Make sure your hand-held transmitter is
programmed to activate the device you are
trying to program your HomeLink® button to.
Ensure that your vehicle is parked outside of
the garage before you begin programming.
It is recommended that you erase all the chan -
nels of your HomeLink® before you use it for
the first time.
Erasing All The HomeLink® Channels
To erase the channels, follow this procedure:
1. Place the ignition switch into the ON/RUN position.
2. Push and hold the two outside HomeLink® buttons (I and III) for up to 20 seconds, or
until the HomeLink® indicator light
flashes.
1 — Homelink® Button 1
2 — Homelink® Button 2
3 — Homelink® Button 3
4 — Homelink® Indicator
21_GU_OM_EN_USC_t.book Page 39
Page 49 of 280
47
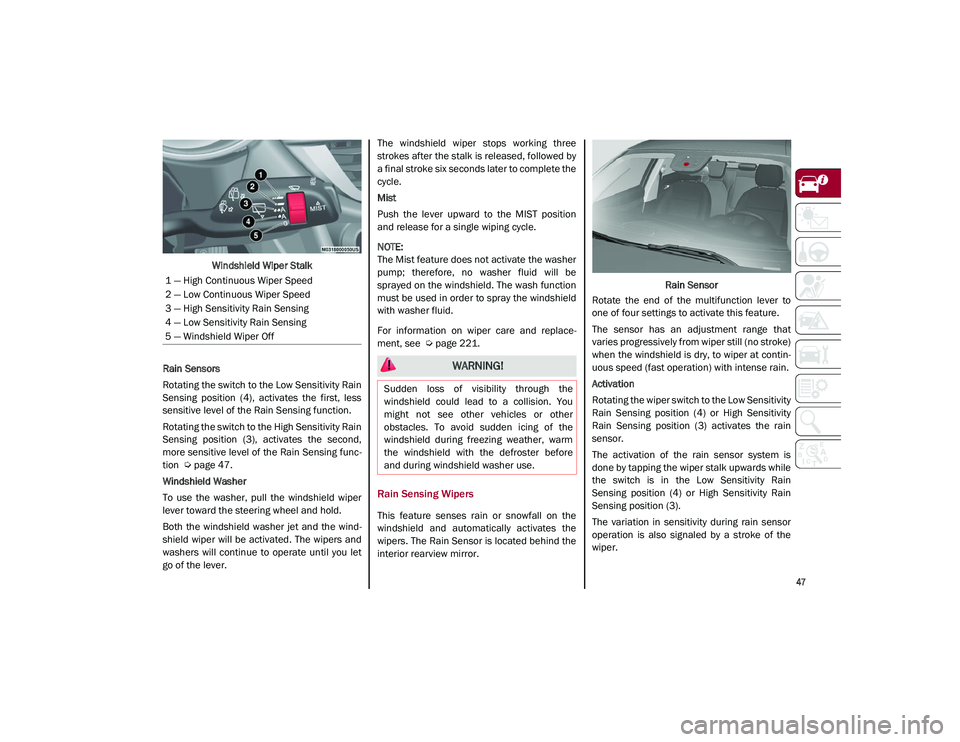
Windshield Wiper Stalk
Rain Sensors
Rotating the switch to the Low Sensitivity Rain
Sensing position (4), activates the first, less
sensitive level of the Rain Sensing function.
Rotating the switch to the High Sensitivity Rain
Sensing position (3), activates the second,
more sensitive level of the Rain Sensing func -
tion
Ú
page 47.
Windshield Washer
To use the washer, pull the windshield wiper
lever toward the steering wheel and hold.
Both the windshield washer jet and the wind -
shield wiper will be activated. The wipers and
washers will continue to operate until you let
go of the lever. The windshield wiper stops working three
strokes after the stalk is released, followed by
a final stroke six seconds later to complete the
cycle.
Mist
Push the lever upward to the MIST position
and release for a single wiping cycle.
NOTE:
The Mist feature does not activate the washer
pump; therefore, no washer fluid will be
sprayed on the windshield. The wash function
must be used in order to spray the windshield
with washer fluid.
For information on wiper care and replace
-
ment, see
Ú
page 221.
Rain Sensing Wipers
This feature senses rain or snowfall on the
windshield and automatically activates the
wipers. The Rain Sensor is located behind the
interior rearview mirror. Rain Sensor
Rotate the end of the multifunction lever to
one of four settings to activate this feature.
The sensor has an adjustment range that
varies progressively from wiper still (no stroke)
when the windshield is dry, to wiper at contin -
uous speed (fast operation) with intense rain.
Activation
Rotating the wiper switch to the Low Sensitivity
Rain Sensing position (4) or High Sensitivity
Rain Sensing position (3) activates the rain
sensor.
The activation of the rain sensor system is
done by tapping the wiper stalk upwards while
the switch is in the Low Sensitivity Rain
Sensing position (4) or High Sensitivity Rain
Sensing position (3).
The variation in sensitivity during rain sensor
operation is also signaled by a stroke of the
wiper.
1 — High Continuous Wiper Speed
2 — Low Continuous Wiper Speed
3 — High Sensitivity Rain Sensing
4 — Low Sensitivity Rain Sensing
5 — Windshield Wiper Off
WARNING!
Sudden loss of visibility through the
windshield could lead to a collision. You
might not see other vehicles or other
obstacles. To avoid sudden icing of the
windshield during freezing weather, warm
the windshield with the defroster before
and during windshield washer use.
21_GU_OM_EN_USC_t.book Page 47
Page 88 of 280
86
(Continued)
STARTING AND OPERATING
STARTING THE ENGINE
Before starting the engine, be sure to adjust
the seat, the interior rear view mirror, door
mirrors, and fasten the seat belt correctly.
Never press the accelerator pedal before
starting the engine.
If necessary, messages indicating the starting
procedure will be shown in the display.
Starting Procedure
Proceed as follows:
1. Apply the Electric Park Brake (EPB) andplace the gear selector in PARK (P) or
NEUTRAL (N).
2. Fully press the brake pedal without touching the accelerator.
3. Briefly push the ignition button.
4. If the engine doesn't start within a few seconds, you need to repeat the proce -
dure.
If the problem persists, contact an authorized
dealer.
Remote Starting System
This system uses the key fob to start the
engine conveniently from outside the vehicle
while still maintaining security. The system
has a range of at least 300 feet (91 meters).
The remote starting system also activates the
climate control, the heated seats (if
equipped), and the heated steering wheel (if
equipped), depending on temperatures
outside and inside of the vehicle.
NOTE:
Obstructions between the vehicle and key fob
may reduce this range.
WARNING!
When leaving the vehicle, always remove
the key fob from the vehicle and lock your
vehicle.
Never leave children alone in a vehicle, or
with access to an unlocked vehicle.
Allowing children to be in a vehicle unat -
tended is dangerous for a number of
reasons. A child or others could be seri -
ously or fatally injured. Children should be
warned not to touch the parking brake,
brake pedal or the transmission gear
selector.
Do not leave the key fob in or near the
vehicle, or in a location accessible to chil -
dren. A child could operate power
windows, other controls, or move the
vehicle.
Do not leave children or animals inside
parked vehicles in hot weather. Interior
heat build-up may cause serious injury or
death.
WARNING!
Never pour fuel or other flammable liquid
into the throttle body air inlet opening in
an attempt to start the vehicle. This could
result in flash fire causing serious
personal injury.
Do not attempt to push or tow your vehicle
to get it started. Vehicles equipped with an
automatic transmission cannot be started
this way. Unburned fuel could enter the
catalytic converter and once the engine
has started, ignite and damage the
converter and vehicle.
If the vehicle has a discharged battery,
booster cables may be used to obtain a
start from a booster battery or the battery
in another vehicle. This type of start can
be dangerous if done improperly
Ú
page 201.
CAUTION!
To prevent damage to the starter, do not
continuously crank the engine for more than
25 seconds at a time. Wait 60 seconds
before trying again.
WARNING! (Continued)
21_GU_OM_EN_USC_t.book Page 86
Page 113 of 280
111
Overtake Aid
When driving with ACC engaged and following
a vehicle at a speed greater than 45 mph
(70 km/h), the system will provide an addi-
tional acceleration up to the ACC set speed to
assist in passing the vehicle. This additional
acceleration is triggered when the driver
utilizes the left turn signal and will only be
active when passing on the left hand side.
The system detects the direction of traffic auto -
matically when the vehicle passes from left
hand traffic to right hand traffic. In this case,
the overtaking assist function is only active
when the reference vehicle is overtaken on the
right. The additional acceleration is deactivated
when the driver uses the right direction indi -
cator and returns to the original lane.
“Stop And Go” Function
The “Stop and Go” operating strategy allows
you to maintain a safe distance from the
vehicle ahead until the vehicle has completely
stopped.
In the event that the ACC system brings your
vehicle to a standstill while following the
vehicle in front, if the vehicle in front starts moving within two seconds of your vehicle
coming to a standstill, your vehicle will resume
motion without the need for any driver action.
If the vehicle in front does not start moving
within two seconds of your vehicle coming to a
standstill, the driver will have to push the RES/
SET switch upward to restart.
Deactivation
The system is deactivated and the set speed is
canceled if:
The on/off button is pushed (when the
system is on or paused).
The ignition is placed in the OFF position
RACE mode is activated (Quadrifoglio
models)
The system is canceled (the set speed and
distance are stored):
When the system is paused
Úpage 108
When the conditions shown in the “Activating
Adaptive Cruise Control (ACC)” section occur
Úpage 108
Limited Operation Warning
If the dedicated message is shown on the
display, a condition limiting the Adaptive
Cruise Control operation may have occurred.
This could be due to an obstruction of the
vehicle’s sensor or camera. It could also be
due to a fault in the system. If an obstruction
is detected, clean the area of the windshield
opposite the interior rearview mirror, where
the camera is located, as well as the area of
the front fascia/bumper where the sensor is
located. Then check that the message has
disappeared.
When the conditions limiting the system func -
tions end, normal operation will resume.
Should the fault persist, contact an authorized
dealer.
Precautions While Driving With ACC
In certain driving situations, ACC may have
detection issues. In these cases, ACC may
brake late or unexpectedly. The driver needs
to stay alert and may need to intervene. The
following are examples of these types of situa -
tions:
Towing A Trailer
Towing a trailer is not advised when using ACC.
Offset Driving
ACC may not detect a vehicle in the same lane
that is offset from your direct line of travel, or
a vehicle merging in from a side lane. There
may not be sufficient distance to the vehicle
The driver is fully responsible for holding a
safe distance from the vehicle ahead
respecting the highway code in force in
the respective country.
WARNING! (Continued)
WARNING!
When the ACC system is resumed, the
driver must ensure that there are no
pedestrians, vehicles or objects in the path
of the vehicle. Failure to follow these
warnings can result in a collision and death
or serious personal injury.
21_GU_OM_EN_USC_t.book Page 111