2021 ALFA ROMEO STELVIO homelink
[x] Cancel search: homelinkPage 10 of 280

8
DEAR CUSTOMER
READ THIS CAREFULLY
Refueling..................................................... 2
Starting The Engine .................................... 2
Parking On Flammable Material ............... 2
Respecting The Environment .................... 2
Electrical Accessories ................................ 2
Scheduled Servicing .................................. 2
Rollover Warning ........................................ 3
VEHICLE CHANGES / ALTERATIONS
Accessories Purchased By The Owner ...... 4
Installing Electrical/Electronic Devices .... 4
Radio Transmitters And Mobile Phones ... 5
GETTING TO KNOW YOUR VEHICLE
KEYS..........................................................18
Key Fob................................................... 18
ENGINE IMMOBILIZER SYSTEM ..............20
IGNITION SWITCH ...................................20
Keyless Push Button Ignition ................ 20
REMOTE START — IF EQUIPPED .............22
How To Use Remote Start ..................... 22
To Exit Remote Start Mode ................... 22
Remote Start Comfort Systems —
If Equipped ............................................. 23
VEHICLE SECURITY SYSTEM —
IF EQUIPPED............................................. 23
To Arm The System................................ 23
To Disarm The System .......................... 23
Volumetric/Anti-Lift Protection —
If Equipped ............................................. 24
DOORS ...................................................... 24
Power Door Locks.................................. 24
Locking The Doors With A Depleted
Battery .................................................... 25 Passive Entry System ........................... 25
Power Lock Safety Device..................... 27
Automatic Door Locks — If Equipped .. 27
Child-Protection Door Lock System — Rear
Doors ...................................................... 27
STEERING WHEEL.................................... 28
Manual Tilt/Telescoping Steering
Column ................................................. 28 Heated Steering Wheel —
If Equipped ............................................ 29
DRIVER MEMORY SETTINGS —
IF EQUIPPED............................................. 30
Programming The Memory Feature ..... 30
Memory Position Recall ........................ 30
SEATS ...................................................... 30
Sparco Racing Seats (Quadrifoglio
Vehicles) — If Equipped ......................... 30 Split Folding Rear Seat ......................... 31
Power Adjustment (Front Seats)........... 33
Heated Seats — If Equipped ................ 34
Head Restraints .................................. 35
MIRRORS ..................................................37
Automatic Dimming Mirror ....................37
Vanity Mirror ...........................................37
Outside Power Mirrors .........................38
Power Folding Outside Mirrors ..............38
Outside Automatic Dimming Mirrors —
If Equipped .............................................39 Heated Mirrors .....................................39
UNIVERSAL GARAGE DOOR OPENER
(HOMELINK®) ..........................................39
Before You Begin Programming
HomeLink® ............................................39 Erasing All The HomeLink®
Channels ................................................. 39 Identifying Whether You Have A Rolling
Code Or Non-Rolling Code Device .........40 Programming HomeLink® To A
Garage Door Opener ..............................40 Programming HomeLink® To A
Miscellaneous Device ............................ 41 Reprogramming A Single HomeLink®
Button .....................................................41 Canadian/Gate Operator
Programming .......................................... 41
EXTERIOR LIGHTS ....................................42
Headlight Switch ..................................42
Daytime Running Lights (DRLs) .........42
High Beam Headlights ..........................43
Automatic Headlights ...........................43
Flash-To-Pass .........................................43
21_GU_OM_EN_USC_t.book Page 8
Page 41 of 280
39
If the door mirrors were folded using the power
mirror control knob, they can only be returned
to the driving position by moving the knob to
the power folding position again.
NOTE:
The power folding operation can be enabled
only when the vehicle speed is lower than
31 mph (50 km/h).
Outside Automatic Dimming Mirrors — If
Equipped
The outside mirrors will automatically dim for
glare from vehicles behind you. This feature is
controlled by the inside automatic dimming
mirror. The mirrors will automatically adjust for
headlight glare when the inside mirror adjusts.
Heated Mirrors
Push the rear defrost button, located within
the climate controls, to activate the heated
mirrors.
UNIVERSAL GARAGE DOOR
OPENER (HOMELINK®)
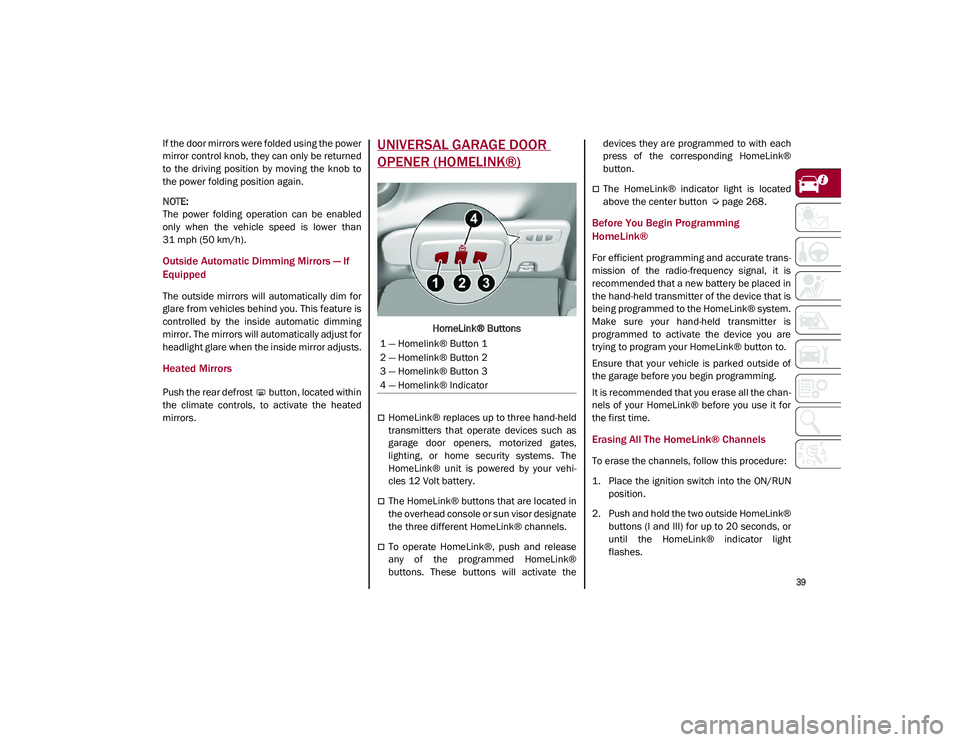
HomeLink® Buttons
HomeLink® replaces up to three hand-held
transmitters that operate devices such as
garage door openers, motorized gates,
lighting, or home security systems. The
HomeLink® unit is powered by your vehi-
cles 12 Volt battery.
The HomeLink® buttons that are located in
the overhead console or sun visor designate
the three different HomeLink® channels.
To operate HomeLink®, push and release
any of the programmed HomeLink®
buttons. These buttons will activate the devices they are programmed to with each
press of the corresponding HomeLink®
button.
The HomeLink® indicator light is located
above the center button
Ú
page 268.
Before You Begin Programming
HomeLink®
For efficient programming and accurate trans -
mission of the radio-frequency signal, it is
recommended that a new battery be placed in
the hand-held transmitter of the device that is
being programmed to the HomeLink® system.
Make sure your hand-held transmitter is
programmed to activate the device you are
trying to program your HomeLink® button to.
Ensure that your vehicle is parked outside of
the garage before you begin programming.
It is recommended that you erase all the chan -
nels of your HomeLink® before you use it for
the first time.
Erasing All The HomeLink® Channels
To erase the channels, follow this procedure:
1. Place the ignition switch into the ON/RUN position.
2. Push and hold the two outside HomeLink® buttons (I and III) for up to 20 seconds, or
until the HomeLink® indicator light
flashes.
1 — Homelink® Button 1
2 — Homelink® Button 2
3 — Homelink® Button 3
4 — Homelink® Indicator
21_GU_OM_EN_USC_t.book Page 39
Page 42 of 280
GETTING TO KNOW YOUR VEHICLE
40
NOTE:
Erasing all channels should only be performed
when programming HomeLink® for the first
time. Do not erase channels when program-
ming additional buttons.
Identifying Whether You Have A Rolling
Code Or Non-Rolling Code Device
Before programming a device to one of your
HomeLink® buttons, you must determine
whether the device has a rolling code or
non-rolling code.
Rolling Code Devices
To determine if your device has a rolling code,
a good indicator is its manufacturing date.
Typically, devices manufactured after 1995
have rolling codes. A device with a rolling code
will also have a “LEARN” or “TRAIN” button
located where the antenna is attached to the
device. The button may not be immediately
visible when looking at the device. The name
and color of the button may vary slightly by
manufacturer.
NOTE:
The “LEARN” or “TRAIN” button is not the
button you normally use to operate the device.
Non-rolling Code Devices
Most devices manufactured before 1995 will
not have a rolling code. These devices will also
not have a “LEARN” or “TRAIN” button.
Programming HomeLink® To A Garage
Door Opener
To program any of the HomeLink® buttons to
activate your garage door opener motor, follow
the steps below:
NOTE:
All HomeLink® buttons are programmed using
this procedure. You do not need to erase all
channels when programming additional
buttons.
1. Place the ignition switch into the ON/RUN position.
2. Place the garage door opener transmitter 1 to 3 inches (3 to 8 cm) away from the
HomeLink® button you wish to program,
while keeping the HomeLink® indicator
light in view.
3. Push and hold the HomeLink® button you want to program while you push and hold
the garage door opener transmitter button
you are trying to replicate.
4. Continue to hold both buttons and observe the HomeLink® indicator light. The Home -
Link® indicator light will flash slowly and
then rapidly. Once this happens, release
both buttons.
NOTE:
Make sure the garage door opener motor is
plugged in before moving on to the rolling
code/non-rolling code final steps. Rolling Code Garage Door Opener Final Steps
NOTE:
You have 30 seconds in which to initiate rolling
code final step 2, after completing rolling code
final step 1.
1. At the garage door opener motor (in the
garage), locate the “LEARN” or “TRAIN”
button. This can usually be found where
the hanging antenna wire is attached to
the garage door opener motor. Firmly push
and release the “LEARN” or “TRAIN”
button.
2. Return to the vehicle and push the programmed HomeLink® button three
times (holding the button for two seconds
each time). If the garage door opener
motor operates, programming is complete.
3. Push the programmed HomeLink® button to confirm that the garage door opener
motor operates. If the garage door opener
motor does not operate, repeat the final
steps for the rolling code procedure.
Non-Rolling Code Garage Door Opener Final
Steps
1. Push and hold the programmed Home -
Link® button and observe the HomeLink®
indicator light. If the HomeLink® indicator
light stays on constantly, programming is
complete.
21_GU_OM_EN_USC_t.book Page 40
Page 43 of 280
41
2. Push the programmed HomeLink® buttonto confirm that the garage door opener
motor operates. If the garage door opener
motor does not operate, repeat the steps
from the beginning.
Programming HomeLink® To A
Miscellaneous Device
Follow the procedure on programming Home -
Link® to a garage door opener
Ú
page 40. Be
sure to determine if the device has a rolling
code, or non-rolling code before beginning the
programming process.
NOTE:
Canadian radio frequency laws require trans -
mitter signals to time-out (or quit) after several
seconds of transmission, which may not be
long enough for HomeLink® to pick up the signal during programming. Similar to this
Canadian law, some U.S. gate operators are
designed to time-out in the same manner. The
procedure may need to be performed multiple
times to successfully pair the device to your
HomeLink® buttons.
Reprogramming A Single HomeLink®
Button
To reprogram a single HomeLink® button that
has been previously trained, without erasing
all the channels, follow the procedure below.
Be sure to determine whether the new device
you want to program the HomeLink® button to
has a Rolling Code, or Non-rolling Code.
1. Place the ignition in the ON/RUN position,
without starting the engine.
2. Push and hold the desired HomeLink® button until the HomeLink® indicator light
begins to flash after 20 seconds. Do not
release the button.
3. Without releasing the button , proceed with
Step 2 in “Programming HomeLink® To A
Garage Door Opener” and follow all
remaining steps.
Canadian/Gate Operator Programming
The programming of transmitters in Canada/
United States require the transmitter signals
to “time-out” after several seconds of trans -
mission. Canadian radio frequency laws require trans
-
mitter signals to time-out (or quit) after several
seconds of transmission – which may not be
long enough for HomeLink® to pick up the
signal during programming. Similar to this
Canadian law, some U.S. gate operators are
designed to time-out in the same manner.
It may be helpful to unplug the device during
the cycling process to prevent possible over -
heating of the garage door or gate motor.
1. Place the ignition in the ON/RUN position.
2. Place the hand-held transmitter 1 to 3 inches (3 to 8 cm) away from the Home -
Link® button you wish to program while
keeping the HomeLink® indicator light in
view.
3. Continue to press and hold the Home -
Link® button, while you press and release
(cycle) your hand-held transmitter every
two seconds until HomeLink® has
successfully accepted the frequency
signal. The indicator light will flash slowly
and then rapidly when fully trained.
4. Watch for the HomeLink® indicator to change flash rates. When it changes, it is
programmed. It may take up to 30 seconds
or longer in rare cases. The garage door
may open and close while you are
programming.
5. Press and hold the programmed Home -
Link® button and observe the indicator
light.
WARNING!
Your motorized door or gate will open and
close while you are programming the
universal transceiver. Do not program the
transceiver if people or pets are in the
path of the door or gate.
Do not run your vehicle in a closed garage or
confined area while programming the transceiver.
Exhaust gas from your vehicle contains Carbon
Monoxide (CO) which is odorless and colorless.
Carbon Monoxide is poisonous when inhaled and
can cause you and others to be severely injured or
killed.
21_GU_OM_EN_USC_t.book Page 41
Page 44 of 280
GETTING TO KNOW YOUR VEHICLE
42
NOTE:
If the indicator light stays on constantly,
programming is complete and the garage
door/device should activate when the
HomeLink® button is pressed.
To program the two remaining HomeLink®
buttons, repeat each step for each
remaining button. DO NOT erase the chan-
nels.
If you unplugged the garage door opener/
device for programming, plug it back in at this
time.
Reprogramming A Single HomeLink® Button
(Canadian/Gate Operator)
To reprogram a channel that has been previ -
ously trained, follow these steps:
1. Place the ignition to the ON/RUN position.
2. Press and hold the desired HomeLink® button until the indicator light begins to
flash after 20 seconds. Do not release the
button.
3. Without releasing the button, proceed with “Canadian/Gate Operator Programming”
step 2 and follow all remaining steps.
EXTERIOR LIGHTS
Headlight Switch
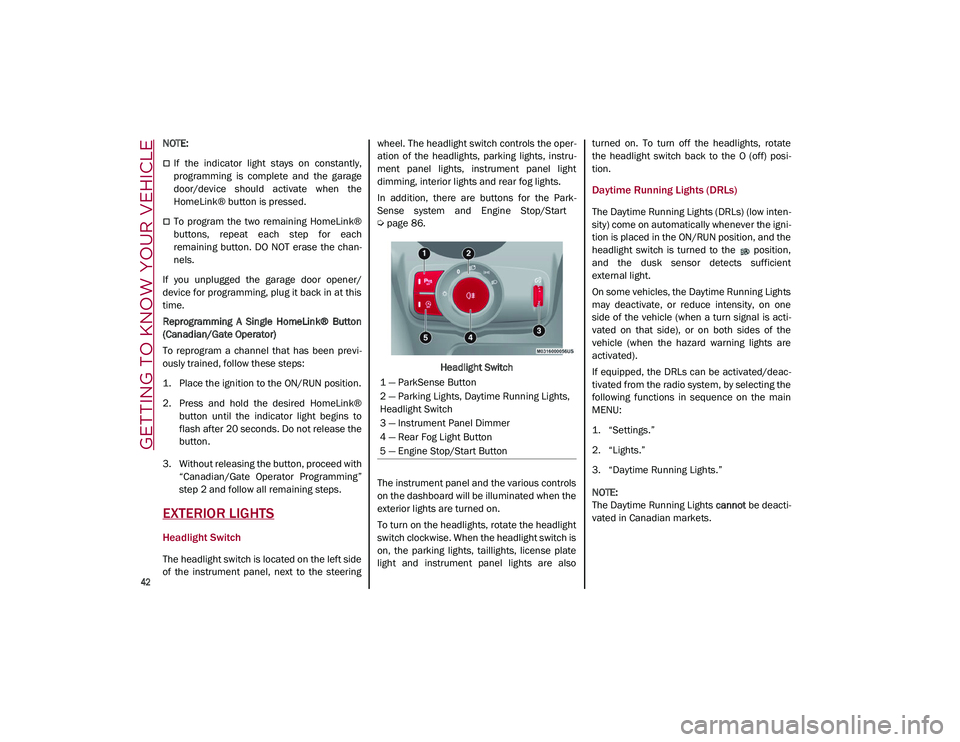
The headlight switch is located on the left side
of the instrument panel, next to the steering wheel. The headlight switch controls the oper
-
ation of the headlights, parking lights, instru -
ment panel lights, instrument panel light
dimming, interior lights and rear fog lights.
In addition, there are buttons for the Park -
Sense system and Engine Stop/Start
Ú
page 86.
Headlight Switch
The instrument panel and the various controls
on the dashboard will be illuminated when the
exterior lights are turned on.
To turn on the headlights, rotate the headlight
switch clockwise. When the headlight switch is
on, the parking lights, taillights, license plate
light and instrument panel lights are also turned on. To turn off the headlights, rotate
the headlight switch back to the O (off) posi
-
tion.
Daytime Running Lights (DRLs)
The Daytime Running Lights (DRLs) (low inten -
sity) come on automatically whenever the igni -
tion is placed in the ON/RUN position, and the
headlight switch is turned to the position,
and the dusk sensor detects sufficient
external light.
On some vehicles, the Daytime Running Lights
may deactivate, or reduce intensity, on one
side of the vehicle (when a turn signal is acti -
vated on that side), or on both sides of the
vehicle (when the hazard warning lights are
activated).
If equipped, the DRLs can be activated/deac -
tivated from the radio system, by selecting the
following functions in sequence on the main
MENU:
1. “Settings.”
2. “Lights.”
3. “Daytime Running Lights.”
NOTE:
The Daytime Running Lights cannot be deacti -
vated in Canadian markets.
1 — ParkSense Button
2 — Parking Lights, Daytime Running Lights,
Headlight Switch
3 — Instrument Panel Dimmer
4 — Rear Fog Light Button
5 — Engine Stop/Start Button
21_GU_OM_EN_USC_t.book Page 42
Page 272 of 280
270
INDEX
Door Opener, Garage ................................... 39
Doors............................................................. 24
Drive Train Control (DTC) System ..............146
Driving Modes .............................................. 98
Dynamic Steering Torque (DST) System ... 146
E
Electric Park Brake....................................... 90
Electric Remote Mirrors ............................... 38
Electronic Speed Control (Cruise
Control) .......................................................104
Electronic Stability Control (ESC)
System ........................................................146
Electronic Throttle Control Warning Light... 79
Emergency In Case Of ......................................192, 198
SOS Emergency Call .............................. 192
Emergency, In Case Of Jump Starting .........................................201
Overheating ............................................ 204
Towing.....................................................206
Emission Control System Maintenance...... 85
Engine ......................................................... 254 Block Heater............................................. 89
Engine Coolant Level .............................216
Exhaust Gas Caution ....................190, 191
Fuel Requirements ................................ 260Oil ............................................................262
Oil Selection ...........................................262
Overheating ............................................ 204
Starting ................................................... 204
Engine Compartment .................................214
Engine Compartment (Washing) ...............250
Engine Oil Level Check ............................................ 215 Enhanced Accident Response
Feature .............................................. 175, 207
Ethanol ....................................................... 260
Exhaust Gas Cautions ...................... 190, 191
Exhaust System ......................................... 190
Exterior Lighting .....................................42, 43
Exterior Lights ..................................... 42, 190
F
Flashers Hazard Warning ..................................... 192
Turn Signals ..............................44, 78, 190
Fluid Capacities ......................................... 262
Fluid Leaks ................................................. 190
Fluids And Lubricants ................................ 263
Fog Lights, Rear ........................................... 44
Forward Collision Warning ........................ 156
Fuel Additives................................................. 261
Clean Air ................................................. 260
Ethanol ................................................... 260
Light .......................................................... 80
Materials Added .................................... 261
Methanol ................................................ 260
Tank Capacity ........................................ 262
G
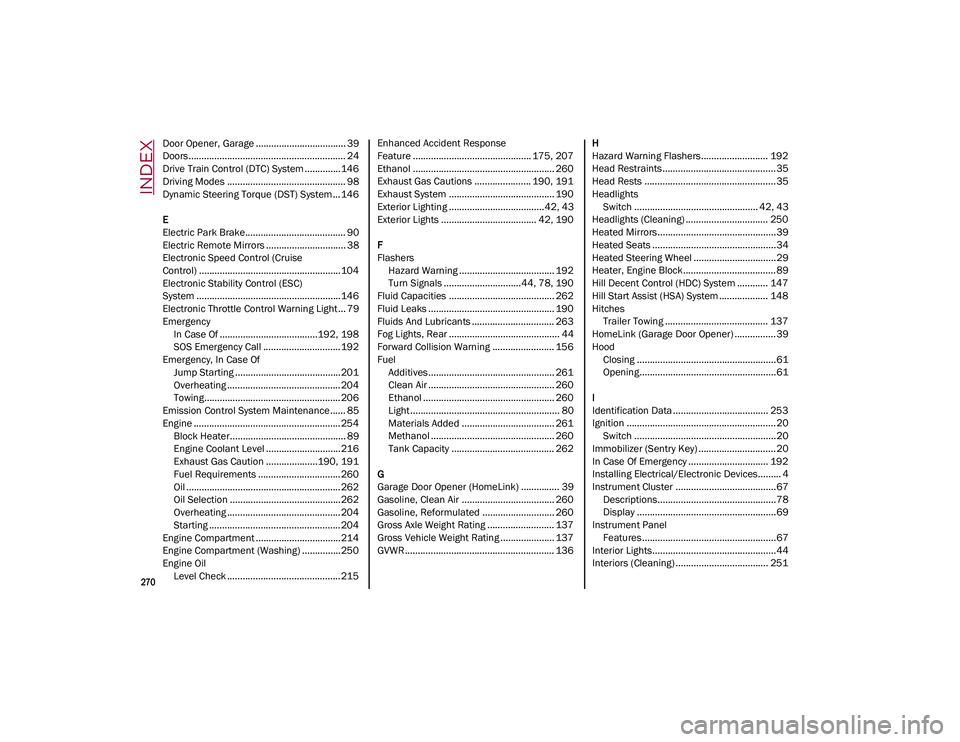
Garage Door Opener (HomeLink) ............... 39
Gasoline, Clean Air .................................... 260
Gasoline, Reformulated ............................ 260
Gross Axle Weight Rating .......................... 137
Gross Vehicle Weight Rating ..................... 137
GVWR .......................................................... 136 H
Hazard Warning Flashers.......................... 192
Head Restraints............................................35
Head Rests ...................................................35
Headlights
Switch ................................................ 42, 43
Headlights (Cleaning) ................................ 250
Heated Mirrors..............................................39
Heated Seats ................................................34
Heated Steering Wheel ................................29
Heater, Engine Block.................................... 89
Hill Decent Control (HDC) System ............ 147
Hill Start Assist (HSA) System ................... 148
Hitches Trailer Towing ........................................ 137
HomeLink (Garage Door Opener) ................39
Hood Closing ......................................................61Opening.....................................................61
I
Identification Data ..................................... 253
Ignition ..........................................................20 Switch .......................................................20
Immobilizer (Sentry Key) ..............................20
In Case Of Emergency ............................... 192
Installing Electrical/Electronic Devices......... 4
Instrument Cluster .......................................67 Descriptions..............................................78
Display ......................................................69
Instrument Panel Features....................................................67
Interior Lights................................................44
Interiors (Cleaning) .................................... 251
21_GU_OM_EN_USC_t.book Page 270
Page 273 of 280
271
J
Jump Starting ............................................. 201
K
Keyless Enter-N-Go ...................................... 25Passive Entry ............................................ 25
Keys .............................................................. 18
L
Lane Change And Turn Signals ................... 44
LaneSense ..................................................126
Lap/Shoulder Belts ....................................164
Latches .......................................................190
Leaks, Fluid ................................................190
Life Of Tires.................................................243
Liftgate .......................................................... 62
Light Bulbs ..................................................190 Types Of Bulbs ....................................... 230
Lights .......................................................... 190 Air Bag ...........................................169, 189
Automatic Headlights .............................. 43
Brake Warning .................................. 74, 75Courtesy/Reading ............................. 45, 46Daytime Running ..................................... 42
Electronic Stability Program(ESP) Indicator ............................................... 79
Exterior ................................................... 190
Fog ............................................................ 44
Headlight Switch ............................... 42, 43 Headlights ......................................... 42, 43
High Beam ................................................ 43
Instrument Cluster ............................ 42, 43Intensity Control ....................................... 46
Interior ............................................... 45, 46
Low Fuel ................................................... 80 Malfunction Indicator (Check Engine).... 77
Map .......................................................... 45
Park ....................................................44, 78
Reading .................................................... 45
Seat Belt Reminder ................................. 75
Turn Signals ..............................44, 78, 190
Warning Instrument Cluster
Descriptions ...................................78, 79
Loading Vehicle .......................................... 135 Tires ........................................................ 237
Locks Automatic Door ........................................ 27
Child Protection ....................................... 27
M
Maintenance ................................................ 61
Malfunction Indicator Light
(Check Engine) .......................................77, 85
Manual Service.................................................... 268
Memory Feature (Memory Seats) ............... 30
Memory Seat ................................................ 30
Methanol .................................................... 260
Mirrors .......................................................... 37 Automatic Dimming ................................. 37
Electric Powered ...................................... 38
Electric Remote ....................................... 38
Heated...................................................... 39
O
Occupant Restraints .................................. 163
Oil Pressure Light ......................................... 79
Oil, Engine Capacity.................................................. 262
Pressure Warning Light ........................... 79 Recommendation.................................. 262
Viscosity ................................................. 262
Opener, Garage Door (Homelink) ................39
Operator Manual Owner's Manual..................................... 268
Outlet Power ........................................................ 56
Overheating, Engine .................................. 204
P
Paintwork (Cleaning And Maintenance) .. 250
Panic Brake Assist (PBA) System ............. 149
Park Assist ................................................. 123
ParkSense System .................................... 123
Passive Entry ................................................25
Pets ............................................................ 189
Placard, Tire And Loading Information .... 237
Power Mirrors.......................................................38Outlet (Auxiliary Electrical Outlet)............56
Seats .........................................................33
Sunroof .....................................................59
Power Seats Forward .............................................. 31, 33
Rearward ........................................... 31, 33
Recline ............................................... 31, 33
Power Supply ............................................. 255
Pregnant Women And Seat Belts ............. 167
Pretensioners Seat Belts .............................................. 167
Prolonged Vehicle Inactivity ...................... 249
R
Radial Ply Tires .......................................... 242
Radio Transmitters And Mobile Phones ....... 5
21_GU_OM_EN_USC_t.book Page 271