2021 ALFA ROMEO STELVIO tow bar
[x] Cancel search: tow barPage 62 of 280
GETTING TO KNOW YOUR VEHICLE
60
The sunroof has three preset positions:
Fully closed
Comfort (intermediate opening)
Fully open
NOTE:
You cannot have the sunshade closed when
the sunroof is open.
Opening And Closing The Sunroof
To open the sunroof’s front panel, push the
open/close button toward the rear of the
vehicle to open to the comfort position (half
way). Pushing the button a second time will
open to the fully open position.
To close the sunroof, push the open/close
button toward the front of the vehicle. The roof
will close completely.
The automatic motion can be interrupted in
any position by pushing the open/close button
again.
Venting Sunroof
To bring the roof into vent position, push and
release the vent button.
This type of vent opening can be activated
regardless of the position of the sunroof.
When starting with the roof in the closed posi -
tion, pushing the vent button automatically
causes the sunroof to open to the vent posi -
tion. If the roof is already open, the button
must be held until the roof reaches the
vent-opening position.
Pushing the vent button again during auto -
matic movement of the roof will stop it.
Sunshade Operation
The sunshade is power operated.
Push the Power Shade open/close button
toward the rear of the vehicle to open the sun
shade.
Push the Power Shade open/close button
toward the front of the vehicle to close the sun
shade.
The automatic motion can be interrupted in
any position by pushing the Power Shade
open/close button again.
Pinch Protect Feature
The sunroof has an anti-pinch safety system
capable of detecting the presence of an
obstacle during the closing movement. If an
obstacle is detected, the system intervenes
and the movement of the sunroof is immedi -
ately reversed.
Re-Initialization Procedure
Automatic operation of the sunroof must be
re-initialized in case of faulty sunroof opera -
tion. It may also be necessary to initialize the
sunroof after the vehicle’s battery has been
disconnected and then reconnected.
NOTE:
The anti-pinch safety device is deactivated
during the re-initialization procedure.
WARNING!
Never leave children unattended in a
vehicle, or with access to an unlocked
vehicle. Never leave the key fob in or near
the vehicle, or in a location accessible to chil -
dren. Do not leave the ignition of a vehicle
equipped with keyless ignition in the ON/
RUN mode. Occupants, particularly unat -
tended children, can become entrapped by
the power sunroof while operating the power
sunroof switch. Such entrapment may result
in serious injury or death.
In a collision, there is a greater risk of
being thrown from a vehicle with an open
sunroof. You could also be seriously
injured or killed. Always fasten your seat
belt properly and make sure all passen -
gers are also properly secured.
Do not allow small children to operate the
sunroof. Never allow your fingers, other
body parts, or any object, to project
through the sunroof opening. Injury may
result.
CAUTION!
Do not open the sun roof if a roof rack or
crossbars are fitted. Do not open the sun
roof if there is snow or ice on it: you may
damage it.
21_GU_OM_EN_USC_t.book Page 60
Page 139 of 280
137
Common Towing Definitions
The following trailer towing related definitions
will assist you in understanding the following
information:
Gross Vehicle Weight Rating (GVWR)
The GVWR is the total allowable weight of your
vehicle. This includes driver, passengers,
cargo and tongue weight. The total load must
be limited so that you do not exceed the GVWR
Ú
page 135.
Gross Trailer Weight (GTW)
The GTW is the weight of the trailer plus the
weight of all cargo, consumables, and equip -
ment (permanent or temporary) loaded in or
on the trailer in its "loaded and ready for oper -
ation" condition.
The recommended way to measure GTW is to
put your fully loaded trailer on a vehicle scale.
The entire weight of the trailer must be
supported by the scale.
Gross Combination Weight Rating (GCWR)
The GCWR is the total allowable weight of your
vehicle and trailer when weighed in combination.
Gross Axle Weight Rating (GAWR)
The GAWR is the maximum capacity of the
front and rear axles. Distribute the load over
the front and rear axles evenly. Make sure that
you do not exceed either front or rear GAWR
Ú
page 135.
Tongue Weight (TW)
The tongue weight is the downward force
exerted on the hitch ball by the trailer. You
must consider this as part of the load on your
vehicle.
Trailer Frontal Area
The frontal area is the maximum height multi -
plied by the maximum width of the front of a
trailer.
Weight-Carrying Hitch
A weight-carrying hitch supports the trailer
tongue weight, just as if it were luggage
located at a hitch ball or some other
connecting point of the vehicle. These kinds of
hitches are the most popular on the market
today and they are commonly used to tow
small and medium sized trailers.
Weight-Distributing Hitch
A weight-distributing system works by applying
leverage through spring (load) bars. They are
typically used for heavier loads to distribute
trailer tongue weight to the tow vehicle's front axle and the trailer axle(s). When used in
accordance with the manufacturer's direc
-
tions, it provides for a more level ride, offering
more consistent steering and brake control
thereby enhancing towing safety. The addition
of a friction/hydraulic sway control also
dampens sway caused by traffic and cross -
winds and contributes positively to tow vehicle
and trailer stability. Trailer Sway Control and a
weight distributing (load equalizing) hitch are
recommended for heavier Tongue Weights
(TW) and may be required depending on
vehicle and trailer configuration/loading to
comply with Gross Axle Weight Rating (GAWR)
requirements.
Trailer Hitch Classification
The following chart provides the industry stan -
dard for the maximum trailer weight a given
trailer hitch class can tow and should be used
to assist you in selecting the correct trailer
hitch for your intended towing condition.
WARNING!
It is important that you do not exceed the
maximum front or rear GAWR. A dangerous
driving condition can result if either rating is
exceeded. You could lose control of the
vehicle and have a collision.
WARNING!
An improperly adjusted Weight Distrib -
uting Hitch system may reduce handling,
stability, braking performance, and could
result in a collision.
Weight Distributing Systems may not be
compatible with Surge Brake Couplers.
Consult with the hitch and trailer manu -
facturer or a reputable Recreational
Vehicle dealer for additional information.
21_GU_OM_EN_USC_t.book Page 137
Page 152 of 280
SAFETY
150
For the operation of the DAA, LDW, LKA, HAS,
TJA, ACC, ISC, or TSR systems, see
Ú
page 86.
NOTE:
When driving on two-way roads where there is
no lane dividing center line (e.g. on unpaved
roads), the use of the ABSA, HAS, TJA, and LKA
systems is strongly discouraged as the system
could detect the entire road as single-lane
dividing lines.
NOTE:
The driving assistance systems are designed
to aid in driving the car. The driver must always
maintain a sufficient level of attention to the
traffic and road conditions and control the
trajectory of the car.
Blind Spot Monitoring (BSM) System — If
Equipped
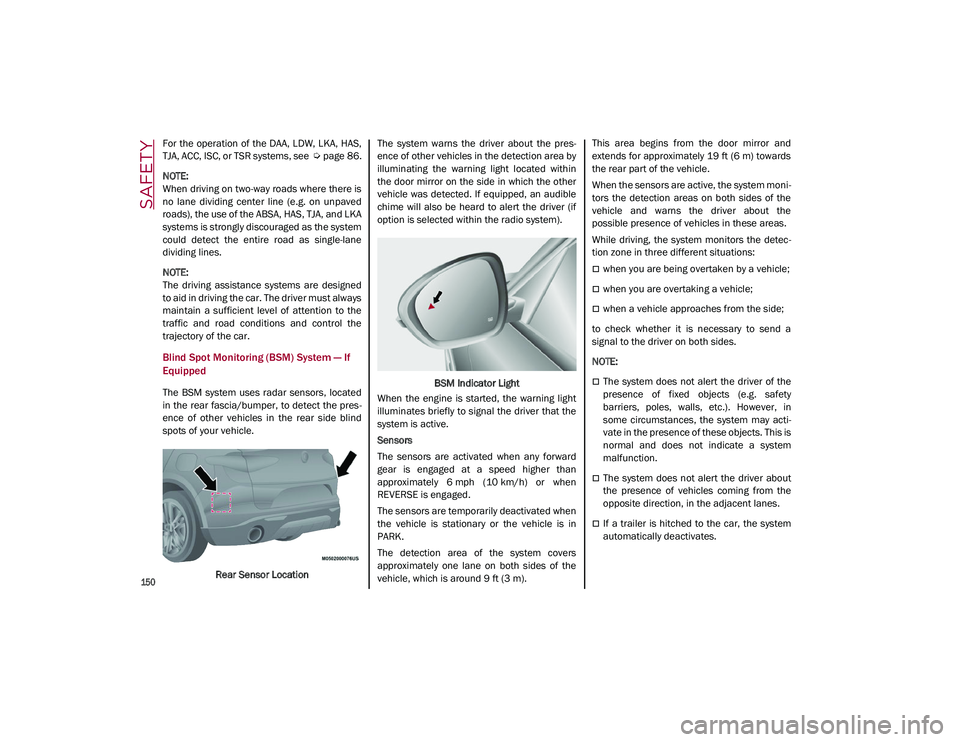
The BSM system uses radar sensors, located
in the rear fascia/bumper, to detect the pres -
ence of other vehicles in the rear side blind
spots of your vehicle.
Rear Sensor Location The system warns the driver about the pres
-
ence of other vehicles in the detection area by
illuminating the warning light located within
the door mirror on the side in which the other
vehicle was detected. If equipped, an audible
chime will also be heard to alert the driver (if
option is selected within the radio system).
BSM Indicator Light
When the engine is started, the warning light
illuminates briefly to signal the driver that the
system is active.
Sensors
The sensors are activated when any forward
gear is engaged at a speed higher than
approximately 6 mph (10 km/h) or when
REVERSE is engaged.
The sensors are temporarily deactivated when
the vehicle is stationary or the vehicle is in
PARK.
The detection area of the system covers
approximately one lane on both sides of the
vehicle, which is around 9 ft (3 m). This area begins from the door mirror and
extends for approximately 19 ft (6 m) towards
the rear part of the vehicle.
When the sensors are active, the system moni
-
tors the detection areas on both sides of the
vehicle and warns the driver about the
possible presence of vehicles in these areas.
While driving, the system monitors the detec -
tion zone in three different situations:
when you are being overtaken by a vehicle;
when you are overtaking a vehicle;
when a vehicle approaches from the side;
to check whether it is necessary to send a
signal to the driver on both sides.
NOTE:
The system does not alert the driver of the
presence of fixed objects (e.g. safety
barriers, poles, walls, etc.). However, in
some circumstances, the system may acti -
vate in the presence of these objects. This is
normal and does not indicate a system
malfunction.
The system does not alert the driver about
the presence of vehicles coming from the
opposite direction, in the adjacent lanes.
If a trailer is hitched to the car, the system
automatically deactivates.
21_GU_OM_EN_USC_t.book Page 150
Page 155 of 280
153
The sensors are activated when any forward
gear is engaged at a speed higher than about
6 mph (10 km/h), or when REVERSE (R) is
engaged.
The sensors are temporarily deactivated when
the car is stationary and in PARK (P).
The detection area of the system covers about
a lane on both sides of the car around 10 ft
(3 meters).
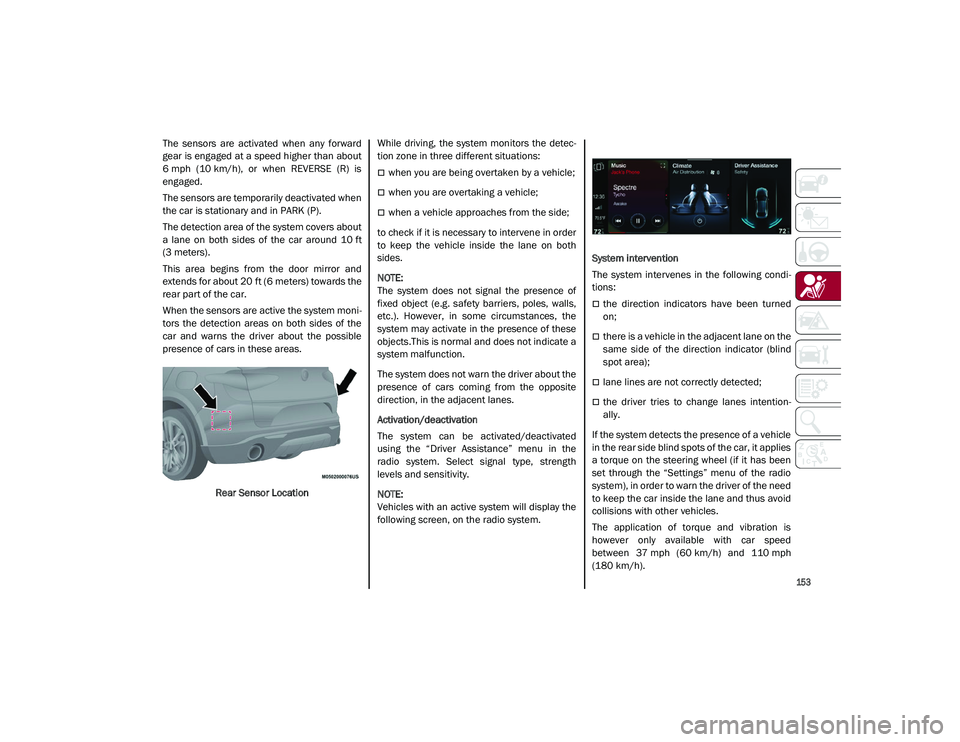
This area begins from the door mirror and
extends for about 20 ft (6 meters) towards the
rear part of the car.
When the sensors are active the system moni-
tors the detection areas on both sides of the
car and warns the driver about the possible
presence of cars in these areas.
Rear Sensor Location While driving, the system monitors the detec
-
tion zone in three different situations:
when you are being overtaken by a vehicle;
when you are overtaking a vehicle;
when a vehicle approaches from the side;
to check if it is necessary to intervene in order
to keep the vehicle inside the lane on both
sides.
NOTE:
The system does not signal the presence of
fixed object (e.g. safety barriers, poles, walls,
etc.). However, in some circumstances, the
system may activate in the presence of these
objects.This is normal and does not indicate a
system malfunction.
The system does not warn the driver about the
presence of cars coming from the opposite
direction, in the adjacent lanes.
Activation/deactivation
The system can be activated/deactivated
using the “Driver Assistance” menu in the
radio system. Select signal type, strength
levels and sensitivity.
NOTE:
Vehicles with an active system will display the
following screen, on the radio system. System intervention
The system intervenes in the following condi
-
tions:
the direction indicators have been turned
on;
there is a vehicle in the adjacent lane on the
same side of the direction indicator (blind
spot area);
lane lines are not correctly detected;
the driver tries to change lanes intention -
ally.
If the system detects the presence of a vehicle
in the rear side blind spots of the car, it applies
a torque on the steering wheel (if it has been
set through the “Settings” menu of the radio
system), in order to warn the driver of the need
to keep the car inside the lane and thus avoid
collisions with other vehicles.
The application of torque and vibration is
however only available with car speed
between 37 mph (60 km/h) and 110 mph
(180 km/h).
21_GU_OM_EN_USC_t.book Page 153
Page 186 of 280
SAFETY
184
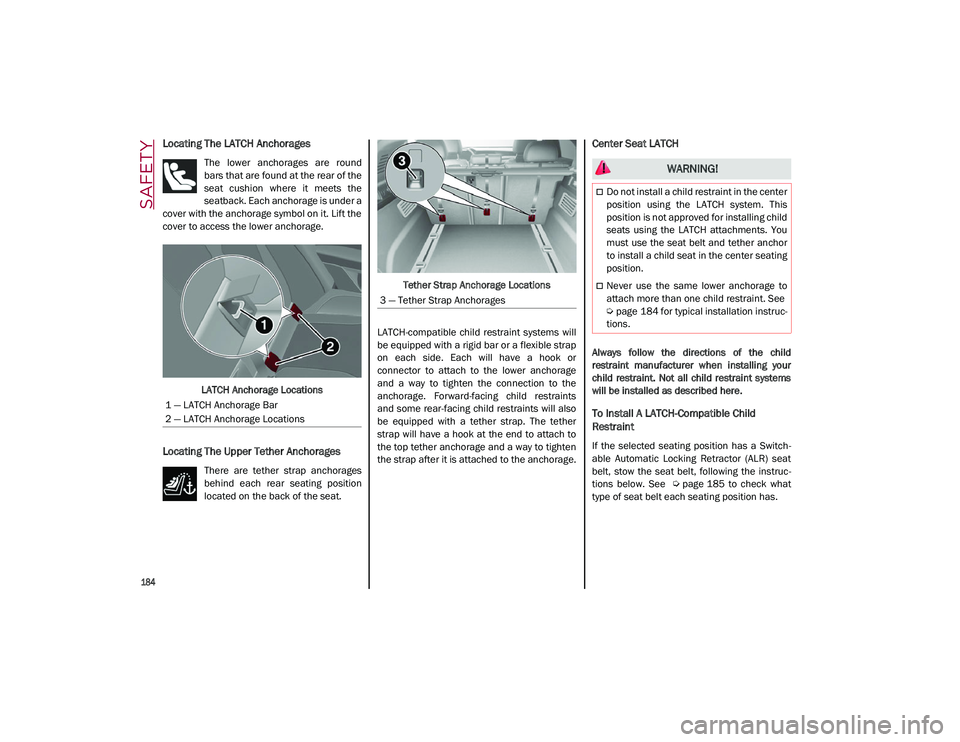
Locating The LATCH Anchorages
The lower anchorages are round
bars that are found at the rear of the
seat cushion where it meets the
seatback. Each anchorage is under a
cover with the anchorage symbol on it. Lift the
cover to access the lower anchorage.
LATCH Anchorage Locations
Locating The Upper Tether Anchorages
There are tether strap anchorages
behind each rear seating position
located on the back of the seat. Tether Strap Anchorage Locations
LATCH-compatible child restraint systems will
be equipped with a rigid bar or a flexible strap
on each side. Each will have a hook or
connector to attach to the lower anchorage
and a way to tighten the connection to the
anchorage. Forward-facing child restraints
and some rear-facing child restraints will also
be equipped with a tether strap. The tether
strap will have a hook at the end to attach to
the top tether anchorage and a way to tighten
the strap after it is attached to the anchorage.
Center Seat LATCH
Always follow the directions of the child
restraint manufacturer when installing your
child restraint. Not all child restraint systems
will be installed as described here.
To Install A LATCH-Compatible Child
Restraint
If the selected seating position has a Switch -
able Automatic Locking Retractor (ALR) seat
belt, stow the seat belt, following the instruc -
tions below. See
Ú
page 185 to check what
type of seat belt each seating position has.
1 — LATCH Anchorage Bar
2 — LATCH Anchorage Locations
3 — Tether Strap Anchorages
WARNING!
Do not install a child restraint in the center
position using the LATCH system. This
position is not approved for installing child
seats using the LATCH attachments. You
must use the seat belt and tether anchor
to install a child seat in the center seating
position.
Never use the same lower anchorage to
attach more than one child restraint. See
Ú
page 184 for typical installation instruc -
tions.
21_GU_OM_EN_USC_t.book Page 184
Page 209 of 280
207
ENHANCED ACCIDENT
RESPONSE SYSTEM (EARS)
This vehicle is equipped with an Enhanced
Accident Response System.
This feature is a communication network that
takes effect in the event of an impact
Ú
page 175.
EVENT DATA RECORDER (EDR)
This vehicle is equipped with an event data
recorder (EDR). The main purpose of an EDR is
to record data that will assist in understanding
how a vehicle’s systems performed under
certain crash or near crash-like situations,
such as an air bag deployment or hitting a road
obstacle
Ú
page 178.
Failure to follow proper tow eye usage may
cause components to break resulting in
serious injury or death.
CAUTION!
The tow eye must be used exclusively for
roadside assistance operations. Only use
the tow eye with an appropriate device in
accordance with the highway code (a rigid
bar or rope) to flat tow the vehicle for a
short distance to the nearest service loca -
tion.
Tow eyes MUST NOT be used to tow vehi -
cles off the road or where there are obsta -
cles.
In compliance with the above conditions,
towing with a tow eye must take place with
two vehicles (one towing, the other towed)
aligned as much as possible along the
same center line. Damage to your vehicle
may occur if these guidelines are not
followed.
When towing, only use a facility that can
tow vehicles with low ground clearances
as extensive damage can result by using a
standard tow truck platform.
WARNING! (Continued)
21_GU_OM_EN_USC_t.book Page 207
Page 231 of 280
229
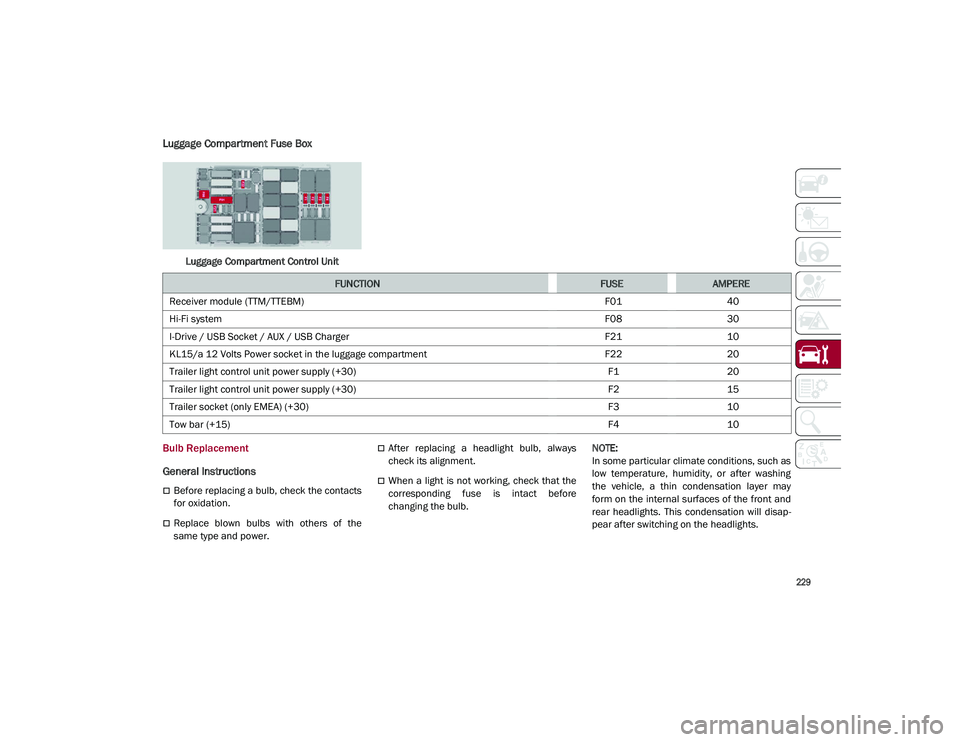
Luggage Compartment Fuse Box
Luggage Compartment Control Unit
Bulb Replacement
General Instructions
Before replacing a bulb, check the contacts
for oxidation.
Replace blown bulbs with others of the
same type and power.
After replacing a headlight bulb, always
check its alignment.
When a light is not working, check that the
corresponding fuse is intact before
changing the bulb.
NOTE:
In some particular climate conditions, such as
low temperature, humidity, or after washing
the vehicle, a thin condensation layer may
form on the internal surfaces of the front and
rear headlights. This condensation will disap
-
pear after switching on the headlights.
FUNCTIONFUSEAMPERE
Receiver module (TTM/TTEBM) F0140
Hi-Fi system F0830
I-Drive / USB Socket / AUX / USB Charger F2110
KL15/a 12 Volts Power socket in the luggage compartment F2220
Trailer light control unit power supply (+30) F120
Trailer light control unit power supply (+30) F215
Trailer socket (only EMEA) (+30) F310
Tow bar (+15) F410
21_GU_OM_EN_USC_t.book Page 229