2021 ALFA ROMEO STELVIO diagram
[x] Cancel search: diagramPage 95 of 280

93
Display
The following information is shown on the
dedicated area of the display:
In Automatic Mode: the active mode (P, R,
N, D) and with "D" the current gear number.
In Manual Drive Mode (Sequential) : the
mode (M), the current gear and the double
or single gear shift request, both up and
down (single or double arrow).
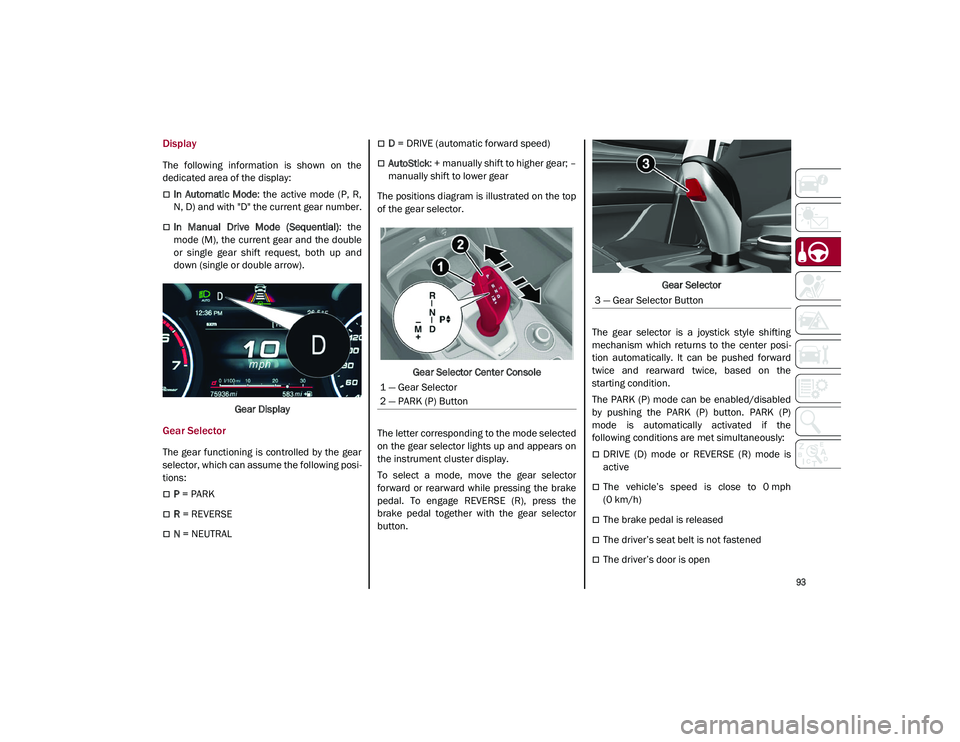
Gear Display
Gear Selector
The gear functioning is controlled by the gear
selector, which can assume the following posi -
tions:
P = PARK
R = REVERSE
N = NEUTRAL
D = DRIVE (automatic forward speed)
AutoStick : + manually shift to higher gear; –
manually shift to lower gear
The positions diagram is illustrated on the top
of the gear selector.
Gear Selector Center Console
The letter corresponding to the mode selected
on the gear selector lights up and appears on
the instrument cluster display.
To select a mode, move the gear selector
forward or rearward while pressing the brake
pedal. To engage REVERSE (R), press the
brake pedal together with the gear selector
button. Gear Selector
The gear selector is a joystick style shifting
mechanism which returns to the center posi -
tion automatically. It can be pushed forward
twice and rearward twice, based on the
starting condition.
The PARK (P) mode can be enabled/disabled
by pushing the PARK (P) button. PARK (P)
mode is automatically activated if the
following conditions are met simultaneously:
DRIVE (D) mode or REVERSE (R) mode is
active
The vehicle’s speed is close to 0 mph
(0 km/h)
The brake pedal is released
The driver’s seat belt is not fastened
The driver’s door is open
1 — Gear Selector
2 — PARK (P) Button
3 — Gear Selector Button
21_GU_OM_EN_USC_t.book Page 93
Page 190 of 280

SAFETY
188
(Continued)
1. Look behind the seating position where youplan to install the child restraint to find the
tether anchorage. You may need to move the
seat forward to provide better access to the
tether anchorage. If there is no top tether
anchorage for that seating position, move the
child restraint to another position in the
vehicle if one is available.
2. Route the tether strap to provide the most direct path for the strap between the anchor
and the child seat. If your vehicle is equipped
with adjustable rear head restraints, raise the
head restraint, and where possible, route the
tether strap under the head restraint and
between the two posts. If not possible, lower
the head restraint and pass the tether strap
around the outboard side of the head
restraint.
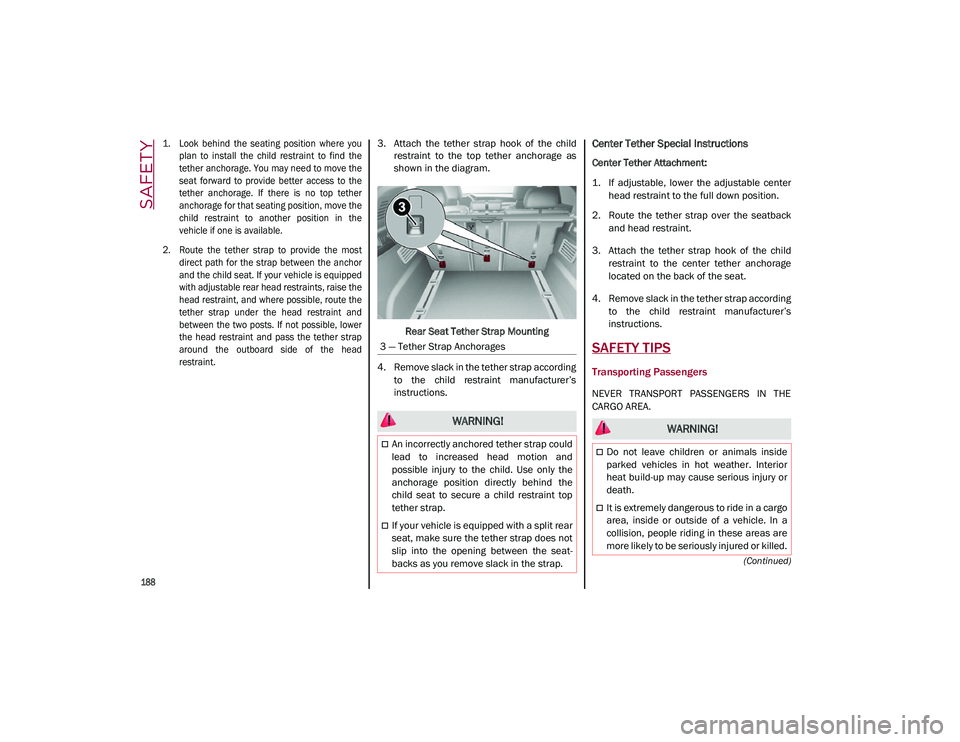
3. Attach the tether strap hook of the child
restraint to the top tether anchorage as
shown in the diagram.
Rear Seat Tether Strap Mounting
4. Remove slack in the tether strap according to the child restraint manufacturer’s
instructions.Center Tether Special Instructions
Center Tether Attachment:
1. If adjustable, lower the adjustable centerhead restraint to the full down position.
2. Route the tether strap over the seatback and head restraint.
3. Attach the tether strap hook of the child restraint to the center tether anchorage
located on the back of the seat.
4. Remove slack in the tether strap according to the child restraint manufacturer’s
instructions.
SAFETY TIPS
Transporting Passengers
NEVER TRANSPORT PASSENGERS IN THE
CARGO AREA.
3 — Tether Strap Anchorages
WARNING!
An incorrectly anchored tether strap could
lead to increased head motion and
possible injury to the child. Use only the
anchorage position directly behind the
child seat to secure a child restraint top
tether strap.
If your vehicle is equipped with a split rear
seat, make sure the tether strap does not
slip into the opening between the seat
-
backs as you remove slack in the strap.
WARNING!
Do not leave children or animals inside
parked vehicles in hot weather. Interior
heat build-up may cause serious injury or
death.
It is extremely dangerous to ride in a cargo
area, inside or outside of a vehicle. In a
collision, people riding in these areas are
more likely to be seriously injured or killed.
21_GU_OM_EN_USC_t.book Page 188
Page 270 of 280

CUSTOMER ASSISTANCE
268
PUBLICATION ORDER FORMS
To order the following manuals, you may use
either the website or the phone numbers listed
below.
Service Manuals
These comprehensive Service Manuals
provide a complete working knowledge of the
vehicle, system, and/or components and is
written in straightforward language with illus-
trations, diagrams, and charts.
Diagnostic Procedure Manuals
Diagnostic Procedure Manuals are filled with
diagrams, charts and detailed illustrations.
These manuals make it easy to find and fix
problems on computer-controlled vehicle
systems and features. They show exactly how
to find and correct problems, using
step-by-step troubleshooting and drivability
procedures, proven diagnostic tests and a
complete list of all tools and equipment.
Owner's Manuals
These Owner's Manuals have been prepared
with the assistance of service and engineering
specialists to acquaint you with specific FCA
US LLC vehicles. To access your Owner's Information online,
visit
alfaromeousa.com/owners/
owners-service-manual
(US)
alfaromeo.ca/fr/owners/
owners-service-manual
(Canada)
To order a hard copy of your Owner’s Informa -
tion, visit:
www.techauthority.com
(US)
Or
Call Tech Authority toll free at:
1-800-890-4038 (US)
1-800-387-1143 (Canada)
General Information
The following regulatory statement applies to
all Radio Frequency (RF) devices equipped in
this vehicle:
This device complies with Part 15 of the FCC
Rules and with Innovation, Science and
Economic Development Canada license-
exempt RSS standard(s). Operation is subject
to the following two conditions:
1. This device may not cause harmful inter -
ference, and
2. This device must accept any interference received, including interference that may
cause undesired operation. Le présent appareil est conforme aux CNR
d`Innovation, Science and Economic Develop
-
ment applicables aux appareils radio exempts
de licence. L'exploitation est autorisée aux
deux conditions suivantes:
1. l'appareil ne doit pas produire de brouil -
lage, et
2. l'utilisateur de l'appareil doit accepter tout brouillage radioélectrique subi, même si le
brouillage est susceptible d'en comprom -
ettre le fonctionnement.
La operación de este equipo está sujeta a las
siguientes dos condiciones:
1. es posible que este equipo o dispositivo no cause interferencia perjudicial y
2. este equipo o dispositivo debe aceptar cualquier interferencia, incluyendo la que
pueda causar su operación no deseada.
NOTE:
Changes or modifications not expressly
approved by the party responsible for compli -
ance could void the user’s authority to operate
the equipment.
21_GU_OM_EN_USC_t.book Page 268