2021 ALFA ROMEO STELVIO heating
[x] Cancel search: heatingPage 14 of 280

12
JUMP STARTING .................................... 201
Remote Battery Connection Posts......202
Jump Starting Procedure.....................203
Bump Starting ..................................204
ENGINE OVERHEATING ......................... 204 MANUAL PARK RELEASE ...................... 205TOWING A DISABLED VEHICLE ............. 205
Four-Wheel Drive (AWD) Models .........206
TOW EYES .............................................. 206
ENHANCED ACCIDENT RESPONSE
SYSTEM (EARS) ..................................... 207EVENT DATA RECORDER (EDR) ............ 207
SERVICING AND MAINTENANCE
SCHEDULED SERVICING ....................... 208
Periodic Checks ...................................208
Heavy Usage Of The Vehicle ...............208
Maintenance Plan (2.0L Engine) ........209
Maintenance Plan (2.9L Engine) ........212
ENGINE COMPARTMENT....................... 214
Checking Levels — 2.0L Engine .......... 214
Checking Levels — 2.9L Engine .......... 215
Engine Oil ............................................. 215
Engine Coolant Fluid............................216
Washer Fluid For Windshield/
Headlights ............................................ 217 Brake Fluid ...........................................217
Automatic Transmission Activation
System Oil ............................................ 217 Useful Advice For Extending The Life Of
Your Battery..........................................217 Battery ..................................................217
Pressure Washing ................................ 218
BATTERY RECHARGING ......................... 218
Important Notes .................................. 218
VEHICLE MAINTENANCE ........................ 219
Engine Oil ............................................. 219
Engine Oil Filter ................................... 220
Engine Air Cleaner Filter ..................... 220
Air Conditioning System
Maintenance........................................ 220 Lubricating Moving Parts Of The
Bodywork ............................................. 220 Windshield Wiper................................. 221
Exhaust System ................................... 222
Cooling System .................................... 223
Braking System.................................... 224
Automatic Transmission ..................... 225
Replacing The Battery ......................... 225
Fuses .................................................... 225
Bulb Replacement ............................... 229
TIRES ...................................................... 233
Tire Safety Information .................... 233
Tires — General Information .............. 239
Spare Tires — If Equipped .................. 244
Wheel And Wheel Trim Care ............ 245
Tire Types ............................................. 246
Tire Chains and Traction Devices ....... 247
Tire Rotation Recommendations........ 247
DEPARTMENT OF TRANSPORTATION
UNIFORM TIRE QUALITY GRADES ......... 248
Treadwear ............................................ 248
Traction Grades ................................... 248
Temperature Grades ........................... 248
STORING THE VEHICLE ......................... 249 BODYWORK ........................................... 249
Protection Against Atmospheric
Agents .................................................. 249 Corrosion Warranty ............................. 250
Preserving The Bodywork .................. 250
INTERIORS ............................................. 251
Seats And Fabric Parts ....................... 251
Leather Seats ...................................... 251
Plastic And Coated Parts .................... 251
Alcantara Parts — If Equipped ............ 251
Genuine Leather Parts........................ 251
Carbon Fiber Parts .............................. 252
TECHNICAL SPECIFICATIONS
VEHICLE IDENTIFICATION
NUMBER (VIN) ....................................... 253
Vehicle Identification Number............ 253
Vehicle Identification Number
(VIN) Plate ............................................ 253
ENGINE .................................................. 254
POWER SUPPLY ..................................... 255 TRANSMISSION ..................................... 255BRAKES.................................................. 255
SUSPENSION ......................................... 256
STEERING .............................................. 256
DIMENSIONS ......................................... 257
Luggage Compartment Volume ......... 259
WEIGHTS ................................................ 259
21_GU_OM_EN_USC_t.book Page 12
Page 18 of 280
SYMBOL GLOSSARY
16
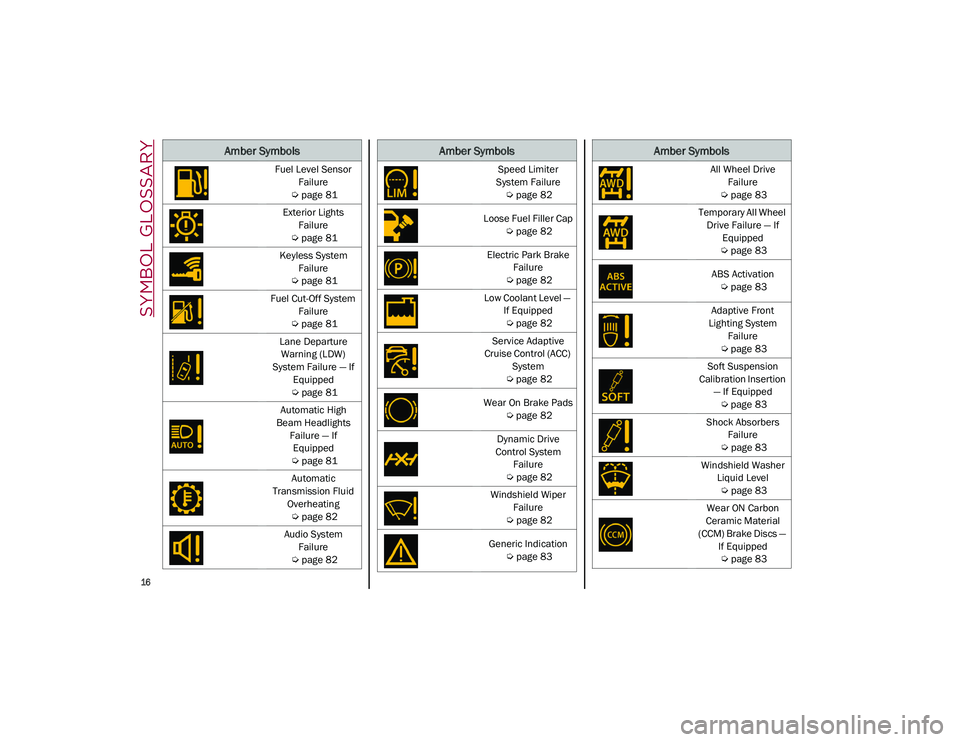
Fuel Level Sensor
Failure
Ú
page 81
Exterior Lights Failure
Ú
page 81
Keyless System Failure
Ú
page 81
Fuel Cut-Off System Failure
Ú
page 81
Lane Departure Warning (LDW)
System Failure — If Equipped
Ú
page 81
Automatic High
Beam Headlights Failure — If Equipped
Ú
page 81
Automatic
Transmission Fluid Overheating
Ú
page 82
Audio System Failure
Ú
page 82
Amber Symbols
Speed Limiter
System Failure
Ú
page 82
Loose Fuel Filler Cap
Ú
page 82
Electric Park Brake Failure
Ú
page 82
Low Coolant Level — If Equipped
Ú
page 82
Service Adaptive
Cruise Control (ACC) System
Ú
page 82
Wear On Brake Pads
Ú
page 82
Dynamic Drive
Control System Failure
Ú
page 82
Windshield Wiper Failure
Ú
page 82
Generic Indication
Ú
page 83
Amber Symbols
All Wheel Drive
Failure
Ú
page 83
Temporary All Wheel Drive Failure — If Equipped
Ú
page 83
ABS Activation
Ú
page 83
Adaptive Front
Lighting System Failure
Ú
page 83
Soft Suspension
Calibration Insertion — If Equipped
Ú
page 83
Shock Absorbers Failure
Ú
page 83
Windshield Washer Liquid Level
Ú
page 83
Wear ON Carbon
Ceramic Material
(CCM) Brake Discs — If Equipped
Ú
page 83
Amber Symbols
21_GU_OM_EN_USC_t.book Page 16
Page 31 of 280

29
To unlock the steering column, push the tilt/
telescoping control handle down to the open
position. To tilt the steering column, move the
steering wheel upward or downward as
desired. To lengthen or shorten the steering
column, pull the steering wheel outward or
push it inward as desired. To lock the steering
column in position, push the tilt/telescoping
control handle to the closed position.
Heated Steering Wheel — If Equipped
The steering wheel contains a heating element
that helps warm your hands in cold weather.
The heated steering wheel has only one
temperature setting. The heated steering
wheel may not turn on when it is already warm.
The heated steering wheel button is located
on the instrument panel.
Push the heated steering wheel button
once to turn the heating element on.
Push the heated steering wheel button a
second time to turn the heating element off.
When the function is enabled, the indicator on
the button will illuminate. Heated Steering Wheel Button
NOTE:
The engine must be running for the heated
steering wheel to operate.
For information on use with the Remote Start
system, see
Ú
page 23.
WARNING!
Do not adjust the steering column while
driving. Adjusting the steering column
while driving or driving with the steering
column unlocked, could cause the driver
to lose control of the vehicle. Failure to
follow this warning may result in serious
injury or death.
Do not place any objects on the steering
wheel (e.g. permanently fixed covers)
which could interfere with the hand detec -
tion sensor on the steering wheel of the
Active Blind Spot Assist (ABSA), Lane
Keeping Assist (LKA), Traffic Jam Assist
(TJA), or Highway Assist systems (HAS) (if
equipped).
WARNING!
It is absolutely forbidden to carry out any
after-market operation involving steering
system or steering column modifications
(e.g. installation of anti-theft device) that
could adversely affect performance. Doing
so could void the New Vehicle Limited
Warrant, cause SERIOUS SAFETY
PROBLEMS INCLUDING INJURY, and also
result in the vehicle not meeting
type-approval requirements.
WARNING!
Persons who are unable to feel pain to the
skin because of advanced age, chronic
illness, diabetes, spinal cord injury, medi -
cation, alcohol use, exhaustion, or other
physical conditions must exercise care
when using the steering wheel heater. It
may cause burns even at low tempera -
tures, especially if used for long periods.
Do not place anything on the steering
wheel that insulates against heat, such as
a blanket or steering wheel covers of any
type and material. This may cause the
steering wheel heater to overheat.
21_GU_OM_EN_USC_t.book Page 29
Page 36 of 280
GETTING TO KNOW YOUR VEHICLE
34
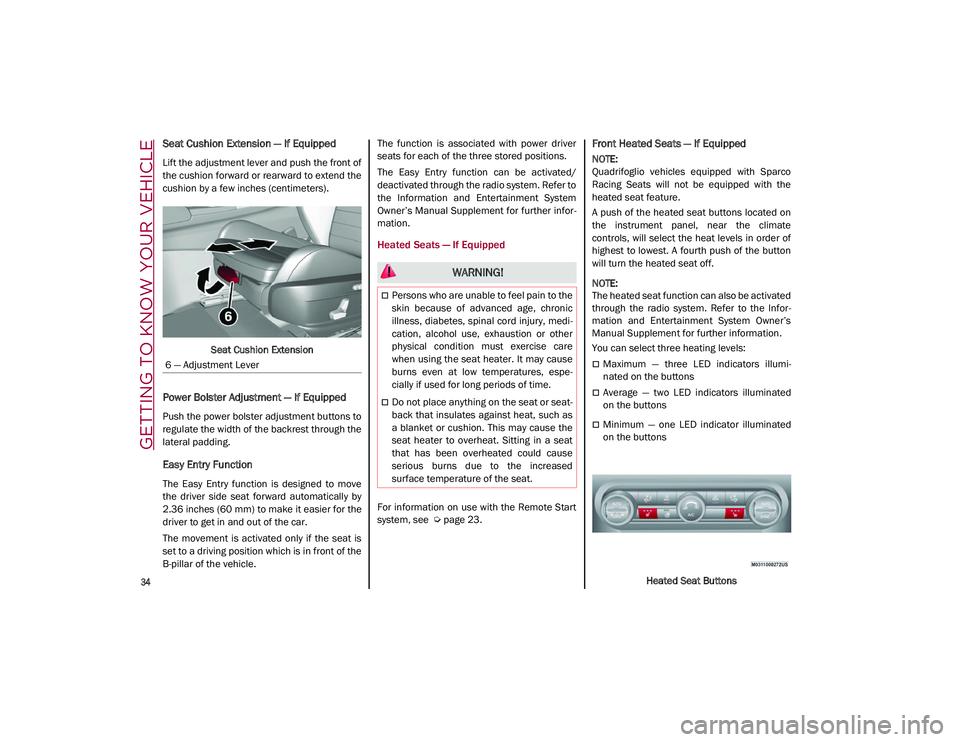
Seat Cushion Extension — If Equipped
Lift the adjustment lever and push the front of
the cushion forward or rearward to extend the
cushion by a few inches (centimeters).Seat Cushion Extension
Power Bolster Adjustment — If Equipped
Push the power bolster adjustment buttons to
regulate the width of the backrest through the
lateral padding.
Easy Entry Function
The Easy Entry function is designed to move
the driver side seat forward automatically by
2.36 inches (60 mm) to make it easier for the
driver to get in and out of the car.
The movement is activated only if the seat is
set to a driving position which is in front of the
B-pillar of the vehicle. The function is associated with power driver
seats for each of the three stored positions.
The Easy Entry function can be activated/
deactivated through the radio system. Refer to
the Information and Entertainment System
Owner’s Manual Supplement for further infor
-
mation.
Heated Seats — If Equipped
For information on use with the Remote Start
system, see
Ú
page 23.
Front Heated Seats — If Equipped
NOTE:
Quadrifoglio vehicles equipped with Sparco
Racing Seats will not be equipped with the
heated seat feature.
A push of the heated seat buttons located on
the instrument panel, near the climate
controls, will select the heat levels in order of
highest to lowest. A fourth push of the button
will turn the heated seat off.
NOTE:
The heated seat function can also be activated
through the radio system. Refer to the Infor -
mation and Entertainment System Owner’s
Manual Supplement for further information.
You can select three heating levels:
Maximum — three LED indicators illumi -
nated on the buttons
Average — two LED indicators illuminated
on the buttons
Minimum — one LED indicator illuminated
on the buttons
Heated Seat Buttons
6 — Adjustment Lever
WARNING!
Persons who are unable to feel pain to the
skin because of advanced age, chronic
illness, diabetes, spinal cord injury, medi
-
cation, alcohol use, exhaustion or other
physical condition must exercise care
when using the seat heater. It may cause
burns even at low temperatures, espe -
cially if used for long periods of time.
Do not place anything on the seat or seat -
back that insulates against heat, such as
a blanket or cushion. This may cause the
seat heater to overheat. Sitting in a seat
that has been overheated could cause
serious burns due to the increased
surface temperature of the seat.
21_GU_OM_EN_USC_t.book Page 34
Page 37 of 280
35
NOTE:
After selecting a heating level, heat will be
felt within a few minutes.
The engine must be running for the heated
seats to operate.
The “minimum” setting is automatically
deactivated once a certain period of time
has elapsed.
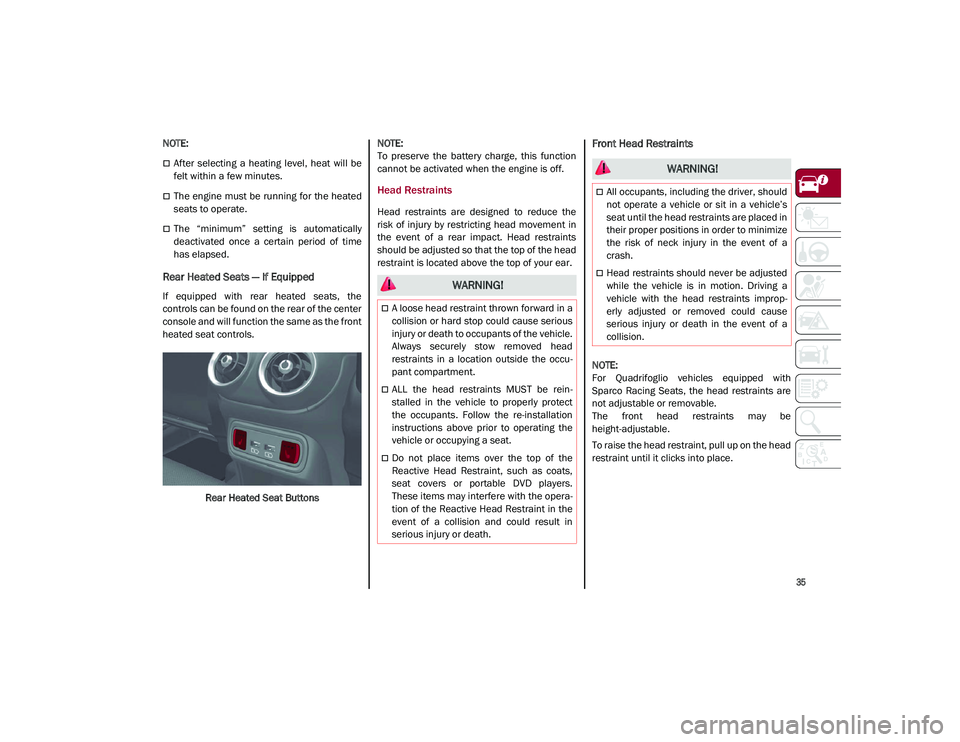
Rear Heated Seats — If Equipped
If equipped with rear heated seats, the
controls can be found on the rear of the center
console and will function the same as the front
heated seat controls.Rear Heated Seat Buttons
NOTE:
To preserve the battery charge, this function
cannot be activated when the engine is off.
Head Restraints
Head restraints are designed to reduce the
risk of injury by restricting head movement in
the event of a rear impact. Head restraints
should be adjusted so that the top of the head
restraint is located above the top of your ear.
Front Head Restraints
NOTE:
For Quadrifoglio vehicles equipped with
Sparco Racing Seats, the head restraints are
not adjustable or removable.
The front head restraints may be
height-adjustable.
To raise the head restraint, pull up on the head
restraint until it clicks into place.
WARNING!
A loose head restraint thrown forward in a
collision or hard stop could cause serious
injury or death to occupants of the vehicle.
Always securely stow removed head
restraints in a location outside the occu
-
pant compartment.
ALL the head restraints MUST be rein -
stalled in the vehicle to properly protect
the occupants. Follow the re-installation
instructions above prior to operating the
vehicle or occupying a seat.
Do not place items over the top of the
Reactive Head Restraint, such as coats,
seat covers or portable DVD players.
These items may interfere with the opera -
tion of the Reactive Head Restraint in the
event of a collision and could result in
serious injury or death.
WARNING!
All occupants, including the driver, should
not operate a vehicle or sit in a vehicle’s
seat until the head restraints are placed in
their proper positions in order to minimize
the risk of neck injury in the event of a
crash.
Head restraints should never be adjusted
while the vehicle is in motion. Driving a
vehicle with the head restraints improp -
erly adjusted or removed could cause
serious injury or death in the event of a
collision.
21_GU_OM_EN_USC_t.book Page 35
Page 43 of 280
41
2. Push the programmed HomeLink® buttonto confirm that the garage door opener
motor operates. If the garage door opener
motor does not operate, repeat the steps
from the beginning.
Programming HomeLink® To A
Miscellaneous Device
Follow the procedure on programming Home -
Link® to a garage door opener
Ú
page 40. Be
sure to determine if the device has a rolling
code, or non-rolling code before beginning the
programming process.
NOTE:
Canadian radio frequency laws require trans -
mitter signals to time-out (or quit) after several
seconds of transmission, which may not be
long enough for HomeLink® to pick up the signal during programming. Similar to this
Canadian law, some U.S. gate operators are
designed to time-out in the same manner. The
procedure may need to be performed multiple
times to successfully pair the device to your
HomeLink® buttons.
Reprogramming A Single HomeLink®
Button
To reprogram a single HomeLink® button that
has been previously trained, without erasing
all the channels, follow the procedure below.
Be sure to determine whether the new device
you want to program the HomeLink® button to
has a Rolling Code, or Non-rolling Code.
1. Place the ignition in the ON/RUN position,
without starting the engine.
2. Push and hold the desired HomeLink® button until the HomeLink® indicator light
begins to flash after 20 seconds. Do not
release the button.
3. Without releasing the button , proceed with
Step 2 in “Programming HomeLink® To A
Garage Door Opener” and follow all
remaining steps.
Canadian/Gate Operator Programming
The programming of transmitters in Canada/
United States require the transmitter signals
to “time-out” after several seconds of trans -
mission. Canadian radio frequency laws require trans
-
mitter signals to time-out (or quit) after several
seconds of transmission – which may not be
long enough for HomeLink® to pick up the
signal during programming. Similar to this
Canadian law, some U.S. gate operators are
designed to time-out in the same manner.
It may be helpful to unplug the device during
the cycling process to prevent possible over -
heating of the garage door or gate motor.
1. Place the ignition in the ON/RUN position.
2. Place the hand-held transmitter 1 to 3 inches (3 to 8 cm) away from the Home -
Link® button you wish to program while
keeping the HomeLink® indicator light in
view.
3. Continue to press and hold the Home -
Link® button, while you press and release
(cycle) your hand-held transmitter every
two seconds until HomeLink® has
successfully accepted the frequency
signal. The indicator light will flash slowly
and then rapidly when fully trained.
4. Watch for the HomeLink® indicator to change flash rates. When it changes, it is
programmed. It may take up to 30 seconds
or longer in rare cases. The garage door
may open and close while you are
programming.
5. Press and hold the programmed Home -
Link® button and observe the indicator
light.
WARNING!
Your motorized door or gate will open and
close while you are programming the
universal transceiver. Do not program the
transceiver if people or pets are in the
path of the door or gate.
Do not run your vehicle in a closed garage or
confined area while programming the transceiver.
Exhaust gas from your vehicle contains Carbon
Monoxide (CO) which is odorless and colorless.
Carbon Monoxide is poisonous when inhaled and
can cause you and others to be severely injured or
killed.
21_GU_OM_EN_USC_t.book Page 41
Page 54 of 280
GETTING TO KNOW YOUR VEHICLE
52
NOTE:
When the A/C is off, the Climate Control
system can not produce air that is colder than
the current outside temperature. Under
certain environmental conditions, windows
could fog up rapidly since the air is not dehu-
midified.
Air Recirculation And Air Quality System (AQS)
Air Recirculation is managed
according to the following operating
mode:
Automatic engagement: indicator is illumi -
nated above the “A” on the Air Recirculation
Button
Forced activation (air circulation always
activated): indicator illuminated above the
icon on the Air Recirculation Button
Forced deactivation (air recirculation
always off with intake of outside air): both
indicators not illuminated on the Air Recir-
culation Button
The three operating conditions are obtained by
pushing the Air Recirculation Button in
sequence.
Enabling The Air Quality System (AQS) Func -
tion — If Equipped
When the automatic recirculation function is
selected, the AQS function automatically acti -
vates internal air recirculation when the
outside air is polluted (e.g. in heavy traffic and
tunnels). At low external temperatures or in high
humidity, the automatic function turns off to
avoid fogging up the windows. The user can
select the function again by pushing the Air
Recirculation Button.
In automatic operation, air recirculation will be
controlled by the system according to outside
environmental conditions.
NOTE:
With the AQS function active and after the
internal air recirculation system has been
functioning for a set amount of time, the
Climate Control System enables air intake
to cycle the air in the passenger compart
-
ment for a set time. The AQS function is
disabled during the air changes.
The engagement of the recirculation system
makes it possible to reach the required
heating or cooling conditions faster. It is,
however, inadvisable to use it on rainy/cold
days as it can increase the possibility of the
windows fogging. When the outside
temperature is low, recirculation is forced
off to prevent the windows from fogging up.
Front Defrost
Air comes from the windshield and
side window demist outlets. Use
Defrost mode with maximum
temperature settings for best wind -
shield and side window defrosting and defog -
ging.
Rear Defrost
Push the Rear Defrost button to acti -
vate (indicators illuminated) the
Rear Defroster.
The Rear Defrost will turn off after 20 minutes
or once the engine is turned off.
NOTE:
To avoid damage, do not apply stickers over
the interior heating filaments of the Rear
Defroster.
Front Defrost And MAX-DEF Function
Push the MAX-DEF button (indicator
illuminated) to defrost the wind -
shield and side windows.
While in MAX-DEF function, the air conditioner
will:
Activate the air conditioner compressor
when the weather allows
Turn air recirculation off
Set the maximum air temperature (HI) on
both the driver and passenger side
Activate a blower speed based on the
temperature of the engine coolant
Adjust the air flow towards the windshield
and front side windows
Activate the Rear Window Defrost
Display the fan speed (indicators illumi -
nated) and current air distribution setting
21_GU_OM_EN_USC_t.book Page 52
Page 55 of 280
53
NOTE:
The MAX-DEF function remains active for
approximately three minutes once the engine
coolant reaches the proper temperature.
When the function is on, AUTO mode will deac-
tivate. The only manual operations possible
are adjusting blower speed and turning off the
Rear Window Defrost.
Pushing the button switches off the
MAX-DEF function.
Air Temperature Adjustment
Rotate the driver or passenger Temperature
Adjustment Knob clockwise for warmer
temperatures or counterclockwise for cooler
temperatures. The set temperatures are
shown on the radio system.
Push the SYNC button to sync the driver and
passenger air temperatures.
Rotate the passenger Temperature Adjust -
ment Knob to cancel the SYNC function. This
will set a new passenger side temperature.
Rotate the Temperature Adjustment Knob fully
clockwise to engage the HI (maximum heating)
setting or fully counterclockwise to engage the
LO (maximum cooling) setting. To deactivate
these functions, rotate the Temperature
Adjustment Knob to the desired temperature.
Rear passengers’ temperature is linked to
driver side selection.
AUTO Button
When the AUTO button is pushed (indicator
illuminated), the Climate Control system auto -
matically adjusts the following settings:
Quantity and distribution of air flow in the
passenger compartment
The air conditioner
Air recirculation
Cancels any manual settings
Selecting the AUTO function illuminates the
indicator on the A/C button.
If air distribution or the fan speed is manually
adjusted, the AUTO button indicator will turn
off to indicate that the Climate Control system
is no longer in AUTO mode.
After a manual adjustment, push the AUTO
button to resume the automatic system.
SYNC Button
Push the SYNC button (indicator illuminated)
to sync the passenger side air temperature
with the driver side air temperature.
This function makes temperature regulation
easier when the driver is traveling alone.
Turn the passenger Temperature Adjustment
Knob or push the passenger side Air Distribu-
tion Selection Button to change the passenger
side air temperature and return to separate air
temperature management.
Blower Speed
Turn the Blower Speed Knob to increase or
decrease the blower speed. The speed is
displayed with lighted indicators in the radio
system display.
Maximum fan speed = all indicators illumi -
nated on the radio system display
Minimum fan speed = one indicator illumi -
nated on the radio system display
The fan can be turned off by rotating the
Blower Speed Knob counterclockwise to the
off position (all segments on the radio system
display are turned off).
NOTE:
To restore automatic control of the fan speed,
push the AUTO button.
Air Distribution Selection
Push the Air Distribution Selection button on
the faceplate to change the mode of air distri -
bution.
NOTE:
In AUTO mode, the Climate Controls automati -
cally manage the air distribution. When set
manually, the respective symbols on the radio
system indicate the air distribution setting.
Panel Mode
Air comes from the outlets in the
instrument panel to ventilate the
chest and face. Each of these outlets
can be individually adjusted to direct
21_GU_OM_EN_USC_t.book Page 53