2021 ALFA ROMEO STELVIO ECO mode
[x] Cancel search: ECO modePage 62 of 280
GETTING TO KNOW YOUR VEHICLE
60
The sunroof has three preset positions:
Fully closed
Comfort (intermediate opening)
Fully open
NOTE:
You cannot have the sunshade closed when
the sunroof is open.
Opening And Closing The Sunroof
To open the sunroof’s front panel, push the
open/close button toward the rear of the
vehicle to open to the comfort position (half
way). Pushing the button a second time will
open to the fully open position.
To close the sunroof, push the open/close
button toward the front of the vehicle. The roof
will close completely.
The automatic motion can be interrupted in
any position by pushing the open/close button
again.
Venting Sunroof
To bring the roof into vent position, push and
release the vent button.
This type of vent opening can be activated
regardless of the position of the sunroof.
When starting with the roof in the closed posi -
tion, pushing the vent button automatically
causes the sunroof to open to the vent posi -
tion. If the roof is already open, the button
must be held until the roof reaches the
vent-opening position.
Pushing the vent button again during auto -
matic movement of the roof will stop it.
Sunshade Operation
The sunshade is power operated.
Push the Power Shade open/close button
toward the rear of the vehicle to open the sun
shade.
Push the Power Shade open/close button
toward the front of the vehicle to close the sun
shade.
The automatic motion can be interrupted in
any position by pushing the Power Shade
open/close button again.
Pinch Protect Feature
The sunroof has an anti-pinch safety system
capable of detecting the presence of an
obstacle during the closing movement. If an
obstacle is detected, the system intervenes
and the movement of the sunroof is immedi -
ately reversed.
Re-Initialization Procedure
Automatic operation of the sunroof must be
re-initialized in case of faulty sunroof opera -
tion. It may also be necessary to initialize the
sunroof after the vehicle’s battery has been
disconnected and then reconnected.
NOTE:
The anti-pinch safety device is deactivated
during the re-initialization procedure.
WARNING!
Never leave children unattended in a
vehicle, or with access to an unlocked
vehicle. Never leave the key fob in or near
the vehicle, or in a location accessible to chil -
dren. Do not leave the ignition of a vehicle
equipped with keyless ignition in the ON/
RUN mode. Occupants, particularly unat -
tended children, can become entrapped by
the power sunroof while operating the power
sunroof switch. Such entrapment may result
in serious injury or death.
In a collision, there is a greater risk of
being thrown from a vehicle with an open
sunroof. You could also be seriously
injured or killed. Always fasten your seat
belt properly and make sure all passen -
gers are also properly secured.
Do not allow small children to operate the
sunroof. Never allow your fingers, other
body parts, or any object, to project
through the sunroof opening. Injury may
result.
CAUTION!
Do not open the sun roof if a roof rack or
crossbars are fitted. Do not open the sun
roof if there is snow or ice on it: you may
damage it.
21_GU_OM_EN_USC_t.book Page 60
Page 70 of 280
GETTING TO KNOW YOUR INSTRUMENT PANEL
68
Quadrifoglio Instrument Cluster
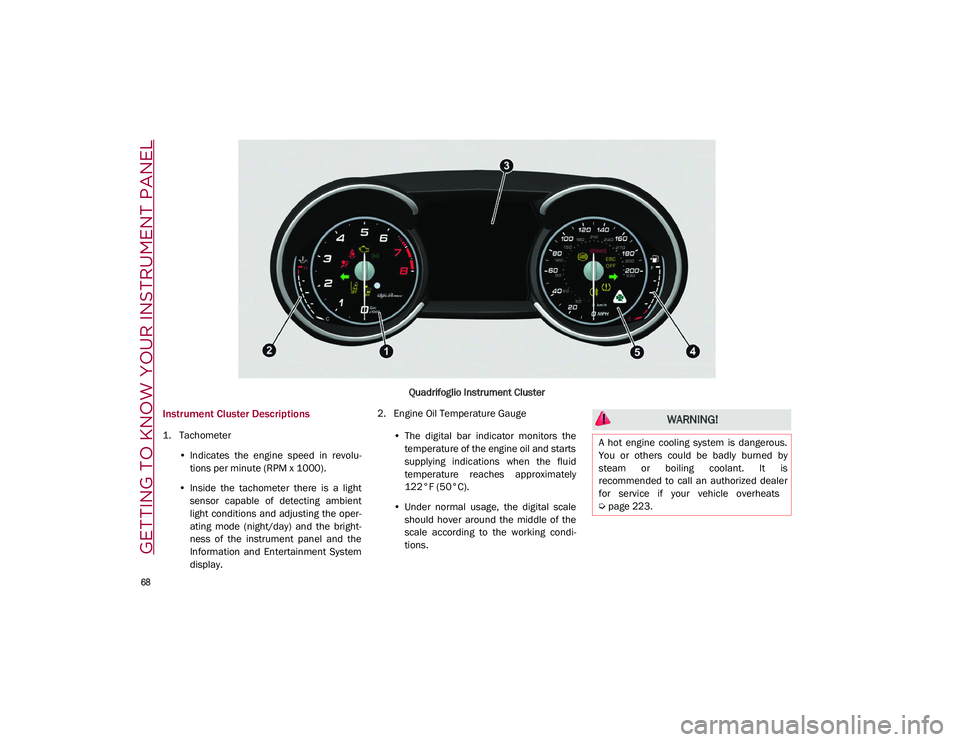
Instrument Cluster Descriptions
1. Tachometer•Indicates the engine speed in revolu-
tions per minute (RPM x 1000).
• Inside the tachometer there is a light
sensor capable of detecting ambient
light conditions and adjusting the oper-
ating mode (night/day) and the bright-
ness of the instrument panel and the
Information and Entertainment System display. 2. Engine Oil Temperature Gauge
•The digital bar indicator monitors the
temperature of the engine oil and starts
supplying indic ations when the fluid
temperature reaches approximately
122°F (
50°C).
• Under normal usage, the digital scale
should hover around the middle of the
scale according to the working condi-
tions.
WARNING!
A hot engine cooling system is dangerous.
You or others could be badly burned by
steam or boiling coolant. It is
recommended to call an authorized dealer
for service if your vehicle overheats
Ú
page 223.
21_GU_OM_EN_USC_t.book Page 68
Page 72 of 280
GETTING TO KNOW YOUR INSTRUMENT PANEL
70
7. Traffic Sign Recognition (TSR) InformationDisplay
8. Time
9. External Temperature
10. Main Display: Vehicle Speed Display, Trip Computer Information, etc...
The screens can be selected, on rotation,
by pushing the MENU selection button on
the windshield wiper stalk.
MENU Selection Button
Depending on the driving mode chosen us -
ing the Alfa DNA (Dynamic, Natural, and
Advanced Efficiency) the screens can be
graphically different. Navigation instruc -
tions and call information can be set and
displayed in the Information and Entertain -
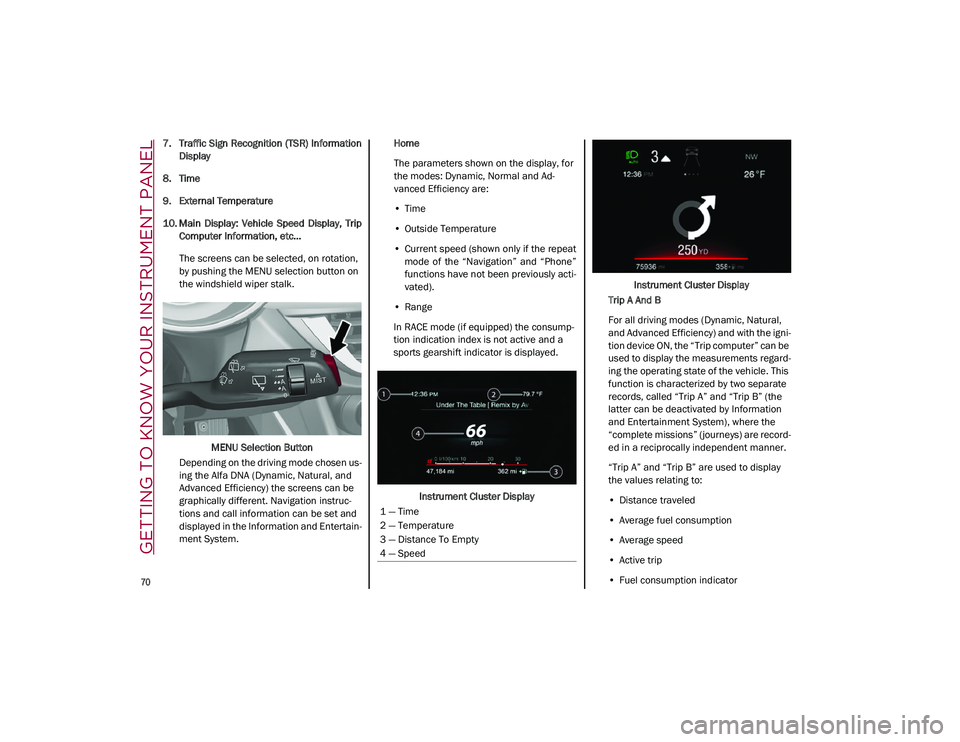
ment System. Home
The parameters shown on the display, for
the modes: Dynamic, Normal and Ad
-
vanced Efficiency are:
• Time
• Outside Temperature
• Current speed (shown only if the repeat
mode of the “Navigation” and “Phone”
functions have not been previously acti-
vated).
• Range
In RACE mode (if equipped) the consump -
tion indication index is not active and a
sports gearshift indicator is displayed.
Instrument Cluster Display Instrument Cluster Display
Trip A And B
For all driving modes (Dynamic, Natural,
and Advanced Efficiency) and with the igni -
tion device ON, the “Trip computer” can be
used to display the measurements regard -
ing the operating state of the vehicle. This
function is characterized by two separate
records, called “Trip A” and “Trip B” (the
latter can be deactivated by Information
and Entertainment System), where the
“complete missions” (journeys) are record -
ed in a reciprocally independent manner.
“Trip A” and “Trip B” are used to display
the values relating to:
• Distance traveled
• Average fuel consumption
• Average speed
• Active trip
• Fuel consumption indicator
1 — Time
2 — Temperature
3 — Distance To Empty
4 — Speed
21_GU_OM_EN_USC_t.book Page 70
Page 79 of 280
77
also reduces fuel efficiency and tire tread life,
and may affect the vehicle’s handling and
stopping ability.
Please note that the TPMS is not a substitute
for proper tire maintenance, and it is the
driver’s responsibility to maintain correct tire
pressure, even if under inflation has not
reached the level to trigger illumination of the
TPMS low tire pressure telltale.
Your vehicle has also been equipped with a
TPMS malfunction indicator to indicate when
the system is not operating properly. The
TPMS malfunction indicator is combined with
the low tire pressure telltale. When the system
detects a malfunction, the telltale will flash for
approximately one minute and then remain
continuously illuminated. This sequence will
continue upon subsequent vehicle start-ups
as long as the malfunction exists. When the
malfunction indicator is illuminated, the
system may not be able to detect or signal low
tire pressure as intended. TPMS malfunctions
may occur for a variety of reasons, including
the installation of replacement or alternate
tires or wheels on the vehicle that prevent the
TPMS from functioning properly. Always check
the TPMS malfunction telltale after replacing
one or more tires or wheels on your vehicle to
ensure that the replacement or alternate tires
and wheels allow the TPMS to continue to
function properly.
Rear Fog Lights
The indicator illuminates when the
rear fog light is activated.
Engine Check/Malfunction Indicator Light
(MIL)
In normal conditions, when the igni-
tion is cycled to ON, the indicator
light illuminates, but it should turn
off as soon as the engine is started.
The operation of the indicator light may be
checked by the traffic police using specific
devices. Comply with the laws and regulations
of the country where you are driving. Under these conditions, the vehicle can
continue traveling at moderate speed but
without demanding excessive effort from the
engine or high speed. Prolonged use of the
vehicle with the indicator light on constantly
may cause damage. Contact an authorized
dealer as soon as possible.
Forward Collision Warning (FCW) System
This indicator light informs the driver
that the frontal collision alarm func
-
tion is not enabled.
Drive carefully and contact an authorized
dealer as soon as possible.
Fuel Reserve/Limited Range
The indicator light (or the symbol in
the display) illuminates when about
2.4 gallons (9 liters) of fuel is left in
the tank.
WARNING!
The TPMS has been optimized for the
original equipment tires and wheels. TPMS
pressures and warning have been
established for the tire size equipped on
your vehicle. Undesirable system operation
or sensor damage may result when using
replacement equipment that is not of the
same size, type, and/or style. Aftermarket
wheels can cause sensor damage. Using
aftermarket tire sealants may cause the
Tire Pressure Monitoring System (TPMS)
sensor to become inoperable. After using
an aftermarket tire sealant it is
recommended that you take your vehicle to
an authorized dealership to have your
sensor function checked.
CAUTION!
If, turning the ignition device to ON, the
warning light does not turn on or if it
turns on steadily or flashing when traveling
(on some versions together with the
message on the display), contact an
authorized dealer as soon as possible.
21_GU_OM_EN_USC_t.book Page 77
Page 85 of 280
83
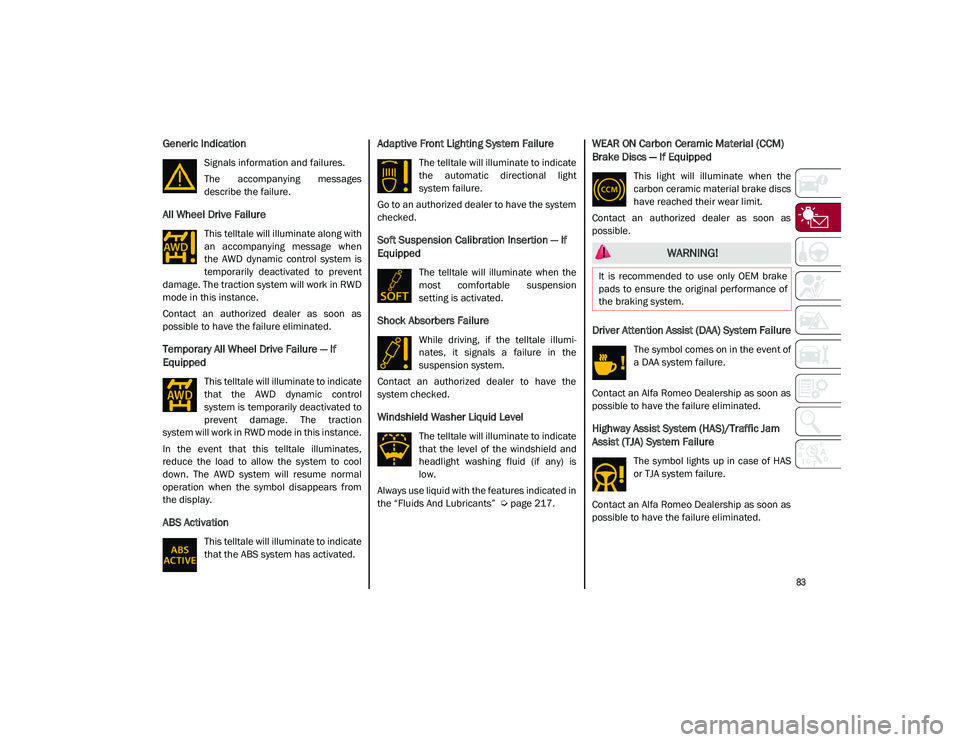
Generic Indication
Signals information and failures.
The accompanying messages
describe the failure.
All Wheel Drive Failure
This telltale will illuminate along with
an accompanying message when
the AWD dynamic control system is
temporarily deactivated to prevent
damage. The traction system will work in RWD
mode in this instance.
Contact an authorized dealer as soon as
possible to have the failure eliminated.
Temporary All Wheel Drive Failure — If
Equipped
This telltale will illuminate to indicate
that the AWD dynamic control
system is temporarily deactivated to
prevent damage. The traction
system will work in RWD mode in this instance.
In the event that this telltale illuminates,
reduce the load to allow the system to cool
down. The AWD system will resume normal
operation when the symbol disappears from
the display.
ABS Activation
This telltale will illuminate to indicate
that the ABS system has activated.
Adaptive Front Lighting System Failure
The telltale will illuminate to indicate
the automatic directional light
system failure.
Go to an authorized dealer to have the system
checked.
Soft Suspension Calibration Insertion — If
Equipped
The telltale will illuminate when the
most comfortable suspension
setting is activated.
Shock Absorbers Failure
While driving, if the telltale illumi -
nates, it signals a failure in the
suspension system.
Contact an authorized dealer to have the
system checked.
Windshield Washer Liquid Level
The telltale will illuminate to indicate
that the level of the windshield and
headlight washing fluid (if any) is
low.
Always use liquid with the features indicated in
the “Fluids And Lubricants”
Ú
page 217.
WEAR ON Carbon Ceramic Material (CCM)
Brake Discs — If Equipped
This light will illuminate when the
carbon ceramic material brake discs
have reached their wear limit.
Contact an authorized dealer as soon as
possible.
Driver Attention Assist (DAA) System Failure
The symbol comes on in the event of
a DAA system failure.
Contact an Alfa Romeo Dealership as soon as
possible to have the failure eliminated.
Highway Assist System (HAS)/Traffic Jam
Assist (TJA) System Failure
The symbol lights up in case of HAS
or TJA system failure.
Contact an Alfa Romeo Dealership as soon as
possible to have the failure eliminated.
WARNING!
It is recommended to use only OEM brake
pads to ensure the original performance of
the braking system.
21_GU_OM_EN_USC_t.book Page 83
Page 89 of 280
87
How To Use Remote Start
All of the following conditions must be met
before the engine will remote start:
Gear selector in PARK (P).
Doors closed.
Hood closed.
Liftgate closed.
Hazard switch off.
Brake switch inactive (brake pedal not
pressed).
Battery at an acceptable charge level.
PANIC button not pushed.
System not disabled from previous remote
start event.
Vehicle Security System indicator flashing.
Ignition in the OFF mode (if equipped with
keyless ignition system).
Fuel level meets minimum requirement.
Remote Start Comfort Systems — If Equipped
When Remote Start is activated, the heated
steering wheel and driver heated seat features
will automatically turn on in cold weather.
These features will stay on through the dura -
tion of remote start until the ignition is placed
in the ON/RUN mode. Remote Start Windshield Wiper De–Icer Acti
-
vation — If Equipped
When remote start is active and the outside ambient
temperature is less than 39°F (4°C), the Windshield
Wiper De-Icer will be enabled. Exiting remote start will
resume previous operation, except if the Windshield
Wiper De-Icer is active.
The Windshield Wiper De-Icer timer and oper -
ation will continue.
Cold Weather Operation
To prevent possible engine damage while
starting at low temperatures, this vehicle will
inhibit engine cranking when the ambient
temperature is less than –22°F (–30°C) and
the oil temperature sensor reading indicates
an engine block heater has not been used. An
externally-powered electric engine block
heater is available as optional equipment or
from an authorized dealer.
The message “plug in engine heater” will be
displayed in the instrument cluster when the
ambient temperature is below 5°F (–15°C) at the
time the engine is shut off as a reminder to avoid
possible crank delays at the next cold start.
Extended Park Starting
If the vehicle has not been started or driven for
at least 30 days, it is advisable to follow the
indications below.
To start the engine, proceed as follows:
1. Briefly push the ignition button
2. If the engine does not start, wait five seconds and let the starter cool down and
then repeat the starting procedure
3. If the engine does not start after eight attempts, let the starter cool down for at
least 10 seconds, and then repeat the
starting procedure
If the problem persists, contact an authorized
dealer.
NOTE:
After prolonged vehicle inactivity, very difficult
starting, that can be noticed through rapid
fatigue of the starter, might also be due to a
partially drained battery
Ú
page 201.
If Engine Fails To Start
Starting the Engine with Key Fob Battery Run
Down or Drained
If the ignition does not respond when the
button is pushed, the key fob battery might be
run down or drained. Therefore, the system
does not detect the presence of the key fob in
the vehicle, and will display a dedicated
message
Ú
page 20. CAUTION!
Use of the recommended oil and adhering
to the prescribed oil change intervals is
important to prevent engine damage and
ensure satisfactory starting in cold
conditions.
21_GU_OM_EN_USC_t.book Page 87
Page 90 of 280
STARTING AND OPERATING
88
After Starting — Warming Up The Engine
Proceed as follows:
Travel slowly, letting the engine run at a
reduced RPM, without accelerating
suddenly.
It is recommended to wait until the digital
engine coolant temperature indicator starts
to rise for maximum performance.
Stopping The Engine
To stop the engine, proceed as follows:
1. Park the vehicle in a position that is notdangerous for oncoming traffic.
2. Engage the PARK (P) mode.
3. With engine idling, push the ENGINE START/STOP button on the steering wheel
to STOP the engine.
NOTE:
Do not leave the ignition in ACC mode when
the engine is off.
To shut off the engine with vehicle speed
greater than 5 mph (8 km/h), you must push
and hold the ignition or push the ENGINE
START/STOP button three times consecutively
within a few seconds. The engine will shut
down, and the ignition will be placed in the
ACC mode With the keyless ignition system, it is possible
to exit the vehicle taking the key fob with you,
without the engine switching off. The vehicle
will inform about the absence of the key on
board, when the doors are closed.
After the engine has stopped (cycling from the
ACC to the OFF position) the accessories are
still powered for about three minutes, or until
a door is opened.
When the ignition is in the OFF mode, the
window switches remain active for three
minutes. Opening a front door will cancel this
function.
After severe driving, idle the engine to allow
the temperature inside the engine compart
-
ment to cool before shutting off the engine.
Turbocharger Cool Down
It is recommended before switching the
vehicle off, to keep the engine idling for a few
minutes so that the turbocharger can be suit -
ably lubricated. This procedure is particularly
recommended after severe driving.
After a full load operation, keep the engine
idling for three to five minutes before
switching it off.
This time allows the lubricating oil and the
engine coolant to eliminate the excessive heat
from combustion chamber, bearings, inner
components and turbocharger.
WARNING!
Never pour fuel or other flammable liquid
into the throttle body air inlet opening in
an attempt to start the vehicle. This could
result in flash fire causing serious
personal injury.
Do not attempt to push or tow your vehicle
to get it started. Vehicles equipped with an
automatic transmission cannot be started
this way. Unburned fuel could enter the
catalytic converter and once the engine
has started, ignite and damage the
converter and vehicle.
If the vehicle has a discharged battery,
booster cables may be used to obtain a
start from a booster battery or the battery
in another vehicle. This type of start can
be dangerous if done improperly
Ú
page 201.
CAUTION!
To prevent damage to the starter, do not
continuously crank the engine for more than
25 seconds at a time. Wait 60 seconds
before trying again.
21_GU_OM_EN_USC_t.book Page 88
Page 96 of 280
STARTING AND OPERATING
94
(Continued)
(Continued)
To transition the vehicle into REVERSE (R)
mode from DRIVE (D) mode, or into DRIVE (D)
mode from REVERSE (R) mode, it is necessary
to move the gear selector by pushing the gear
selector button.
AutoStick can be activated by moving the gear
selector from DRIVE (D) to the left and then
forward toward the - symbol (or backward
toward the + symbol) changing the gear.
To shift out of PARK (P), or to pass from posi -
tion NEUTRAL (N) to position DRIVE (D) or
REVERSE (R), the vehicle must be moving at a
low speed or stopped, and the brake pedal
must also be pressed.
NOTE:
DO NOT accelerate while shifting from posi -
tion PARK (P) or NEUTRAL (N) to another
position.
After selecting a gear, wait a few seconds
before accelerating. This precaution is
particularly important with engine cold.
It is not possible to select NEUTRAL (N)
mode from PARK (P) mode.
Transmission Operating Modes
PARK (P)
The transmission is locked in this mode. The
engine can be started in this mode.
NOTE:
Never try to engage PARK (P) mode when the
vehicle is moving. Before leaving the vehicle,
make sure this mode is engaged (letter P
shown on the display and gear selector) and
that the parking brake is engaged.
When parking on a flat surface, first engage
the PARK (P) mode and then engage the EPB.
When parking uphill, before activating the
PARK (P) mode, engage the EPB. Otherwise, it
could be difficult to engage the (P) mode.
To check that the PARK (P) mode is actually
engaged, make sure (P) is illuminated on the
display and on the gear selector.
WARNING!
Never use the PARK position as a substi
-
tute for the parking brake. Always apply
the parking brake fully when parked to
guard against vehicle movement and
possible injury or damage.
Your vehicle could move and injure you
and others if it is not in PARK. Check by
trying to move the gear selector out of
PARK with the brake pedal released.
Make sure the transmission is in PARK
before leaving the vehicle.
It is dangerous to shift out of PARK or
NEUTRAL if the engine speed is higher
than idle speed. If your foot is not firmly
pressing the brake pedal, the vehicle
could accelerate quickly forward or in
reverse. You could lose control of the
vehicle and hit someone or something.
Only shift into gear when the engine is
idling normally and your foot is firmly
pressing the brake pedal.
Unintended movement of a vehicle could
injure those in or near the vehicle. As with
all vehicles, you should never exit a
vehicle while the engine is running. Before
exiting a vehicle, always apply the parking
brake, shift the transmission into PARK,
and turn the ignition OFF. When the igni -
tion is in the OFF mode, the transmission
is locked in PARK, securing the vehicle
against unwanted movement.
When leaving the vehicle, always make
sure the ignition is in the OFF mode,
remove the key fob from the vehicle, and
lock the vehicle.
WARNING! (Continued)
21_GU_OM_EN_USC_t.book Page 94