2021 ALFA ROMEO STELVIO wiper blades
[x] Cancel search: wiper bladesPage 48 of 280
GETTING TO KNOW YOUR VEHICLE
46
Rear Overhead Light
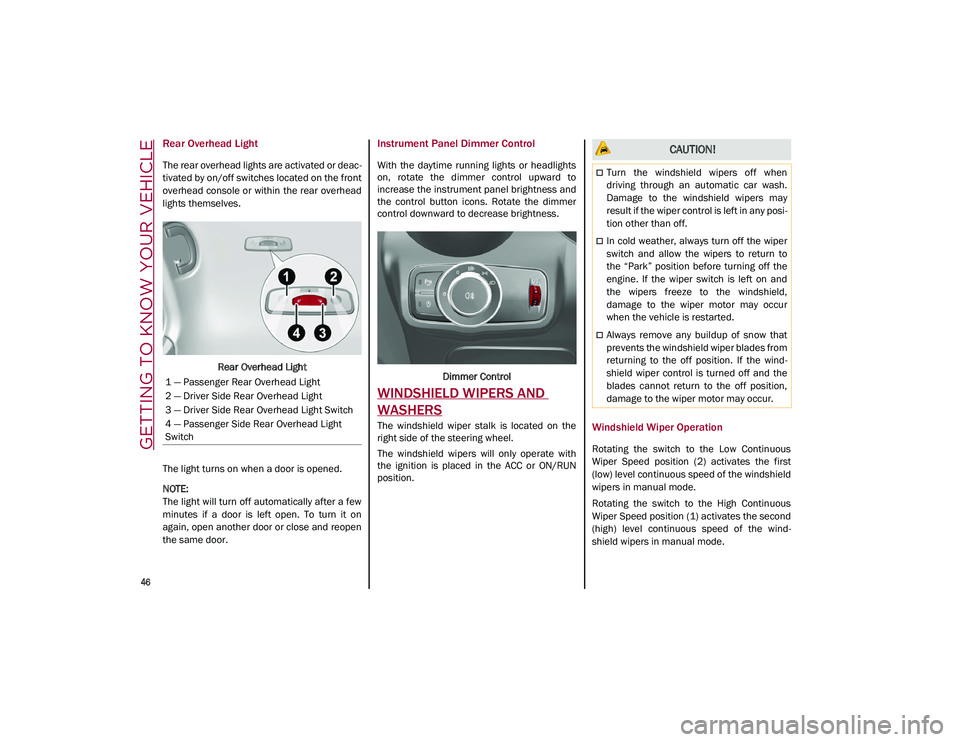
The rear overhead lights are activated or deac-
tivated by on/off switches located on the front
overhead console or within the rear overhead
lights themselves.
Rear Overhead Light
The light turns on when a door is opened.
NOTE:
The light will turn off automatically after a few
minutes if a door is left open. To turn it on
again, open another door or close and reopen
the same door.
Instrument Panel Dimmer Control
With the daytime running lights or headlights
on, rotate the dimmer control upward to
increase the instrument panel brightness and
the control button icons. Rotate the dimmer
control downward to decrease brightness.
Dimmer Control
WINDSHIELD WIPERS AND
WASHERS
The windshield wiper stalk is located on the
right side of the steering wheel.
The windshield wipers will only operate with
the ignition is placed in the ACC or ON/RUN
position.Windshield Wiper Operation
Rotating the switch to the Low Continuous
Wiper Speed position (2) activates the first
(low) level continuous speed of the windshield
wipers in manual mode.
Rotating the switch to the High Continuous
Wiper Speed position (1) activates the second
(high) level continuous speed of the wind -
shield wipers in manual mode.
1 — Passenger Rear Overhead Light
2 — Driver Side Rear Overhead Light
3 — Driver Side Rear Overhead Light Switch
4 — Passenger Side Rear Overhead Light
Switch
CAUTION!
Turn the windshield wipers off when
driving through an automatic car wash.
Damage to the windshield wipers may
result if the wiper control is left in any posi
-
tion other than off.
In cold weather, always turn off the wiper
switch and allow the wipers to return to
the “Park” position before turning off the
engine. If the wiper switch is left on and
the wipers freeze to the windshield,
damage to the wiper motor may occur
when the vehicle is restarted.
Always remove any buildup of snow that
prevents the windshield wiper blades from
returning to the off position. If the wind -
shield wiper control is turned off and the
blades cannot return to the off position,
damage to the wiper motor may occur.
21_GU_OM_EN_USC_t.book Page 46
Page 50 of 280
GETTING TO KNOW YOUR VEHICLE
48
If the windshield washer is used with the rain
sensor activated, the normal washing cycle is
performed, and then the rain sensor resumes
its normal automatic operation.
NOTE:
Keep the glass in the sensor area clean.
Deactivation
To turn off the Rain Sensing Wipers, use the
wiper switch or place the ignition in the OFF
position.
In the event of malfunction of the rain sensor
while it is active, the windshield wiper oper-
ates intermittently at a speed consistent with
the sensitivity setting of the rain sensor,
whether or not there is rain on the glass for as
long as the sensor failure is indicated on the
display.
The sensor continues to operate and it is
possible to set the windshield wiper to contin -
uous mode (1 or 2). The failure indication
remains on for as long as the sensor is active. The rain sensor is able to recognize and auto
-
matically adjust itself in the presence of the
following conditions:
Presence of dirt on the controlled surface
(e.g. salt, dirt, etc.).
Presence of streaks of water caused by the
worn window wiper blades.
Difference between day and night.
Rear Window Wiper/Washer
Push the windshield wiper lever downward to
activate/deactivate continuous rear wiper
operation.
Push the windshield wiper lever towards the
instrument panel to activate the rear window
washer (a brief push activates one washing
cycle, keeping the stalk pushed washes
continuously until the stalk is released).
Shifting the vehicle into REVERSE with the
windshield wiper operating activates a single
cycle of the rear window wiper.
Headlamp Washers — If Equipped
The windshield wiper lever operates the head -
light washers when the ignition is in the ON
position and the headlights are turned on. To
use the headlight washers, pull the lever
toward you and release it. The headlight
washers will spray a timed high-pressure spray
of washer fluid onto each headlight lens. In
addition, the windshield washers will spray the
windshield and the windshield wipers will
cycle.
NOTE:
The headlight washers work on every tenth
wash cycle request.
CLIMATE CONTROLS
The Climate Control system allows you to regu -
late the temperature, air flow, and direction of
air circulating throughout the vehicle. The
controls are located on the touchscreen and
on the instrument panel below the radio.
21_GU_OM_EN_USC_t.book Page 48
Page 210 of 280
208
SERVICING AND MAINTENANCE
Correct servicing permits the performance of
the vehicle to be maintained over time, as well
as limited running costs and safeguarding the
efficiency of the safety systems.
SCHEDULED SERVICING
Correct servicing is crucial for guaranteeing a
long life for the vehicle under the best condi-
tions.
For this reason, Alfa Romeo has planned a
series of checks and services for your vehicle
at fixed intervals based on distance and time,
as described in the Scheduled Servicing Plan.
Before each service, it is always necessary to
carefully follow the instructions in the Sched -
uled Servicing Plan (e.g. periodically check
level of fluids, tire pressure, etc.).
Scheduled Servicing is offered by an autho -
rized dealer according to a set time schedule.
If, during each operation, in addition to the
ones scheduled, the need arises for further
replacements or repairs, these may be carried
out with the owner’s explicit consent only.
NOTE:
Scheduled Servicing intervals are required by
the manufacturer. Failure to have them
carried out may invalidate the New Vehicle
Limited Warranty.
You are advised to inform an authorized
dealer of any small operating irregularities
without waiting for the next service.
Periodic Checks
Every month or every 620 miles (1,000 km) or
before long trips check and, if necessary, top
off:
Engine coolant level.
Brake fluid level (if insufficient, see an
authorized dealer as soon as possible).
Windshield washer fluid level.
Tire inflation pressure and condition.
Operation of lighting system (headlights,
direction indicators, hazard warning lights,
etc.).
Operation of windshield washing/wiping
system and positioning/wear of wiper
blades.
Inspect the CV/Universal joints.
Oil consumption of the engine depends on
conditions and driving style. For this reason,
the engine oil level must be checked every
1,860 miles (3,000 km), and top off if neces -
sary; for further information
Ú
page 215.
Heavy Usage Of The Vehicle
If the vehicle is used under one of the following
conditions:
Dusty roads.
Short, repeated journeys less than 4 miles
(7 km) at sub-zero outside temperatures.
Engine often idling or driving long distances
at low speeds or long periods of inactivity.
In the event of a long period of inactivity.
The following checks must be carried out more
often than indicated in the Scheduled
Servicing Plan:
Check cleanliness of hood and liftgate
locks, cleanliness and lubrication of
linkage.
Visually inspect conditions of: engine, trans -
mission, pipes and hoses (exhaust/fuel
system/brakes) and rubber elements
(sleeves/bushes, etc.).
Check battery charge and battery fluid level
(electrolyte).
Visually inspect conditions of the accessory
drive belts.
Check and, if necessary, change engine oil
and replace oil filter.
Check and, if necessary, replace cabin air
filter.
Check and, if necessary, replace air cleaner.
Severe Duty All Models
Change engine oil at 4,000 miles (6,500 km)
if the vehicle is operated in a dusty and
off-road environment or is operated predomi -
nately at idle or only very low engine RPM. This
type of vehicle use is considered Severe Duty.
21_GU_OM_EN_USC_t.book Page 208
Page 223 of 280
221
Thoroughly clean the components, eliminating
every trace of dirt and dust. After lubricating,
eliminate excess oil and grease. Also pay
particular attention to the hood closing
devices, to ensure correct operation. Opera-
tions of the hood are to be carried out with the
engine cold. Remember to check, clean and
lubricate the locking, release and safety
devices.
Lubricate the external lock barrels twice a
year. Apply a small amount of high-quality
lubricant directly into the lock barrel.
If necessary, contact an authorized dealer as
soon as possible.
Windshield Wiper
Periodically clean the windshield, rear window
and rubber profile of the windshield wiper
blades, using a sponge or a soft cloth and a
non-abrasive detergent. This eliminates the
salt or impurities accumulated when driving.
Prolonged operation of the windshield window
wipers with dry glass may cause the deteriora -
tion of the blades, in addition to abrasion of
the surface of the glass. To eliminate the impu -
rities on the dry glass, always operate the
windshield washers.
In the event of very low outdoor temperatures,
below 0°F (-17.8°C), ensure that the move -
ment of the rubber part in contact with the
glass is not obstructed. Use a suitable deicing
product to release it if required. Avoid using the windshield wipers to remove
frost or ice.
Also avoid contact of the rubber profile of the
blades with petroleum derivatives such as
engine oil, gas, etc.
NOTE:
The life of the windshield wiper blades varies
according to the usage frequency. It is advised
to replace the blades approximately once a
year. When the blades are worn, noise, marks
on the glass or streaks of water may be
noticed. In the presence of these conditions,
clean the windshield wiper blades or, if neces
-
sary, replace them.
Raising The Windshield Wiper Blades
(“Service Position” Function)
The “service position” function allows the
driver to replace the windshield wiper blades
easily. It is also recommended to activate this
function when it is snowing and to make it
easier to remove any dirt deposits in the area
where the blades are normally positioned,
while washing.
NOTE:
If the windshield wipers are raised while not in
the “service position,” it is possible to damage
the hood. Activation Of The Function
To activate this function, disable the wind
-
shield wiper before placing the ignition in the
OFF position.
This function can only be activated within two
minutes of placing the ignition in the OFF posi -
tion.
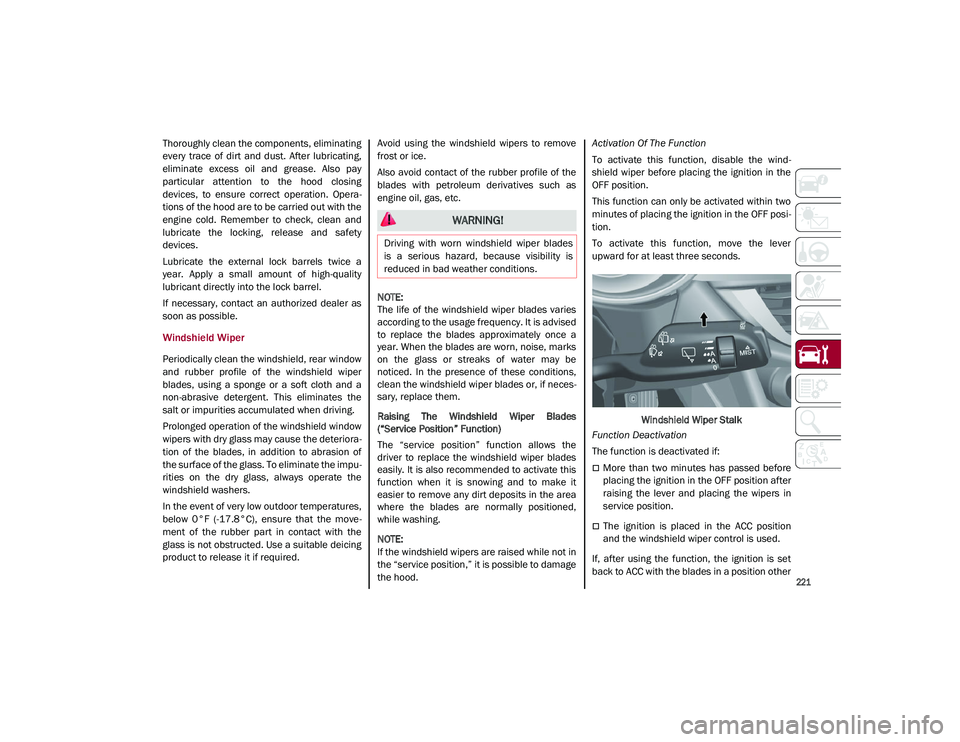
To activate this function, move the lever
upward for at least three seconds.
Windshield Wiper Stalk
Function Deactivation
The function is deactivated if:
More than two minutes has passed before
placing the ignition in the OFF position after
raising the lever and placing the wipers in
service position.
The ignition is placed in the ACC position
and the windshield wiper control is used.
If, after using the function, the ignition is set
back to ACC with the blades in a position other
WARNING!
Driving with worn windshield wiper blades
is a serious hazard, because visibility is
reduced in bad weather conditions.
21_GU_OM_EN_USC_t.book Page 221
Page 224 of 280
SERVICING AND MAINTENANCE
222
than rest position (at the base of the wind-
shield), they will only return to rest position
following a command given using the stalk
(stalk upwards, into unstable position) or
when a speed of 3 mph (5 km/h) is exceeded.
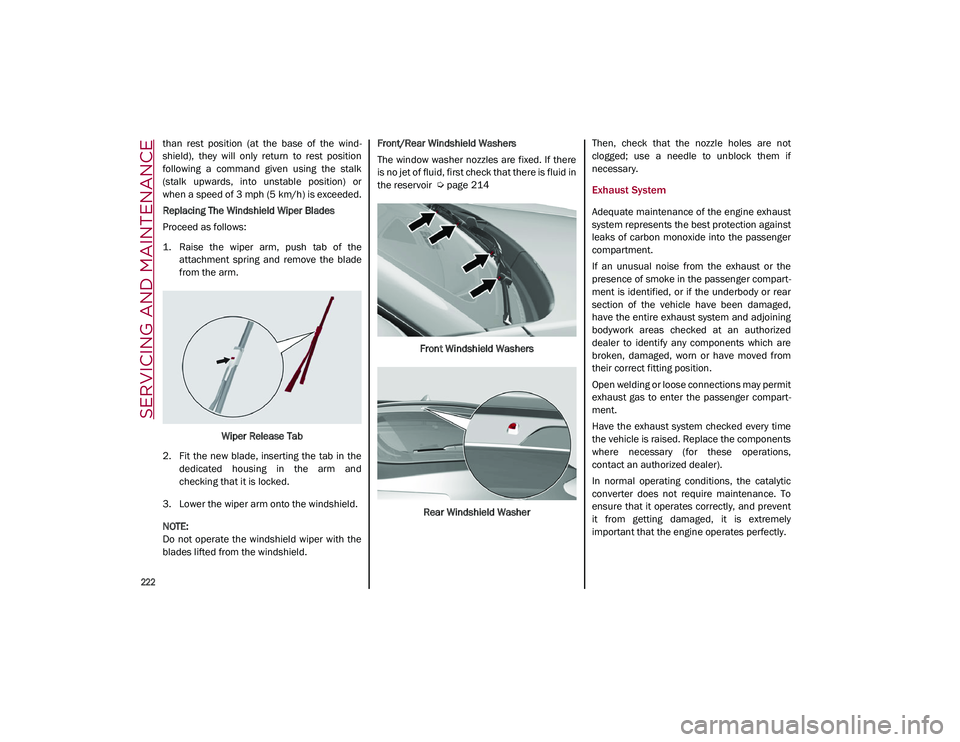
Replacing The Windshield Wiper Blades
Proceed as follows:
1. Raise the wiper arm, push tab of the attachment spring and remove the blade
from the arm.
Wiper Release Tab
2. Fit the new blade, inserting the tab in the dedicated housing in the arm and
checking that it is locked.
3. Lower the wiper arm onto the windshield.
NOTE:
Do not operate the windshield wiper with the
blades lifted from the windshield. Front/Rear Windshield Washers
The window washer nozzles are fixed. If there
is no jet of fluid, first check that there is fluid in
the reservoir
Ú
page 214
Front Windshield Washers
Rear Windshield Washer Then, check that the nozzle holes are not
clogged; use a needle to unblock them if
necessary.
Exhaust System
Adequate maintenance of the engine exhaust
system represents the best protection against
leaks of carbon monoxide into the passenger
compartment.
If an unusual noise from the exhaust or the
presence of smoke in the passenger compart
-
ment is identified, or if the underbody or rear
section of the vehicle have been damaged,
have the entire exhaust system and adjoining
bodywork areas checked at an authorized
dealer to identify any components which are
broken, damaged, worn or have moved from
their correct fitting position.
Open welding or loose connections may permit
exhaust gas to enter the passenger compart -
ment.
Have the exhaust system checked every time
the vehicle is raised. Replace the components
where necessary (for these operations,
contact an authorized dealer).
In normal operating conditions, the catalytic
converter does not require maintenance. To
ensure that it operates correctly, and prevent
it from getting damaged, it is extremely
important that the engine operates perfectly.
21_GU_OM_EN_USC_t.book Page 222
Page 251 of 280
249
test wheel. Sustained high temperature
can cause the material of the tire to
degenerate and reduce tire life, and
excessive temperature can lead to
sudden tire failure. The grade C corre-
sponds to a level of performance, which
all passenger vehicle tires must meet
under the Federal Motor Vehicle Safety
Standard No. 109. Grades B and A
represent higher levels of performance
on the laboratory test wheel, than the
minimum required by law.
STORING THE VEHICLE
If the vehicle is left inactive for longer than a
month, the following precautions should be
observed:
Park the vehicle in an area that is covered
and dry, and well-ventilated if possible.
Slightly open the windows.
Check that the Electric Park Brake (EPB) is
not activated.
Carry out the “Liftgate Emergency Opening”
procedure
Ú
page 62.
Disconnect the negative battery terminal
and check the battery charge. Repeat this
check once every three months during
storage.
If the battery is not disconnected from the
electrical system, check its state of charge
every 30 days.
Clean and protect the painted parts using
protective wax.
Clean and protect the shiny metal parts using
special compounds available commercially.
Sprinkle talcum powder on the windshield
wiper rubber blades, and lift them off the
glass.
Cover the vehicle with a fabric or perforated
plastic sheet, paying particular care not to
damage the painted surface by dragging
any dust that may have accumulated on it.
Do not use compact plastic sheets, as they
do not allow humidity to evaporate from the
surface of the vehicle.
Inflate tires to +7.25 psi (+0.5 bar) above
the standard prescribed pressure and
check it periodically.
Do not drain the engine cooling system.
Any time the vehicle is left inactive for two
weeks or more, operate the air conditioning
system with engine idling for at least five minutes, setting external air and with fan
set to maximum speed. This operation will
ensure appropriate lubrication for the
system, thus minimizing the possibility of
damage to the compressor when the
system is operated again.
NOTE:
After cycling the ignition to STOP and having
closed the driver side door, wait at least one
minute before disconnecting the electrical
supply from the battery. When reconnecting
the electrical supply to the battery, make sure
that the ignition is in the STOP position and the
driver’s side door is closed.
BODYWORK
Protection Against Atmospheric Agents
The vehicle is equipped with the best available
technological solutions to protect the body -
work against corrosion.
These include:
Painting products and systems which give
the vehicle resistance to corrosion and
abrasion.
Use of galvanized (or pre-treated) steel
sheets, with high resistance to corrosion.
Spraying of plastic parts, with a protective
function in the more exposed points: under
door, inner wing, edges, etc.
WARNING!
The temperature grade for this tire is
established for a tire that is properly inflated
and not overloaded. Excessive speed,
underinflation, or excessive loading, either
separately or in combination, can cause
heat buildup and possible tire failure.
21_GU_OM_EN_USC_t.book Page 249
Page 252 of 280
SERVICING AND MAINTENANCE
250
Use of “open” boxed sections to prevent
condensation and pockets of moisture
which could favor the formation of rust
inside.
Use of special films to protect against abra-
sion in exposed areas (e.g. rear wing, doors,
etc.).
Corrosion Warranty
Your vehicle is covered by Corrosion Warranty
against perforation due to rust of any original
element of the structure or bodywork. For the
general terms of this warranty, refer to the
Warranty Booklet.
Preserving The Bodywork
Paint
Touch up abrasions and scratches immedi -
ately to prevent the formation of rust.
Maintenance of paintwork consists of washing
the vehicle: the frequency depends on the
conditions and environment where the vehicle
is used. For example, it is advisable to wash
the vehicle more often in areas with high levels
of atmospheric pollution or salted roads.
Some parts of the vehicle may be covered with
a matte paint which, in order to be maintained
intact, requires special care.
To correctly wash the vehicle, follow these
instructions:
If high pressure jets or cleaners are used to
wash the vehicle, keep a distance of at least 15 inches (40 cm) from the bodywork to
avoid damage or alteration. Build up of
water could cause damage to the vehicle in
the long term.
To make it easier to remove any dirt
deposits in the area where the blades are
normally located it is recommended to posi
-
tion the windshield wipers vertically (service
position)
Ú
page 219.
Wash the bodywork using a low pressure jet
of water if possible.
Wipe a sponge with a slightly soapy solution
over the bodywork, frequently rinsing the
sponge.
Rinse well with water and dry with a leather
chamois.
Dry the less visible parts (e.g. door frames,
hood, headlight frames, etc.) with special care,
as water may stagnate more easily in these
areas. Do not wash the vehicle after it has
been left in the sun or with the hood hot: this
may alter the shine of the paintwork.
NOTE:
Avoid parking under trees; the resin dropped
by trees makes the paintwork go opaque and
increases the possibility of corrosion.
Exterior plastic parts must be cleaned in the
same way as the rest of the vehicle. If washing the vehicle in a service that moves
the vehicle, for vehicles with automatic trans
-
missions, proceed with the following direc -
tions:
Ensure that the vehicle is on a flat surface.
Disable the automatic engagement of the
parking brake
Ú
page 90.
With the vehicle stationary, the gear in
NEUTRAL (N) and the brake pedal pressed,
push the START button.
NOTE:
The vehicle will remain in NEUTRAL (N) for
15 minutes before PARK (P) will be engaged
automatically.
Windows
Use specific detergents and clean cloths to
prevent scratching or altering the transpar -
ency.
Front Headlights
Use a soft cloth soaked in water and detergent
for washing vehicles.
CAUTION!
Wipe the rear window inside gently with a
cloth following the direction of the filaments
to avoid damaging the heating device.
21_GU_OM_EN_USC_t.book Page 250
Page 275 of 280
273
Tires .................................190, 239, 244, 248Aging (Life Of Tires) ................................ 243Air Pressure ............................................ 239
Changing.................................................198
Compact Spare ...................................... 245
General Information......................239, 244
High Speed ............................................. 240
Inflation Pressure...................................240Life Of Tires ............................................ 243
Load Capacity.........................................237
Pressure Monitoring System (TPMS) ...... 76
Quality Grading....................................... 248
Radial......................................................242
Replacement ..........................................244
Safety .............................................233, 239
Sizes .......................................................234
Snow Tires ..............................................246
Spare Tires ....................................244, 245Spinning..................................................243
Trailer Towing .........................................139
Tread Wear Indicators ...........................243
Tongue Weight/Trailer Weight .................. 138
Towing ................................................136, 138 Disabled Vehicle ....................................205
Towing Eyes ................................................206
TPMS (Tire Pressure Monitoring
System) .......................................................161 Traction Control System (TCS) .................. 149
Trailer Towing ............................................. 136
Hitches ................................................... 137
Minimum Requirements ....................... 139Tips ......................................................... 141
Trailer And Tongue Weight .................... 138
Wiring ..................................................... 140
Trailer Towing Guide .................................. 138
Trailer Weight ............................................. 138
Transmission .............................................. 255
Transporting Pets....................................... 189
Tread Wear Indicators ............................... 243
Turn Signals ...........................................44, 78
U
Uconnect Settings Customer Programmable Features ........ 25
Passive Entry Programming .................... 25
Uniform Tire Quality Grades ...................... 248
Universal Transmitter .................................. 39
Untwisting Procedure, Seat Belt ............... 166
V
Vehicle Changes/Alterations ......................... 4
Vehicle Identification Number .................. 253
Vehicle Loading ................................. 135, 237 W
Warning Lights (Instrument Cluster
Descriptions)................................................. 76
Warnings, Roll Over ........................................ 3
Warranty Information ................................ 267
Washer Fluid For Windshield/
Headlights .................................................. 217
Washers, Windshield.................................... 46
Weights ...................................................... 259
Wheel And Wheel Tire Care ...................... 245
Wheel And Wheel Tire Trim....................... 245
Wheels And Tires ....................................... 233
Wind Buffeting ..............................................59
Windows (Cleaning) ................................... 250
Windshield Defroster ................................ 189
Windshield Washers.....................................46
Windshield Wiper
Replacing Blades .................................. 222
Windshield Wipers ........................................46
Wipers, Rain Sensitive .................................46
21_GU_OM_EN_USC_t.book Page 273